
Palace (1)
The Palace (1) Action Board does NOT have a Main action. When moving a worker here, you may only place it on a Royal tile to take a Worship action or in the general area to take a Collect Cocoa action.
Forest (2), Stone Quarry (3), Gold Deposit (4)
Count the number of your unlocked workers in the general area of the Action Board in question (including the worker you just moved) to select a row on the Action Board.
Use the power of your lowest value worker to select a column on the Action Board. Gain the rewards (wood, stone, gold, cocoa, Victory Points, or temple advances) shown in the corresponding cell.
Then power up one of your workers on the same Action Board. If you have 3 or more workers on that Action Board, you may power up twice instead (still powering up only workers on the same Action Board).
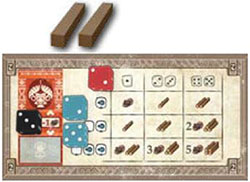
Example: The Blue player performs a Main action on the Forest (2) Action Board with two workers: power of 2 and 5.
Since the lower value is 2, this grants the player 2 wood and the ability to power up one worker on the Forest (2) Action Board.
Alchemy (5)
Select one Technology tile on the Alchemy (5) Action Board observing the following restrictions:
-
If you have only one worker on this Action Board, you must select from the first row.
-
If you have two or more workers on this Action Board, you may select from either row.
-
Exception: If you have only one worker on this Action Board but its power is 4 or 5, you may still choose from the second row, but doing this will forfeit the power-up you would gain from this action.
Pay the cost in gold as shown on the selected tile and place one of your Technology markers (wooden discs) on it to mark that you have acquired this Technology. Refer to the Appendix for an explanation of the ongoing benefit of each Technology tile.
Any other player who already had a disc on the tile you develop immediately scores 3 Victory Points. You may never develop a Technology you have previously acquired (you may not place a Technology marker on a Technology tile with one of your markers present).
After placing the Technology marker, advance once on one temple, depending on which column the selected Technology belongs to:  for the left column,
  for the center column,
  for the right column.
Afterwards, power up one of your workers on the Alchemy (5) Action Board, unless you used the 3rd option when selecting the tile (you used a single power 4 or 5 worker to place your marker on a second-row Technology).
Example: Blue is performing the Alchemy (5) Main action using a single worker with a power of 4.
They can either gain a Technology from the first row and power up the worker to a 5, or gain a Technology from the second row without powering up the worker (because of the exception option).
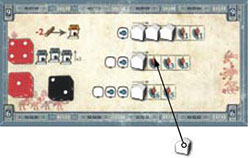
Power up a Worker

When an ability allows you to power up one of your workers, select one of your unlocked workers and rotate the die representing the worker to the side showing a one higher number, to increase its power.
If this causes the worker to reach a power of 6, it immediately triggers an Ascension. If an ability allows you to power up twice, you may power up the same worker twice or two eligible workers once each.
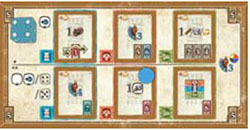
Nobles (6)
Pay 2 wood to take the first available Building from the left side of the Buildings row on the Main Board (it is important that these Buildings are always taken from left to right), and place it in the leftmost available space of one of the Building rows of the Nobles (6) Action Board:
If you have 1 worker on this Action Board: Place the Building in the leftmost empty space of the top row. If there are no empty spaces, you may not take this action.
If you have 2 workers on this Action Board: Place it in the leftmost empty space of the center row. If there are no empty spaces on the second row, place it in the row above, if possible.
If you have 3 workers on this Action Board: Place it in the leftmost empty space of the bottom row. If there are no empty spaces on the third row, place it in one of the rows above, if possible.
Then, score a number of Victory Points equal to the printed value of the space you covered with the Building, and advance your marker one step on the Avenue of the Dead track, to a maximum of 9.
Afterwards, power up one of your workers on the Nobles (6) Action Board. lf you have 3 or more workers on that Action Board, you may power up twice instead (still powering up only workers on the same Action Board).
Example: Red player is performing the Nobles (6) Main action using two workers. Red pays 2 wood and places a Building on the leftmost space of the center row.
Red advances their marker on the Avenue of the Dead track by one and immediately scores 4 VP.
Decorations (7)
Pay 3 gold to select one of the 4 available Decoration tiles. For each additional worker you have on this Action Board you receive a 1 gold discount to the cost (to a minimum of 1 gold).
Add the selected Decoration tile to the Pyramid using the following restrictions:
It must be placed in one of the marked spaces.
You can only place on the spaces marked with a "2" if there is a layer of Pyramid tiles under both of its squares AND there is a Decoration on the nearest space marked "1".
You can only place on the spaces marked with a "3" if there are two layers of Pyramid tiles under both of its squares AND there is a Decoration on the nearest space marked "2".
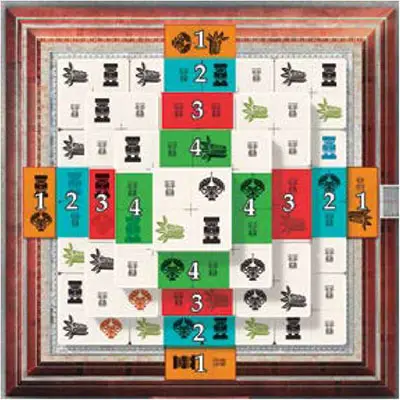
You can only place on the spaces marked with a "4" if there are three layers of Pyramid tiles under both of its squares AND there is a Decoration on the nearest space marked "3". The tile must be placed so that its arrow points towards the center of the Pyramid.
When placing the tile, check the icons you are covering. For each icon being covered by an icon of the same type on the Decoration tile, score 1 Victory Point.
If you scored 1 Victory Point for an icon that is red  , green
  , or blue
  on the Decoration tile (the color of the icon that is being covered does not matter), also advance on the corresponding temple.
Then score an additional 3 Victory Points and advance your marker one step on the Pyramid track. Afterwards, power up one of your workers on the Decorations (7) Action Board and draw a new Decoration tile to refill the tile offer.
Construction (8)
You can place a Pyramid tile on the first (bottom) level, into one of the empty squares, by paying 2 stone. Score 1 Victory Point for each tile added to the first level.
You can place a Pyramid tile on the second level, over the intersection of four tiles of the first level, by paying 2 stone and 1 wood. Score 3 Victory Points for each tile added to the second level.
You can place a Pyramid tile on the third level, over the intersection of four tiles of the second level, by paying 2 stone and 2 wood. Score 5 Victory Points for each tile added to the third level.
You can place the top tile of the Pyramid (the fourth level) over the intersection of the four tiles that form the third level of the Pyramid, by paying 2 stone and 3 wood. Score 7 Victory Points if you place the top tile.
Additional effect: If a tile was placed on the fourth level of the Pyramid, the Pyramid is considered finished. The active player must immediately move the white Calendar disc to the position of the black Calendar disc. This will trigger a final Eclipse, as described in the Eclipse & End of Game section, and end the game.
You may rotate the tile any way you choose. When placing the tile, check the icons you are covering. For each icon being covered by an icon of the same type on the newly placed Pyramid tile, score 1 Victory Point.
If you scored 1 Victory Point for an icon that is red , green , or blue on the newly placed Pyramid tile (the color of the icon that is being covered does not matter), also advance on the corresponding temple.
Then advance your marker one step on the Pyramid track.
If adding more than one tile to the Pyramid, always fully resolve all effects before adding the next tile, including the scoring of Victory Points, advancement on the Pyramid track, as well as temple advancements, if any.
Afterwards, power up one of your workers on the Construction (8) Action Board. If you have 3 or more workers on that Action Board, you may power up twice instead (still powering up only workers on the same Action Board). Finally, draw new Pyramid tile(s) to refill the offer.
You may select one of the available Pyramid tiles and add it to the Pyramid for each worker you have on the Construction (8) Action Board. You must add at least one tile.
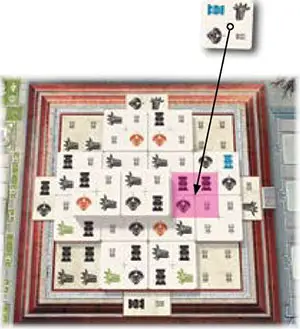
Example: Blue is placing the tile shown onto the Pyramid, rotating the tile to maximize the benefits.
The cost of this placement is 2 stone and 1 wood (as the newly added Pyramid tile is being placed on the second level), and will score 3+3= 6 Victory Points, 3 for being placed on the second level, and an additional 3 for matching the icons being covered with the icons on the Pyramid tile.
Additionally, the player advances on the blue temple once, as one of the icons that scored 1 Victory Point is blue
Continue Reading
