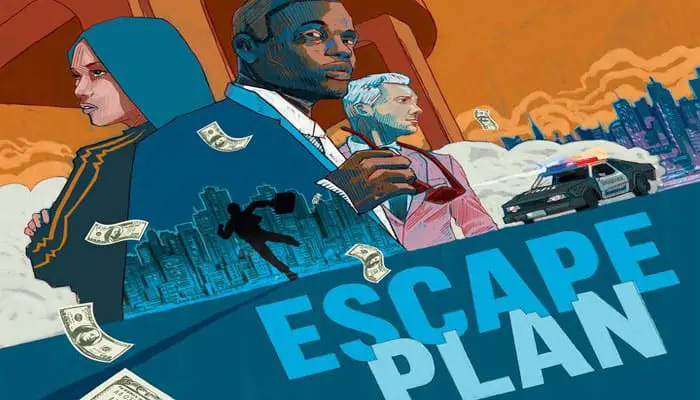
Escape plan is played over 3 rounds, each round representing one day. Over the course of a round, Police Officers spread throughout the city, populating the streets and closing off exits.
On their turns, players will use between 3 and 5 Actions to travel around the city recovering their hidden money, hiring gangs, visiting stores to buy disguises and open lockers, etc. Due to these actions, players' notoriety may increase, unlocking new abilities but in turn causing the Police Officers to be more aware of them.
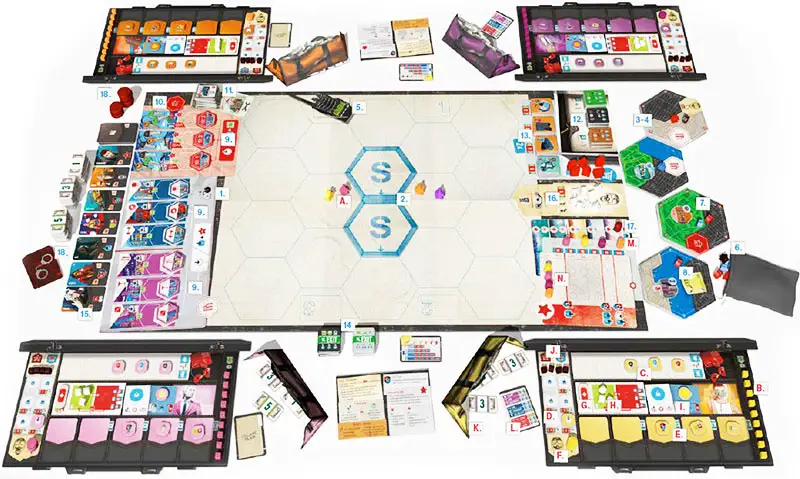
Components
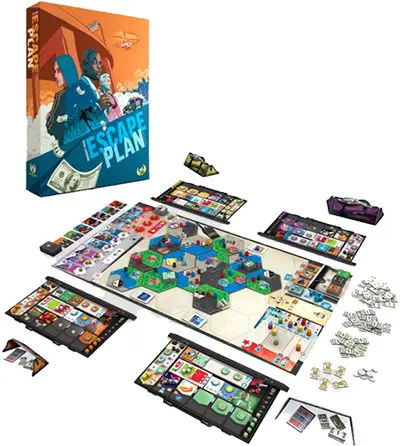
- 7 double-sided Game board
- 5 Player boards and 5 screens
- 14 City tiles
- 15 Locker tiles in 3 types
- 16 Equipment tiles in 4 types
- 9 keys in 3 colors
- Money tokens in 3 types
- 6 Patrol cards
- 32 Contact cards
- 5 Player aids and scoring sheets
- 30 Police Officers
- 8 Gang members
- 5 Player pawns
- 10 Gang Control markers
- 45 Income cubes
- 6 Business tiles
- 3 Safe House tiles
- 8 Fixer tiles
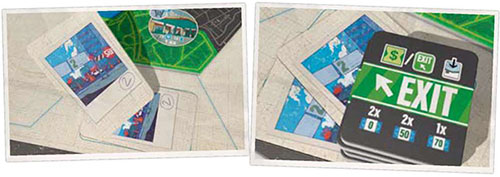
- 10 Exit tiles in 2 types
- 35 Asset tiles
- 5 Rest tokens and 5 First Aid tiles
- 9 Escape Plan cards
- 15 Inspector cards
- 2 Exit Cost Cards
- 10 Handcuff cards
- 6 Gas can tokens
- 15 Wound cubes
- 20 Notoriety cubes
- 5 Notoriety markers
- 5 Turn order markers
- 8 Action discs
- 1 Time marker
- 1 bag
Setup
-
City Setup

Place the Game board in the middle of the playing area. Ensure that the correct side is face up according to the number of players in game. (Look for this symbol in the business area).
-
Place the 2 starting City tiles face down in the marked spaces at random. The arrows on the backs of both tiles must be pointing in the same direction, either up or down. Then, flip both tiles face up, maintaining their respective orientation.
-
Separate the remaining City tiles according to the letter on the back of the tiles. Separately shuffle each group of tiles and place them in 4 face- down stacks next to the Game board.
-
Flip over the top City tile of each stack (leaving the tiles on top of their stacks).
-
Police Setup
Shuffle the 6 Patrol cards and randomly return one to the game box without anyone seeing it. Place the 5 remaining cards face down in their proper place on the board, forming the Patrol deck.
-
Place all Police Officers into the bag and mix them up.
-
Add 2 Police Officers at random from the bag to each of the City tiles top of the on stacks. Then, draw 2 more Police Officers and place them on the starting City tile without the hospital.
-
If any City tile (on the board or in the display) now has 2 Police Officers of the same type (color) on it, return 1 back to the bag (do not draw a replacement).
-
Business And Safe House Locations Setup
Place all Business and Safe House tiles face up on their proper spaces of the Game board (matching the icons relating to each business type).
-
Place the 9 Key tiles face up at random in the 9 spaces of the Safe Houses.
-
Place the Fixer tiles in a face-up stack on their space next to the Safe Houses. The order of these does not matter.
-
Separate the Locker tiles by color. Shuffle each stack and place them face down in their matching locker spaces of the Convenience Store.
-
Separate the Equipment tiles by type and place them face up in the corresponding spaces near the Convenience Store. Place the 6 Gas can tokens next to the Equipment tiles.
-
Separate the Exit tiles by their backs, shuffle each stack separately, and place them near the Game board.
-
Additional Setup
Shuffle the Contact cards and place them face down as a Contact deck near the Game board. Reveal the top 7 cards of this deck and place them face up next to the deck to form a display.
-
Place 6 Gang members on their place on the board, and the remaining 2 Gang members on the Gang HQ of the starting City tile.
-
Place the Time marker on the starting space of the Time track.
-
Place all the Extra Action discs, money, Handcuff cards next to the board.
Player Setup
Each player chooses a color and takes the respective Player board, Player screen, and all pieces of their chosen color.
Place your Player board in front of you and arrange the pieces as shown above:
-
Place your Player pawn on the Hospital Location on the Game board.
-
Place your 9 Income cubes on the spaces of your Income track (spaces 0 to 8).
-
Place your 3 Asset tiles depicting the Police Officer shields face up in the indicated Item spaces (the order does not matter).
-
Place your Asset tile depicting the Extra Action icon on the $5k unlocked Asset tile space.
-
Place your 3 remaining Asset tiles face up on the indicated Contact card spaces (the order does not matter).
-
Place your 2 Gang Control markers in your Gang area.
-
Place a First Aid tile face up on its space.
-
Place 3 Wound cubes in your Green Wounds box.
-
Place your Rest token with the sun face up on its space.
-
Place 4 Notoriety cubes in the space below the red and blue Notoriety boxes.
-
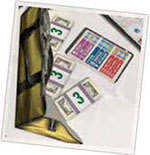
Place your Player screen in front of you, take $9k in money and place it behind your screen. Your money should remain hidden from other players during the game.
-
Shuffle the Escape Plan cards and deal one at random face down to each player. Return any remaining cards to the box without anyone seeing them. Players should look at their own card, but keep it secret from other players until the end of the game.
-
The first player is the player who most recently robbed a bank. They place their Turn order marker on the first space of the turn order track. Continuing in clockwise order, each other player places their Turn order markers in the next available space.
-
Players place their Notoriety marker on an empty space at the bottom of the Notoriety track (the order does not matter here) on the Game Board.
Object of the Game
On the 3rd day, players attempt to leave the city through the only open exit, but they need to have enough money to pay for their escape; otherwise, they are arrested, score no points, and cannot win the game.
The winner is the player who escapes with the highest amount of total cash.
Game Play
Each round consists of the following 6 phases:
- Income Phase - Receive money for your investments and may pay to unlock an Asset tile.
- Patrol Phase - The police start to close the exits.
- City Phase - The city gradually gets revealed.
- Turn order Phase - Change the order of play for the rest of this round.
- Day turns Phase - Split into 5 parts (Morning, Afternoon, Evening, Night, Dawn); this is where players take their actions.
- Change of Day Phase - Prepare for the next day.
1. Income
Note: Skip this Phase on Day one.
Each cube on your income track represents a return you receive from money invested in various businesses throughout the city. During the game, you will be recovering this invested money from those business, thereby reducing the income you receive.
In this phase, all players receive income based on the number of Income cubes on their Player board.
The amount of money you gain is equal to the lowest visible number on your Income track. At the start of the game, this is $9k, but as cubes are removed from your track, your income decreases.

Example: Vinnie has 6 cubes on the income spaces, so he receives $6k (6 is the lowest visible number on his Player board).
After taking Income, all players with a Notoriety of 1 or 2 may spend $3k to unlock an Asset tile.
2. Patrol
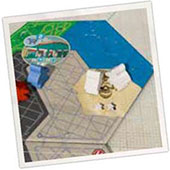
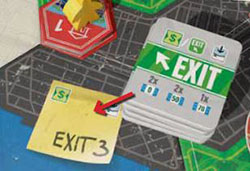
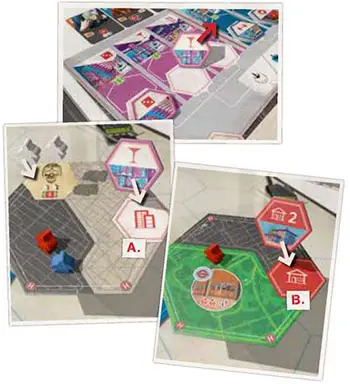
Over the course of the game, SWAT teams set up patrols at the various exits out of the city. On Day 4, all the exits will be blocked, so you must escape during Day 3 when the last exit is still open.
Reveal the top 2 cards from the Patrol deck and place them face-up on the corresponding patrol space of the Game board. If it is Day 3, draw the last remaining card.
If a second card is placed on a Patrol space, that exit is now blocked.
If the City tile depicting that exit is either on the board or face up on one of the stacks of City tiles in the display, take one of the face-down stacks of Exit tiles (it does not matter which) and place it on that City tile, covering the exit space.
If the City tile depicting the given exit is not yet visible, place one stack of Exit tiles on top of the Patrol cards for that exit. As soon as the exit becomes visible on a City tile in the display, place a stack of Exit tiles on top of the newly revealed exit space.
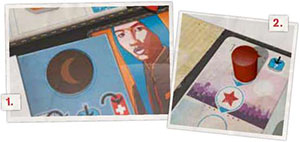
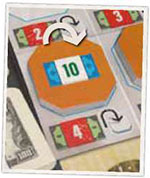
Example 1: The top card of the Patrol deck is revealed. It shows a 1. The card is placed face up on Patrol space 1 on the board. Since this was the first card placed in this space, nothing happens.
The second card is revealed, and it shows a 3. The card is placed face up on Patrol space 3. This is the second card placed there, so exit number 3 is now blocked.
As the City tile depicting exit number 3 is already on the board, one of the two stacks of Exit tiles is placed on that space of the City tile.
Example 2: The top card of the Patrol deck is revealed. It shows a 2, so it is placed on Patrol space 2. This is the second card placed there, so exit 2 is now blocked. The City tile depicting exit 2 is not currently on the board or face up on one of the stacks.
One of the stacks of Exit tiles must be placed on top of the Patrol cards of exit number 2. Once the City tile depicting exit 2 appears, the Exit tiles are moved from the Patrol cards onto the Exit space of that City tile.
3. City
During the game, the geography of the city is slowly revealed along with the positions of the police in the streets. Use this information to your advantage.
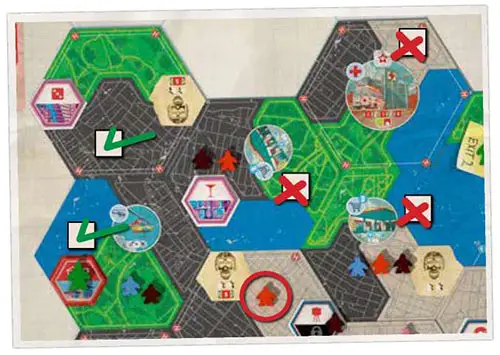
Beginning with the first player and continuing in turn order, players place 1 new City tile from the display onto the board until all of the 4 face-up tiles in the display have been placed in the city.
Therefore, in a 4-player game, each player will place 1 new tile. In games with fewer than 4 players, the sequence repeats again with some players placing more than one tile. In a 5-player game, the player last in turn order does not get to place a tile.
Example: Vinnie, Scar, and Claws are playing a 3-player game, in that player order. Vinnie is the first player, and places the first tile. Scar places the 2nd, Claws places the 3rd. Now that all players have placed a tile, the sequence starts again and Vinnie places the 4th tile.
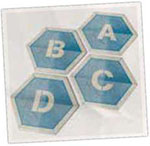
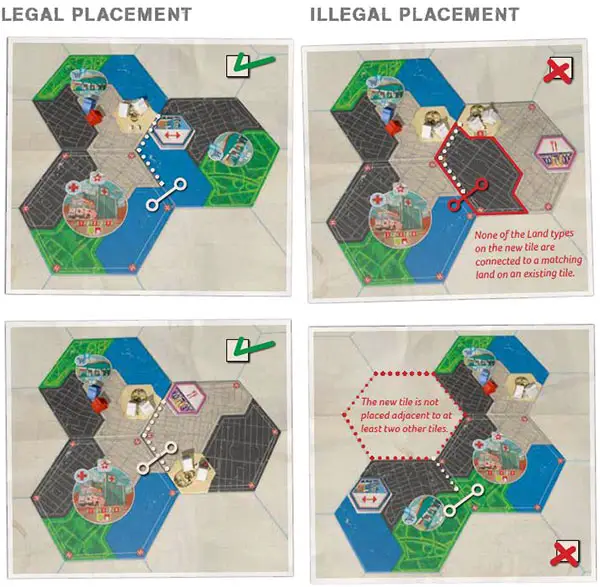
When placing new City tiles, they must be placed adjacent to at least 2 existing City tiles, and rotated in such a way that at least one of the Land types of the new tile is connected to the same Land type on another tile.
Tip: Matching more than one Land type makes the movement of the players in the city easier.
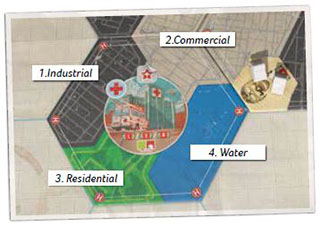
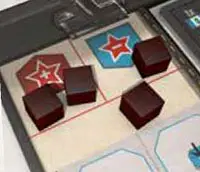
Land Type
There are 4 different Land types on the City tiles:
- Black zones: Industrial
- Grey zones: Commercial
- Green zones: Resdential
- Blue zones: Water
The following rules also apply to placing a City tile:
All Police Officers on the tile are moved along with it.
If the tile has a Business
Aspace on it, choose any available Business tile (one not already placed on a City tile) and place it on the Business space.If the tile has a Safe House
Bspace on it, choose any available Safe House tile (one not already placed on a City tile) and place it on the Safe House space.If the tile has a Gang space on it, place 2 Gang members from their area on the board onto that Location.
After all 4 tiles City tiles have been placed, flip the top tile of each City tile stack to form a new display. Then, for each of the new face-up City tiles, draw 2 Police Officers at random from the bag and place them on top of each tile.
After placing all the Police Officers onto tiles, if any tile has 2 Police Officers of the same type, return 1 back to the bag (do not draw a replacement).
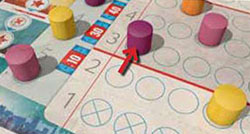
4. Turn Order
Turn order is adjusted based on the position of players' Notoriety markers.
This phase is divided into 5 parts: Morning, Afternoon, Evening, Night, and Dawn.
The player with the highest Notoriety becomes the first player regardless of previous position, the player with the second highest Notoriety is the second player, and so forth in order of descending Notoriety.
In case of a tie, the relative positions of the tied players are reversed. This means that on Day 1, because everyone is tied on Notoriety, the last player will become the first player, and so forth.
Example: In a 4-player game, the current turn order is : Claws, Vinnie, Scar, and Ruby.
Scar has the highest Notoriety, with Claws, Vinnie, and Ruby all tied with the lowest Notoriety. The new turn order is : Scar, then Ruby, Vinnie, and Claws.
5. Day Turns
In each part of the day, in turn order, players first take one Action each (and any number of Executive Actions), and after that, the Notoriety track is updated, which is also done in turn order.
The Time marker is advanced along the Time track to keep track of which part of the day it is, and whether players are taking Actions or updating their Notoriety.
All players must take one action during the Morning, Afternoon, and Evening. Taking turns during the Night and Dawn is optional and requires the use of Extra Action discs.
Therefore, you will take between 3 and 5 turns each day. The only time you may take fewer than 3 turns is during Day 3 when you can escape the city. Once you have done this, you take no further turns.
During the Night of each day, each player, in turn order, decides whether or not they want to discard one of their Extra Action discs to play during that part of the day.
If they do, they complete their turn before the next player decides if they wish to do the same, and so on. Once all players have taken their actions, the Notoriety track is updated as normal.
The Dawn part of the day is resolved in the same way. It is possible to use an Extra Action disc at Dawn, even if you did not use one at Night.
Note: In order to use an Extra Action disc to take a turn during Night and/or Dawn, you must have that disc before the part of the day in which you are about to use it.
Actions
Read here all detailed information about the actions.
6. Change of Day
Skip this Phase on Day 3.
In this phase, the following steps are performed:
- All players with Rest tokens that are moon-side up flip them back over to show the sun side.
- Reset the Time marker to the start space on the Time track.
Executive Actions
During your turn, there are a number of different Executive Actions that you can perform.
If game components that allows you to take Executive Actions has a symbol in the top corner, it can only be used during the appropriate step of your turn:
 Used In The Travel Step.
 Used In The Avoid Step.
If there is no symbol depicted (for example Asset tiles, First aid tile), you can use the Executive action at any point during your turn.
Any number of Executive Actions can be used in the same step.
The Executive Actions Are:
- Use A Contact Card
- Use An Equipment Tile
- Use A Fixer Tile
- Perform First Aid
- Use A Gang Member
- Use An Unlocked Asset Tile
Helipads
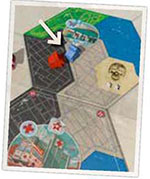
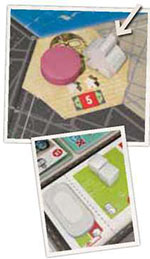
Some Executive Actions allow you to make use of a Helipad. A City tile that has small Helipad icons on the corners is considered to have a Helipad on all of the Land spaces and Locations on that tile.
Example: Mr. Bones is on Exit 3, he could spend 1 MP to move to the Industrial area on the same tile, then move to the Industrial area on the tile to the left (for 0 MP). Once there, he may use any abilities that require him to be on a Heliport.

Moving Police Officers
Some Executive Actions allow you to move Police Officers around. The following rules always apply:
The Police Officer chosen can be moved from any tile to any other tile, regardless of distance.
No more than one Police Officer of each type can be on the same tile. Meaning that is not possible to move one Police Officer to a tile that already has another Police Officer of the same type.
No Police Officers can ever be on the Hospital tile.
A. Use a Contact Card
- To use a Contact card, do the following:
- Pay the value depicted on the card
- If is shown, gain 1 Notoriety.
- Use the benefit of the card.
- Flip the card face down.
B. Use an Equipment Tile
Flip the tile to use the benefit of the tile.
Note: When you choose the Rest action, your face-down Equipment tiles are flipped back face up.
C. Use a Fixer Tile
Flip the tile to use the benefit of the tile.
Note: Fixer tiles are one-use only. They are not flipped back up when you choose the Rest action but they remain on your Player board. They are only discarded if replaced.
D. Perform First Aid
Flip this tile to heal 1 Wound (move 1 Wound cube from your Red Wounds box to your Green Wounds box.
Note: The First Aid tile is flipped back up when you choose the Rest action.
E. Use a Gang Member
Return one of your Gang members to the Gang space where you have a Gang Control marker to use any one of their 3 abilities.
Lose 1 Notoriety.
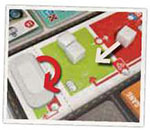
During the Travel step, if you are on a tile with a Heliport, spend 1 MP to move to any Location or Land space on a City tile adjacent to or 2 tiles away from your current tile. If you move 2 tiles away, ignore all Police Officers from the tile you move through. You still need to avoid the ones on the tile you left.
During the Avoiding step, ignore all the Police Officers on a tile of your choice.
Once both Gang members have been returned, take back your Gang Control marker. The gang is available again to any player who wants to control it.
F. Use an Unlocked Asset Tile
Once unlocked (on an Asset space on the left of your Player board), each of these tiles can be used once per game.
To use an unlocked Asset tile, do the following:
- Pay the value indicated below the tile.
- Gain the benefit of the tile.
- Flip the tile.
All used tiles are worth 10k at the end of the game.
Asset Tiles
You have a total of 7 Asset tiles on your Player board. Your Extra Action Asset tile starts the game unlocked on the left side of your Player board (on the $5k Asset space).
Three of your Asset tiles start the game occupying three of your Item spaces, and the other 3 occupy three of your Contact card spaces. These 6 Asset tiles are locked when the game begins.
When you unlock an Asset tile, choose any locked Asset tile and move it to the most expensive empty Unlocked Asset space. If you unlock an Asset tile on a Contract space, move all remaining Asset tiles on your Contract spaces to the right to fill any gaps.
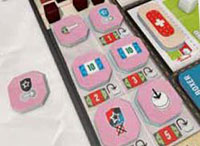
When you unlock your final Asset tile, remove it from the game, as you only have space for 6 unlocked Asset tiles on your Player board; you may not replace an existing one.
Unlocked Asset tiles may be used as an Executive Action.
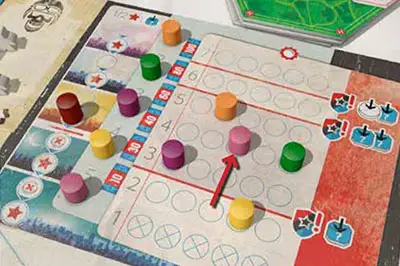
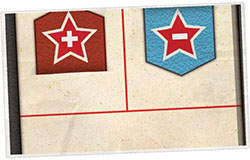
Adjusting Notoriety
During the game your Notoriety will increase, allowing you to unlock more Asset tiles which in turn allow you to have more Equipment and Contact cards. However, as your Notoriety increases, you will have to deal with more Police Officers.
You can try and keep your Notoriety low, since maintaining a low profile will draw less attention to yourself. At the end of the game, having a high Notoriety will reduce your final score.
As mentioned earlier, you track your gains and losses of Notoriety during your turn using your Notoriety cubes. You do not update the Notoriety track directly when taking your Action.
In each part of the day, after all players have taken their Action, the Notoriety track is updated.
In turn order, each player adjusts their Notoriety marker on the Notoriety track according to their Notoriety cubes.
Each cube in your Red Notoriety box moves you up on the Notoriety track, and each cube in your Blue Notoriety box moves you down on the Notoriety track. Calculate how much your Notoriety marker will move (and in which direction) before moving your token.
After adjusting your token on the Notoriety track, reset your Notoriety cubes by placing them all back in the bottom part of your Notoriety box.
Note that your token cannot go below the bottom of the track. If it were to do this, leave it on the bottom row.
If your token is at the top of the track and would increase further, take 1 Wound for each increase above the top row and leave the token on the top row.
Example: Mr. Bones has 2 cubes in his Red Notoriety box and 1 cube in his Blue Notoriety box. His Notoriety moves two steps up on the Notoriety track.
Crossing the Threshold
Every time your Notoriety marker crosses a threshold line when moving upwards, you gain an immediate benefit (before other players adjust their Notoriety). If your Notoriety marker would later drop below the threshold line, you get the bonus again the next time it rises over the line.
First, when you cross a threshold, all players with less Notoriety than you (their Notoriety markers are lower on the Notoriety track) in turn order must move one Police Officer towards you (if possible).
The player moving the Police Officer can take them from any City tile and place them on any other tile (does not have to be adjacent), with the following conditions:
- The moved Police Officer must end up on a tile which is at least one tile closer to the active player's Location than the one on which the Police Officer started.
- There can never be 2 Police Officers of the same type on the same tile.
- There can never be any Police Officers on the Hospital City tile.
Second, crossing a threshold unlocks Asset tiles to the active player (see page XX).
- Crossing the 1st threshold line: Unlock 1 Asset tile.
- Crossing the 2nd threshold line: Unlock 2 Asset tiles.
- Crossing the 3rd threshold line: Unlock 1 Asset tile and take an Extra Action disc.
Example: Vinnie moves his Notoriety marker across the first red line. In turn order, all players with less Notoriety than Vinnie move a Police Officer in his direction.
Ruby has more Notoriety than him, so she does not move anyone. Scar has the same Notoriety than Vinnie, so again, she does not move anyone.
Mr. Bones has less Notoriety than Vinnie, so he takes a Red Police Officer from 2 tiles away from Vinnie and moves it onto his tile. He could not move a Blue Police Officer to Vinnie's tile because there is already one there.
Claws also has less Notoriety than Vinnie but is currently in the same location as him, so she needs to be careful when moving Police Officers towards Vinnie to ensure that it doesn't cause her problems on her next turn. She moves a Red Police Officer one tile closer to Vinnie, to a tile where she is not planning to move to next turn.
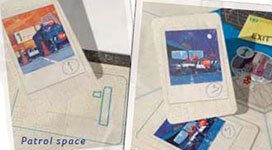
Escaping The City
Only on Day 3 can you escape the city. To do this, you must move to the open Exit Location and choose to exit. You then remove your pawn from the board. This happens during the Travel step of your turn.
In the Avoid step, you must try to Avoid any Police Officers as normal, including any that were on the tile with the Exit (since you are also leaving that tile). On the turn in which you exit the city, you do not perform step 3.
To exit the city, you must pay a certain amount of money. If you are first player to escape, it costs nothing, but after that, the cost depends on the number of players in the game and also the order in which you are leaving the city. If you do not have enough money to escape the city, you are arrested and out of the game.
When you escape the city, remove your pawn from the board.
As soon as the first player escapes, all other players must pay $1k on each of their turns before they take an action. If they are unable to pay, they are immediately arrested and out of the game. This cost is always $1k no matter how many players have escaped.
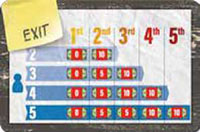
- 2- player games:($k) :0, 10
- 3- player games:($k): 0, 5, 10
- 4- player games:($k): 0, 5, 10, 10
- 5- player games:($k): 0, 5, 5, 10, 10,
Example: in a 4-player game, Mr. Bones is the second player to escape the city.
He must pay $1k to be able to take his turn, and after moving to the exit and trying to avoid the Police Officers, he pays $5k to leave the city.
Note: Your Notoriety is still updated on the turn you escape. This may cause other players to move Police Officers towards you. In this case, the police are moved towards your last known location: the exit tile where you escaped.
End of the Game
Only players who manage to escape the city are eligible to win the game.
Before final scoring, each player must discard 1 Contact card from their Player board for each Handcuff card they have.
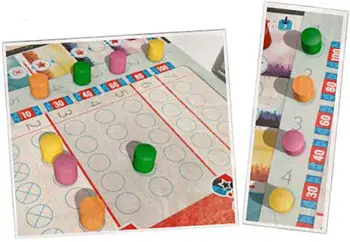
The player with the most money wins
Fill the scoring pad with the following:
- Total money collected on the visited buildings of the first group (check Escape Plan card)
- Total money collected on the visited buildings of the second group (check Escape Plan card)
- Total money collected on the visited Safe Houses (check Escape Plan card)
- Money behind your Player screen
- $10k per each Asset tile used (flipped face down)
- 0,10,30,60,100k for having 1,2,3,4,5 Contact Cards on your Player board
- Total money from collected Locker and Exit tiles
You lose money for the following:
- Your position on Notoriety track (between 0 and -100 depicted to the side of the track)
- -20k for each Wound cube in your Red Wound box.
In the case of a tie:
- The tied player with the most money behind their screen wins.
- If there is still a tie, the tied player with the least notoriety wins.
- If there is still a tie, the tied player with the least Wounds wins.
- In the rare case of another tie, all tied players share victory.
Continue Reading