Well hello again! Do you have the play area set up and ready to go? Normally, before you choose a Gearloc, you would want to read over their Gearloc Reference Sheet to better understand how that Gearloc plays - we are all so different!
For now, you'll just have to trust me that I'm the best choice. Ha! But enough about me, let's get started!

You may want to select someone in your party to serve as a "Party Leader" to help make those tough decisions that the group cannot decide on. In this example, I shall nominate myself as the most apt leader!
Hopefully you have chosen Drellen as your Tyrant (since that's who we are headed to take down)! Let's check to see if you have your Encounter Deck set up correctly!
You should have Special Encounters 001-003, then a total of 8 shuffled Encounters which should include Drellen's Tyrant Encounter. Yes? Awesome!
We will be facing bogs, goblins, and beasts on this adventure. If you have those types shuffled and set as your Active Baddie Stacks, and the Day Counter set at 1, then we are ready to draw our first Encounter!
As we go through things, try to mimic as much as possible so you can better understand all aspects of the game!
Day 1
Picket draws the top Special Encounter: "Leaving Obendar". After reading the card, the party chooses to "Shake down a shady peddler!" This is a peaceful encounter with no extra requirements for success. This means they can move right to the Reward Phase.
Picket and Boomer each draw 2 cards from the Loot pile. Picket chooses the Infused Incense, and Boomer chooses the Stone Hammer, discarding the others.
Each Gearloc also gains a Training Point. Picket chooses to train in Dex. Training in Dex always succeeds, so he places a Stat Die, set at 1, in his Dex slot. Boomer already starts the adventure with the Element, Casing, Fuse, and Boom Counter Skills (see her Innate), but no specific grenades yet.
She decides she wants the option to throw a grenade in her first battle if she can. Boomer trains in Frag Grenade and places the Frag Skill Die (#5) on her mat in the Frag Skill slot.
The party also gains a Progress Pt. They place this card with the point showing, under the Tyrant Card to track their progress. Only 5 more Progress Pts (within 9 days) are needed to reach Drellen!
Whew, Day 1 is almost done! Nice work! All we have left is the Recovery Phase! No need for Picket and I to trade loot, and nothing to Lockpick, therefore, we are just down to our individual options. Since we are both full HP and we like our loot, I think we will both opt to 'Scout the area'!...(45 mins pass)...
Hah! I beat Picket back! With my roll of 3, I scouted a 1Pt Bog Frog and Picket's dud roll of a 1 uncovered a 1Pt Bog Pole. I like our chances with these 2, no need to avoid them! Time to nap and then get outta here! Rotate that Day Counter to Day 2!
Day 2
After drawing and reading their second Special Encounter: "Hardly out of the Gate', the party decides to go with the first choice: "Hail the guards for help". This choice will result in a battle, and there are some beneficial conditions that go along with their choice.
Note: A battle's difficulty greatly depends on the party size and Baddies you face! Certain days and Baddie combinations can result in a very tough battle!
During battle, your Gearloc(s) may be Knocked Out (KO'd) from losing all HP. If there are no surviving Gearlocs at the end of battle (all Gearlocs KO'd), there will be no Progress or Rewards for that day and the Encounter Card is discarded.
You will begin the next day (increase Day Counter by 1) by drawing a new Encounter card. Don't give up! Losing a battle (or failing a peaceful Encounter) is part of the adventure!
Yes! We are headed into a battle! Every battle is shaped by your party size, total days you've been adventuring, and any modifications in your Encounter. Since their are no specific Battle Queue (BQ) rules on this card, we are going to need to build our BQ by calculating our Baddie Pts.
Do you remember how to do that? Current Day x Number of Gearlocs in Party. Simple! For us it's Day 2, it's just Picket and I, and there are no other mods, so that's 2 x 2 = 4. Yeah, I just did that in my head. I'm gifted.
Thanks for that, Boomer. *sigh* Now that we know our Baddie Pt total is 4, we need to set up our BQ! We must draw Baddies starting with the largest Pt stack possible.
If our total was 6, we would draw a 5Pt Baddie and a 1Pt Baddie to total 6. With 4, however, we will be drawing 4 1Pt Baddies. Remember, the BQ is set up with the highest Pt Baddies on top, in descending order, to the lowest Pt Baddies on the bottom.
For us, they are all equal so it will be the Bog Frog, then the Bog Pole, and then 2 Baddies we have yet to see.
Let's see who else we are up against! Normally this part is random, but for this example, prepare your BQ with the following Baddies: Goblin Sandbagger on the bottom, then a Clay Golem, next the Bog Pole, and finish the BQ stack with that big ol' Bog Frog on top!
Before listening to anything else Picket has to say, see if you can place these Baddies on the Battle Mat correctly (including Health, Lane Markers, and Baddie Initiative Dice).
No really, STOP reading and try to set up your Battle Mat. Picket will still have something to say when you return...I promise.
Boomer, lighten up! I want to make sure they understand! Remember, up to 4 Baddies can battle at one time. The first Baddie from the top of the BQ will take a Lane 1 Baddie Melee or Range position depending on its Attack Form.
The second Baddie will go in Lane 2 and so on. When placing these Baddies on the Battle Mat, first place their HP stack, then the Lane Marker that corresponds to the Lane they are in, and then the Baddie chip itself.
Also, set the Baddie's Initiative using the Baddie Initiative Die that matches the Lane it's in.
Ok, ok! Since you're STILL TALKING, I'll add this: If there are more than 4 Baddies in the fight, the rest of the Baddies remain face down in the BQ and off to the side of the Battle Mat.
If one of the 4 current Baddies is defeated, the next Baddie in the BQ will come out once the current round ends. Remember, when bringing this Baddie into battle, use the first available Lane Marker and Baddie Ini Die. Now, Picket! No more talking!
Battling 4+ Baddies Reminder
During battle, if a Baddie cannot enter the Battle Mat because its position is occupied, it will instead take the first available Baddie position (starting with Lane 1-4) that matches its Attack Form. Then, it will try the opposite Attack Form.
Baddie Initiative Reminder
During battle set-up, for each Baddie that enters the Battle Mat, set the corresponding Baddie Ini Die to reflect the Baddie's Initiative  , and place it on the Ini Meter. Initiative tie-breakers with Baddies and Gearlocs are decided by the party.
If a unit joins the fight after Round 1, it will ignore this starting Ini number and instead be placed at the top or bottom spot of the Ini Meter. 1Pt and 5Pt Baddies start at the bottom spot, 20Pt and Tyrant Baddies start at the top spot.
How did you do? Adjust if you need to! Next, it's time for Picket and I to join! As you can see from the image, Picket has chosen Lane 4. I am going to play it safe and set up right behind him! We had some unlucky Initiative rolls...I blame our party leader. Go ahead and set our chips and Initiative Dice to match the image!
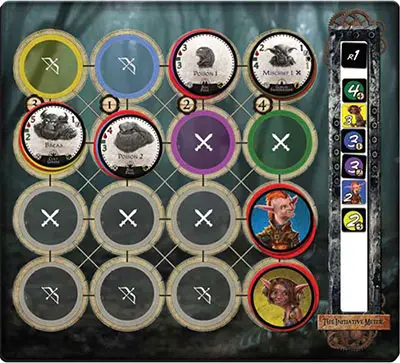
Gearloc Placement and Initiative Reminder
Gearlocs are always placed onto the Battle Mat after the Baddies. All Gearlocs roll their Initiative Dice and place them into the Ini Meter, along with the Baddies, in descending order. Then, each Gearloc is placed, along with their current HP stack, onto a Gearloc position that matches its Attack Form.
Great job! One more thing before we get this battle started! Picket has an Innate Skill that allows him to open with Shield Wall before battle begins! Let's see how he does!
Picket rolls his 2  Dice and lands only 1
  and a
and a  he locks the Def in one of his Active Slots. Shield Wall does not allow the to be used, so it is placed back into the dice pool.
Rotten oggots! I usually roll better than that. Ah well, we have help because as Round 1 begins, our Encounter choice condition kicks in!
Each Baddie is dealt 1 True Dmg from the Obendar wall guards. Go ahead and remove 1 HP from each Baddie. Now the battle can begin. It looks like the Goblin Sandbagger is first!
This Baddie has Ranged Attack Form, so it does not move and it targets Boomer. The Goblin Sandbagger rolls 1  Die and 1 Die. The Atk Die rolls a and the Def Die rolls a 1 . The triggers Mischief 1 (defined on the Gearloc Adventuring Reference Guide) which forces Boomer to remove a die from her Active slot.
She does not have one, so this does nothing. Also, since the goblin did not roll any Dmg, it does not hurt Boomer. Place the 1 it rolled on the goblin Baddie chip. The goblin's turn is now over.
Baddie Movement and Targeting Reminder
Melee Baddies may move up to 2 adjacent positions per turn. They will always move toward and attack the closest (route with fewest positions) opposing unit.
If there is a tie for "closest", use its  to determine which it pursues. If a Melee Baddie is already adjacent to an opposing unit, it will not move. Ranged Baddies do not move and can target any opposing unit on the Battle Mat.
lt's my turn next! Yee-hoo! I'm not going to move, which allows me to use all 3 Dex for dice rolling! It looks like I have 6 dice options to choose from: an Element, Casing, Fuse, 1 Die, and 2 Dice. In order to use my Frag, I need to get my Boom Counter to 1 by finding 1 of each Component! I think I'll target the Bog Pole and will roll 1 Die, 1 Die, and my Element Die. Here we go!
Boomer rolls 2 Elements, 1  , and 1 (with her Def Die). She chooses to apply the Dmg from the Atk Die to the Bog Pole. With the , Boomer also decides to use her Backup Plan: Throw Odds, which allows her to do an additional 1 Dmg to her target.
This means the Bog Pole is defeated. Remove Bog Pole, along with its Lane Marker and Baddie Ini Die, from the Battle Mat and place it in the Defeated Baddies area. Finally, Boomer places her 2 Elements result in one of her Locked slots. She now has 1 of the 3 needed Components toward making a grenade.
Picket! Did you see that? I KNOW you saw that! Nailed that pole right in the kisser with the bolt I was going to use for Frag shrapnel! If you were half as accurate with your sword...hehe...I'll stop there because we are in the middle of a battle! FOCUS! One Baddie down! But no celebrating yet, that Bog Frog is next!
The Bog Frog moves 2 positions towards its closest target (Picket is 3 positions away, and Boomer is 4). Go ahead and move it to either position adjacent to Picket. The Bog Frog does not have any dice to roll, but it does have a Skill that triggers each turn. In this case, place a Poison Effect Die, set at 2, on Picket's chip.
Next up is Picket (it would have been the Bog Pole, but it was defeated before it could have a turn). At the start of Picket's turn, he immediately takes 2 True Dmg (ignoring his Defense) from Poison (remove 2 HP from Picket) and decreases the Poison Effect Die to 1.
Since Picket still has a Die in his Active slot, it is not available to roll. Picket chooses to use his Loot: Infused Incense. This adds 2 additional Atk Dice to his roll for no Dex cost. He chooses the Bog Frog as his target since it is already adjacent to him and rolls 3 Dice and 1 Die.
Picket's roll results in a total of 2 , 1 , and 1 . He places the in his Backup Plan, places the Def Die in his Active slot, and applies 2 Dmg to the Bog Frog (remove 2 HP from it).
Don't fret, Boomer, I've got this! This battle is practically over already! That frog will soon take another guard arrow so it be decimated before its next turn.
I, of course, am still very healthy, and my awareness of this battle and its remaining dangers is unmatched! Just one more Baddie this round and it's only a...ugh... ouch...a Clay Golem...as I suspected!
The Clay Golem pursues the closest opposing unit. When moving the Clay Golem, there are possibly 2 positions you could move it to (depending on how you moved the Bog Frog). Move the Clay Golem toward Picket.
Note: With the round over, if there was a Baddie still in the BQ, it would enter the Battle Mat at this time using the Lane 2 Marker and Ini Die.
Increase the Round Counter to R2, and remove 1 HP from all Baddies (for the Encounter condition).
OK! With the first round under your belt, it's time for you to play out the rest of the rounds in this battle! See how well you can navigate the remaining Baddie and Gearloc turns.
Better read up on what the Clay Golem's Skill "Break" does. It can be nasty! Thankfully, both yours truly and Picket will take our turns first! Good luck!
Continue Reading