Components
- 139 Dice
- 4 Dice Storage Trays
- 4 Neoprene Die cut Gearloc Character Mats
- 1 Neoprene Die cut Battle Mat
- 5 PVC Plastic Reference Sheets
- 60 PVC Plastic Encounter Cards
- 40 PVC Plastic Loot Cards
- 20 PVC Plastic Trove Loot Cards
- 65 - 4g Health Chips
- 55 - 11.5g Baddie Chips
- 7 - 11.5g Tyrant Chips
- 4 - 11.5g Gearloc Chips
- 4 - 11.5g Lane Marker Chips
- 1 - 11.5g Day Counter Chip
- 1 Map Marker
- Rulebook
Object of the Game
Your task is easy...according to the Gearloc Council. Simply reach and defeat the selected Tyrant within its day allotment to win.
Setup
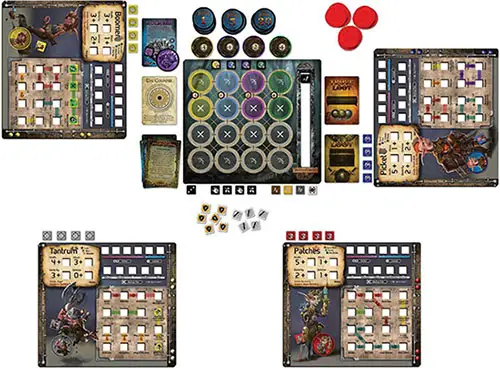
Let's start by setting up for your adventure. Place the Battle Mat in the center of your play area.
Tyrant And Day Counter
Select a Tyrant based on the length of game you'd like to play or draw one at random (you may look at both sides and familiarize yourself with its Skills and Tyrant Die effects). Games can range from 1-4 hours depending on the Tyrant and number of Gearlocs.
Place the Tyrant's Card, Chip, and Die to the left of the Battle Mat. Place the Day Counter Card and Chip (set to 1) directly below your Tyrant Card.
Encounters
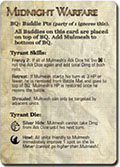
Find any Tyrant Encounters (blue) associated with that Tyrant (1-3 cards and labeled with the Tyrant name at the bottom of the card) and set those aside. Place other Tyrant Cards in the game box.
Shuffle the General Encounter Deck (green), or Solo Encounter Deck (green and labeled "Solo" at the bottom) if playing with only one Gearloc, and draw Encounter Cards equal to the  shown on your Tyrant Card minus 3 cards.
Shuffle these together with the Tyrant Encounter Card(s) you set aside, and place them all to the left (story side up) of the Battle Mat as shown. Place other Encounter Cards in the game box. In rare instances where you run out of Encounters, you may replenish your Encounter Deck from the box.
Finally, find Special Encounters 001-003 and place them, in order, on top of your newly created Encounter Deck. Place other Special Encounters in the game box (keep these accessible, as you may need them later on).
Loot & Trove Loot
Shuffle all Loot and Trove Loot cards and place both decks (chest side up) to the right of the Battle Mat. Take the 4 Lockpicking Dice and place them nearby.
Baddies
Using the Baddie Type icons ( ) shown on your Tyrant Card, find all Baddies of these types. Flip them face down, shuffle, and create 1Pt, 5Pt, and 20Pt Baddie "Active Stacks".
Place these stacks above the Battle Mat. Place other Baddie Chips in your game box (on occasion, you may need to access these Baddies for a specific Encounter). If you ever run out of Baddies in an Active Stack, reshuffle defeated Baddies.
Place a few stacks of 8-10 Health Chips to the right of your Baddie Active Stacks as shown.
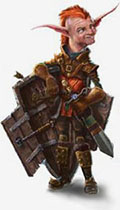
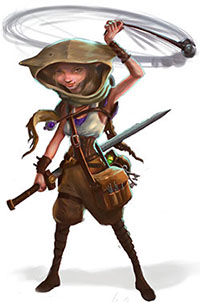
Gearlocs
Each player chooses a Gearloc and places their selected Gearloc Mat, Gearloc Chip (with [#] of Starting Health Chips underneath it), Initiative Die, and Stat Dice as shown. Adjust mat placement to your liking based on party size.
Find your Gearloc's 16 Skill Dice and place them in a Storage Tray near your Gearloc Mat (the tray covers work great for storing Attack and Defense Dice near each Gearloc as well).
Using your Gearloc Reference Sheet (front right column), look for any Skills with a circle ( ) next to its name. Your Gearloc starts the game with these Skills (find the Skill names on your Gearloc Mat and then place the Skill Dice with corresponding numbers into those slots on your mat).
These dice are usually Counters (meaning the side facing up on your mat is important). Start these dice with their "0" side showing, if possible.
Other Components
Gather some Attack Dice (6-10), Defense Dice (10-12), and Effect Dice (2-4 of each type), and place them below the Battle Mat. Set the black D6 in this area as well.
Place the 4 Lane Marker Chips above the Battle Mat as shown. Do the same for the 4 Baddie Initiative Dice. Lastly, place the Round Counter Die at the top of the Initiative Meter on the Battle Mat, set to R1.
You are ready for your adventure!
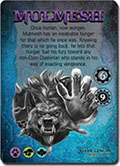
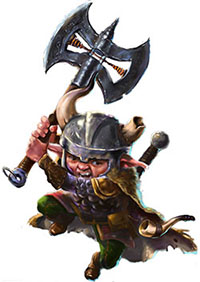
Baddies
Baddies represent the opposition you will face during your adventure. Each Baddie comes with its own chip and stats.
1. HP
This is the number of Health Chips placed beneath a Baddie when it enters the Battle Mat.
2. Initiative
This determines its starting spot on the Ini Meter. A Baddie Initiative Die is used to indicate this.
3. Attack Form
Melee Baddies ( ) can only attack adjacent (not diagonal) opposing units. If none exist, they cannot attack this turn. Ranged Baddies (
 ) can attack any opposing unit, regardless of mat position.
4. Creature Type

5. Defense
This is the number of Defense Dice this Baddie rolls on its turn (minus any active Defense Dice). Rolled 9 is applied to top of Baddie chip (making it active). A Baddie does not need a target in range to roll its Defense Dice.
6. Attack
This represents the number of Attack Dice this Baddie rolls against its target on its turn. Total  rolled is [#] Dmg done to target. If Baddie has multiple targets, these dice are rolled separately for each.
7. Skills
These Skills (in black) are always in effect. Refer to the Gearloc Adventuring Reference Guide for a list of Baddie Skills and how they work.
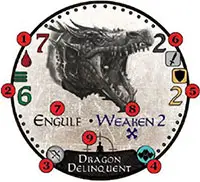
8. BP Skills
These Skills (in blue with  icon) trigger if a Baddie rolls at least the # of shown on the Baddie chip from all its Attack and Defense Dice rolls combined this turn.
Rolled do not carry over to the next turn.
9. Target(s)
Target ( ) determines which unit(s) this Baddie is pursuing and attacking. Melee Baddies always pursue the "closest" (route with fewest positions) . Ranged Baddies don't move so they just attack their .
Some Baddies will attack multiple targets (shown by [#] figures within the icon) but will not attack the same target more than once per turn. A Baddie will attack either the weakest ( ) target (opposing unit
with lowest HP) or the strongest ( ) target (opposing unit with highest HP). Party chooses on ties.
10. Diagonal Movement
Baddies/Tyrants with  can move diagonally.
11. Extra Baddies
A Baddie with  or
or  adds this many 5Pt Baddies to the top of the Battle Queue when it enters the Battle Mat.
Movement
All melee Baddies move up to 2 positions toward their on their turn before attacking (if possible).
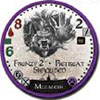
Baddie Points (pts)
There are 4 types of Baddies: Tyrants, 1Pt, 5Pt, and 20Pt Baddies. They are identified by their image or [#] Pts on the back of the Baddie chip.
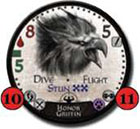
Tyrants
Reaching and defeating the Tyrant is your main objective in Too Many Bones.
Tyrant Card
A Tyrant Card front gives information about that Tyrant and shows the Creature Types you are to use for this adventure.
It also lists the Progress Points  needed in order to challenge the Tyrant. While you are not required to challenge the Tyrant the day after earning the required , you must defeat the Tyrant before its is exceeded in order to win.
The back of the Tyrant Card instructs you on how to set up the Battle Mat for the Tyrant battle and explains each Skill the Tyrant has, including its Tyrant Die. You only need to defeat the Tyrant Baddie to win this battle.
A failed Tyrant battle is handled the same as an unsuccessful Encounter battle and can be tried again if you have enough days for another try.
Tyrant Chip
Each Tyrant has a chip that is used as a Baddie chip in the final battle.
Tyrant Die

Along with its Attack and Defense Dice, each Tyrant has a unique Tyrant Die that is rolled each time the Tyrant takes its turn. This die is only rolled once per Tyrant turn.
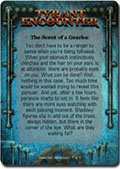
Tyrant Encounters
Each Tyrant has Tyrant Encounter Cards specific to them. Tyrant Encounter Cards for the Tyrant you are pursuing are always shuffled into your Encounter Deck before your adventure begins.
Encouters
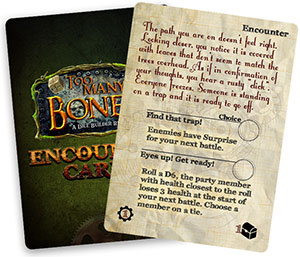

Encounters are daily situations your party must overcome as they make their way toward their objective. Each day, your party will start by drawing an Encounter Card and reading it aloud.
The front of the card presents a situation your party "encounters". The back, lists your choices and the effects those choices will have on the Encounter (you may read the entire card and discuss before deciding).
Your party must choose one of the options offered. These choices will result in a peaceful outcome (no battle)  or a battle
  . Either way, you must successfully complete the Encounter to earn its rewards (usually Progress Pts, Loot, and/or Training Points).
Refer to the Gearloc Adventuring Reference Guide for details on all Encounter icons (rewards, etc)..
Note: Be aware that even some peaceful outcomes have success requirements noted on the card.
Specific choices may have rewards listed after that choice. General rewards given for successful completion of either choice are listed at the bottom of the card (left/right corners).
A battle is successful if at least one Gearloc remains on the Battle Mat after all Baddies are defeated. In this case, place all Gearlocs with their remaining HP (or just their Gearloc chip if KO'd) back on their Gearloc Mat Prep Area and move into the Reward Phase.
If an Encounter is unsuccessful (Peaceful or Battle), your party does not gain any rewards and must immediately move into the Recovery Phase. If it was a battle, clear the Battle Mat and place KO'd Gearlocs back on their Gearloc Mat Prep Area and any undefeated Baddies face down on the bottom of their appropriate Active Stacks.
After an Encounter is over, discard it unless it states otherwise, or, if you earned a Progress Point reward, stack this card with the point showing under your Tyrant Card.
Encounter Types
There are 3 types of Encounters in TMB. Special Encounters are used only when instructed in set- up or by another Encounter. Tyrant Encounters are added to the Encounter Deck based on which Tyrant you are facing.
Regular Encounters come in 2 sets: General and Solo Encounters (indicated on the front at the bottom of each card). Use Solo when adventuring with 1 Gearloc only. Use General for 2 or more Gearlocs.
As you unlock Trove Loot, you cam keep track of the locks you've solved by connecting the pipes to your Gearloc mat!
One pipe connected means you Solved one of the three locks and so on! Solve all three? Success!! Flip it over!
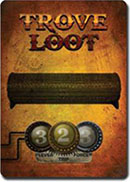
Loot
In order to have a chance at taking down a Tyrant, your party will need to find some Loot and, if lucky, some Trove Loot along the way. Here are a few details about both:
-
You are limited to 4 Loot & Trove Loot per Gearloc at any time (when drawing 5th or more, choose 4 to keep, discard remaining).
-
Turn a Loot card with multiple uses to show it has been used (start with highest #).
-
After fully using Loot card, discard it.
-
During battle, if not specified otherwise, Loot & Trove Loot must be used on your turn.
-
Trove Loot should remain "chest" side up until it is fully opened through successful Lockpicking Attempts (takes up a loot spot either way).
-
Heavy: Counts as 3 Loot.
-
Permanent: Do not discard when used.
-
Backup Plan Extensions: grant additional BP Skills that you may use
for. Using this counts as using your Backup Plan for this turn.
Lockpicking

The need for Lockpicking can come from a random Encounter or any Trove Loot you manage to get your hands on. There are 4 Lockpicking Dice used in this process consisting of 1 Intuition Die and 3 Action Dice.
You can learn more about how these work on the Gearloc Adventuring Reference Guide.
Each Gearloc will have an opportunity to make one Lockpicking Attempt per day on any discovered Trove Loot during the Recovery Phase. If you manage to solve only the 1st or 2nd lock during an attempt, those locks remain solved, giving you a head start on your next attempt.
Also, your Lockpicking Attempt can be used on someone else's Trove Loot instead of your own if you see that as more beneficial.
Miscellaneous
Dangerous Darts (DD)
You will most likely be playing DD soon after meeting the Mohlnor, and could be initiated by any one of a number of Encounters. It is advised that your party become familiar with the game and how to play it. You will find the specifics covered on the Gearloc Adventuring Reference Guide.
Day Counter (chip And Card)
At the start of each day, rotate this chip by 1.
This happens regardless of whether your previous Encounter was successful or not. You must challenge and defeat the Tyrant.before the Day Counter exceeds the Tyrant's .
Effect Dice

These dice are used to help remember when a specific Effect is in use or applied to a unit on the Battle Mat. Place this die on the Baddie or Gearloc Chip to show the Effect is Active. These are the only dice that get placed on Gearloc Chips.
Progress Points (Pts)
Progress Points represent the party's advancement toward the Tyrant. Stack all successfully completed Encounters, with their showing, in a neat row to easily reference how many points your party currently has.
Once you earn enough Progress Pts to equal or exceed the shown on your Tyrant, you may choose to face the Tyrant instead of drawing an Encounter during your next Encounter Phase.
Training Points
A Party Training Point ( ) is earned through the successful completion of Encounters. When a is earned, each party member gains a Training Point that can be used toward a Training Attempt of one of their Skills or Stats.
Training HP, Dex, or a Skill will always succeed. However, training in Attack or Defense requires a successful attempt in order to increase this stat. A failed attempt means you will be forced to train in something else with that Training Point. The training process is covered in the Gearloc Mat section (page 8-9) and on the Gearloc Adventuring Reference Guide.
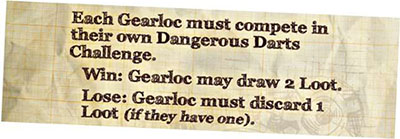
The origins of Dangerous Darts is not fully known. However, in recent decades, the Mohlnor have latched onto the game and adopted it as a goto pastime for just about anything.
Entertainment? Bartering? Disputes? A game of Dangerous Darts (always rigged in their favor) is the answer!
While most Gearlocs detest the game, sometimes even they have been caught playing to decide party leader status and the like. In those rare cases, younger Gearlocs always go first and dice choosing is done in secret
Game Phases
There are 4 Game Phases within TMB. A reminder of these phases exists under "Adventure Routine" on the Gearloc Adventuring Reference Guide.
1. New Day
Rotate Day Counter 1 day (skip this for Day 1).
2. Encounter Phase
Draw an Encounter and read it to the party.
Pick a choice and attempt to successfully complete it.
If successful, go to the Reward Phase.
If unsuccessful, skip the Reward Phase and go directly to the Recovery Phase.
3. Reward Phase
Gain your Choice rewards and also any general Encounter rewards.
If rewards include Loot or Trove Loot, draw them now.
If rewards include Training Point(s), use them now.
If rewards include Progress Point(s), record your progress now.
4. Recovery Phase
Trade Loot (including Trove Loot) within your Party. Any Loot! Any amount! To anyone!
Make a Lockpicking Attempt. This can be on your Trove Loot or someone else's.
Individual Options (each Gearloc may choose 1):
-
Rest and Recover: Heal to full HP.
-
Search for Better Loot: Discard 1 Loot. Roll 6 Attack Dice. For each
you roll, reveal a Loot card - you may keep 1. -
Scout the Area: Roll a D6. On 1-3: Reveal a 1Pt Baddie; 4-5: Reveal up to a 5Pt Baddie; 6: Reveal up to a 20Pt Baddie. Once revealed, you may leave that Baddie face up on top of the stack or cycle that Baddie to the bottom.
There is no limit to the # of Baddies you can reveal per stack.
This completes your day! Start over at: New Day.
Continue Reading