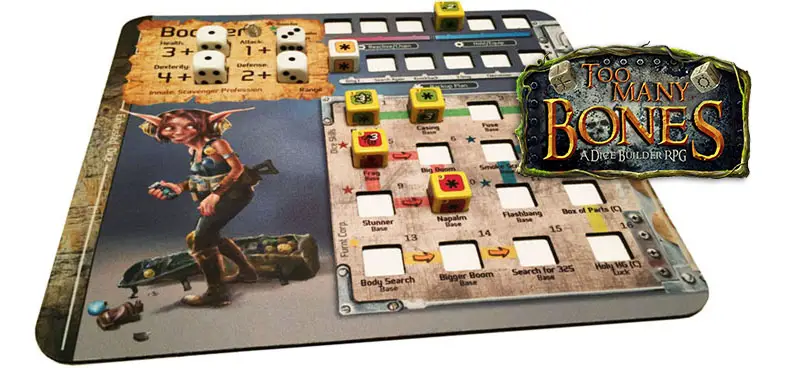
Before you draw your first Encounter, let's go over some of the different components within TMB, starting with the Gearloc Mat.
1. Stat Area
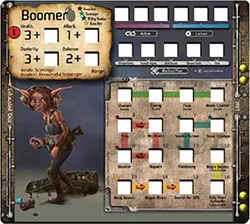
Each Gearloc has 4 Stats: Health, Dexterity, Attack, and Defense.
Each Stat consists of a Starting Stat (printed number on the mat) which can be increased by placing a Stat Die in the corresponding Stat Dice slot during the game.
The Starting Stat plus the value of the Stat Die equals the current (Max) Stat of your Gearloc.
You can upgrade these stats using Training Points ( ) from completing Encounters.
A Training Point gives you 1 Training Attempt for any Stat (or Skill). If a Training Attempt is successful, place (or increase by 1) a Stat Die in the slot next to the Starting Stat to reflect the new modified number (Stat Dice cannot go higher than 6).
Stat Dice from Training remain throughout the adventure.
Health (HP)
Your HP is the number [#] of Health Chips your Gearloc currently has stacked under their Gearloc Chip.
HP cannot exceed its [Max] Stat (excess healing or regen is lost). *Buff HP is separate from your HP and is therefore handled differently. Your individual Gearloc Reference Sheet will give specifics if they have a Buff HP Skill.
An HP Training Attempt will always succeed. After Training in HP, add 1 HP to your Gearloc (in addition to increasing the HP Stat Die).
Losing your last HP means you are Knocked Out (KO'd). Remove your Gearloc, its Initiative Die, and all slotted Active, Locked, and Backup Plan dice from the Battle Mat (use Recovery Phase to replenish to full HP).
Dexterity (Dex)
Your Dex is the total [#] of dice you may roll each turn (any combination of Atk, Defense & Skill Dice).
A Dex Training Attempt will always succeed.
Dex may also be spent to move your Gearloc on the Battle Mat (costs 1 Dex per position).
Attack (Atk)
Your Attack Stat is the [#] of Attack Dice ( (
 ) you have available to roll each turn.
Each Attack Die costs 1 Dex to roll in battle.
An Attack Training Attempt requires you to roll your current Attack (Starting Stat + Stat Die). If no are rolled, you are successful. If unsuccessful, there is no Attack Stat increase and you must spend this Training Point elsewhere.
Attack Dice must have a target before they are rolled (one target only).
Each rolled I3is [#] damage (Dmg) that may be applied to target (can be combined with other rolled Dmg).
Each rolled ^amay be used in your Backup Plan (does not reduce [#] of Attack Dice available to you in future turns).
Defense (Def)
-
Your Defense Stat is the [#] of Defense Dice (
 ) you have available to roll each turn.
 -
Each Defense Die costs 1 Dex to roll in battle.
-
A Defense Training Attempt requires you to roll your current Defense (Starting Stat + Stat Die). Any
 rolled are rolled once more. If no are rolled after the second roll (or first), you are successful. If unsuccessful, there is no Defense Stat increase and you must spend this Training Point elsewhere.
 -
The total Defense Dice currently in Active slots will reduce available Defense Dice for rolling this turn.
(e.g. Boomer has a Defense stat of 2. She rolls both Defense Dice on her turn and gets a 1 and a 2 result. She chooses to place both dice in her Active slots.
Later in the round, a Baddie attacks her for 1 Dmg, so she chooses to remove the 1 Defense from her Active slot. It's now her turn again, but because she still has a Defense Die in her Active slot, she can only roll 1 Defense Die this turn).
-
Each rolled
may be placed in an Active slot. -
The total [#] of
 in your Active slots is the [#] Attack Dmg you may prevent. Decrease by this amount (in the example above, Boomer had the choice between reducing a 2 Defense to 1 or simply removing the 1).
Defense Dice must be used for all incoming Dmg (except True Dmg) first before removing HP.
-
Each rolled
may be used in your Backup Plan (does not reduce [#] of Defense Dice available to you in future turns).
Innate & Innate +1
Each Gearloc starts with a unique talent (Innate) and can use it throughout their adventure. Use your Gearloc Reference Sheet to learn more about what it can do.
Your Gearloc's Innate can be upgraded by using 6 (JJI on your Backup Plan. This also lasts the entire adventure and its effects are explained on your Gearloc Reference Sheet.
Play with the non-star side of your Gearloc chip face up until you upgrade to Innate+1, then flip it!
Attack Form (ranged / Melee / Melee-ranged)
This determines how your Gearloc can attack. Melee (& Melee-Ranged) Gearlocs can only target adjacent units when attacking (rolling Attack Dice). Ranged Gearlocs can target any unit.
Your form also determines your Gearloc's Battle Mat starting position options in battle.
Unlike Skill Dice, Defense and Attack Dice are. never Exhausted and tore available to you every turn...unless of course you meet a golem.or maybe a bog wyrm.
In which case, I ve got this, Just stay behind me! My point is, Attack and Defense stats are important! Roll these dice and use them often!
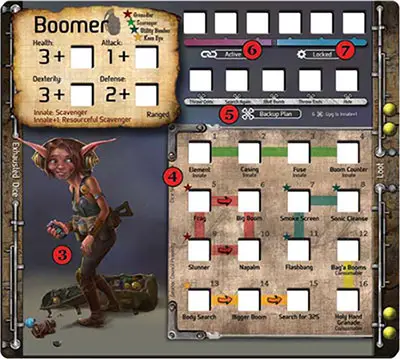
2. Exhausted Dice Area
When Skill Dice are used, they must be Exhausted (unless otherwise noted).
Exhausted Dice are stored to the left of the Gearloc Mat for the remainder of the current battle and are no longer available to you. All Exhausted dice are unexhausted after battle.
Baddie Skills may force you to Exhaust Attack or Defense Dice. Each die Exhausted in this way reduces your Attack or Defense Stat by 1 for the battle.
3. Prep Area
The picture of your Gearloc also serves as a staging area for certain components throughout the game.
This is where your Gearloc Chip stack with its current HP sits when not in battle.
If your Gearloc receives Buff HP, it is placed here.
Some Gearlocs even use this area for staging certain Skills before they are used in battle.
4. Skills Area
Skill Dice
Begin your adventure with all Skill Dice in your Storage Tray (out of play), except for any Skills your Gearloc starts with. These have circled bullets on your Gearloc Reference Sheet (
 ).
).Skills are learned through Training Points. When you train/unlock a Skill, locate the numbered die in your Storage Tray that matches the Skill you're training and place it on your mat in its correct slot.
The side showing on Skill Dice in your Skills Area doesn't matter (Counters are often the exception).
A Skill Training Attempt will always succeed.
Skills are usable only once per battle (unless otherwise noted). Exhaust each Skill Die after use.
Once trained/unlocked, Skill Dice are usable throughout the adventure.
Each Skill Die side has an icon that can be matched to your Gearloc's Reference Sheet to find out how this icon functions. It also shows where this die may be placed once rolled (i.e. Active [A], Locked [L]).
How Skill Dice function can vary greatly. Some are immediately resolved, while others are placed onto your Active Slot, waiting to be triggered.
A few Skills even go onto your Locked Slots, where they may remain for the entire adventure, or until you choose to use them!
To learn more about how each Gearloc's Skills work, read about them on the Gearloc Reference Sheets.
Professions
A profession is a set of Skills unique to your Gearloc. Professions are listed in the top right corner of the Stat Area and its corresponding Skills are linked by colored lines in the Skills Area.
Starred (
 ) Skills (visible next to certain slots in your Skills Area) are always available for training.
Some Skills will have arrows pointing to them and do not have a
. These Skills must be learned in order, starting with a Skill and following the arrows (if 2 arrows point to a Skill, only 1 is needed to unlock it).You do not need to unlock all the Skills in a profession before starting another profession.
Consumables
Consumable Dice cannot be gained using Training Points and are instead acquired through Loot or certain Backup Plans. *Some Gearlocs even start with certain Consumable Counter Dice on their mats.
When you acquire a Consumable Die, take it from your Storage Tray and place it on your mat.
Once a Consumable is used, it is removed from your mat (place back in your Storage Tray). *A few Consumables are the exception to this rule and remain on your mat as a counter throughout your adventure.
5. Backup Plan (BP)
Backup Plan Skills
Only 1 Backup Plan Skill may be used per turn.
The cost of using a BP Skill varies from 1-6
as shown on Gearloc Mat & Reference Sheet.Remove [#]
to use a BP Skill that costs [#]. from Attack & Defense Dice are simply removed, but Skill Dice used in this way must be Exhausted.
Managing Bones
Up to 5 total
may be stored within the BP from turn to turn.Line up
from left to right in the order they are earned.Use
from left to right. Shift unused all the way left.- may remain in your BP until used and must be cleared at the end of battle or if KO'd.
Multi-bones Dice
These take up multiple slots on the BP (skip slots to show this).
If the BP Skill uses up only part of a multi-Bones Die, the entire die is used and any unspent
are lost.
Upgrading To Innate +1
It takes the use of 6
to upgrade to a Gearloc's Innate+1.Flip over Gearloc Chip (to stars side) for the rest of the adventure to indicate this upgrade!
Bones are misses, sort of. You will find that the vast majority of the dice that you roll may have one or more sides with the Bones icon.
Oftentimes, these are an undesired result of the dice you rolled. However, they play a pivotal role in your decision-making process.
You will always have the option of putting Bones into your Backup Plan.
6. Active Slots
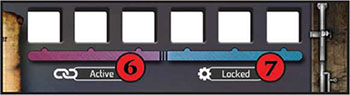
Place rolled Defense Dice and Active (A) Skill Dice effects here. Ally Active (AA) Skill Dice effects are
also placed in this area (by other Gearlocs). Specific Active and Ally Active Skill Dice effects are explained on the Gearloc Reference Sheets.
Active Dice remain here until used and must be cleared at the end of battle or if Gearloc is KO'd.
Skill Dice in these slots must be Exhausted when used (unless otherwise stated).
7. Locked Slots
Place rolled Locked (L) Skill Dice effects here.
Locked Dice remain here from battle to battle until used. These dice must be cleared if Gearloc is KO'd.
Skill Dice in these slots must be Exhausted when used (unless otherwise stated).
Important: To free up space, a player may remove (Exhaust if Skill Die) dice from Active or Locked slots at any time during their turn.

8. Loot Area
When a Gearloc earns Loot or Trove Loot, they can store it to the right of their Gearloc Mat.
Each Gearloc can hold up to 4 Loot & Trove Loot (when drawing 5th or more, choose 4 to keep, discard remaining).
Continue Reading