Tainted Grail is a story-rich survival and exploration game for 1-4 players, set in a grim universe that blends Arthurian legends and Celtic mythology with the unique, dark vision of Awaken Realms artists and writers.
Each player controls one of four unlikely heroes who must face impossible odds, where stronger and wiser champions have failed. Chased by the encroaching, twisted power of the wyrd- ness, fighting an uneven battle against depleting resources and challenging Encounters, the Characters set out to achieve the impossible - and die many times in the process.
The different Tainted Grail Campaigns are set apart by many years, revealing the long-term consequences of player actions, while a deep, branching storyline allows players to tackle problems in different ways, ensuring no two games play alike.
Components
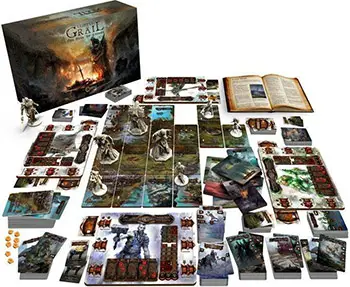
- 8 Miniature Models
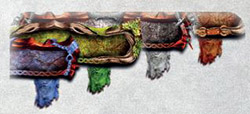
- 4 Double Boards
- 143 Small Cards
- 556 Standard Cards
- 72 Oversized Cards
- 10 Dials
- 8 Time Tokens
- 4 Quest tokens
- 4 Health limiters
- 1 Guardian die
- 1 Regular die
- 90 Universal markers
- 25 Large markers
- 4 Starting letters
- 4 Adventure maps
- 30 Save sheets
- Rulebook
Simple Gameplay Overview
During a standard game of Tainted Grail, you will spend most of your time journeying across the dangerous island of Avalon. Your Character will Travel from one Location card to another, spending Energy and revealing more Locations.
To progress further, you often must activate one of the Menhir statues scattered throughout the realm. These monuments go dark after some time, and activating them requires considerable Resources, so plotting your course will test your planning and logistics skills.
At any point, you may Explore any Location you visit. This will throw you into the middle of a non-linear, branching storyline, contained in the Exploration Journal that often changes the game world around you, swapping some of the Location cards for their different versions or granting you game-changing Statuses or Secret cards.
At some point, your day will end. At the start of each day, a new Event card will be revealed, slowly pushing time forward and providing you with new Quests.
While playing, you will also stumble upon many random Encounters. To resolve them, you will use your Combat and Diplomacy decks, using your tactical and deck building skills.
Rewards from these Encounters will help your Character advance, letting you expand and optimize your two decks, gain interesting Skills, raise your Attributes, and - eventually - reach parts of the island that you would not have reached otherwise, until you finally complete your current story Chapter or arrive at the end of the Campaign.
That is unless you first succumb to death or insanity. Their shadow will hang above you right from the start. After all, The Fall of Avalon is not a good time to be alive...
When you return, you will hopefully be wiser and better prepared!
Campaign Setup
To learn the game in the simplest way possible, we strongly encourage you to use the Open & Play guide that explains the basics in an introductory solo adventure. To set up any further Campaigns, please follow the steps below.
If you come back to a Campaign in progress, you don't need to follow the full game setup below. Instead, go to the "Saving the Game" chapter in the Basic Rules section of this manual.
Character Setup
Each player completes the following steps separately.
-
Choose your Character.
Take this Character's cardboard Tile and a Character Tray of the same color.
Hint: The main difference between Characters is their Character Action and negative trait, visible on the front of their Tiles, as well as the length of Survival Tracks on their matching Character Tray, and their unique Combat and Diplomacy cards.
The expansion Character Niamh has a red Tile and may use a Tray of any color.
-
Mark the starting levels of your
 (Energy) and
  (Terror).
Find the
and tracks on your Character Tray. Place universal markers in the starting slots, highlighted by two red chevrons on these tracks.
-
Place the T-shaped
 (Health) marker in the track slot. It is also highlighted with two red chevrons.
The shape of the marker will help you remember about the effect your
has on the other two tracks (see: Playing the Game).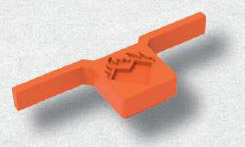
-
Mark your starting Attributes.
You will find their starting values on the back of your Character Tile.
-
Mark your starting Resources.
They are also listed on the back of your Character Tile. Place the corresponding numbers of universal markers in the Resource slots on your Character Tray.
-
Set aside the 80 Combat and Diplomacy cards that match the color of your Character Tray.
There are 50 basic Combat and Diplomacy cards that match your Character Tray, and 30 advanced Combat and Diplomacy cards with your Character's name above their title.
-
Create your 15-card Combat and Diplomacy starter decks.
Pick the 15 basic Combat and the 15 basic Diplomacy cards with a banner that matches your Tray's color (see illustration below). The banner is located under the card's name. Shuffle these cards and place them to the left (Combat) and right (Diplomacy) of your Character Tray.
Characters from other Campaigns need to refer to the starter deck lists found on the back of their Character Tile.
In the Fall of Avalon Campaign, the starter cards used in this step are numbered 1-15/25. Starter cards DO NOT have Character names on them!
-
Create your 25-card Combat and Diplomacy Advancement Pools.
Take the 15 advanced Combat cards that have your Character's name. Then, take the 10 remaining basic Combat cards of the color matching your Character Tray (the ones without the banner, that weren't used in the previous step to create your starter deck).
Shuffle these 15 advanced cards with the 10 basic cards. This is your 25-card Combat Advancement Pool. As the game progresses, you will use it to buy additional cards and improve your deck.
Now, repeat the above with the Diplomacy cards to build your Diplomacy Advancement Pool.
Place both Advancement Pools in one of the Save Compartments in the box or cover it with the "Advancement Pool" card.
-
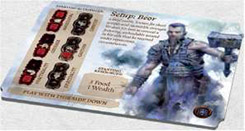
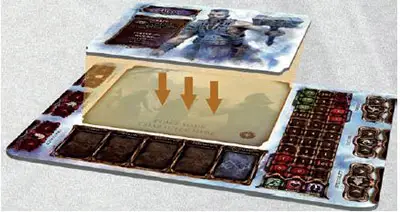
Place your Character Tile on the Character Tray.
Setup information should face down, and your Character Action should face up.
-
Read your Character's introductory Letter.
Written by your former mentor, who disappeared with the previous expedition, it will reveal more about your initial situation.
Introductory Letters also contain your unique Character Number, used rarely to break ties and unresolved votes.
-
Take your Adventure Map.
If you have no knowledge of Ava- lon, it will help you reach some important landmarks of the Island. Beware though, the cartographer who created the map lived over a century ago, and his drawing may no longer be accurate!
World Setup
After all players have set up their Characters, follow the steps below.
-
Set the Starting Location.
The Starting Location for the Fall of Avalon is Location card 101. Place your Starting Location in the middle of your play space and place all the Character models you are starting the Campaign with there.
Other Campaigns use Locations 201,301, and 401 as their starting points.
-
Place one Menhir model on the Starting Location and put a Dial in the slot under this Menhir.
Turn the Dial so that it shows the following number: 8 (for 1 player), 7 (for 2 players), 6 (for 3 players) or 5 (for 4 players).
This important Dial shows how many days you have left before the Menhir goes dark (see: Menhirs and Wyrdnessf

-
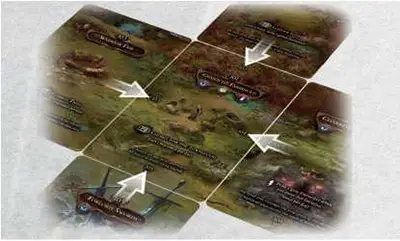
Build the starting section of the map.
Check the four Direction Keys on the four edges of your Starting Location. Find the four Location cards with the corresponding Location numbers and attach each of them to their matching Direction Key.
Example: In the Fall of Avalon campaign, you should attach Hunters' Grove (102) to the top edge of your Starting Location (101), Warriors' Fair (103) to its left edge, Charred Conclave (104) to its right edge, and Forlorn Swords (105) to its bottom edge.
-
Prepare the Encounter cards.
Take all Encounters and sort them by color into four piles. Each pile should contain 31 cards, including a special Encounter marked as "Your First Encounter". You will use these piles to build your Encounter decks in step IX.
-
Prepare the Secret and Item decks.
Take all Item and Secret cards and place them in two piles next to the Encounters. You may want to sort the Secret cards by number in order to find them more easily during the game. Shuffle the Item deck.
-
Take a fresh Save sheet.
You will use it save your game and to mark Statuses that permanently change the way some locations and people respond to your group.
-
Distribute Help cards.
Each player should receive one Icon Guide card and one Turn Order card with the Action list on the back. Leave the Combat / Diplomacy Help card on the table.
-
Optional: pick your Chronicler.
Designating one player as a Chronicler helps to maintain the flow of the game and limits downtime. For the breakdown of a Chronicler's responsibilities, see the Chronicler frame.
-
Set up the first Chapter.
Find the Chapter I Setup card and follow its instructions, starting from the front side, to build the Event deck and Encounter decks.
Then, take all Random Event cards, shuffle them and place them on the side of your play space or in the box. The Event cards will sometimes ask you to put a certain number of these Random Events on top of the Event deck. When asked to draw an Event, you always draw from the deck, and never from the Random Event pile!
After you complete each chapter of the game, you will be asked follow a new Chapter Setup card to prepare you for another Chapter and modify your Encounter decks, phasing out easier cards and introducing harder ones.
-
The first day of your journey has started.
Go to the "Playing the Game" section of this Rulebook and begin your journey!
Hint: Exploring your home Location is a good first step that will let you check what options are available there.
Hint: For the first several in-game days, keep your Order of the Day Help card handy and perform the listed steps one by one. A new player can easily forget about important actions, such as reducing each Dial or revealing a new Event card at the start of each day.
Chronicler (Optional)
In cooperative games with 2-4 players, we suggest one player volunteer as the Chronicler. Apart from playing the game, the Chronicler becomes Tainted Grail's equivalent of the Game Master and is responsible for:
Reading (or re-telling) paragraphs of the Exploration Journal aloud to other players.
Performing upkeep tasks, such as revealing new Event cards and reducing all Dials at the Start of the Day.
Maintaining the Save Sheet, marking any Statuses gained by players, and checking the Statuses when asked.
Adding new Location cards and removing Location cards no longer in a range of an Active Menhir.
Dealing Item and Secret cards from their decks.
Breaking ties and making the final decision in any conflicting situation.
While the Chronicler has no gameplay impact and having one is not mandatory, choosing a single person to perform this role will reduce the time spent on upkeep and will lead to fewer mistakes.
Additionally, listening to what other Characters go though in their exploration helps to keep the rest of the group occupied and immersed!
Game Play
This section will teach you how to play Tainted Grail. Start by following the Order of the Day and then learn all the Basic Rules.
Order of the Day
The day is the most important time unit in Tainted Grail, and represents a full turn of the game. During the Day (stage II), Characters spend to perform Actions until they have no more or decide to Pass.
After that, players perform a short End of the Day (stage III) sequence, where Characters rest, recover, read Dreams, advance, and optimize their decks. Then, a new day begins, with the Start of the Day sequence (stage I) that includes some upkeep tasks and reveals a new Event card.
In short, as you play Tainted Grail, you will continuously go through three stages described below:
I. Start of the Day
-
Remove expired Menhirs.
If a Menhir has no Dial in the slot of its base, it becomes inactive and goes dark right now. Remove any such Menhirs from the table. Any Menhirs still on the table are referred to as "Active Menhirs".
-
Remove Locations out of the Menhir range.
Each Location card in the game should be adjacent (in a straight line or diagonally) to a Location with an Active Menhir. If there are any Location cards that no longer touch a Location with an Active Menhir, discard them now (see: Menhirs and Wyrdness).
-
Reduce Menhir Dials
Reduce the Dial of each Active Menhir by 1. If a Dial was already at 1, and you can't reduce it further, remove it from under the Menhir. Please note: the Menhir itself won't disappear nor become inactive until the next Start of the Day!
-
Reduce Time Dials and remove Time Tokens.
If there are any Dials with Time Tokens on them anywhere on the table, including on the Secret cards or next to the Characters, reduce them by 1. If a Dial can no longer be reduced, remove it from the game.
Remove one Time token from every Location card that has any.
Only Dials with Time Tokens should be reduced in this step. Dials with Quest Tokens move according to different rules. You also shouldn't remove any Quest Tokens from any Location.
-
Reveal and read a new Event card.
If it contains a Quest text and a red padlock symbol
 , you should move it to the Quest pile, next to the Event deck.
Unlike regular Events that stay active for one day, Events containing Quests remain on the table until the moment specified on their cards.
-
Move Guardians.
Guardians are special, roaming Encounters. If there are any Guardians on the table, roll the Direction die for each of them and move them according to the rules found in the Guardians section of the Basic Rules.
-
Discuss your plans.
If you play coop, all players should take time to discuss their plans. You will win or lose together, so careful planning and logistics are necessary!
-
Equip for your journey.
Make sure your Character doesn't have more than one item with the same keyword (see: Items) laying face-up. Flip any excess Items face down.
II. During The Day
When this stage begins, each player performs one Action, in any order, the players agree on. If the players cannot decide on the order, then the Character with the lowest Character Number goes first. Each available Action in the game is marked with a special Action icon that also indicates the cost of this Action.

All Actions have this icon in front of them. X denotes the cost of the Action. Some actions may have or costs instead.
A group of two or more players sharing the same Location may agree to take the same Action together, at the same time, as a Party - see the Party rules written in blue next to each Action.
Once every player has performed one Action or taken part in one Party action, or Passed, the players may once again perform one Action each.
This continues until everyone Passes or has no more to spend. When this happens, go to stage III, End of the Day.
Hint: To reduce downtime, a player involved in an Encounter might resolve it while the other players perform their own Action.
Additionally, the players should plan how to spend their Exp or how to modify their Combat and Diplomacy decks in advance, in order to reduce downtime during the End of the Day stage.
The six most important Actions of the game can also be found on the Action side of the Help card. They are:
-
Explore - Costs 1
Every Location card in Tainted Grail contains plenty of lore, secrets, or tasks, and Exploration is your primary way of discovering them. Flip your current Location card and read the text on the back.
Some cards are self-contained, but others point you to specific parts of the Exploration Journal for more decisions and options. Continue Exploration in the Journal until you reach "Exploration ends". Then, flip the Location card back and continue the game.
Remember to read the "How to Use the Exploration Journal" introduction at the start of the Journal before your first Exploration!
In a Party: If you Explore as a Party, the cost of Exploration scales to 1
per Party member. Most positive and negative effects will apply to every Character in the Party.On the other hand, most rewards will not scale and will have to be shared by the members of the Party. For more, see the "How to Use the Exploration Journal" section at the start of the Journal.
Hint: If flipping the card would be impractical because there are multiple models on it, go directly to the Exploration Journal! Every Location section in the Journal starts with the same text that is on the back of the card.
-
Travel - Costs 1
Move your Character model to any Location card connected to your current one (see: Locations). If two Locations are placed next to each other, but there are no Direction Keys connecting them, it means you can't travel from one to the other (usually due to mountain ranges, walls, wide rivers, and other natural features).
As you arrive in a new location, check whether your Travel revealed any new Location cards (see: Locations). Then, check whether your new Location has a lightning symbol (
 ). anywhere on its face. Anything marked with this symbol needs to be resolved as soon as you enter the Location.
Example: if the Location card has a lightning icon next to "Draw a gray Encounter" text, you must draw an Encounter from the gray deck immediately on arrival, before any other player has a chance to act.
In a Party: If you Travel as a Party, any automatic Action or Guardian Encounter triggered by your new Location must be resolved as a Party as well! The cost of Traveling scales to 1
per Party member.Important: You can only move in straight lines. No diagonal Travel allowed!
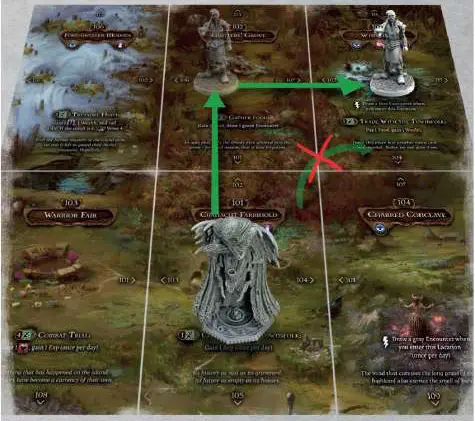
Example: Going from Cuanacht Farmhold to Whitening will require two Travel Actions, as diagonal movement is not allowed.
Additionally, when Characters arrive in the Whitening, they need to immediately resolve the section of the Whitening Location card marked with the lightning symbol.
-
Location action - see the cost on the Location card
Most Location cards contain one Action, clearly visible on their front. Activating this Action is possible whenever a Character is present in this location and is not involved in some other Action.
Location-based Actions are important, as they often let you gather or exchange critical resources. Try to keep an eye on them and plan your Travels in advance!
Please note that some Location Actions are marked as "once per day". When you perform this Action, you may cover its icon with a Time Token to help you remember it was already used.
Please keep in mind some locations track other rules with Time Tokens as well. It's best not to put these other Time Tokens on the Action, to avoid mixing them up.
In a Party: You may activate a Location Action as a Party. In this case, you pay the cost only once and receive the output of the Action once.
However, players in the Party may help each other pay costs, splitting them any way they want, and if they trigger an Encounter, they resolve it as a Party too.
Example: two players use a Location Action that reads
 Hunt: gain 1 Food, then draw a green Encounter". They split the cost between themselves and pay 1 each. Then, they receive 1 unit of Food, reveal an Encounter and fight it as a Party.
 -
Character Action - Its fixed cost varies per Character.
Every Character has a personal Action on their Character Tile. Activating this Action is only possible outside of Encounters and Exploration.
In a Party: only your Character can use your Character Action, but Party members may help pay the
cost.However, the Character performing the Action must ALWAYS pay at least 1
-
Inspect a Menhir - Always free.
If the location you are in has a Menhir seal next to its name (see: Locations), it contains one of these ancient monuments. Inspecting the Menhir is free and will inform you which Resources or Secret cards you need to activate this Menhir.
If you decide to do this, simply flip the Location card and read the Menhir section at the bottom. If you have the required resources and meet all other criteria, you may activate this Menhir right away.
Important: please note all costs of Activating a Menhir scale up with the total number of players in the game (and not only in the Party!).
Hint: Always keep in mind which Menhir you plan to activate next and what are the Resources you need to do so!
Hint: If you don't want to flip the Location card, you may also find all Menhir information in the Exploration Journal of this Location.
Hint: Activating a Menhir requires the help of all players. Plan your logistics accordingly.
-
Pass - Free.
Your Character decides to finish their day and rest. You may Pass even if you have unspent
, but this decision is irreversible - once you've passed, you won't be able to take any more Actions until the next day!There may be further Actions listed on your Character Tray, your Items, Skills or even Secret cards!
In short, During the Day, when your turn comes, look at the Action Help card, and on any other cards and boards on the table, pick one Action and use it. Other Characters in your Location may join you.
Then, players who haven't yet acted take one Action. Repeat this sequence until everyone has passed or ran out of

III. End of the Day
The day ends when all Characters have Passed or run out of . When this happens, perform the following steps for every Character:
-
Rest.
Eat 1 Food. If you do, restore 1
and lose 1 . If you don't have enough food (or you don't want to eat it now), drop your to 0. If your is already at 0, lose 1 instead.Remember that Characters in the same Location may trade Food between them at any moment, as long as they are not currently involved in an Action or Encounter (see: Parties and Party Actions)!
-
Restore Your
Place the marker on your track back in the starting slot. If you're Exhausted (your
marker is in one of the red slots), restore only 4 points of . Please remember that your marker limits your maximum energy - your energy marker can never be moved past your health marker. -
Advance Your Character
If you have any Exp points, you may now spend them to raise your Attributes, gain new Skills or add new Combat & Diplomacy cards to your deck (see: Character Advancement). 4) Build your Character decks.
If you want to, you can customize your Combat and Diplomacy decks with any cards your Character gained from the Advancement Pool during the game. You can also remove some cards that don't fit your playstyle, but remember that each deck must have at least 15 cards!
-
Experience Dreams
If the location you're in has a Dream icon, open its section of the Exploration Journal and read the Dream. If your marker is on one of the red slots (the "YOU ARE GOING INSANE" card is attached to your Character Tray), read the Nightmare instead of the Dream.
Hint: Dreams often provide helpful tips or reveal more of the lore and story.
Continue Reading