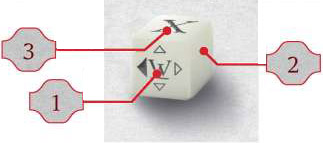
Survival Tracks
These three tracks on your Character Tray are especially important because nearly everything you do in the game affects them.
-
 Energy - your basic stamina that renews each day.
Most in-game activities (see: During the Day) deplete your energy Wounds and afflictions limit your half-dead, you won't be able to do as much as you would when healthy and rested.
The last two slots of the emergy track are red. If the
marker reaches one of them, you become Exhausted. This will negatively influence your performance and make you regenerate less energy (see: End of the Day). Despite that, Exhausting yourself is sometimes necessary to avoid something even worse! -
 Health - your physical condition.
When your health runs out, you start dying. To represent this, you will be asked to attach the "You Are Dying" card to your Character Tray and enable the additional rules found on this card.
You can never have more energy than health (energy marker should never go past the T-shaped
marker).If you have more
 than health (your terror| marker is above the health marker) means you Panic in Combat and Diplomacy.
The shape of the
marker will remind you about these two crucial thresholds! -
Terror - mental trauma, stress, and insanity.
If your
marker reaches either of the two red slots at the top of the track, you start to go insane. To represent this, you will be asked to attach the "You Are Going Insane" card to your Character Tray and follow the additional rules found on this card.Additionally, if your terror is higher than your health, you Panic (this will negatively impact your performance in both Combat and Diplomacy).
Character Attributes
The six basic attributes, divided into three opposing pairs, are what define your Character. They are used during various En- counters and may open up different story events or solutions when Exploring Locations.
After you raise any Attribute to 2, every subsequent point of this Attribute provides a special, useful Skill card that attaches to the side of your Character Tray, next to the Attribute (see: Character Advancement).
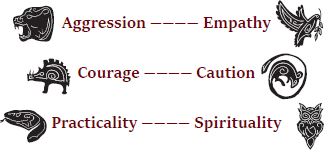
Hint: The Exp costs of raising the Attributes are determined separately for each of the three opposing Attribute pairs.
This means, for example, the more points you have in aggression, the more expensive your empathy upgrades become!
Resources
There are five spendable resources that Characters can gather and use throughout their travels.
Food - at each End of the Day, your Character should eat one unit of Food. Without Food, you won't be able to regenerate (see: End of the Day).
Wealth - gold, gems and other riches that may help you buy life-saving Items and equipment.
Reputation (Rep) - your fame and glory; if you have many Rep points, people of the island will often go out of their way to help you!
Magic - supernatural power that might help you during Encounters, and is often required to enable Menhirs.
Experience (Exp) - spent on raising your Attributes and buying new Combat and Diplomacy cards that greatly increase your chances of survival.
Food and Wealth may be traded with Party members or any other Characters in the same Location who are not currently in- volved in an Action. Rep, Exp, and Magic can never be traded.
Locations
These oversized cards are the segments of the map of Avalon, depicting all places you will visit during your journey.
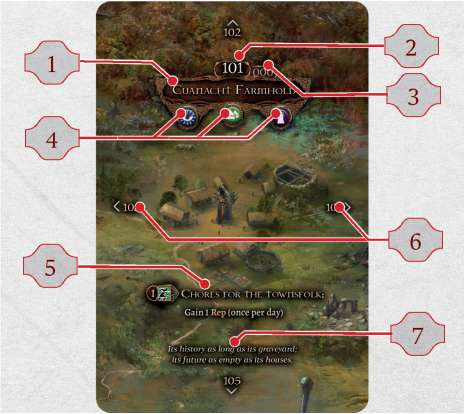
Location name
Location number - refers to the corresponding section of the Exploration Journal.
Legacy Location number - the number of the previous version of this Location (some actions, events or circumstances may replace a specific Location with its modified version).
Location Seals - each Location card may have up to three special Seals next to its name:
Location Action - an Action that can be performed in this Location.
Direction Keys - numbers that indicate the neighboring Locations.
Location Description - short description of the Location that will often give you hints on what to expect there.

Menhir - this Location contains a Menhir you can activate. During the game, the Activate Menhir Action can only be performed in Locations with this symbol!

Dreams - if you end your day in this Location, prophetic Dreams (or horrible Nightmares) will come to you in your sleep.

Unfriendly Settlement - this Location will trigger an Encounter as soon as you enter it (usually a Diplomatic one). Look for specific rules on the Location card.

Friendly Settlement - Unfortunately, they are quite rare...
As you Travel (see: During the Day), you will reveal more and more Location cards. To Travel between two adjacent Location cards, both must be connected to each other with Direction Keys.
If two Location cards are next to each other, but there are no Direction Keys on their adjacent edges, then this route is blocked (usually by natural features such as mountain ranges, coves or steep cliffs). You must find another way!
Whenever you arrive in a new Location, always follow the sequence below:
-
Reveal further Location cards.
Find cards that match the Direction Keys on the edges of your new Location. Attach them to the corresponding Keys IF the Location card you are trying to attach is no further than 1 card away (including diagonally) from an Active Menhir.
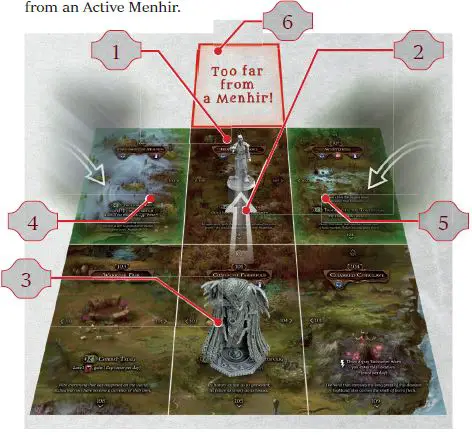
- Your Character Model
- Your Travel
- Active Menhir
- Attach these Location cards as you arrive in your new Location (their Location Numbers match the Direction Keys on the edges of your Location card AND they are within the range of an Active Menhir).
- The same as 4.
- This Location card won't be attached! Its Location Number matches the Direction Key BUT it wouldn't within the range of to an Active Menhir.
-
Resolve any instant rules.
If a rule on the card is marked with a Lightning symbol (
 ), you must resolve it now.
If a Guardian is present in the Location, resolve the Encounter before triggering the Location's instant rule.
Special Movement
Some cards and effects ask you to move your Character to the "low- est-numbered revealed Location", "any connected Location", and so on. This special move does not count as Travel, costs no and is performed instantly.
It does however reveal further Location cards and trigger any instant Actions or Guardian Encounters.
Legacy Location Numbers
In Tainted Grail, many Locations are transformed by the player's actions. Sometimes your exploits will switch an entire Location card for its new, altered version.
When Location cards change, their number changes as well, since they receive a new section in the Exploration Journal. However, the original Location number can still be found on the card, and is called the Legacy Location number. Use it when connecting the Direction Keys!
Example: You enter Location that has a "190" Direction Key on its right edge. You look for Location 190, but it's not available in the game anymore.
You check the Legacy Location numbers and discover that Location 195 has a Legacy Key 190. You place Location 195 right next to the "190" Direction Key.
To sum up: when you visit any Location during the game, you will reveal additional, neighboring Locations, provided they are: a) connected with a matching Direction Key, b) within the Menhir range.
If the Location card with a number indicated by the Direction Key is no longer available in game, check the Legacy Location number instead!
Menhirs and Wyrdness
In the land of Avalon, whenever a Menhir goes dark, parts of the land soon sink into the primal force of the wyrdness - except for small, isolated pockets of reality left around disabled Menhirs and other powerful relics. To represent this, at each Start of the Day, you will be asked to discard any Locations that are no longer in range of an Active Menhir.
All Characters present on any removed Location card immediately lose 2 , gain 2 and are moved to the nearest remaining Location card (if there are several Locations the same distance away, choose the lowest-numbered one). This is not a Travel Action!
Activating Menhirs requires Characters to use the Action found on the back of the Location card or in the Exploration Journal of this location. Both the costs and the Menhir setup are covered by this Action's text. Please note that Activating Menhirs is only possible in Locations that have the Menhir seal (Q next to their name.
Characters may also extend the remaining duration of Menhirs that are still Active, by simply Activating them again. Any remaining "power" left on the Menhir Dial is lost at the moment of new Activation. When you extend a Menhir, do not add a ew Menhir model in the Location!
If the last Menhir on the map goes out, do not remove the last remaining Location cards. The Characters may continue to play in these locations, but they lose 2 ff- and gain 2 at each Start of the Day- until they die or activate one of the Menhirs.
Events, Quests, and Tasks
The Event card you reveal at the start of the game sets you out on your first Quest. In Tainted Grail, Quests are the main branches of the story - large, important missions that always lead to the end of the Chapter and let you progress through the Campaign.
Quests are always contained on either Event or Secret cards and are marked by their special layout (see illustration) and a  symbol in the corner of their card. Whenever you draw a card containing a Quest, you should read it and place it in the Active Quests pile, next to the Event deck.
Example: The very first Event you draw during the game contains a Quest that reads "Gain the Menhir Rites Secret card". Place this Event next to the Event Deck, in the Quest pile. As soon as any Character has gained the Menhir Rites Secret card, follow the rules listed in the "Success" section of the Quest.
Hint: if you're not sure where to go or what to do, always start by checking your Active Quests again.
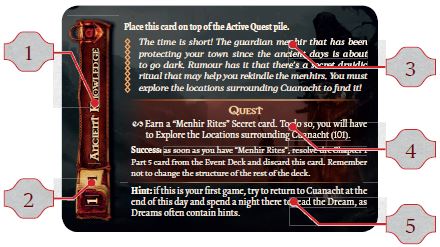
- Title
- Chapter and part - they allow you to set up the Event deck correctly.
- Story description - story introduction to the Event that tells you what is happening.
- Quest - explains what you have to accomplish in order to progress the story further.
- Hint - a tidbit of information which might help you to complete the Quest.
Important: Never remove any cards containing a Quest, unless you're clearly instructed to do so!
Apart from the main Quests, your Party will meet a multitude of Tasks. Those are small side missions or clues that you may choose to pursue. Following Tasks is often profitable and may expand your knowledge of the world, but it is technically possible to finish the game without completing any.
Tasks have no separate cards and no defined end conditions. They are essentially road signs that point you toward interesting places and stories. Unlike Quests, they are not tied to the Chapter and may be completed at any point - at least until your actions permanently change the Location card they are contained in.
Example: When visiting Titan's Steps (Location 115) players discover that the hermits and beggars who used to inhabit the nearby caves are gone. The Exploration Journal for this Location contains a line: "New Task: discover the fate of the hermits". If players follow the clues, they will eventually find a dark secret behind this disappearance in one of the nearby Locations...
Important: You should consider taking notes whenever you get a new Task. While the game provides references concerning Quests (in the form of their cards), remembering each Task you have found might be difficult.
Important: Whenever you want to push the Campaign forward, follow your Quests. Tasks are also important and may be profitable, but they will not lead you to the end of your current Chapter.
Quest Tokens
Many Quests and Tasks use Quest Tokens to track their progress. It is important to note that any Dials with Quest Tokens on them (called Quest Dials) are not reduced at the Start of the Day (see: Order of the Day). Only Time Dials are reduced automatically.
Parties and Party Actions
In Tainted Grail, players are free to group or split as they see fit! You may travel, fight and negotiate as a single Party, then go your separate ways, only for some of you to join back together to tackle a dangerous situation.
Whenever any Character takes any Action, other Characters in the same Location may decide to join them. If the Character performing the Action agrees, all Characters form a Party and take this Action together - the detailed rules depend on the Action.
All Characters in a Party are always referred to as Party Members.
In a Party: Party Members can trade Food, Wealth, Items and Secrets at any time, as long as the Party is not currently involved in an Encounter.
Additionally, if you're in a Party with another Character, you may spend your or Magic instead of another party member! You may even cover the entire cost of the Action for all the other Party members.
There's only one exception: when performing the Character Action found on the Character Tray, the Active Character must always spend at least .
Hint: Traveling as a Party is safer, but when you're pressed for time, splitting might let you cover more ground, explore more and gain more rewards!
Important: Joining an Action is possible only before it begins. Once the Action begins, Characters can no longer form or disband a Party, unless specific cards or rules say otherwise.
Leaving or Disbanding a Party
Each Party Action needs to be taken and approved by all Party members. Any Character that does not want to take a specific action with the rest of the Party must leave the Party before the Action begins. You may not leave a Party in the middle of an Action. You may leave a Party anytime it is not resolving an Action.
The only exception is when a Character in a Party cannot pay the Action cost required for each Party member. In such a case, any character who doesn't pay is dropped out of the Party. The remaining Characters proceed with the Action.
Example: An entry in the Exploration Journal requires each Party member to pay 2 . Players A and B do so, while Player C cannot. Players A and B do not agree to cover the cost for Player C. Player C is dropped out of the Exploration immediately, while players A and B carry on together.
Party members may only leave during Combat and Diplomacy if they Escape (see: Escaping Combat and Diplomacy) from the Encounter or are removed due to the effect of the "You Are Dying" card.
Statuses and Save Sheet
As you Travel, complete Quests and solve Tasks, you will often be asked to mark or check a certain Status (or a numbered part of the Status) on the Save Sheet.
Statuses are story-triggers that represent your impact upon the world. They are not personal. If there's a status marked on a Save Sheet, all Characters have it. Smaller, personal changes (like being sick or having a unique magic aura) are handled with personal Secret cards.
Exploration Journal
Most Exploration Actions will direct you to the Exploration Journal - a thick book full of stories and interactions necessary to progress through the game. Before using it for the first time, be sure to read the "How to Use the Exploration Journal" chapter at the start of the Journal!
Encounters
There are four types of Encounters found in the game:
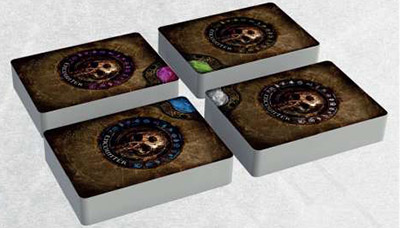
The GREEN deck is mostly used in the wild and contains natural threats such as wild animals or legendary beasts. Many of these Encounters grant Food when defeated.
The GRAY deck contains dangers related to the world of men, such as brigands, rogue knights, or people driven to insanity. Many of these Encounters grant Items when defeated.
The PURPLE deck contains mysterious and supernatural threats. You will have to discover its significance yourself.
The BLUE deck is a special, non-combat deck. It is used mostly when you visit an unfriendly Settlement and it contains dangerous situations, as well as personal and diplomatic challenges.
Cards in each of these decks are divided into four difficulty levels, making the game harder as it progresses.
Drawing an Encounter immediately launches you and your Party into Combat or Diplomacy, depending on the Encounter card (see: Combat and Diplomacy sections of this Rulebook).
Colorblind players can use the quarter-circles in the corners of the card backs to differentiate the decks: lower left - gray, lower right - green, upper right - purple, upper left - blue.
Guardians
These dangerous enemies will keep roaming the area even after you Escape (see: Escaping Combat). If you fail to defeat a Guardian Encounter, place its card on the Location where you have triggered it. At the start of each day, roll a Guardian die:
- Cardinal direction - move the Guardian accordingly.
- Nothing - the Guardian does not move.
- Discard - remove the Guardian from play, returning its card to the bottom of its Encounter deck.
If the Guardian should move to an unrevealed or unconnected Location, move it to the highest-numbered connected Location instead.
If the Guardian stays in the same location and there are any Characters present there, immediately start the Encounter (all Characters present in this Location have to fight together).
If the Guardian enters a Location with any Character, it immediately triggers the Encounter. Once the Guardian is defeated, discard its card.
If a Character or a Party enters a Location with a Guardian, immediately trigger the Encounter. If there's more than one Guardian there, players may choose which Encounter to trigger first.
If a Character or a Party enters a Location with a Guardian and an instant Action (denoted by the lightning icon), trigger the Guardian Encounter first and then resolve the rules on the Location card.
The Monsters of Avalon expansion contains one unique, dedicated model for each Guardian Encounter. In very rare situations, there might be more Encounters of a certain type on the board than available models. In such case, use cards to represent any excess Encounters.
Items and Equipment
Some of the Item cards available in Tainted Grail bear one of the following keywords:
- Weapon
- Armor
- Shield
- Companion
- Relic
You can have any number of Items, but you may never use more than one Item or Secret with a single keyword at the same time. At the Start of the Day, if you have several Items or Secrets with a certain keyword, decide which one you use and turn the others face down.
Do the same thing each time you get a new Item or Secret bearing the same keyword as another of your face up Items or Secrets. That way, you can only have one Weapon, one Shield, one Armor, one Companion and one Relic active at any given moment.
Some Items also contain a "C" symbol - these are the Craftable Items, the only ones that may be manufactured by player Characters. If a Crafting Action or an Encounter Reward asks you to "draw a Craftable Item", keep drawing cards from the Item deck until you find the first Item with the "C" sign. Take it and shuffle the rest of the Item deck. The same applies for drawing a "Companion Item", "Weapon Item" etc.
Characters may freely trade Items when they are in the same Location and they're not involved in an Action or Encounter.
Flipping Cards
Some Items ask you to flip their card in Combat or Diplomacy to indicate they have been used. When instructed to flip the card, simply turn it face-down. At the end of your Combat or Diplomacy, remember to flip the card back!
Secrets
Secrets are story related, numbered objects and powers that should never be a part of the standard Item deck. They may never be lost or sold, unless the rules specifically ask you to. They are also not affected by any rules that limit the number of items (such as the "You Are Dying" card).
If an effect asks you to discard Item cards, omit any Secrets, even if they have an Item-specific keyword.
Example: Disembodied Voracity eats two of your Items, and you have only one regular Item and one Secret card (that's also a Weapon). In that case, discard only the regular Item card.
Players are free to trade Secret cards between their Characters whenever they are in the same Location and not involved in an Action. The only exceptions are the cards with the "Personal" keyword. They may never be transferred to another Character!
Character Advancement
Experience points (Exp) points are the primary means of Char- acter Advancement. You can spend them at each End of the Day to raise your Attributes, gain additional Combat or Diplomacy cards, or gain Skills.
Advancing Combat or Diplomacy Decks
Pay 2 Exp. Take three cards from the top of your Advancement Pool. Pick one of them and add it to your deck. Shuffle the two remaining cards back into your Advacement Pool.
Your Combat and Diplomacy decks should always contain at least 15 cards each.
You can swap cards you own in and out of your deck at each End of the Day. The cards that are not in your deck at the moment DO NOT return to the Advancement Pool. Place them next to your Character Tray or in the Save compartment of your Character.
Advancing Attributes
The cost of raising Attributes depends on the total value of the Attribute pair (for more on Attribute pairs, see Attributes).
- 2 Exp: 1st point in a pair of opposing Attributes.
- 4 Exp: 2nd point in a pair of opposing Attributes.
- 6 Exp: 3rd point in a pair of opposing Attributes.
- 8 Exp: 4th point in a pair of opposing Attributes.
- 10 Exp: 5th and any further points in a pair of opposing Attributes.
Buying Skills
Whenever you earn a 3rd (or any subsequent) point in any single Attribute, attach a Skill card bearing this Attribute to the appropriate edge of your Character Tray.
Skill card are double-sided, containing two mutually exclusive Skills. Whenever you gain a Skill, you must choose one side and forfeit the other. All 72 skills in the game are unique, so be sure to discuss the Character advancements with other players to maximize your team's potential.
Remember that every Skill card has a point of its Attribute printed on its face. This means if you have two markers in the aggression slots of your Character Tray, and two aggression Skill cards, your total aggression is 4.
Death and Insanity
At Death's Door
If your falls to 0 at any point of the game, attach the "You Are Dying" card to your Character Tray, immediately Escape any current Encounter, and resolve all additional rules found on the "You are Dying" card.
From now on, every Action might turn out to be your last! The "You Are Dying" status gives your Character additional time to recover, but at some point, you will finally give up your ghost.
Death
In single-player mode, the game ends when your character dies. That's why the single-player "You Are Dying" card is more lenient, giving you more chances to recover.
In cooperative mode, your death does not end the game. Instead, follow the steps below:
If there's an unclaimed Character left in the box, you may claim this Character, perform standard Character Setup, then place their model in the lowest-numbered revealed Location.
All items that are left by the dead Character are placed on the Location where the Character has died. They may be picked up by any other players until the Location disappears.
All Secrets belonging to the dead Character are split between the other Characters - in any way the owner of the dead Character wishes, with one exception. Some rare Secrets with a "Personal" keyword (see: Secrets) disappear forever when their owner is killed!
If all other Characters are either in use or dead when a Character dies, the game ends in failure, even for Characters who are still alive. This gives players an additional incentive to save each other at all costs!
If your game ends in failure, you can use the Allmother's Mercy described below to salvage it.
Insanity
If your reaches the two top red-colored slots of the track, attach the "You Are Going Insane" card to your Character Tray and follow its instructions. This will open the way for destructive Nightmares and makes Exploration or Travel harder and riskier.
Allmother's Mercy
If you and your Party perish and do not wish to start again, you may decide that the intervention of the Allmother herself saved you.
In that case, mark status 'Saved by the Goddess' on your Save Sheet and go to Verse 500 in the Book of Secrets. This will restart you at the beginning of the Chapter with some pre-defined resources but will let you continue your game.
Important: Relying on higher powers to keep you alive is not an intended way to play! If you keep requesting the Allmother's Mercy, consider restarting the game using the Story Mode (see: Alternative Modes & Appendix).
Saving the game
We recommend that you save your game and store it only after completing a Chapter, when the Journal or Event card gives you such option.
Otherwise, you may forget various details of the Quest or interaction you were in the middle of, and "once-per-day" Actions might refresh more often than planned. However, in emergency situations, you may save the game at any moment. To save the game, simply follow the instructions below:
-
Each player saves the state of their Character:
-
Pick one Character Tray diagram on the Save Sheet. Sign it with your Character's name. Then, use a pencil to mark your Attributes, the numbers of your Resources, and the state of your Survival Tracks on the diagram.
-
If you have any Skills, write their unique numbers next to the Attribute they attach to.
-
Write down any additional info you deem important, such as the state of the Quest Dials or Secret card Dials (if you have any).
-
Remove all markers from your Character Tray and store them in the box.
-
Put all your Items and Secrets in one of the four Save compartments in the box.
-
Stack all your Diplomacy cards with all your Combat cards. Put the "Advancement Pool" separator cards on top of your Combat and Diplomacy Advancement Pools and stack them together. Put both stacks in your Save compartment.
-
-
The Chronicler or all players save the state of the world:
-
Use your Save Sheet to note the current Location of all Character models, Guardian models, Menhir models, and special Dials, as well as the current value of each Dial.
-
Remove all models, Dials and tokens, and place them in the box.
-
Stack all revealed Locations into a pile and place the "Re- vealed Locations" separator card on top of them. Then, add the unrevealed Locations to the pile, facing the other way. Place all Location cards in the oversized cards compartment of the box.
Important: make sure that any Locations you've removed from the game are stored separately, in the other, smaller compartment!
-
Store all four of your current Encounter decks in the box, behind the "Saved Encounters" separator card.
-
Store your Event deck and any Active Quests in the box, behind the "Saved Events" separator card.
-
Place any remaining cards (unused Secrets, Items, Encounters or Events) in the box.
To restore a saved game, reverse this process.
-
Adding or Removing players
Every time you set up a new game session, you may add or remove players and Characters at will (within the 1-4 Characters limit).
Make sure you distribute any Secret cards in possession of any removed Characters to Characters who remain in the game. Secrets should never be removed from the Campaign in progress unless you are specifically asked to do this.
Place any fresh Characters in the same location as one of the veteran Characters. They are the reinforcements you receive from Cuanacht and begin the game with their standard starting Resources and decks.
Discarding and removing cards
Most cards in Tainted Grail have no separate discard piles. Whenever you are asked to discard a Location, Random Event, Encounter, Secret or an Item card, put this card back at the bottom of its deck.
Combat and Diplomacy cards, discarded or destroyed during the Encounters, should be shuffled back into your Combat or Diplomacy deck as soon as the Encounter ends.
However, the Event deck does have its own discard pile - it helps you track time and ensures proper use of the deck.
Removing From The Game
Sometimes, instead of discarding a card, you will be asked to remove it from the game. In such a case, put the card back in the game box, outside of Save Compartments. It is no longer a part of this Campaign and should not return to any deck, unless you're specifically asked to bring it back.
General Game Tips
Explore around. Most valuable finds and many storylines are only available through Exploration. Sometimes you will need to explore the same place multiple times.
Try to always keep enough Food and resources for the next couple of days.
Inspect all Menhirs on revealed Locations, and prepare a plan to activate your next Menhir early. Any Encounter gone awry or a bad decision may set you back a day or two!
Resolving Encounters or exploring dangerous Locations together can really boost your odds. On the other hand, the more of you there are, the quicker you need to move! Parting ways may sometimes be necessary to cover more ground.
Remember that Characters in the same Location can assist each other, helping them pay any cost.
Continue Reading