
Hastings Cutoff
In the solo version of Sierra West you will play against an automated opponent called Hastings.
This name is inspired by Lansford Hastings, a man who lead a large group of pioneers to their demise by suggesting a deadly "shortcut". Throughout these rules "you" will refer to the lone human player, while "Hastings" or "it" will refer to the automated opponent.
Components
- 4x mode-specific solo reference cards
- 18x Hastings's plan cards
Setup
-
Set up the game with a mode for 2-players, choosing any color for Hastings's pieces. But mind the following exceptions:
Hastings does not need a player board, deck of hand cards, green-path pioneer, or mode-specific animal tile.
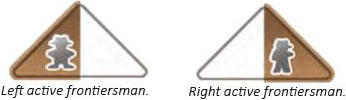
Hastings's frontiersman will be referred to as the right frontiersman.
Place its tan-path pioneer on the mountain base. For the purposes of these rules this figure will function exactly like a second frontiersman for Hastings. It will be referred to as the left frontiersman.
-
Place the mode-specific solo reference card nearby.
-
Shuffle the Hastings's plan deck and keep it face- down with room for a discard pile.
-
Draw one plan card from the deck and place it face- up. This will be Hastings's first active plan card.
-
You will be the starting player.
Recap: Hastings should have a wagon on the trailhead; a marker on each track of the homestead scoring board; a set of common animal tiles (but not the mode-specific one).
Two figures on the mountain base; and a supply area to keep gold nuggets, Pair of Boots tokens, claimed cards, built cabins, and any additional mode-specific pieces it may collect.
Note: Hastings does not collect basic resources (food/ wood/stone).
Changes in Game Play
Your Turn:
You will take your turns exactly as in a normal 2-player game, noting the following interactions:
If you claim a card from under one of Hastings's frontiersmen, it gains a Pair of Boots token.
Check if Hastings will perform a Trapper action.
Hastings's Trapper Action
Before you pass check if Hastings's face-up plan card has a Trapper icon highlighted. If so check which side left/ right. If there is an animal shown on your cards (on the correct side) that Hastings has face-down, flip it face up.
Note: Hastings does not use the mode-specific animal tile-just the common four: rabbit, beaver, fox, and bear.
Hastings's Turn
Draw a plan card, and place it face-up to the right of the current face-up plan card. The left side of the new card will mark 3 out of 4 actions on the right side of the first card. Note: The card on the left is the active plan card.
Hastings will perform each of the 3 actions marked by the card on the right, starting from the top of the card. If Hastings has or gains the mule during its turn, it will perform the 4th action that was not marked by the card on the right.
Important Note: The 4th action granted by the mule is always performed after the other 3 actions.
You may use your Trapper and Tracker off-turn actions on Hasting's turn, exactly the same way you would in a 2+ player game. The animals shown on the plan cards are available to trap as long as the cards are face-up.
The  icon means the mode-specific animal (deer
  , racoon
  , mormot
  , badger
  ).
).
When after all of the required active plan card actions are complete, discard the active plan card. Note: The remaining card will become Hastings's new active plan card for its next turn. By observing it you can usually predict what actions it will perform.
Hastings's Actions
The top of the active plan card will tell you which of Hastings's figures will be the active frontiersman this turn. Each frontiersman has a "side preference". This will decide which things it will choose as it takes actions.
For example, the left active frontiersman will always choose to build the leftmost of the four cabins on the cabin market. Likewise it will move to the leftmost face-up mountain card when it uses a move action.
-

Advance Hastings's wagon one space to the right (ignoring the printed cost on the wagon trail).
-

Advance Hastings's marker on the food homestead track. Hastings gains the mule.
Note: You may use your Tracker action to gain 1 food.
-

Advance Hastings's marker on the wood homestead track. Hastings gains 1 Pair of Boots tokens.
Note: You may use your Tracker action to gain 1 wood.
-

Advance Hastings's marker on the stone homestead track. Hastings gains 1 gold.
Note: You may use your Tracker action to gain 1 stone.\
-

Look at the top of the active plan card.
If it is
 , move the left frontiersman to the leftmost face-up mountain card.
If it is
 , move the right frontiersman to the rightmost face-up mountain card.
Note: If the given frontiersman is already on the qualifying face-up card, simply leave it where it is.
-

Look at the top of the active plan card. It will perform one of the following actions based on where it is. If the active frontiersman in on the mountain base, it will build a cabin from the market.
-
Left active Frontiersman: It takes the leftmost cabin from the cabin market (paying no cost) and adds it face-down to its supply.
Note: It will then discard the rightmost cabin, according to the usual rules.
-
Right active Frontiersman: It takes the rightmost cabin from the cabin market and adds it face-down to its supply.
Important Note: Hastings can build more than four cabins, and is allowed to have more than one of the same type. Each cabin in Hastings's supply scores 3 points-see Hastings's Scoring below.
if the active frontiersman is on a face-up card, it will claim the card from the mountain.
The frontiersman moves to the mountain base, then takes the card and adds it face-down to Hastings's supply. Note: The card is not added to the plan deck. Each card in Hastings's supply scores points in the usual way-see Hastings's Scoring below.
Note: If Hastings claiming a card causes your frontiersman to be moved to the mountain base, gain 1 Pair of Boots token in compensation, according to the usual rules.
-
-

When Hastings performs the fur trade action, it gains 1 gold per face-up animal tile it has (instead of the printed effects). For example, if Hastings has the bear, fox, and rabbit face-up, it gains 3 gold. (The bear tile does not give 1 additional gold).
-

Hastings gains 1 gold.
-

Hastings performs the mode-specific action, as shown on the solo reference card.
-
In Apple Hill, reset both apple supply tracks to zero. Then move Hastings's markers up on both apple homestead tracks, gaining both homestead bonuses (Fur Trade and 2 gold).
Note: Even if there were no apples at the start of this action, move Hastings's markers up on both apple homestead tracks.
-
In Boats & Banjos, roll the six sided die to see what fish Hastings collects. Then, remove the leftmost resource from all river cards along its trail, discarding stone and keeping gold.
Note: Hastings uses the Fish Market only at the end of the game-see Hastings's Scoring below.
-
In Gold Rush, Hastings takes the dynamite and lantern cards. Then it takes 1 mine cart and fills it with 2 gold from the general supply.
Note: If there are no mine carts available, Hastings just gains the 2 gold.
-
In Outlaws & Outposts, Hastings takes the Sheriff card. Then takes 2 outlaws from the top outpost card (or the mountain base if outpost "V" has already been removed) Then it gains 2 gold (because of the Sheriff card).
-
End of the Game
The game end is triggered when the sixth special card is added below the wagon trail. The round continues until each player has played an equal number of turns.
Hastings scores points same as a human would for:
- Cards claimed (according to the chart)
- Homestead tracks (multiplied by its wagon's position)
- Gold/Pair of Boots tokens (1 point each)
- Animal tiles (-3 per face-down animal tile)
- Apple Hill: apple homestead tracks (multiplied by its wagon's position)
- Gold Rush: gold on mine carts, and dynamite/lantern cards (3 points each)
- Outlaws & Outposts: captured outlaws (multiplied by its wagon's position), and the Sheriff card (3 points)
Hastings scores points unlike a human would for:
- Cabins built: 3 points each. Note: It does not lose points for having fewer than four cabins.
- Boats & Banjos: Hastings uses the Fish Market to get the most gold per fish possible, then counts this golds as 1 point each.
Calculate your score as usual. If your score is higher than Hastings's, you win!
Difficulity Levels
To add difficulty to the game you may give Hastings extra advantages. Add any combination of the following:
- Hastings starts with the mule.
- Hastings starts with the bear animal tile face-up.
- Hastings scores 5 points per cabin in its supply
- Hastings scores 2 points per gold in its supply.
- Hastings scores 2 points per Pair of Boots token in its supply.
- Hastings begins with its wagon on the first space of the wagon trail (or further for additional difficulty).
Continue Reading
