
In the solo game, you will be competing directly with one opponent: Lacerda.
To win the game, you must fulfill all the requirments of any one of the goals shown on the following page.
Play with the general game rules for 2 players with the following exceptions:
Setup
Choose a color for yourself and another for Lacerda's company. Setup both Player boards and the main board as for a 2-player game with two exceptions:
Lacerda does not get any Private Goal cards.
Instead of placing Lacerda's Bot on his Shelter, place it on the icon of the Mine in the Progress Area.
In addition, shuffle the solo deck and place it face down nearby.

Shuffle the First Colonists tiles and choose one at random. This is the starting Turn Order space for Lacerda.
Then, choose a Turn Order space for yourself (or use a random one), gaining the benefit as usual. The Shuttle starts in the red space on the same side as Lacerda.
Colonisation Phase
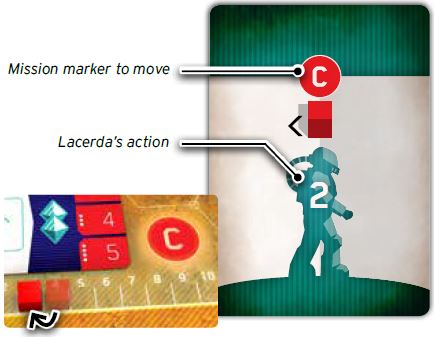
On Lacerda's turn, reveal the top card from the solo deck. He performs an action (detailed below) and then the card is discarded.
When the solo deck is empty, the next time Lacerda takes a turn, reshuffle the discarded cards to make a new deck and then reveal the top one as normal.
After you have shuffled the deck once (the 2nd time through the deck), in addition to Lacerda performing the action, also move the indicated Mission tracker cube down one space. He gets Crystals for contributing to the Mission as usual.
Shuttle Phase

Lacerda always chooses to travel with the Shuttle unless the most recent solo card depicts an X next to the cube in the top of the card, in which case, he does not travel.
When Lacerda travels, choose an available Turn Order space at random. Resolve the travel as normal, but with the following changes:
When traveling to Orbit, Lacerda skips both steps.

When traveling to the Colony, Lacerda places a Discovery tile but skips the retrieve Colonists step.
When placing a Discovery tile, Lacerda always places the leftmost Discovery tile from the Exploration space. It is placed 3 spaces away from his Rover as far away as possible from your Rover and in the direction of a Research tile.
When Lacerda travels to the Colony, after choosing a Turn Order space, he constructs a Building, following the same rules as Action 1 - Construction (see below).
 Lacerda places a Discovery tile. |
Extra Rules for Lacerda
Lacerda always has as many Colonists as he needs. At the end of the game, all spaces in his Living Quarters are considered occupied for scoring.
Lacerda does not take any Executive actions.
When the Colony levels up, at the end of the current player's turn, Lacerda builds a Shelter (a Complex if possible) and Welcomes a new Ship. He never spends his own Ships, just keeps them to score.
Lacerda never collects or stores resources. He never pays Resources to take any action.
Lacerda gains Crystals as normal (Constructing Shelters, taking a Shelter Blueprint, contributing to a Mission, etc).. The number of Crystals he can store is limited to spaces in his Depot.
When Lacerda builds a LSS building, if he has a Colonist on the Hire a Scientists action slot, he chooses the reward of retrieving that Colonist. If he does not have a Colonist there, he gains a Crystal instead.
Lacerda always uses Tech if it is available. You get an Oxygen as normal if he uses your Tech.
When he moves his Bot, move it to the next icon in the LSS sequence (Mine > Generator > Water Extractor > Greenhouse > Oxygen Condenser > back to Mine, etc)..
Turn Order Space Benefits
-

Lacerda takes whatever there is the most of. In case of a tie, he takes the leftmost one (Crystals first). Any Resources taken are placed into the general supply.
-

Lacerda takes a Tech tile as as described under learn new technology action.
-

Since Lacerda always has all the Colonists he needs, instead he moves his Rover (see below).
-

Move Lacerda's Bot using the rules shown above.
-

Lacerda takes a Blueprint as described under obtain blueprint action.
Colonist Placement Cost and Illegal Moves
Lacerda always has to place a Colonist on actions that depict a Red Colonist. He pays the additional cost with Crystals, he cannot pay with Colonists.
If he does not have enough Crystals to pay, or if the move he is doing is not allowed for some reason (no space in his Lab to learn more Techs, no Blueprints available, Scientist slot is already occupied, etc)., then instead of performing the action, he moves his Rover instead.
Moving Lacerda's Rover
Whenever Lacerda moves his Rover, it moves toward the closest tile (either Research or Discovery) that it can collect. Do not count any Discovery tiles that give Resources as they are useless to Lacerda.
If tied, check the Resolving Ambiguities rules. He uses any available Tech and spends additional Crystals if required. If he reaches a tile, it is resolved immediately.
Orbit Side - Lacerda's Actions

The number in the Astronaut image indicates the action that Lacerda will take.
-

Action 1. Obtain Blueprint: Take the Blueprint of a type that scores Lacerda's Scientists. If tied, take the leftmost card from the row with the most cards in it (bottom row if tied). Ensure that Lacerda's Blueprints are kept in a line with the oldest one taken on the left.
-

Action 2. Learn New Technology: Lacerda takes the cheapest one, leftmost if there are more than one. Place it in Lacerda's laboratory, top space first, taking benefit as normal (see above for Warehouse priority).
-

Action 3. research and development: Lacerda develops the most-developed Tech that can be developed once, then the least- developed Tech that can be developed once. If two Techs are tied, develop the bottom one.
-

Resupply: Lacerda only takes this action in the Shuttle Phase when his astronaut is placed on the Resupply space of the turn order track, or by placing a Tech tile on the appropriate space of his Lab.
-

Landing Pod: He never takes it.
Colony Side - Lacerda's Actions
-

Action 1. Construct A Building: Lacerda always builds the Building corresponding to the icon his Bot is on, but only if the LSS marker for that Building is below the Colony level marker.
If his Bot is on the icon for a Building whose marker is above the current Colony level, he builds the next Building in the sequence, unless that Building's marker is above the current Colony level, and so on. He always constructs a Mine if that is next in the sequence.
When constructing, Lacerda always tries to build the largest Complex possible using any available Tech. If there is more than one legal Building placement, you choose where to construct or check the Resolving Ambiguities rules.
After constructing, move his Bot to the next icon in the sequence after the Building that was just constructed.
-

Action 2. Upgrade a Building: Lacerda uses one of his Blueprints and upgrades a Building anywhere on the board. If the Upgrade Tech is in play, he uses it if able to upgrade as many Buildings as he can.
If there is more than one Blueprint to upgrade, he gives preference to the one that increases the OP provided by his Scientists and then from the oldest to the newest in the Blueprints he has.
-

Action 3. Hire a scientist or take +an earth contract: If there is at least one Contract on display, Lacerda takes a Contract (the one worth the most OP, leftmost on the display in case of a tie).
His Contracts are considered automatically completed. Otherwise, he takes the Scientist that will score the most potential OP based on the number of Blueprint cards owned by each player (whether used to upgrade a Building yet or not).
In case of a tie, take the one which scores for his taken Blueprints from left to right (oldest first). After taking the Scientist or Contract card, Lacerda shuffles the Contract deck and refills the display with the top card.
Colony Levels Up
Every time this happens, Lacerda places a Shelter according to the construction rules above, then he takes 1 Bot which is placed on his Player board. It is never placed on the main board, but it counts towards LSS Rewards or Missions.
Resolving Ambiguities
During the game, there will be times when Lacerda has more than one choice. In these cases, you must always choose the option which gives the most advantage to Lacerda, if any. If there isn't, you are free to choose.
Alternatively, if you don't want to make those choices and prefer to use a random system, just give a number to each of the choices and take a card from the solo deck until the one of those numbers shows up. Then shuffle the cards again into the deck.
Solo Goals
These are the goals of the game:
Lvl 1 - First Colonists
- Reach at least Colony level 3
- Complete at least 1 Contract
- Complete 1 Private Goal card
- Have a level 6 Tech tile
- Have more OP than Lacerda
Lvl 2 - Net Generation
- Reach at least Colony level 3
- Complete at least 2 Contracts, 1 of each type
- Complete 1 Private Goal card
- Have at least 2 Research tiles
- Have at least 4 Shelters built
- Beat Lacerda by 10 OP or more
Lvl 3 - Hunky Dory
- Reach at least Colony level 4
- Complete at least 2 Contracts, 1 of each type
- Complete 1 Private Goal card
- Have Colonists and/or Advanced Building markers on at least 3 Mines
- Have at least 5 Advanced Buildings
- Beat Lacerda by 20 OP or more
A Martian Potato Survival Scenario
- Reach at least Colony level 3
- Complete the size 4 Greenhouse Contract
- Complete the Delivery Contract with Plants and Minerals (#11)
- Take the Biochemist
- Have at least 3 Greenhouse advanced buildings
- Expand a Greenhouse Complex to at least size 5
- Have at least 5 Plants in storage
- Take at least 2 Research tiles
- Have the Greenhouse Tech at level 6
- Finish the game in Orbit
- Beat Lacerda by 30 OP or more
Continue Reading

