
A cooperative dice game by Wolfgang Warsch For 2-4 players, age 10 years and up Playing time: 30-60 min
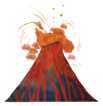
In Fuji, you take on the role of an adventurer who wants to explore the most famous volcano in Japan, Mount Fuji. But shortly before you reach your goal, the ground starts to shake. The volcano that has slept for over 200 years is erupting!
You must flee from the deadly lava streams as quickly as possible. Can everyone reach the safe village in time before one of your group members falls victim to the lava or their own fatigue? Only by working together and with some luck will you be able to win this race against time!
Components
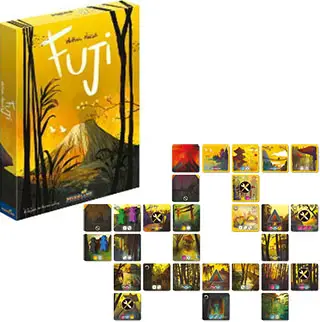
- 4 screens (not shown)
- 4 wooden meeples
- 4 destination markers
- 4 stamina trackers
- 1 volcano card
- 2 rubble cards
- 24 landscape cards
- 6 village cards
- 4 character cards
- 6 skill cards
- 15 equipment cards
- 7 scenario cards
- 24 dice
- 2 eruption tokens
- 7 equipment tokens
- 4 level cards
- 1 stamina board
- 16 injury tokens
- 3 power bars
- Instructions
Setup
Each player chooses one of the 4 character cards at random (or allow players to pick). Place it face up in front of you. Randomly choose (or pick) one of the 6 skill cards  and place it next to your character card. To learn more about how these skills can help you in the game.
Shuffle the equipment cards  face down. Now give each player the number of cards that is indicated on their skill card under . Also place these cards face up in front of you. Place the rest of the equip- ment cards on the table to serve as a draw pile.
Your player color is determined by your character card. In that color each of you receives:
- 5 or 6 dice (depending on the skill card, under
 )
) - 1 meeple
- 1 destination marker (place it on your character card)
- 1 stamina tracker
Choose one of the 7 scenario cards or randomly draw one and build the terrain according to the instructions shown. The steps of the setup ( 1 to 7 ) are shown in the example on the right.
Place the stamina board next to the terrain. Place your stamina trackers on the first space  of the stamina board.
Place the wound tiles next to the board. Choose a difficulty level. Take the corresponding level card and place it to the left of the stamina board, so that it fits into the designated slot.
Difficulty Levels:
The game can be played on 4 different difficulty levels: Level 1, 2, 3, and 4.
Groups with little playing experience should start at level 1. More experienced players can start at level 2.
Put the rest of the components (including your scenario card) back in the box. They are no longer needed.
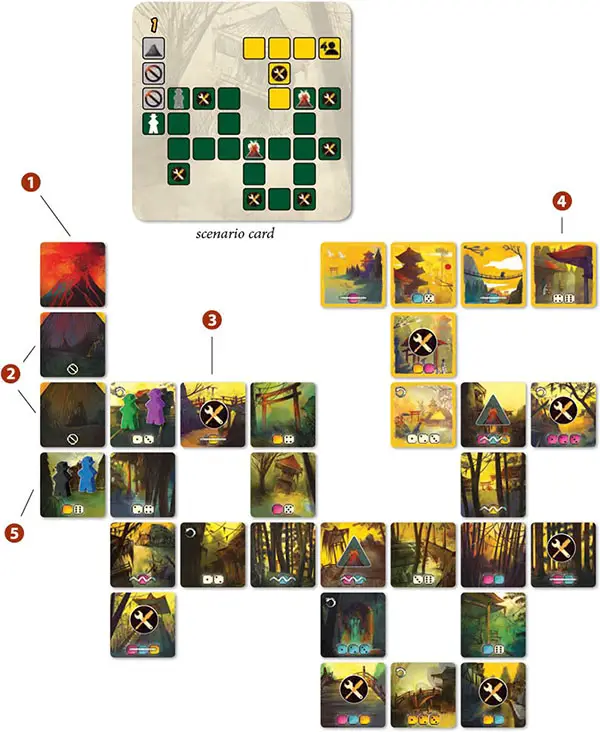
1 Place the volcano card on the table in the position indicated by the  on the scenario card. Make sure that there is enough space left on the table for the rest of the cards.
2 Place the 2 rubble cards in the positions with the @o.jpt -symbol
3 Shuffle the 24 landscape cards and place one of them face up at each position showing a  .
.
4 Shuffle the 6 village cards and place one face up in each position showing a  . You only place a village card at the position marked with the
  -symbol if you are playing with 4 players.
5 For 2 or 3 players: Place your meeples on the landscape card with the white  -symbol on the scenario card. For 4 Players: Place the meeples of two players on the landscape card with the white -symbol on the scenario card and the meeples of the other two players on the landscape card with the grey
  -symbol.

6 Place 1 equipment token on every terrain card with the -symbol.

7 Place the eruption tokens on the terrain cards that are marked with  on the scenario card. Place them so that the side with only one is visible.
 stamina board with the chosen level card |
Object of the Game
You will play cooperatively as a team against the game. To win, the meeples of all players must be standing on village cards.
If any one of your characters dies before reaching the safety of the village (either by being swallowed by lava or because they collapse due to exhaustion), you all immediately lose the game.
Moving to a Card
of the game is the way a player moves from card to card: All of you roll your dice simultaneously and compare your results with the results of the players sitting next to you. It is important to understand this principle from the beginning.
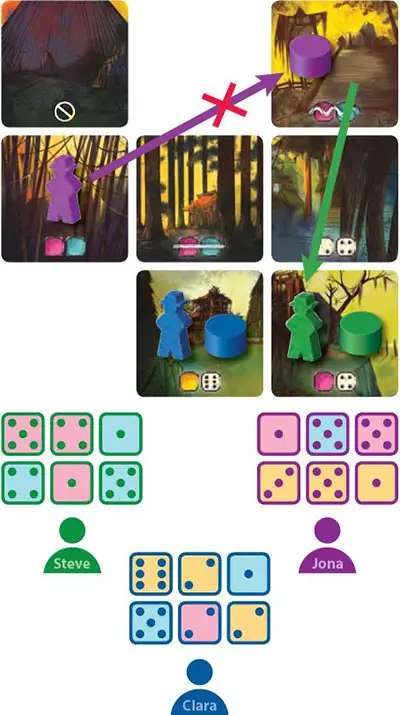
Take a look at the following scenario:
1 Clara wants to move onto the shown terrain card and has marked it with her destination marker.
2 All players have already rolled their dice. The results of their 6 dice are visible to all players.
3 At the bottom, the chosen terrain card shows its dice requirements. In this case only yellow dice  and dice showing a value of
  are valid for moving onto the card. All other dice are ignored.
4 Clara may only move onto the selected card if all her valid dice (highlighted in grey in the example below) together have a higher total than the valid dice of each of her neighbors.
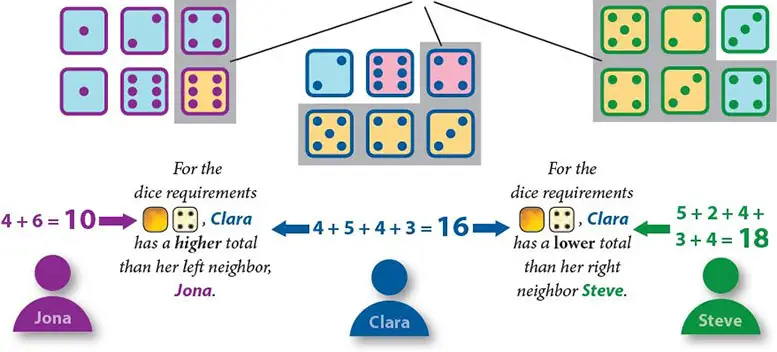
Clara has reached a total of 16. Her left neighbor, Jona, has a total of 10, which is a lower total than Clara's. Her right neighbor, Steve, has a total of 18. Since Steve has a higher total than herself, Clara cannot move this round and her meeple must remain where it is.
Now you understand the most important mechanism in this game! Let us return to the usual way of teaching a game, focusing on the phases of a game round.
The Phases of a Round
Each round consists of six phases (as shown on the back side of your screen):
-
Rolling The Dice
Roll your dice behind the screens.
-
Planning and Equipment Cards

Discuss which cards you want to move to. You may also use certain equipment cards.
-
Rerolls

Some or all of you may roll again.
-
Equipment Cards

You may use certain equipment cards.
-
Movement and Stamina

Move your meeples and lose stamina.
-
Eruption
Lava spreads across the landscape.
After eruption, the round is over, and the next round starts, beginning with rolling the dice. Each of these phases will be explained in more detail in the following sections.
Phase 1: Rolling the Dice
Set up your screens with enough room for you to roll your dice behind them. Now all of you roll all of your dice once behind your screens. Your result should only be visible to yourself.
Note: Nobody can check what you are doing behind your screen. You are not allowed to manipulate your result! Neither in this, nor in any other phase.
Phase 2: Planning and Equipment Cards

In this phase, decide which cards to move your meeples onto. You can discuss this  and exchange information. You also place your destination markers on different terrain cards
  . You can also use equipment cards that show Phase 2.
Movement Rules
Decide which card you want to move your meeple onto.
Restrictions:
- A meeple can be moved up to three spaces per round (including through occupied spaces).
- Each of these steps can be vertical or horizontal, but not diagonal.
- A meeple can stay on its current space.
- You may not move onto or over lava cards, rubble cards, or the volcano card.
Placing your destination marker
Place your destination marker on your chosen terrain card.
- Your meeple must be able to reach this card according to the movement rules (see above).
- Players seated next to each other cannot choose the same destination card.
- You may place your destination marker onto a card that a teammate's meeple is currently standing on.
- Even when you want to stay where you are, you still need to place your destination marker on that card.
- Placing your destination marker is not a final decision. You can move your destination marker as often as you like during planning. Your decision is binding only once you have begun the next phase (reroll). From then on, you can no longer move your destination marker.
Example: Movement and destination markers

Steve places his destination marker a distance of 2 cards from his meeple. Jona places his destination marker a distance of 3 cards from his meeple. Clara decides to stay on her current card. She places her destination marker on that card.
Note: You should use your destination markers during discussion as a visual aid for planning your movements.
That way everyone can easily see which card you wish to move onto, as well as its corresponding dice requirements.
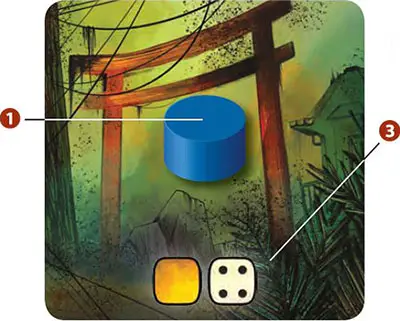
Dice Requirements
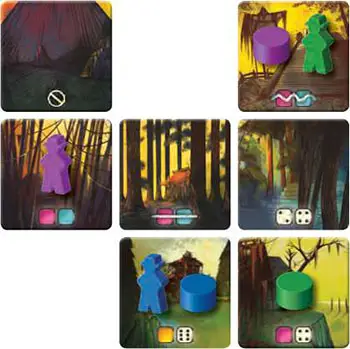
At the bottom of every terrain card you will find a dice requirement. It states which dice must be used as valid dice to move onto that card. Two criteria are differentiated here:

The value of the dice:
To be allowed to move your meeple onto a card, you must fulfill the fol- lowing movement condition:
Examples: Dice requirements
 All dice with a 1,2, or 3 (of any color).
 All yellow dice and all dice that display a 4.
 All pink and blue dice that display an odd value.
 All yellow dice that display an even value.
Note: Each of you is in a dilemma. On the one hand, you want to roll as high as possible for your dice requirements to have a higher chance to move. On the other hand, a high dice result might prevent your teammates from moving.
The total of the values of your valid dice (those that fulfill the dice requirement of your destination card) must be higher than the total of your neighbors' valid dice.
Communication Rules
While your dice results are of great relevance to your neighbors, they lie hidden behind your screens. To overcome this problem and exchange useful information you will need to talk to each other. However you must obey the following important limitation:
Statements that include numbers or the average in any way (as concrete statements or indirect descriptions) are not allowed!
This applies both to the number and to the value of your dice.
If you communicate cleverly with each other and have a bit of luck, each of you will still be able to fulfill your movement conditions.
Phase 3: Rerolls

After all of you have chosen your destination, the rerolling  begins.
Number of Rerolls
Each of you can reroll your dice 0 - 3 times. The number depends on how far you want to move your meeple in this round (i.e. the distance between your destination marker and your current position):
- If you want to stay on your current card, you get 2 rerolls .
- If you want to move 1 or 2 spaces, you get 1 reroll .
- If you want to move 3 spaces, you do not get a reroll.
- Some terrain cards have a -symbol in the upper left corner. If you placed your destination marker on such a terrain card, you receive 1 additional reroll .
Example: Number of rerolls
Clara may reroll twice. Steve may reroll once. Jona may not reroll.
How to Reroll
When you reroll, you choose a number of your dice and reroll them.
You repeat this process for every reroll you get.
- You can choose to reroll any number of dice (up to all your dice) for a reroll.
- You can choose freely which dice you want to reroll. It does not matter if you rerolled these dice previously or not.
- You reroll all your chosen dice at the same time.
- You are not required to perform all the rerolls you are entitled to. If you are happy with your result, you may stop rerolling at any time.
Limitations for the reroll
- All of you must perform your rerolls at the same time.
- You are not allowed to communicate
 during the rerolls (Phase 3).
Phase 4: Equipment Cards

After all of you have completed your rerolls, you now have the chance to use certain equipment cards
Equipment cards represent objects that provide their owners with useful skills, but only once.
-
You can use your equipment cards either in phase 2 (Planning and Equipment cards) or in phase 4 (Equipment cards). It is noted on each card in which phase (2 and/or 4) you can use it.
-
You can discuss the use of equipment cards. The cards lie face up in front of you so everyone can see them clearly. But remember, you may no longer move your destination marker nor reroll your dice!
Additionally, your dice are still hidden behind your screens, so the communication rules (page 6) are still valid.
-
Both in phase 2 and phase 4 you can use any number of cards in any order.
If you wish to use an equipment card, you announce it to your teammates first. Then you use it. Afterwards, you must discard the card to the discard pile. It is no longer available to you or your teammates.
Phase 5: Movement and Stamina

As soon as you no longer can or want to use your equipment cards, it is time to move your meeples. First, you remove your screens, making your final dice results visible to all. After that any player can begin and performs the following two steps:
- Compare results and move meeple
- Adjust stamina
For phase 5 the general rule applies: for the entire duration of your turn, you solely observe the dice requirement of your own destination card. All other cards are irrelevant.
You decide in which order you wish to take your turns. After the first of you has completed both steps in order, the others perform them as well. After all of you have performed these actions, the phase is over and the volcano erupts.
A. Compare Results And Move Meeple 
Perform the following steps:
You and your two neighbors select all the dice that fulfill the dice requirement of your destination card (these are the "valid dice" during your turn).
Add up the values of your valid dice to obtain your movement value.
Your two neighbors do the same with their valid dice to obtain their respective movement values.
If your own movement value is higher than those of both your neighbors, you may move. You move your meeple onto the card with your destina- tion marker or stay on your current card if you placed your destination marker there.
If your movement value is the same or lower than the value of at least one of your neighbors, you are not allowed to move. You must leave your meeple on its current card.
Finally, place your destination marker back onto your character card.
Example: Move meeple
Steve has a dice requirement of pink dice and dice with value 4.
He has a total value of 14 and has a higher movement value for his requirement than both of his neighbors Jona 6 and Clara 2. He may move his meeple to his chosen destination.
Clara has a dice requirement of yellow dice and dice with value 6. She has a total value of 10 and thus a higher movement value for her requirement than both of her neighbors Jona 9 and Steve 0. Since she wanted to stay on her current landscape card, she doesn't move her meeple.
Jona has a dice requirement of odd pink and blue dice. With a result of 11, his total movement value for his requirement is lower than the movement value of his neighbor Steve (12) and therefore he is not allowed to move his meeple.
Collecting Equipment
Every time your meeple ends up on a card with an equipment token you may draw a new equipment card.
Draw the topmost card from the deck and lay it face up in front of you. You can use it from the next round onward.
Afterwards, you remove the equipment token from the terrain card.
You can now no longer collect equipment cards from there.
Eruption Tokens
At the beginning of the game the eruption tokens  are placed on two of the terrain cards.
If you move your meeple onto or over a card with an eruption token, it triggers an additional volcano eruption. It works the same way as described in "Phase 6: eruption".
Afterwards, you remove the eruption token from the card. Each eruption token can only be triggered once per game.
Note: If one of you would activate an eruption marker, then they should be the last player to take their turn in phase 5.
B. Adjust Stamina 
All of you start the game with full stamina . Over the course of the game, though, you will lose stamina and receive injuries that limit your actions.
If you were allowed to move your meeple, you now calculate the difference between your own movement value and that of your neighbor whose movement value is the highest. Afterwards, refer to the level card to determine how much stamina you lose this round (depending on the calculated difference). For each lost point of stamina, you move your stamina tracker one space forward on the stamina board.
If you were not allowed to move, you do not calculate the difference. Instead, you lose the maximum amount of stamina , indicated in the topmost row on the level card  .
.
Should your stamina tracker ever reach the last space on the stamina track (the one with the @st.jpg-symbol) your character dies of exhaustion, ending the game for all of you.
Injury Tokens
Each time you move your stamina tracker onto or over a card with a  symbol you immediately receive an injury and must take an injury token.
Place this injury marker over one of the four injury spaces on your skill card. You must choose a space that has not yet been covered up. Each injury token limits your possible actions and keeps its effect until the end of the game.
Depending which injury space you cover up, the effects are the following:
-

Leg injury: You permanently lose one of your dice. You can decide which die you lose.
Remove it only once all players have adjusted their stamina, since your current dice results are still important for your teammates.
-

Broken arm: You can no longer use any equipment cards.
-

Amnesia: You can no longer use your skill ability.
-

Eye injury: You are no longer able to reroll dice during phase 3. Rerolls due to equipment cards and skill cards are not affected.
Note: The rear sides of the injury tokens show the 4 different effects of the markers. You can place the marker with the chosen symbol in front of you instead of placing it on your skill card.
Note: The Equipment manager can still pass equipment to other players with a broken arm.
Phase 6: Eruption
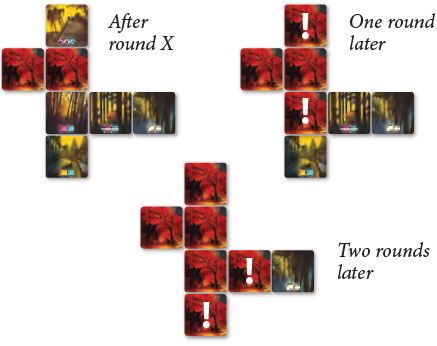
At the end of each round, there is a volcano eruption  . Flip all landscape cards that are either vertically or horizontally adjacent to a lava card onto their lava side. Now, these cards become lava cards themselves.
In round 1, the volcano card is the only lava card. Therefore, you only flip the first rubble card (next to the volcano). In later rounds, you might have to flip more than one card at once!
If there is ever a meeple standing on a card that must be flipped over, this player is swallowed by the lava and you all lose the game instantly.
Otherwise, the next round begins after the eruption. It follows the same course as the round before and starts with phase 1 rolling the dice.
Example: Spreading of the lava
End of the Game
The game either ends in a victory or a defeat for your group of adventurers.
You will suffer a defeat if one team member dies.
This can happen in two ways:
The card you are currently standing on must be flipped over to its lava side due to a volcano eruption
.Your stamina
marker is advanced onto the final space of the stamina board (the one with the  -symbol).
In both cases, the game ends instantly and the entire team suffers a defeat.
You achieve victory as soon as the last meeple is moved onto a village card so that all players' meeples are standing on village cards. In this case, the game also ends immediately. You needn't await the eruption at the end of the round.
Village Cards
Village cards function in the same way as any terrain card. If your meeple reaches a village card, it is not removed from the game. You still have to roll your dice and adjust your stamina each round. You can even continue to move your meeple.
It is often a good idea to move further into the village to clear the cards at the edge of the village and make room for your teammates.
If you arrived at the village, you may still leave it again in a later round. But you can only win the game if all meeples are standing on village cards at the same time.
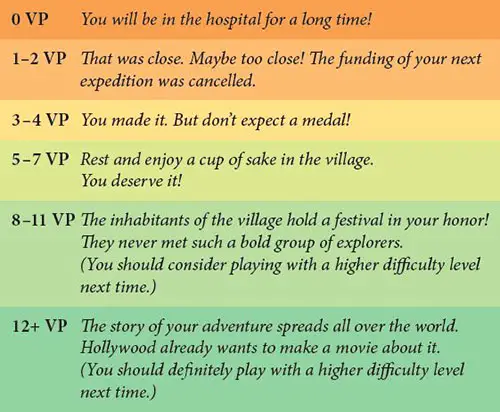
Final Score
If you want to know how well you performed, you can determine your point value after your win.
The victory points (VP) are determined like this:
- 4 VP per player
- -1 VP for each injury token
- +1 VP for each unused equipment card
The following overview shows how well your team did:
Variant
Extra thrill: If you want to increase the tension at the end of the game, you can use the following variant.
During setup, turn the eruption token closest to the village onto its back, so that it shows 2 symbols instead of 1.
If the token is activated, there are 2 additional eruptions instead of 1. This variant is playable at each difficulty level.
Continue Reading
