
Your flying machine is about to dock at a secret power platform that floats 7,000 feet above the ground. As you descend, you catch a glimpse of a rocket poking out of the fog. If your team can power this rocket, you'll be able to blast off with the hope of finally finding the Archean's long-lost civilization.
In order to succeed in your mission, you will have to explore the platform and wire together all the necessary components (capacitors, lightning rods, and the launch pad) into a true electrical circuit. Your problem?
The platform is in the middle of a fierce storm that threatens every move with lightning and high winds. Will your team be able to power up the rocket before you're electrocuted or blown off to the depths below?
Components
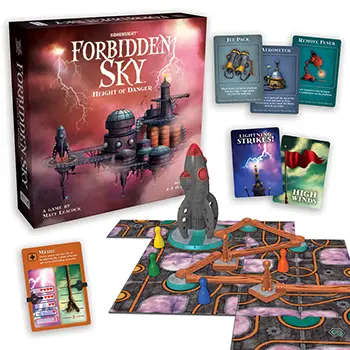
- 15 Storm cards
- 14 Equipment cards
- 6 Adventurer cards
- 2 Blueprint cards
- 36 Power Platform tiles
- 32 circuit components
- 13 meter clips
- 6 wooden pawns
- 1 Storm meter
- 1 Storm meter stand
- 1 starting grid
- 1 rocket
Setup
-
Examine the Tiles
Look at the 36 Power Platform tiles to get an idea of what they look like. Flip them all face down, mix them, and stack them to form the Power Platform draw pile.

-
Place the Starting Grid
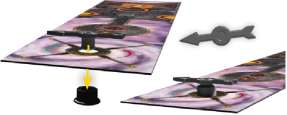
If this is your first time playing, assemble the starting grid by placing the wind compass arrow into the center hole on one end and snapping the bottom connector to secure it.
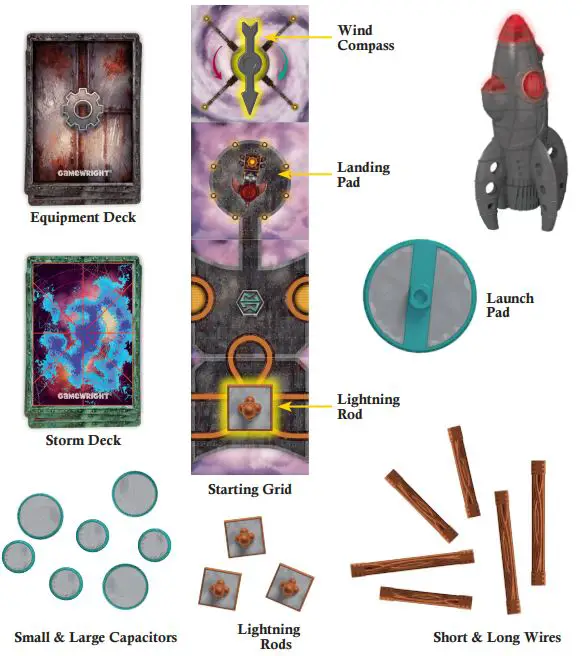
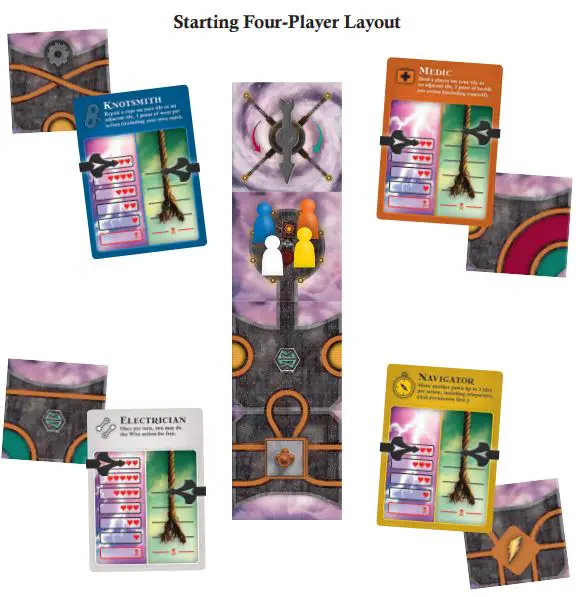
Place the starting grid in the center of the playing area. Put a lightning rod on the location indicated. Treat this grid as 4 separate tiles from now on. Point the wind compass towards the platform as shown below.
-
Place the Rocket and Circuit Components
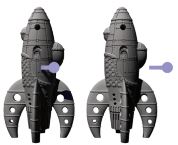
Place the rocket, launch pad, large and small capacitors, lightning rods, and wires near the starting grid. (If this is your first time playing, remove the tab from the side of the rocket).
-
Set Up the Storm
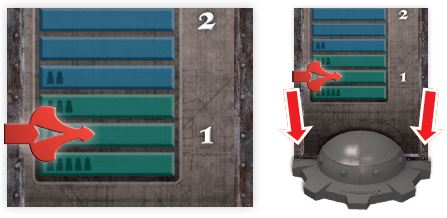
Place the red clip on the Storm meter according to the number of players and push the meter into its stand.
-
Divide The Cards
Separate the cards into the Storm deck (radar pattern back), Equipment deck (gear back), Blueprint cards, and Adventurer cards. Shuffle the Storm deck and place it face down near the Storm meter. Shuffle the Equipment deck and place it off to the side.
-
Choose your Difficulty Level
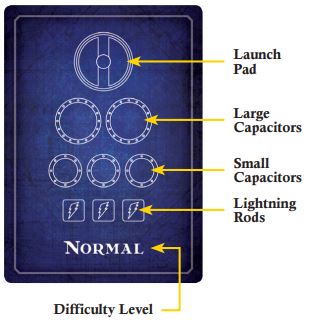
Select the Blueprint card corresponding to the difficulty you want to play and place it face up, near the circuit components. (For example, if this is your first time playing a cooperative game, select the Novice blueprint.
If you have played Forbidden Island or Forbidden Desert, or if you are an experienced cooperative game player, start on Normal). Put the other Blueprint cards back into the box.
Note that each Blueprint shows the outline of the launch pad (up top) along with a different number of large capacitors, small capacitors, and lightning rods, which you will have to wire into a circuit to win the game.
-
The Adventurers Appear
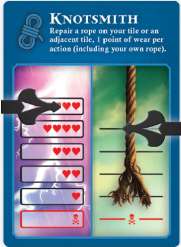
Shuffle the 6 Adventurer cards and randomly deal 1 to each player. Take a moment to read aloud the powers written on die front of your cards so your teammates know your strengths.
You'll find you may need to take advantage of each player's special abilities in order to win. Hie front of your card also shows your adventurer's health meter and rope meter.
Take 2 clips and place them over your card so that one covers the top mark of your health meter (left) and one covers the top mark of your rope meter (right). As you lose health or your rope takes wear, you'll move these clips down.
Take a pawn matching the color of your Adventurer card and place it on the "landing pad" tile on the starting grid. Put any extra Adventurer cards, pawns, and clips back into the box.
Hand a tile from the Power Platform draw pile to each player. Players should keep these tiles face up.
Game Play
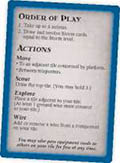
The person who last traveled by air goes fir st and play continues to die left. On every turn, do the following things in order:
Take up to 4 actions.
Draw and resolve Storm cards equal to the Storm Intensity.
The parts of each tarn are described below. Also note that every Adventurer card shows a quick reference guide on die back.
1. Take Up to 4 Actions
You may take up to 4 actions each turn (0, 1, 2, 3, or 4, in any order).
Your teammates are allowed (and encouraged!) to give you advice on the best actions to take during your turn. Select any combination of the following actions: Move, Scout, Explore, and Wire.
Move
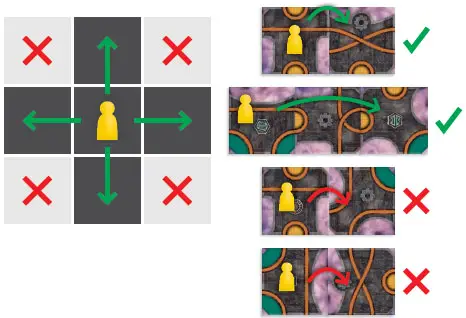
You may move your pawn to an adjacent tile for 1 action per move: either up, down, left, or right, but never diagonady. The surface of the platform must he connected across the two tiles for you to move in this way. (You cannot move across sky). You may also move between teleporter tiles for 1 action.
Scout
Draw die top tile from the Power Platform draw pile and place it face up in front of you. You may hold up to 3 tiles at any one time. If you already have 3 tiles, you may not perform the Scout action.

Explore
Place one of your tiles onto the Power Platform so that it is adjacent to the tile that your pawn is on. Rotate the tile any way you want as long as at least one printed copper wire on the new tile connects to a printed wire on your current tile. (You cannot connect a side with only sky to an adjacent tile). The tile must also square up with die adjacent tile.
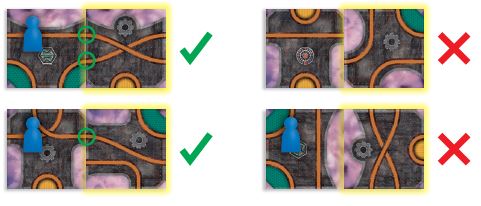

If die the you place has a lightning rod symbol on it, immediately place a lightning rod component on die tile.
If the the you place completes a circle filled with a color, immediately place the corresponding circuit component on top of it:
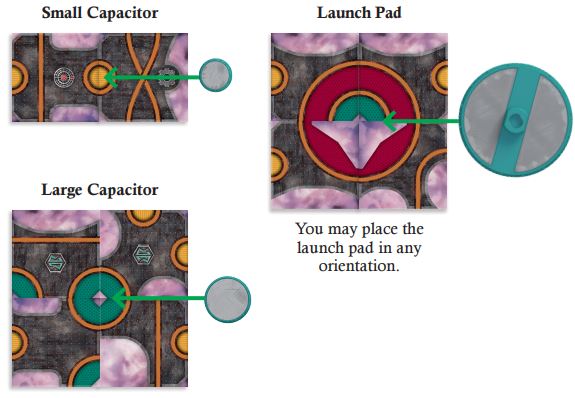
You may place a component even if you've already placed the number of components required in your chosen blueprint.
However, once every component of a given type is used, you can no longer place any more of that type of component. (For example, once you place all 3 large capacitors, you cannot place another large capacitor, even if you make another green circle).
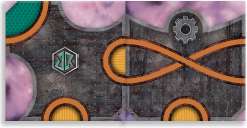
Note that all component part circles have printed copper wires as their borders.
You may place a tile so that a component part connects with a plain wire on another tile. This counts for connecting wires, but the component will remain incomplete.
Tile Symbols
Lightning Rod (6 Tiles)

Whenever you place a tile with the lightning rod symbol on the power platform, immediately add a lightning rod component.
These components are all shuck by lightning every time a Lightning Strikes! card is drawn from the Storm deck. Be careful how you place these-any players on tiles connected to a lightning rod by wires (both physical and printed) will be jolted when lightning strikes.
Teleporter (7 Tiles)

You may move between any two tiles containing teleporters for 1 action.
Gear (12 Tiles)

When you explore (place) a tile with a gear symbol on it, you've discovered a valuable piece of equipment that can help your team during the game. Immediately draw the top card from the Equipment deck, place it face up in front of you, and read its instructions. Keep die card until you decide to use it.
Important: Equipment cards may only be used by the player who possesses them. However, you may pass them for free at any time to another player on your tile. Most equipment can be played at any time (see specifics on each card), though as a general rule they cannot reverse the effects of Storm cards once they have been drawn. There is no hand limit for Equipment cards.
Wind Shelter (3 Tiles)

Wind Shelters provide protection from High Winds cards. Pawns on tiles with these symbols are not blown when a High Winds card is drawn. Note: If your pawn is blown to a tile with this symbol during the Storm phase, you are sheltered from future high winds as long as your pawn is on it.
Faraday Cage (4 Tiles)

Faraday Cages provide protection from electricity. Pawns on tiles with these symbols are not jolted (and therefore do not lose any health) when lightning strikes. Note: If your pawn is blown to a tile with this symbol during the Storm phase, you are protected from future lightning strikes as long as your pawn is on it.
Wire
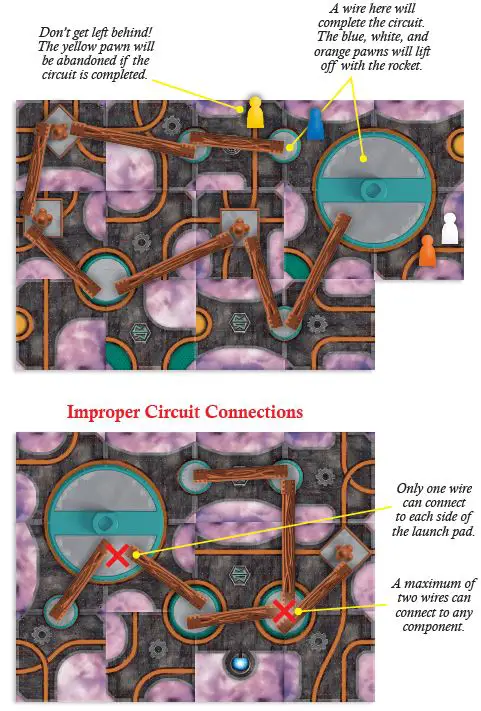
Add a physical wire to a circuit component attached to your tile so that it connects to another circuit component. You may use either a short or long wire, as long as it reaches the other component. If the wire cannot span both components without falling off, you may not add it there.
You may also peform this action to remove a wire from a circuit component on your tile. (When you do this, return the wire to the supply).
Important:
Each component may have up to two wires connecting to it.
To complete the circuit, the launch pad must have one wire touching each metal side.
Make sure that each wire makes a clean connection to the metal of the component.
You do not have to wire a component if it's beyond the required minimum to complete your blueprint.
Creating The Circuit
In order to take off in the rocket, you must wire die launch pad into a circuit, using the components listed on your blueprint card.
The blueprint shows the minimum number of each kind of component that must be used. (You may use more). The components must be in a true series circuit, that is, they must be connected in a circle starting with a wire connected to one side of the launch pad and ending with a wire connected to the opposite side of the launch pad.
Watch out! As soon as the very last wire is placed, the rocket will launch! Be sure each pawn is on one of the four tiles holding the launch pad before you place the last wire, or the rocket will leave adventurers behind-and everyone will lose the game!
Share Equipment
In addition to the above actions, players on the same tile may pass equipment cards at any time during the game for free. Unless your adventurer says otherwise, you may not pass tiles or share ropes or health.
2. Draw Storm Cards
After taking actions, you must now take on the role of the lightning storm!
Draw cards from the Storm draw pile equal to the Storm Intensity level on the Storm meter. Reveal and resolve the cards one at a time and discard them face up into the discard pile.
Note: You may look through the discard pile at any time during the game.
Lightning Strikes
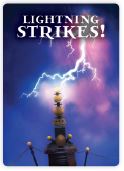
There are 6 Lightning Strikes! cards in the Storm deck. When you draw one of these cards, every lightning rod in play is struck by lightning and every player on a lightning rod tile receives a "jolt" of electricity and loses 1 health.
In addition, the electricity from the lightning rod follows the wires (both the printed wires on the board and the wires added by the players) that can trace a path to them, and everyone on a tile that is connected in this way gets jolted and loses 1 health.
(Lower the clip on the health meter on your Adventurer card to the next lowest tick mark). If a clip reaches the  symbol, that character has received too many jolts and everyone loses the game.
Note: A player only ever loses 1 health per Lightning Strikes! card.
Example:
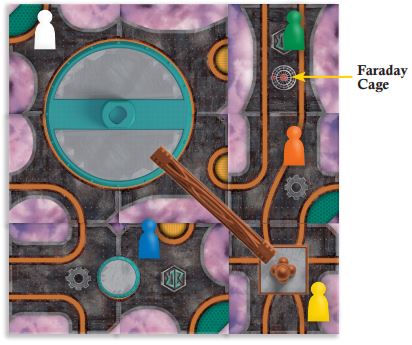
When a Lightning Strikes! card is drawn, the Navigator (yellow pawn) gets jolted and loses 1 health because she's on a tile with a lightning rod. The Medic (orange) also loses 1 health because she's on a tile that's connected to a lightning rod by a printed copper wire.
The Surveyor (green) does not lose health because he's on a tile with a Faraday Cage. The Electrician (white) loses 1 health because she's on a launch pad tile and the launch pad is connected to the lightning rod. The Knotsmith (blue) does not lose health because he's on a tile that is not connected to the lightning rod by either type of wire. (It's okay that a wire passes over his tile).
Winds Change
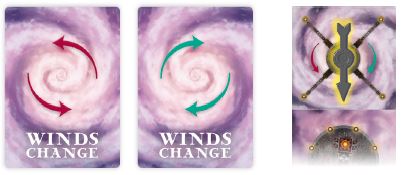
These 2 cards change die direction of the wind. Rotate the arrow on the wind compass 90° either clockwise or counter-clockwise as shown on the card.
High Winds

These 4 cards "blow" the adventurers one tile in the direction of the arrow on the wind compass. If a pawn cannot move because there is no tile in that direction, then that adventurer's rope gets worn by 1 point instead. (Lower the rope clip on the adventurer card to the next lowest tick mark).
If there's a tile in that direction but it is only connected by clouds (the platform surface is not attached) the pawn does not move and that adventurer's rope loses 1 point instead. If a clip reaches the  symbol, the rope has snapped, that character falls 7,000 feet, and everyone loses the game.
Example:
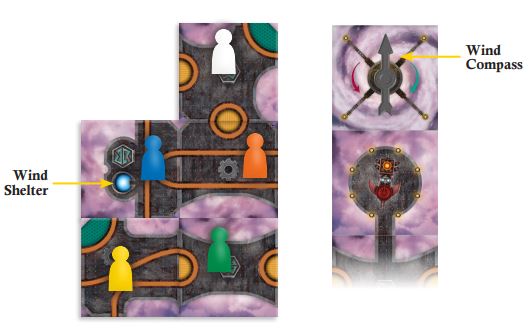
When a High Winds card is drawn, players look at the direction of the wind compass (up in this case). The Electrician (white pawn) loses 1 point of rope because there is no tile above her for her to move to. The Medic (orange) moves up 1 tile (to the tile with the white pawn- no rope loss). The Surveyor (green) does not move and loses 1 point of rope because he cannot cross the cloud gap between tiles.
The Navigator (yellow) also does not move and loses 1 point of rope because the tile above her is not connected by platform. The Knotsmith (blue) does not lose rope because he's on a tile with a Wind Shelter.
Storm Intensifies
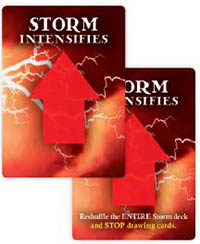
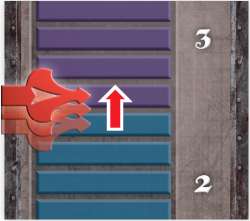
There are 3 Storm Intensifies cards in the Storm deck. When you draw a Storm Intensifies card, move the clip on the Storm meter up 1 tick mark.
The numbers on the Storm meter show the Storm Intensity. This is how many cards you'll draw, starting on the next player's turn. If the clip on the Storm meter ever reaches the  the storm has become so intense that the players are all blown off the platform and lose the game!
One of the Storm Intensifies cards instructs you to also reshuffle all the cards in the Storm deck and to stop drawing cards. Shuffle cards in the draw pile and discard pile together, stack them to form a new Storm draw pile, and stop drawing Storm cards for that turn.
End of the Game
Get to the Launch Pad! Once you have wired the required components into a circuit (except one final wire that you'll use to take off), first place the rocket onto the launch pad.
Then everyone should head to one of the four tiles containing the launch pad. (You all don't have to be on the same tile).
As a final step, one player must add the last wire (either on their turn or by Remote Fuser) to complete the circuit and launch the rocket for the win!
Losing The Game
There are 4 possible ways to lose:
- Electrocuted: If the clip on any player's health meter reaches
 .
. - Fall: If die clip on any player's rope meter reaches
 .
. - Swept Away: If die clip on die Storm meter reaches
 .
. - Abandoned: If die rocket takes off before everyone is on a launch pad tile.
Difficulty
Once you've won on the Novice game, try the Normal, Elite, or Legendary difficulty settings. Each one presents a more challenging circuit to build. Also, try playing with different mixes of adventurers.
Continue Reading
