Components
- 5-Piece Interlocking Board
- 1 Life Support Dial
- 1 Plastic Connector
- 40 Medic Dice (8 in each of the 5 player colors)
- 2 Emergency Dice
- 20 Large Patient Cards
- 29 Emergency Cards:
- 4 Double-Sided Power Meters
- 20 Cleared Line Tiles
- 10 Power Cubes
- 4 Lock-Down Tiles
- 1 Player Aid
- Rulebook
Object of the Game
To win the game, you and your team will need to treat all the patients before time runs out.
Setup
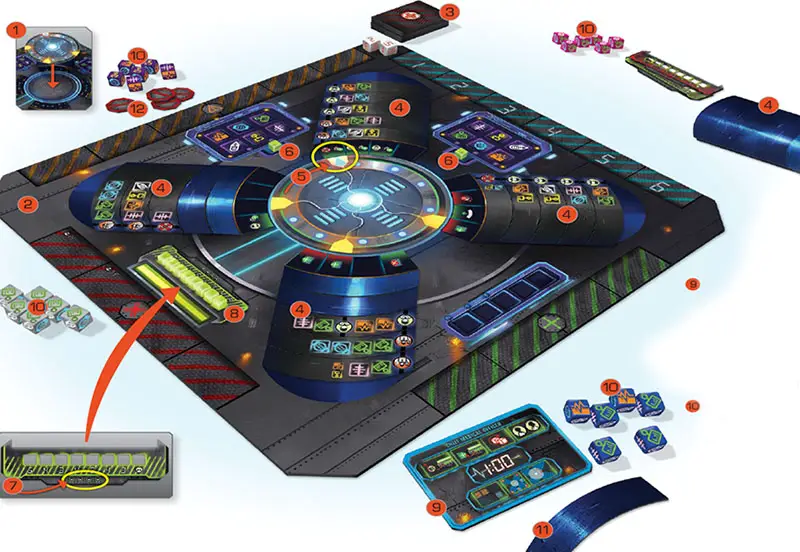
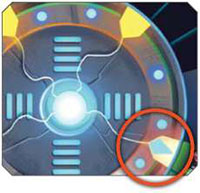
1 Before your first game, attach the Life Support Dial to the center board piece as shown in the illustration. Once attached, you will never need to separate these pieces again.
2 Build the board by attaching the four Corner Board Pieces around the Life Support Dial in the center of the table.
3 Shuffle the Emergency cards and place them face-down on the table near the area of the board numbered 1 to 6 (near the 1). Place the Emergency Dice just to the left of number 1.
4 Shuffle the Patient Cards and deal a number of them into a face-down stack based on the number of players and the difficulty level you have chosen:
| Players | Training | Standard | Expert |
|---|---|---|---|
| 1-2 | 6 | 7 | 8 |
| 3 | 9 | 10 | 11 |
| 4 | 11 | 12 | 14 |
| 5 | 13 | 15 | 17 |
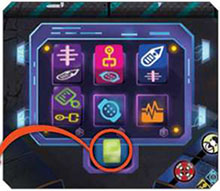
Place the remaining Patient Cards back in the box, as they will not be needed in the game. From the stack of Patient Cards that you created, flip up the top four and place them face-up on the indicated spaces on the board. Place the remaining tiles off to the side.
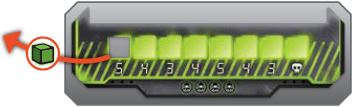
5 Turn the Life Support Dial so that the connection with the diamond is lined up with the first space on any one of the Patient Cards.
6 Place one Power Cube on each of the Recharging spaces on the board.
7 Take the Power Meter matching the number of players in the game, and choose to play the standard (green) side or the expert (red) side. This will impact the number of Emergencies that come out during the game. Place this tile, with the chosen side up, on the indicated space on the board. All unused Power Meters can be returned to the box.
8 Fill the Power Meter with the remaining eight Power Cubes, one per space on the meter.
9 Choose a player to be the Chief Medical Officer, and give them the player aid tile. This is usually the player who is most familiar with the game. Since you're reading these rules that will probably be you. Congratulations.
The Chief Medical Officer is responsible for the overall flow of the game, which will be explained in detail in the Gameplay section of these rules. Choose another player to be the Intern. This player will be responsible for sorting and redistributing the dice to the players as the Chief Medical Officer resolves things.
10 Each player chooses a color of dice, and takes six of them into his play area. One of the remaining dice is placed off to the side, and one is placed back in the box. NOTE: With 2 players, each player takes seven of their dice instead of six, and places the remaining die off to the side.
Note: In a solitaire game, choose 2 colors and set up the game identical to the 2 player setup.
11 Place the Cleared Tiles on the table, within reach of the Chief Medical Officer.
12 Place the Lock-Down Tiles next to the board. These will only be used if referenced on a card. See page 14 for details.
Game Play
Each round of FLATLINE is broken into several phases, as noted on the Chief Medical Officer's player aid.
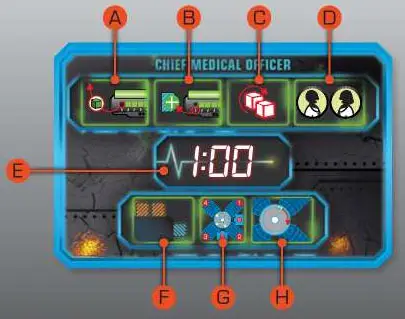
The Chief Medical Officer will lead the team each round through the following steps:
-
Pre-countdown:
ALose Power.BAdd Emergencies.CRoll the Emergency Dice.DPlanning. -
ECountdown -
Resolution:
FResolve cards.GResolve Patient Cards and Recharging Stations.HTurn the Life Support Dial.
Note: A solitaire game is played as if two players are playing, it's just that one player is controlling both sets of dice. All rules remain the same as the two player game.
I. Pre-countdown
A. Lose Power
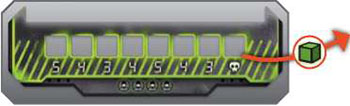
Take the left-most Power Cube from the Power Meter and remove it from the board.
Note: This tracker will show you how many cards to draw in the next phase. Also, if you ever need to remove the last Power Cube from the Power Meter, you lose!
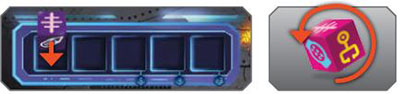
B. Add Emergencies
Below the Power Cube that was just removed is a number. This indicates the number of Emergency Cards that must be revealed.
Flip up the indicated number of cards from the face-down deck, and add them face-up next to the board following these rules:
-
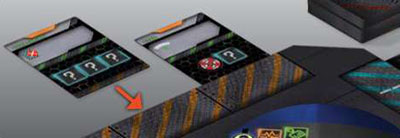
If the revealed card has an ORANGE tab at the top, add it to the Stat area of the board. These are more dire emergencies that must be dealt with this round.
Note: Unresolved cards from the Stat area can cause you to lose the game!
-
If the revealed card has a BLUE tab at the top, add it to the Emergency area of the board (numbered 1-6), following these rules:
Always add the card next to the lowest number with an open space. If the first 6 spaces are full, then begin a 2nd row of cards above the 1st row.
If there are open spaces in both the first row and second row, always add cards to the first row. New cards will only be added to the second row once the first row is full.
If both the first and second rows are full (12 cards), then any revealed cards (whether they have an orange or blue tab) are placed back in the box and discarded out of the game permanently.
Note: If at any time you need to draw Emergency Cards and there aren't enough in the draw pile, simply shuffle the discard pile and create a new draw deck.
C. Roll the Emergency Dice
Roll the two Emergency Dice, and place them in the Emergency area of the board, on the matching numbers. Any Emergency Cards in these slots are now activated. Resolve the cards from left to right (from 1-6).
If there are two cards in a slot (row one and row two), then activate the card in row one first, followed by the card in row two.
Note: Rolling doubles only activates the cards in that space one time.
D. Planning
Players now discuss a strategy for the round, determining priorities and a plan of action. This phase has an unlimited amount of time, but if you like to feel pressured you could start the timer and limit discussion to one minute.
II. E. Countdown
This phase is the main part of the game. The Countdown phase ends at the end of one minute, or when all players have placed their dice, whichever comes first.
During this phase you will be trying to save your patients, clear Emergency Cards, and/or utilize the Recharge Stations to earn extra rounds. You will do all of these by placing your dice on various parts of the board.
-
Saving Patients
The Patient Cards show specific combinations of icons needed in order to treat the patient. The player's dice show these same icons, and players will place their dice on the matching spaces in order to treat the patients.
When all players are ready, start the timer. Players then roll all their dice one time in front of them on the table.
Players must now work together to combine and place their dice based on the requirements shown on the Patient Cards, Emergency Cards, and Recharging Stations.
Each Patient Card shows between three and five separate 'lines' of needed icons. Each line must be completed separately and completely by placing the matching dice on them. These lines can be worked on in any order that the players choose.
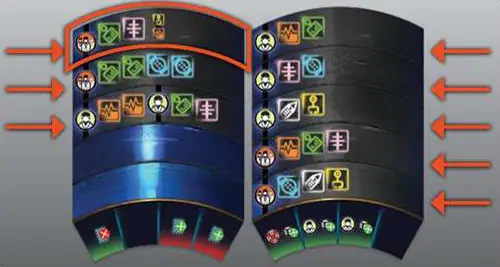
To treat a line on a Patient Card, simply place the needed dice directly onto the icons on the card, following these rules:
 one player must treat the entire line by themselves.
 exactly two players must treat the line together.
 more than one player must work together to treat this line.
 ALL players must place the needed die.
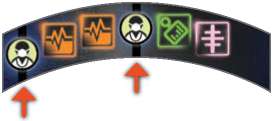
If a line is split, then one player must treat the area on the left, and a different player must treat the area on the right.
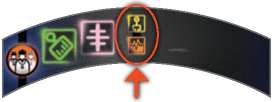
If a die space is split, then either die could be placed here.
Note: Once a die is placed on a Patient Card, Card, or Recharging Station space, it cannot be picked up during the round. Make sure you communicate with your teammates and decide together where to place dice before putting them on spaces.
-
Clearing Emergency Cards
Emergency Cards represent other emergencies that are being brought in to your medical bay. While you do not need to clear these Emergency Cards in order to win, the game will be much harder to win if you ignore them.
Emergency cards can be cleared in the same way as treating Patient Cards. Simply place the needed dice onto the matching icons on the cards.
Note: Unless otherwise noted on the Emergency card, they can always be cleared by any combination of players, including one player placing all the necessary dice by themselves.
-
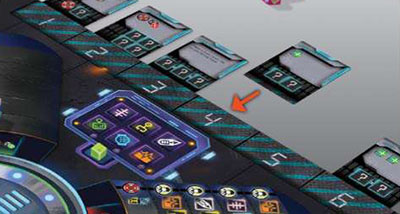
Activating Recharging Stations
There are two recharging stations on the board. By placing dice here, players can earn additional rounds of play, giving them more time to treat their patients.
Like the Emergency cards, dice can be placed here by any combination of players, including one player placing all the necessary dice by themselves.
-
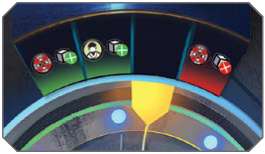
Re-Rolling
There is a re-roll track on the board. For a player to re-roll their dice, any player (including themselves) must sacrifice one of their dice by placing it on this track.
The chosen player may then re-roll as many of their unplaced dice as they would like. The die is always placed in the left-most open space on the track.
Example: Carter needs a yellow this round and doesn't have one. Kallen takes one of his dice and places it on the re-roll track, which allows Carter to re-roll as many of his dice as he would like.
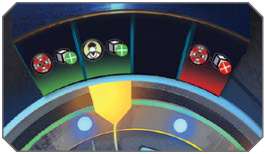
There are a limited number of spaces on the re-roll track each round. With 1, 2, or 3 players, re-rolls can be activated up to five times each round. With 4 players, four times, and with 5 players, three times.
Example: This is a five player game, and Carrie just placed a die on the 3rd space of the re-roll track. No more dice can be placed on the re-roll track for the remainder of the round.
These dice are returned to the players at the end of the round along with all of the other dice.
III. Resolution
F. Resolve Cards
This phase begins as soon as the timer has run out. During this phase, players will resolve the cards in all areas of the board.
Beginning with cards in the Stat area, and then moving to the Emergency Area, resolve the cards.
-
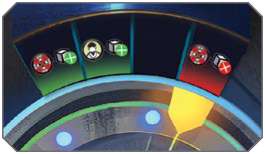
Stat Area
If a card was NOT cleared (does not have the necessary dice on it), then flip it face-down and place it next to the red edge of the board, in the left-most open slot. Too many cards added to this area will result in a loss for the players.
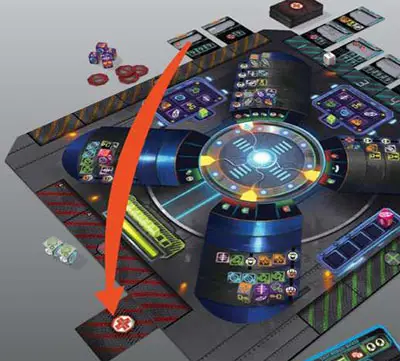
If a card was cleared, then place it face-up along the green edge of the board, sliding it partially under the board so that the dice icons are no longer visible.
This becomes a Triage Card, which is a one-time use benefit that the players can use at any time.
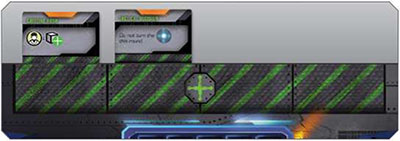
Note: These Triage Cards can be used at any time, but must be in the + area to be activated. They cannot be activated immediately upon clearing them unless there is an open slot in the + area (max: 4 cards).
When used, place the card in the discard pile. You may discard cards from the + at any time to make room for new cards.
Note: Cards can be activated to be used in the current round, or during resolution can be activated for use in the next round, unless indicated otherwise on the card itself.
As in the example above, where players activated a card during the resolution of the cards in order to give themselves an extra die for the next round.
-
Emergency Area
Simply discard any cards that you cleared here. After clearing cards, if there is a card in the 2nd row of a slot, and the card in the 1st row of that slot is cleared, slide the card down into the open slot.
G. Resolve Patient Cards
Beginning with the Patient Card with the diamond on the Life Support connection, and continuing clockwise around the board, resolve each Patient Card and then each Recharging Station.
In order to clear a line on a Patient Card, the line must be treated completely during the round.
If a line does not have all of the required dice to complete it, then simply return those dice to the players. For each correctly completed line on a Patient Card, place a Cleared Tile over the line.
If this was the last line on the Patient Card requiring dice, then the patient has been successfully treated.
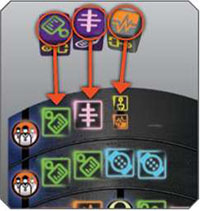
When a patient has been successfully treated (all lines on the Patient Card have been cleared), then the trigger space at the bottom of the Patient Card that is currently connected to the Life Support system is activated.
Immediately resolve this effect.
If the space is blank, do nothing.
If the space has a green light, then this is a benefit to the players.
If the space has a red light, the patient is still treated, but some other emergency has occurred.
After resolving the effect of the trigger, discard the Patient Card out of the game and replace it with the top patient card in your deck (if there are any left).

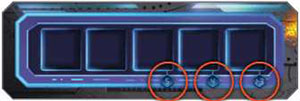
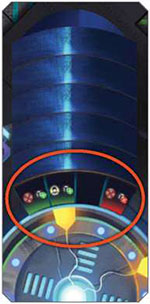
G. Resolve Recharging Stations
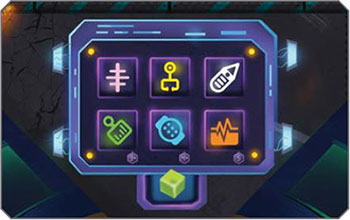
Recharging Stations are a way to recharge the Power Meter and earn an extra round. Depending on the number of players, a certain number of spaces on the Recharging Station must be filled with dice.
If these spaces were filled during the round, then move one of the Power Cubes from the Recharging Station to the right-most open space on the Power Meter.
Example: Since this is a three player game, the top row and the left-most space in the bottom row must be filled.
The middle space on the bottom is for four and five player games, and the rightmost space is only used in five player games.
Note: The same as with Emergency and Stat Cards, any number of players can place dice on the Recharging Stations, including one player doing it by themselves.
Note: When resolving cards, Recharging Stations, or Patient Cards, the Chief Medical Officer will remove the dice and give them to the Intern. The Intern will sort the dice and return them to the appropriate players.
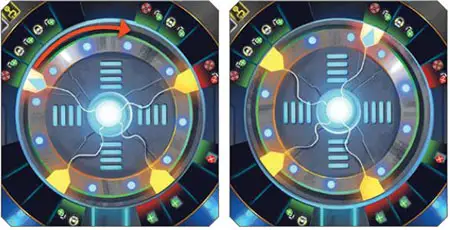
H. Turn the Life Support Dial
After resolving everything on the board and returning all dice to the players, turn the Life Support Dial one time clockwise. The easiest way to do this is to find the connection with the diamond and turn it so that it is now connected to the first space on the next patient in clockwise order.
After turning the dial the round ends. If there are any Lock-Down Tiles on the board, remove them. Make sure everyone has the correct number of dice for the next round, and then you are ready to begin the next round.
Note: All game effects from cards and other triggers last for one round only, and their effects end as soon as the Life Support Dial is turned.
End of the Game
The players win if they successfully treat all the required Patient Cards before time runs out.
The players lose if either of the following occurs:
-
The last Power Cube is removed from the Power Meter for any reason.
-
There are ever 3 face-down cards in the X area of the board (4 face-down in a 1 or 2 player game).
Continue Reading
