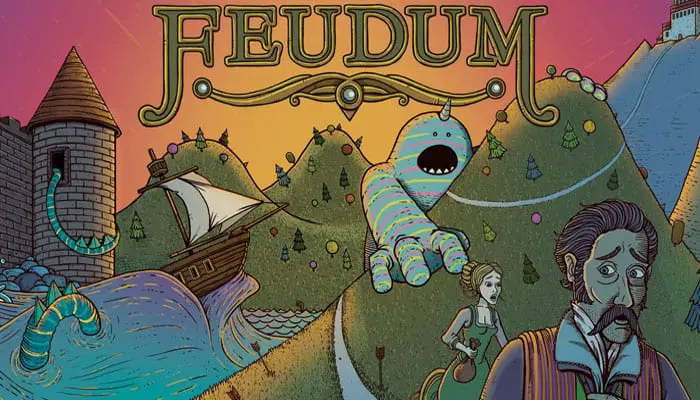
Blimey! You and your blokes have been unfairly banished and stripped of everything but a few shillings and table scraps. Undaunted, you journey to a strange land to reclaim your honor.
Under the steely gaze of her majesty, Queen Anne, you must chart your path to fame and glory. Will you farm the earth, fight as knights or finagle your own feudums?
Whatever your fate, one thing is clear: Medieval life is not a bowl of cherry tarts. Fertile land is scarce, food is dwindling, and fanciful creatures fancy you for dinner!
Luckily, not everything feudal is (ahem)... futile. If you seize control of the local guilds, you could become most venerated in the kingdom.
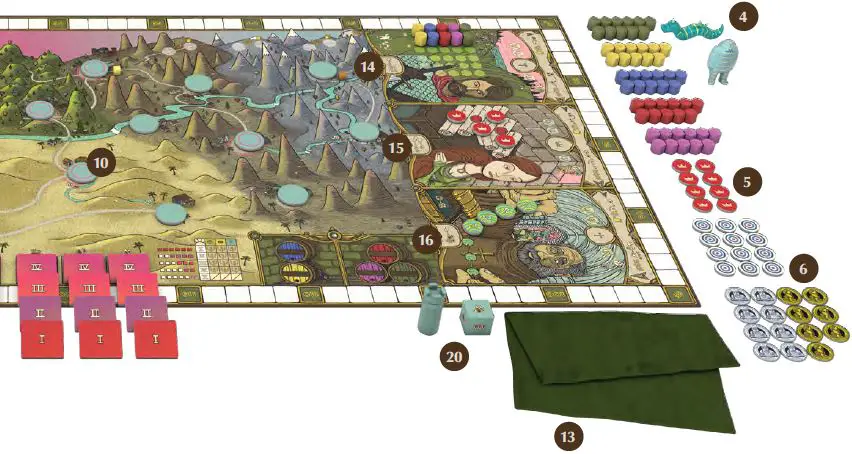
Components
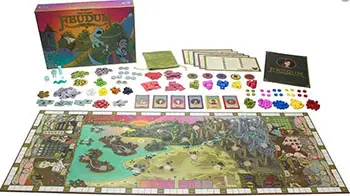
- 1 Game Board
- 55 Action Cards
- 16 Royal Writ Cards
- 20 Player Discs/Reeves
- 100 Influence Markers
- 24 Region/LandscapeTiles
- 9 Vessels
- 44 Location Discs
- 5 Player Pouches
- 30 Saltpeter Goods
- 30 Sulfur Goods
- 11 in each of 5 player colors
- 15 Pawns
- 17 King's Seals/Rosary Beads
- 12 Archery Targets
- 1 Epoch Marker
- 1 Starting Player Marker
- 50 Silver and Gold Shillings
- 15 Reference Cards
- 1 Progress Die
- 170 Goods
- 1 Haversack
- 2 Monsters
- 3 Rulebooks
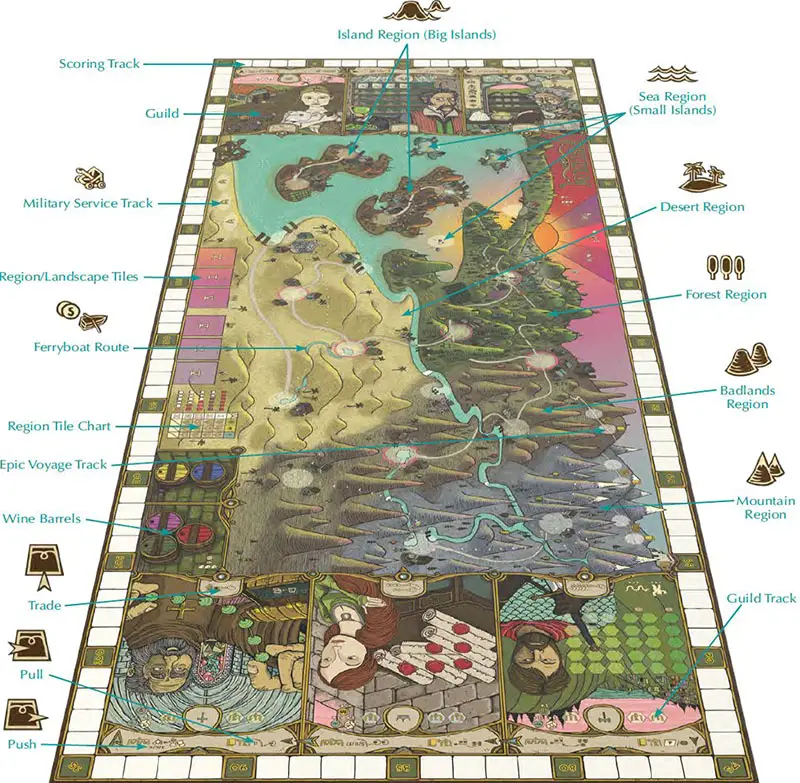
The Board
King Daniel's dominion is divided into 6 regions (sea, island, forest, desert, badlands and mountain) and flanked by 6 medieval guilds (Farmer, Merchant, Alchemist, Knight, Noble and Monk).
The board also features 22 spaces for location discs (outposts, farms, towns and feudums) and a host of other functional areas relevant to gameplay.
Setup
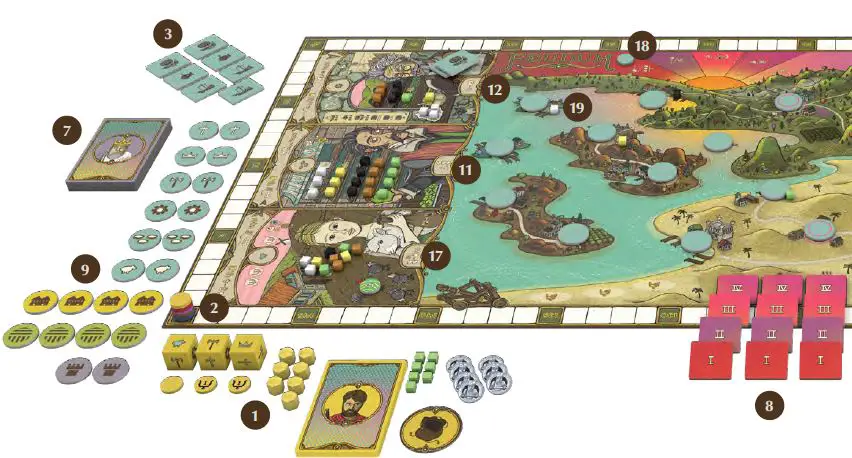
Place the board in the middle of the table. Each player selects a color and puts the following into his personal supply: 3 pawns, 4 player discs/reeves, 11 action cards, 7 influence markers, 7 food, 7 shillings, 1 player pouch and 1 reference card 1. Each player places his blank player disc 2 on the scoring track.
Now, create a general supply of resources as follows: Place the vessels 3 near the Alchemist Guild. Place the influence markers and monsters 4 near the Knight Guild. Place the king's seals/rosary beads 5 near the Noble Guild. Place the shillings and archery targets 6 near the board.
Shuffle the Royal Writ cards 7 and put them facedown. Create six stacks of region tiles 8 in descending order. Remove the double-sided location discs including the 12 feudums 9 and put them in the general supply. Shuffle the remaining locations 10 and place the ones marked with a circle on the starting spaces circled in pink, and the others on the remaining map spaces. Finally, turn all the location discs face up.
Place goods into the Merchant Guild 11 as shown, leaving the last space in the saltpeter and sulfur rows empty. Place goods into the Alchemist Guild 12 as shown, leaving 2 spaces in the food cart and 2 in the sulfur bowl empty. Also, randomly draw 2 vessels and place them in the guild.
Put the rest of the goods into the haversack 13. From the general supply, place 2 influence markers per player in the Knight Guild 14 as shown. If there are fewer than 4 players, add "dummy" rows so there are at least 4 colors in play.
Shuffle all 17 king's seals (red side up) and draw 4 to place on the scrolls in the Noble Guild 15 as shown. Draw 4 more and flip to reveal rosary beads and put them in the Monk Guild 16 on the rosary.
Draw 1 more and flip to reveal a rosary bead and place it atop a chicken in the Farmer Guild 17. Randomly draw 10 goods from the haversack and put them in the barn in the Farmer Guild.

Place the epoch marker on the epoch 18 space (the first sunray). Randomly select 6 goods 19 from the haversack and place 1 in each region beside the location featuring the letter "N". Randomly select a starting player and give him the starting player marker and the progress die 20.

In turn order, each player selects 3 different goods of his choice from the haversack.
If a player chooses a sulfur good, he must decide whether to put it into his wine barrel (it helps nourish your pawns) or into his personal supply (It lets you play two actions in a row). More on that later!

In turn, order, select a character icon on one of your pawns and position it face up beside one of the 6 starting locations circled in pink.
Immediately place an influence marker from your personal supply onto the 5 VP hexagon in the guild bearing the same icon as your pawn. If the hexagon is occupied, place it on the 3 VP hexagon. You are now ready to play the basic or advanced game.
Game Play
The object of Feudum is to be the "most venerated in all the land". Less loftily put, players try to score the most  veneration points (VP) over 5 epochs - typically 7-10 rounds. Each round, players use action cards to move pawns, influence locations, interact with guilds and a slew of other things.
During the game, you will secure membership status in different guilds by putting pawns and/or feudums into play. You will also race to rule locations, as this reinforces your guild status, and unlocks additional actions. Latecomers must settle for serfdom-but this can be advantageous!
Players who hurry to improve locations in each region are rewarded immediate VP and valuable region tiles!
Tiles can be traded for any good, or used by your serfs to tend landscapes. As tiles are drawn, the dawn of each epoch is triggered and VP are scored for status in the guilds, landscapes tended and regions in which you are active.
If you are ambitious, you may acquire a feudum to become a vassal and increase your guild status immensely. However, you then must pay homage to the king by conquering opponents throughout the game to avoid negative VP for disloyalty.
All players may trade with guilds to get the resources they need. However, only guild members may move goods from guild to guild in return for immediate VP!
You may decide to thwart the flow of goods, but be warned, a player could throw you a "feast" and perform your guild powers while you are incapacitated.
When one region tile stack is empty the game ends and final VP (such as Royal Writs) are scored.
The paths to victory are many! Will you rule locations or humbly tend landscapes? Be a dutiful vassal or avoid royal obligations? Fortify your feudums or expand your kingdom?
Rest assured, your foresight and finesse will prove fruitful. Unless you are unwittingly bludgeoned by a lumbering behemoth. Long live the king!
Playing a Round
Each epoch is made up of 1 or more rounds. Each round consists of 5 steps, briefly described here:
-
Take Actions
All players secretly select 4 out of their 11 action cards. Then, each player executes them one at a time in turn order.
-
Nourish Pawns

All players must sustain pawns on the board with food and/or wine.
-

Roll Progress Die
Roll the progress die to determine a region tile to remove.
-

Advance Epoch Marker & Score Epoch
(If Triggered)
If a new epoch is triggered, advance the epoch marker, score veneration points and replenish the board with resources as directed. Otherwise go to Step 5.
-

End Round or End Game & Final Scoring
Pass the starting player marker clockwise and begin a new round. If epoch 5 was triggered during the round, the game is over. After scoring the epoch, perform final scoring.
I. Take Actions
All players secretly choose 4 action cards from their decks to create a hand for the round. Unselected cards are set aside. When everyone is ready, the starting player plays 1 card face up and carries out the action.
Play continues clockwise, one card at a time, until all players have played all of their chosen cards.
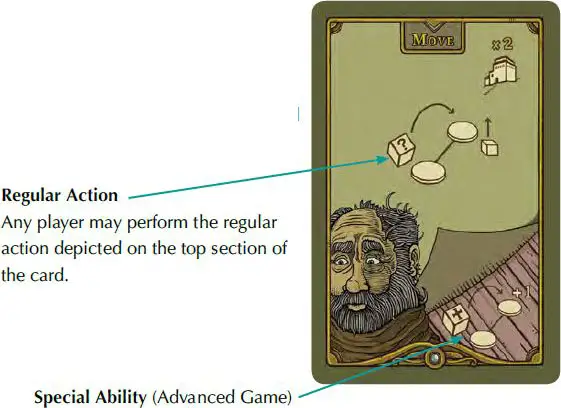
Possession of a certain good or having a particular pawn in play gives you the option to perform the special ability depicted at the base of the card. Special abilities enhance or replace the regular action. For example, this move action card depicts the monk pawn and his special ability.
Extra or Sequential Action
During card selection, you may play a saltpeter or sulfur good to gain a bonus during this round. Place the chosen good on top of your player pouch to signal which bonus you intend to use:
Extra Action: Playing a saltpeter allows you to add a fifth action card to your hand.
Sequential Action: Playing a sulfur allows you to play 2 action cards back to back on a single turn. Sulfur stored in your barrel may NOT be used for sequential actions.
After the extra or sequential action is carried out, remove the good from your player pouch and discard it into the haversack. You may play either an extra or sequential action once per round, but NOT both.
Note: You must play at least 1 selected action card each turn, however you may forfeit the action.
Long Live the King
If you wish, you may wait to see if anyone before you in turn order has placed a saltpeter or sulfur onto his player pouch before you finalize your card selections. When a player makes his selections, he must announce, "Long live the king". Once this is uttered, a player may not change his selections.
Card Symbols
The following symbols appear on some action cards and denote the following:

This card may be played again by using the repeat action card later that same round.

This card may not be played again in the same round even if the repeat action card is played.

This card may not be the last card you reveal this round

Perform the regular action or the special ability, but not both.
Score veneration points (vp).
Eleven Action Cards
Choose from the 11 action cards described here.
Guild Membership
Guild membership is a crucial part of the game. Not only does it enable you to perform the push and pull functions during a Guild Action for immediate veneration points, it also earns you recurring VP at the dawn of each epoch. Membership in a guild is realized by earning related status stars as follows:
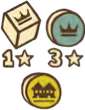
- Each related pawn in play: +1 ★( primary)
- Each related feudum ruled: +3 ★ (primary)
- Each related location ruled: +1 ★ (secondary)
You must have at least 1 of the guild's primary criteria (pawn or feudum) in play BEFORE the guild's related location (outpost, farm or town) counts towards status in that guild. (Refer to location icons printed in each guild).
Guild Track
If you have earned 1 or more status stars in a guild, you MUST immediately place an influence marker from your personal supply onto the related guild track. If you have no influence markers in your personal supply, place one in the guild as soon as you get one. Influence markers in guilds may not be voluntarily removed.
Guild Status
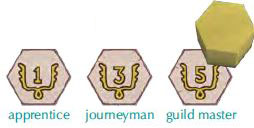
The player with the most status stars places his marker on the space furthest to the right on the guild track denoting him as guild master.
Players with the second and third most status stars place markers to the left in descending order and are known as the journeyman and apprentice respectively. The guild master, journeyman and apprentice score 5, 3 or 1 VP respectively at the dawn of each epoch.
Note: The apprentice space is NOT used in a game with less than 4 players. Whether or not the space is occupied, the apprentice portion of a payment is ALWAYS sent to the opposite side of the board to the church coffer or farmer's purse.
You must surpass (not tie) another player in status stars to take his spot on a guild track. When this happens, replace his marker with yours and bump his marker 1 square to the left (or return his marker if no space remains).
Reeves (Advanced Game)

When you perform a journeyman's pull or a guild master's push, you may add a maximum of 1 Reeve disc to the guild (top left or right respectively) to immediately score a bonus of +1 VP.
If one of your reeves is already present in that guild, earn +1 VP for that reeve AND another +1 VP if your second reeve is in play at another guild!
Note: Players who throw feasts do NOT score for their opponent's reeves.
If you switch from journeyman to guild master or vice versa, move your reeve to that side of the guild. If you are demoted to apprentice (4 to 5-player game), or get bumped off the guild, return the reeve to your personal supply.
Note: Using your reeves may limit you from entering the Epic Voyage and Military Service Tracks!
The Six Guilds
When playing a Guild Action, you must choose 1 of 3 guild functions. The 6 guilds and their functions are described here and summarized on the back side of your reference card.
Note: There are limited resources in the game and a shortage may weaken or prevent a guild action.
II. Nourish Pawns
After the last action card is played in a round, you must nourish your pawns with food and/or wine (using a wild tile is optional). Unnourished pawns go back into your personal supply. If losing a pawn takes you out of a guild, retrieve your influence marker from that guild.
Food 
To nourish a pawn with food, turn in 1 food to the haversack. Player-controlled monsters do not need feeding.
Wine
To nourish a pawn with wine, remove a sulfur good from your wine barrel and place it atop the pawn to sustain it for 2 full rounds. At the end of the following round, simply remove the sulfur from atop the pawn to satisfy the nourishment requirement (the pawn has sobered up).
While wine is a more efficient way to nourish pawns, it carries a risk!
Important: During the first round when the pawn carries the sulfur, its defense and attack capabilities are reduced to 0.
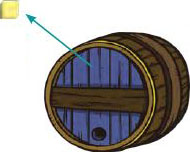 Medieval wine was preserved by placing sulfur in the wine barrels. |
Wine Barrels & Sulfur

Upon purchasing, pilfering, or acquiring a sulfur in any way, you must decide whether to place it into your personal supply, or into your wine barrel.
Your wine barrel may hold a maximum of 3 sulfur goods.
III. Roll Progress Die
After nourishing pawns, roll the progress die and remove a region tile matching the region rolled. The tile to be removed must be from the current or a former epoch.
If it is not, roll again until one is removed. If no region tiles from the current or a former epoch remain, do not roll the progress die.
IV. Step 4: Advance Epoch Marker & Score Epoch
(if Triggered)
After rolling the progress die, consult the region tile chart to see if a new epoch has been triggered based on the following criteria:
Epoch Advancement Criteria
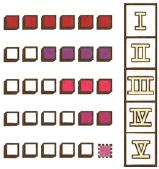
- Epoch II: 4 epoch II tiles must be showing
- Epoch III: 3 epoch III tiles must be showing
- Epoch IV: 2 epoch IV tiles must be showing
- Epoch V: 1 epoch V space must be showing
If a new epoch was triggered, advance the epoch marker to the next sunray and do the following:
-
Score Epoch (dawn of all epochs)
- Guild Status: 1/3/5 VP
- Landscapes (Empty landscape: 2 VP, Landscapes with at least 1 resource: 4 VP)
- Active Regions: 1/3/5/7/9/11 VP (score for each region occupied by either a ruler or a landscape-tending serf).
-

Subtract for Disloyalty (epochs 2, 4 & 5 only)
Subtract for disloyalty (- 3/- 4/- 5 vp) if you rule a feudum but have not covered the current epoch's catapult space. Also, cumulatively subtract points for previously uncovered spaces.
-
Replenish Landscapes (dawn of all epochs)
Add 3 appropriate resources to each landscape tile. Serfs must decide if they wish to collect all accumulated resources or leave them on the tile. When serfs collect, they must pay 1 resource to the location's ruler.
-
Replenish Map (epochs 2, 3 & 4 only)
Randomly select goods from the haversack and place 1 in the southern, eastern, or western-most location in each region per the direction icon in the sunray.
Look for the locations containing the letter S, E, or W (goods are placed at Northern locations at the beginning of the game). Goods placed on farms become part of that farm's harvest.
-

Replenish Guilds (dawn of epoch 3 only)
At the dawn of epoch 3, replenish the 6 guilds with resources so they cover the spaces indicated at setup. (Leave any extra resources where they are).
Step 5: End Round/Game & Final Scoring
At the end of the round, pass the starting player marker clockwise, take up all your action cards and begin a new round.
However, if epoch 5 was triggered during the round, the game is nearly over. Complete all remaining actions and score the epoch as usual.
Then, perform Final Scoring as follows:
-
Epic voyage: 3/5, 7/9, 11 /13, 1 7 vp
Score the higher value if you are in the lead (or tied) in any section.
-
Large Empires
- Each outpost, farm, town ruled: 1 VP
- Each feudum ruled: 3 VP
- 3 identical locations ruled: 3 VP (Here, a feudum is "wild" and may either match itself or another location type)
-
3 Shillings: 1 Vp
-
Royal Writ with King's Seal: ? Vp
End of the Game
The player with the most VP is heralded, "most venerated in all the land!" If there is a tie, the player with the most sulfur left in his barrel wins (sobriety is more honorable).
If there is still a tie, the players share in the victory.
Continue Reading


