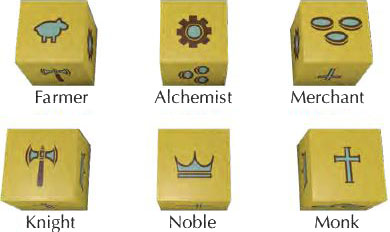
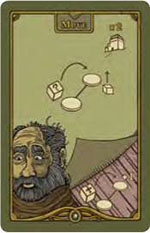
1. Migrate Action

You may migrate 1 of your pawns to or from the board. If you choose to migrate a pawn onto the board, turn in a food for the journey. Now, take a pawn from your personal supply, rotating it so that 1 of its 6 characters faces up.
Finally, place it beside a location already containing 1 of your pawns or influence markers. If neither are in play, place your pawn beside 1 of the 6 pink-circled starting locations.
If you migrate a pawn from the board, return it to your personal supply without food penalty.
Note: Having a pawn in play earns a player membership status in 7 of 6 guilds (see Guild Membership on page 16).
"Distant Kin" (Advanced Game)
If you have an Alchemist pawn already on the board, you may migrate a new pawn onto the board to any of the 6 starting locations instead (even without one of your pawns or influence markers there).
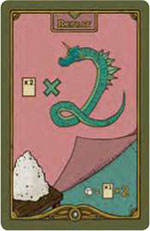
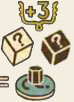
The Six Pawn Characters
2. Move Action
Your total movement allowance is equal to the number of pawns you have on the board.
Movement may be divided among multiple pawns. Pawns move from 1 location to the next and may move along roads or special vessel routes.
Pilfer Resources
At the end of your Move Action, if one of the pawns you moved is beside a location containing a resource, you may pilfer 1 resource from that space.
(This includes resources atop landscape tiles such as goods, targets or shillings).
You may not pilfer from a farm you rule or a landscape that your own serf is tending (limit 1 pilfered resource per movement action).
Vessels & Vessel Routes
If you have a vessel in your personal supply, you may place it under 1 of your pawns on the board, and move along the vessel route matching the vessel. The pawn remains atop the vessel until the pawn moves away from the route.
Deploying a vessel does not count as an action and can be done at any time during your turn. Once the vessel is placed, it may not be taken off the board.
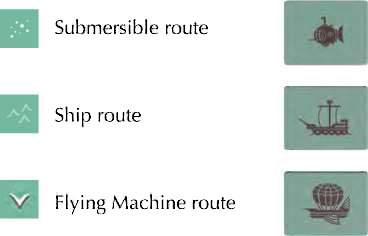
Abandoned Vessels
If you are using a vessel and decide to continue movement to another location requiring another mode of travel, you may abandon the vessel and continue movement on a road, or by deploying a different vessel from your personal supply.
On a future turn, any player (including you) may board the abandoned vessel during a movement action.
Ferryboats

Ferryboat routes can be used by any player for a payment of 2 shillings to the general supply. Each payment grants a single, one-way trip.
Important: Ferryboat routes are closed if the Alchemist has 1 or more vessels for sale within his guild!
Epic Voyage

If you successfully play the Move Action twice in a single round, you may take 1 of your player discs and place it on the first space of the epic voyage track.

If you are already on the track, advance your disc to the next space. Upon reaching a space marked with a card icon, draw 2 Royal Writ cards and keep 1 of them. Return the other card to the bottom of the deck.
The epic voyage track is divided into sections. At the end of the game, the leading player disc in each section will score the higher of the two veneration point values printed in that section (3/5, 7/9, 11/13 VP).
If 2 discs are tied, they both score the higher value. The fourth section contains only 1 space: the monastery. Any marker reaching this spot will receive 17 VP.
Note: A pawn must move at least 1 space for the move action to be successful.
"Godspeed" (Advanced Came)
If you have a Monk pawn on the board, that pawn may move +1 space at the end of your regular movement action.
The monk pawn does not have to be part of your regular movement action. If you have multiple monks, choose 1 to perform this ability.
3. Influence Action
You may add 1 influence marker to each location containing one of your pawns. For example, if all of your pawns were at different locations, you could add 3 influence markers.
During the game, a location may hold a maximum of 3 influence markers belonging to 2 different players. No player may have more than 2 of his own markers at a location.
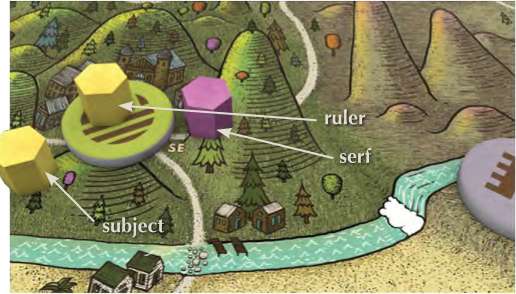
Rulers, Subjects & Serfs
If you are the first to add an influence marker to a location, place your marker on TOP of the disc to become its ruler.
If you are the second (and different) player to add a marker, place it beside the disc to become a serf. This earns you the right to tend a landscape.
On a future turn, either player may add 1 final influence marker. If you are already the ruler, add your marker beside the disc to reinforce your rule as a subject. If you are a serf, bump the ruler down to the serf position, leaving your new marker on top as the location's new ruler.
Guild Status & Active Regions
The locations you rule may increase your guild status, and earn you veneration points for active regions.
"Money is Influence" (Advanced Came)
If you use your Merchant pawn to influence a location ruled by an opponent's SINGLE marker, you may pay 1 shilling to the general supply to move his marker to the serf position and place yours on top as the ruler (even though you are merely tied for influence).
If you have multiple merchants, choose 1 to perform this ability.
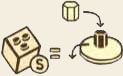
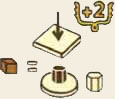
4. Improve Action
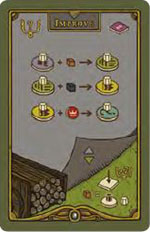
Turn in the required resource to improve a location you rule as follows:
- outpost to farm (wood)
- farm to town (iron)
- town to feudum (king's seal)
Replace the location disc with the NEW one from the general supply and place your ruling influence marker on top. If you improve a town to a feudum, choose one with an icon related to the guild in which you wish to gain status (see Guild Membership on page 16).

Note: If you improve from a farm to a town, discard all goods that were on the farm into the haversack.
Region Tiles & Veneration Points

As a reward for improvement, draw the top region tile from the stack that matches the region where the improvement occurred. The tile must be from the current or a former epoch, or it is prohibited. The region icons at the base of each stack correlate to the map regions.
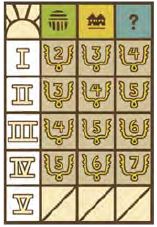
Consult the region tile chart and score veneration points based on the tile's epoch number and the new location. For example, if you improved a farm to a TOWN and the tile drawn had the Roman numeral I on it, you earn 3 VP as printed on the chart.
If the tile is prohibited, draw a former epoch tile from a different region tile stack. You score NO points for collecting this tile. If there are no former epoch tiles available, do not draw a tile.
Wild Tiles

Collected region tiles are considered "wild", and may be substituted for any good (food, wood, iron, sulfur or saltpeter) at any time. Alternatively, they may be used as a landscape. Note: Removing region tiles may trigger the next epoch.
Feudums, Vassals & Military Service

The moment you rule a feudum, you become a vassal, earning you powerful status in the related guild. However, you must now pay tribute to the king in the form of military service.
If you do not perform several conquer actions by the end of the game, you could lose veneration points for disloyalty. Tip: Even one conquer action will help a vassal immensely.
Details on how to conquer are presented later, but the military service track works as follows: When you conquer an opponent, you may place 1 of your player discs (blank side up) on the FIRST catapult projectile space on the military service track. After each subsequent conquer action, place another one of your discs on the SECOND space and so on.

If you fail to perform conquers by the dawn of the epochs designated with catapult icons, you must subtract the VP noted in the epoch's related catapult space, as well the negative value in the uncovered space(s) before it.
In this way, penalties for disloyalty are cumulative. You may satisfy your military service earlier (or later) than the designated epoch.
Non-vassals
If you do not rule (or no longer rule) any feudums, you are not subject to point deductions. Even without a feudum, a player may still put player discs onto the military track for each successful conquer action in anticipation of becoming a vassal later.
"Tend Landscape" (Advanced Game)
If you turn in Wood to the haversack, you may place 1 of your collected landscapes beside any location where you are the serf and score 2 VP. Only 1 landscape is allowed per location.
Landscapes may not be replaced.
Important: Play this instead of the regular improve action.
Immediately upon placing a landscape, AND at the dawn of each subsequent epoch (after scoring), take 3 designated resources and add them to the tile.
Each time, you may choose to collect all of the resources that have accumulated or let the resources continue to grow. When you decide to collect the resources, you must pay 1 resource to the location'* and their resources are:
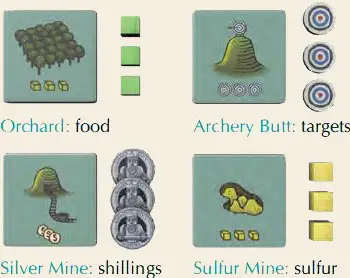
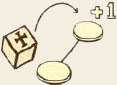
Note: Targets are traded in for influence markers from the general supply when you collect the resources.
At the dawn of each epoch (before adding resources), score veneration points for each landscape tended by your serf(s). Score 2 VP per empty landscape and 4 VP per landscape containing 1 or more resources.
In order to score the higher value, players may forego immediate collection of resources. Of course, be aware that other players may pilfer resources!
Note: Tended landscapes count towards active regions during epoch scoring.
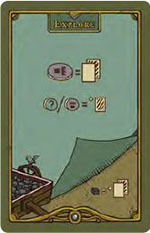
5. Explore Action
If you rule an outpost, you may play the explore action. Draw 2 Royal Writ cards, +1 card for each additional outpost and/or feudum ruled, and keep 1 of them.
Return the other card to the bottom of the deck.
Royal Writs
Royal Writ cards come in 2 varieties: Mandates and Charters. Mandates grant you resources (from the general supply) or attack strength, and may require you to either turn in a good (outlined by a square) or achieve guild status in order to realize the award.
Charters grant you end game veneration points based on completed objectives.
Mandates are already sealed by the king and can be played and discarded at any time; however, in order for charters to become valid, you must obtain a king's seal and place it on the card at the END of the game.
You may not have more than 3 Royal Writ cards at a time, but may discard unused cards to the bottom of the deck at any time.
"Shovels & Swords" (Advanced Game)

If you turn in an Iron to the haversack, draw 2 additional cards and pick another one to keep!
Note: This is done APTER the normal explore action is taken.
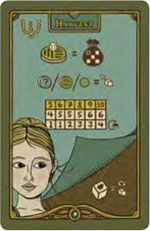
6. Harvest Action
If you rule a farm, you may play the Harvest Action to randomly draw 5 goods from the haversack to place beside 1 of your farms, and score 1 vp.
Add +1 good for each additional farm and/or feudum ruled, and +2 to +5 goods for each rosary bead in your possession.
Note: The maximum harvest permitted on a single action is 10 goods-even if your yield calculation is higher.
Note: If a farm has 10 or more goods, you may not harvest there again until the farm drops below 10 goods.
On a future turn, you may play the Guild Action (trade) to move all goods from a ruled farm to the Farmer Guild to acquire 1 food or 1 shilling for every 2 goods traded.
Favors
In lieu of placing the total harvest onto 1 of your ruled farms, you may choose to randomly draw and place a partial harvest there, and then randomly draw and place the remaining goods (favors or "kickbacks") into your personal supply.
Consult the harvest chart to see how a total harvest breaks down into a partial harvest plus favors.
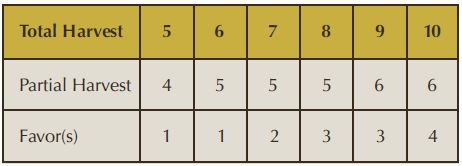
Rosary Beads

Rosary beads increase your total harvest yield from +2 to +5 additional goods for as long as you possess the bead(s). However, if you take the allotted
favors (a rather unholy act), your bead(s) are immediately flipped over and become king's seals (you give up future harvest bonuses, but gain king's seals).
"Inspect the Harvest" (Advanced Game)

If you have a Farmer pawn in play, you may visibly choose your favors after randomly drawing the total harvest.
7. Tax Action
If you rule a town, you may play the Tax Action to collect 2 shillings.
Add +1 shilling for each additional town and/or feudum ruled.
"Reinforcements" (Advanced Game)

If you have a Knight pawn on the board, you may also collect 1 influence marker from the general supply, or from the Knight Guild if the general supply is depleted.
If you have multiple knights, you still only receive 1 influence marker.
8. Conquer Action
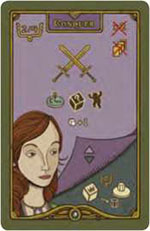
If 1 or more of your pawns occupies the same location as an opponent's pawn or feudum, you may attempt to conquer and remove it from play.
Important: The Conquer Action may not be your last action in a round. Also, outposts, farms and towns may NEVER be targeted.
A successful Conquer Action scores you 2/4 VP and lets you move 1 of your player discs onto the military service track.
Players may attack or defend with multiple pawns; however, only 1 pawn or feudum may be targeted. Pawns or serfs belonging to a third player do NOT factor into the battle. To win, your attack value must be greater than your opponent's defense value. A tie is a failed action.
Conquering a Pawn
When attacking a pawn, players add up the attack and defense values of: zs
- Character pawn(s): + 1 attack, + 2 defense
- Monster pawn(s): + 1 attack, + 1 defense
If the attack is successful, score 2 vp, return the conquered pawn to the opponent, adjust guild status and, if desired, move 1 of your player discs (blank side up) onto the military service track. If the pawn was atop a vessel, the vessel remains on the board.
Conquering a Feudum
When attacking a feudum, players add up the attack or defense values of the following:
- Character and/or Monster pawns
- Ruled feudum: +2 defense
- Defending subject: +1 defense
- Rebelling serf (of attacker): +1 attack
If the attack is successful, score 4 VP, replace the feudum with an outpost, adjust guild status and, if desired, move a player disc onto the military service track.
Return all influence markers to their respective owners unless you had a rebelling serf there. If so, place the serf atop the outpost to rule it. Any goods or landscape tiles remain.
Saltpeter & Weapons
Turn in 1 saltpeter to the haversack to increase your attack by +1. Important: Typically, you may only use 1 saltpeter. However, if your knight is involved in the attack, you may use as many as needed!
Additionally, any of your pawns may use weapons to increase your attack by + 1 or +2. Saltpeter and/or weapons may be added even after your opponent flips over a defend action card.
"Starve the People" (Advanced Game)
If you have a Noble pawn beside a location with an opponent's subject or serf, you may conquer 1 of them and return it to its owner.
Important: Play this instead of the regular Conquer Action. You do not earn veneration points (as this act is quite ignoble), but you may move one of your player discs onto the military service track.
Important: After a successful "starve the people" action, remove ALL alms (rosary bead discs) atop the chickens and return them to the general supply.
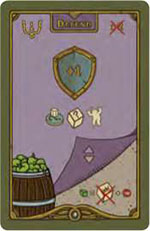
9. Defend Action
If an opponent attacks 1 of your pawns or feudums, and you preselected the Defend Action, you may flip it over out of turn and add +1 to your defense and score 1 VP.
If no one attacks you during the round, you still collect 1 VP.
"Royal Immunity" (Advanced Came)
If you turn in a Food to the haversack, you may play this action out of turn to nullify a noble's Starve the People action against you.
Additionally, place a king's seal from the general supply beneath your subject or serf to denote royal immunity from further Starve the People attacks! You may remove and use the king's seal at any time; however, your subject or serf will revert back to its unprotected status.
10. Repeat Action
The Repeat Action lets you execute any action card you have already played during that round again, provided it features the (x2) symbol at the top.
"Deja vu" (Advanced Game)
If you turn in a Saltpeter to the haversack, you may execute a card that does not feature the (x2) symbol a second time in the round.
For example, the Migrate Action could be played a second time in the same round to enter a second pawn onto the board.
Note: The Conquer and Defend Actions may never be played twice in one round as indicated by the x2) symbol.
11. Guild Action
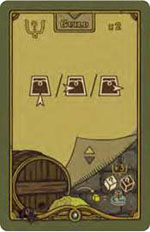
A Guild Action lets players interact with 1 of the 6 guilds that flank the game board. An overview of the guild action is presented here. An in-depth look is presented later.
Guild Functions
A Guild Action lets you perform 1 of 3 guild functions: trade, push or pull. Any player may trade for goods depicted at the base of each guild.
The player with the highest status in a guild is the guild master and may perform the push function. The player ranked second in status is the journeyman and may perform the pull function.
Note: In a game with 4+ players, the third ranked player is the apprentice.
Repeating Guild Action
If a player plays the Repeat Action to perform the Guild Action again, he must interact with a different guild.
1. Trade (any Player)

You may trade for resources at a guild (even if you are not a member).
- Farmer Guild: 1 food (from haversack) or shilling for every 2 goods sent to Farmer Guild
- Merchant Guild: 1-3 goods for stated shilling price
- Alchemist Guild: 1 vessel for 3 shillings
- Knight Guild: 1 row of Influence markers for 3 shillings
- Noble Guild: 1 or 2 King's Seals for 3/6 shillings
- Monk Guild: 1 rosary bead for 3 shillings
Trading Procedure 
When you trade shillings for resources, you must pay guild members in rank order. For example, if the total cost is 3s (3 shillings), you would pay:
- 1 shilling to the guild master
- 1 shilling to the journeyman
- 1 shilling to opposite side of board into the farmer's purse or church coffer. (The apprentice's share ALWAYS goes to charity!)
If guild members are absent, return their shillings to the general supply (except for the apprentice's share). If the cost of resources is higher than 3 shillings, simply repeat the sequence until the cost has been satisfied.
Important: Even though guild members who trade with their own guilds will pay themselves, they still MUST have the total shillings required to complete each purchase.
2. Pull (Journeyman)

The journeyman pulls resources into his guild (from the guild on the left) to score 3 VP and to draw 2 Royal Writ cards, keeping 1 of them. Return the other card to the bottom of deck.
Note: The Monk Guild is to the left of the Farmer Guild, and the Alchemist Guild is to the left of the Knight Guild.
3. Push (Guild Master)

The guild master pushes resources out of his guild (to the guild on his right) to score 4, 5, or 6 VP based on outcome.
"Feast" (Advanced Game)
If you turn in a Sulfur from your wine barrel to the haversack, you may throw a feast for any pawn or feudum owner your pawn is beside. Perform his push/pulI function to score his regular points +3 VP.
If a push function triggers the distribution of the church coffer or farmer's purse, take his share of the shillings.
Continue Reading


