You have a big job ahead of you. Together, you want to build a new, thriving city where people are happy. To do that, you have a number of milestones to complete.
Each milestone represents a period of construction for your city. You will have to finish each milestone before beginning the next. Once you have completed them all, the game ends. The quality and skill of your cooperative efforts will be reflected in the happiness of your residents.
You can plan and consult among yourselves as much as you like. If you are not able to agree on something, it will be up to the active player to make the final decision. Just make sure that you don't run out of money, or you will all lose the game together.
You learn the game by playing through various scenarios. The introductory game contains the important basic rules, but not all of the game elements. In further scenarios, a variety of additional elements will come into play.
The final scenario involves the most variety and new challenges. If it's your first time playing the game, you will want to play through the scenarios in the specified order.
Components
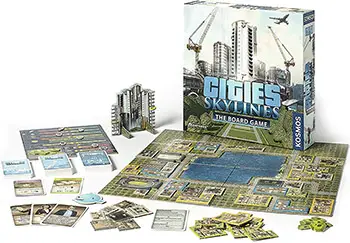
- 6 Game board pieces
- 24 Residential zones
- 12 Commercial zones
- 12 Industrial zones
- 9 Utility buildings
- 26 Money tokens
- 18 Service buildings
- 10 Unique buildings
- 8 Administration markers
- 1 Administration board
- 1 Starting player token
- 2 Mounting feet
- 2 Happiness indicators
- 75 Construction cards
- 10 Unique Building cards
- 10 Role cards
- 10 Policies cards
- 10 News cards
- 1 "End of a Milestone" card
- 4 Turn Overview cards
- 1 Skyline
- Rulebook
Setup
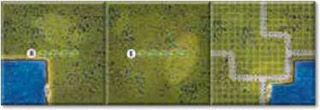
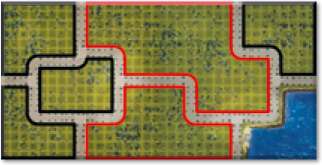
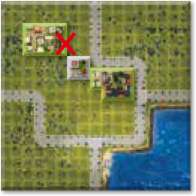
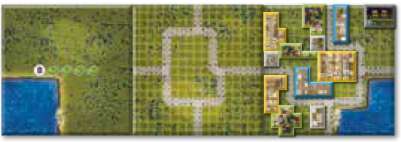
Assemble the three game board pieces B, E, and A in the middle of the table as shown below. The back sides with the letters should be facing up.
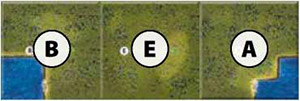
Note: In later games or if you want to play with all the rules right away , assemble all four game boards as indicated for the given scenario.
Place the administration board face up next to the game boards and put the eight administration markers on the matching display bars, on the "0" space in each case.

Deposit a starting capital of 12 money tokens (two large money with a value of five and two small ones with a value of one) in the city treasury. The rest of the money is placed in a stockpile next to the playing area.
Sort all the zone and building tiles in accordance with their color and type, and keep them ready next to the playing area.

Shuffle the construction cards for Stage 1 and deal each player the appropriate number of cards based on the total number of players (see below). Each player places these cards face up in front of himself or herself:
- 4 players: three cards each
- 3 players: four cards each
- 2 players: five cards each
- 1 player: seven cards
Give each player their own Turn Overview card.
Shuffle the remaining Stage I construction cards, as well as the Stage II and Stage III ones, keeping the different stages separated. Have them ready next to the playing area.
Place the Happiness display (Skyline) next to the administration board. Stick the display chips onto the "0" spaces of the numerical scales on the left and right sides of the display.

The youngest player gets the Starting player token and the "End of a Milestone" overview card. The starting player token is "Chirper", the mascot of Cities: Skylines.

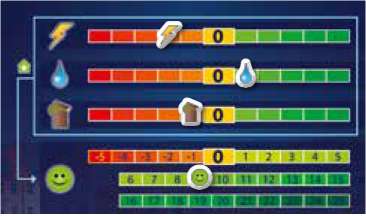
The Administration Board
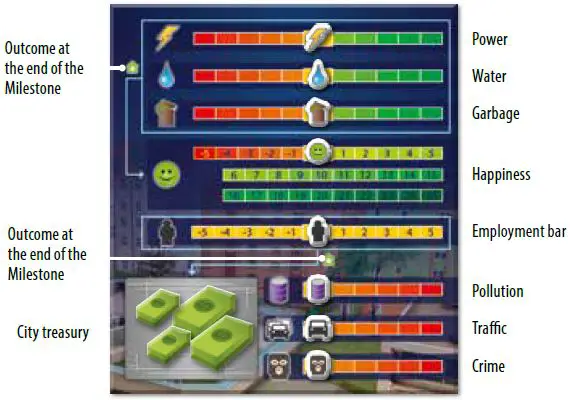
The administration board helps you keep track of how well your city is doing.
In the upper area, you can read the capacity of your city in the utility categories of Power, Water, and Garbage. The farther into the green range your marker is, the higher your capacity.
Important: For each step below "0" (red range), the Happiness of your residents will drop by one at the End of a Milestone.
Happiness can take a positive, negative, or neutral (=0) value. After each Milestone, this value is transferred to the overall Happiness display (Skyline). The higher the overall Happiness at the end of play, the better your final result will turn out to be. You can see what this is by looking at the success table on the final page.
The employment bar displays the working population available to you.
Important: For each step away from "0" for your working population, whether above or below, you will have to pay one money from the city treasury at the end of a Milestone.
Background: The "0" value stands for full employment. If the value is below "0", the economy lacks a sufficient labor force. If the value is above it, there is a shortage of jobs. In either case, money must be invested.
In the lower area, you will see three bars that will have an impact on the quality of life of your residents. Your construction activities will raise the pollution, traffic, and crime values during the game, but you can lower these values by taking various countermeasures.
Important: At the end of the game, the overall Happiness of your residents will drop in accordance with how far above "0" you are on these bars.
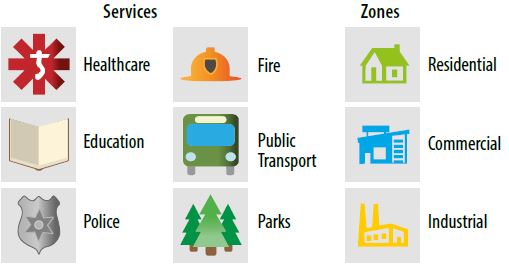
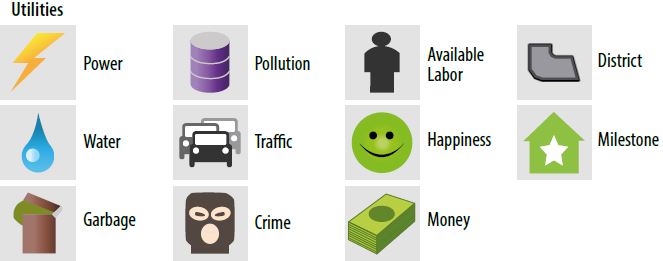
Game Symbols
Game Play
Start of a Milestone

First, decide together which board game piece you want to start with. You will want to take into consideration the development costs printed on them.
Once you have decided (the starting player has the final word!), take the required sum of money from the city treasury and return it to the stockpile next to the playing area, turn the selected board piece over, but keep it in the same position relative to the other pieces.
Note: You will have to rotate it around its longitudinal axis (formed by the row of money tokens printed on it!). That way, the bodies of water shown on the front side will be arranged the same as on the back.
Example: You pay two money tokens and turn game board piece A face-up.
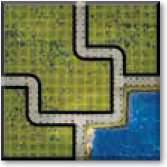
On the front side of the board piece, you will see a grid of squares, where you will be placing building and zone tiles during the course of the game.
The tiles are not allowed to be placed over the edge of the playing area, across streets, on other building tiles, or on the water.
The squares are arranged into various areas. These are the districts of your city. All areas that are bordered by a street or the edge of the board count as City Districts.
Later on during the course of play, a city district will be able to extend over several game board pieces. Many of the cards refer to these districts.
Also, a condition for the end of a Milestone is that there be at least one building or zone tile in each city district.
As the first active player, the starting player carries out one of the following three actions. Then, the next player in a clockwise direction becomes the active player, etc.
The Actions:
- Play a construction card
- Exchange a construction card
- End a Milestone
A. Play a Construction Card
There are two types of construction card:
For construction cards with service buildings or utility buildings on them, you have to pay the amount of money indicated.
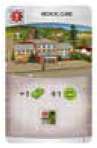
Example 1: You are building a medical clinic. You have to pay one money and your Happiness increases by one.

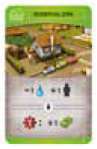
Example 2: You are building a wind power plant. You have to pay three money tokens and your Power capacity increases by three. This means that you will soon be able to use more power.
The green, blue, and yellow construction cards are used to build residential, commercial, and industrial zones.
These are free and require no money. Their impact on your city will vary in terms of a number of factors, however. If you build them in such a way that you use already-available services, this will yield benefits for your city.
Example: You build a residential zone. Recently-arrived residents consume more water. That causes your water capacity to drop by one. But there is also a larger workforce available.
The value on your employment bar increases by one. If you utilize the "healthcare" service indicated in the lower part of the card, you get one money for your city treasury.
Important: This benefit only applies if the service building is already on the game board. If it is not built until later, the benefit will not apply retroactively.
If the player wants to play one of the construction cards lying in front of himself or herself, he or she slides the card slightly forward.
The cards for service and utility buildings display the required tile on the card. With the residential, commercial, and industrial cards, you can take any tile you like from the matching zone category.
The player takes the tile from the general supply and places it on a suitable location on the face-up game board. The player may turn and rotate it however he or she likes to make it fit best. The tile must fit into the grid of squares.
Once placed a constructed tile has to remain in place until the end of the game. It cannot be moved again.
Important: In each city district, you are not allowed to construct more than one utility building. If, say, you already have a wind turbine  in a district, you cannot also build an oil power plant there.
A water tower  wouldn't be possible there either.

For service buildings in the "Stage I" pile, the new zone (or at least one square of it) has to be built directly adjacent to the service building for this service building to be utilized. Be sure to leave enough space to be able to build more than one neighboring zone that can utilize the service.
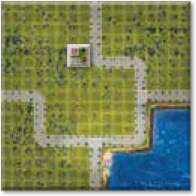
Example: Build the medical clinic in such a way that there is room for several directly adjacent zones.
Example: Thanks to a neighboring medical clinic already in place, you can utilize the "healthcare" service.
To do that, the residential zone has to have at least one square bordering the medical center. A residential zone that only touches the medical center by a corner does not count as neighboring.

For service buildings in the Stage II and III piles, the new zone just has to be built in the same city district as the required service building.
Example: The hospital is good for the entire district. So the residential zone does not have to be neighboring.
When constructing utility buildings, you do not have to worry about adjacency since they are not prerequisites for later benefits. They have a one-time effect during the construction process.
Then, you pay the costs indicated on the card (in the first row of the residential, commercial, or industrial construction card). If you have to pay money, it will be deposited from the city treasury into the stockpile.
The markers indicated on the card are then moved accordingly on the administration board. "-" means to move the marker to the left, "+" means to move it to the right.
For residential, commercial, and industrial there is then a reward (second row of the construction card) in the form of money or a change in the administration markers, assuming the prerequisite is met.
For cards with the "city district" symbol, the new zone has to be built in a  district where certain other tiles are already present in order to take advantage of this symbol.
Detailed Examples for specific construction cards:
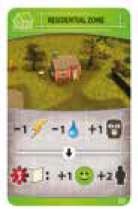
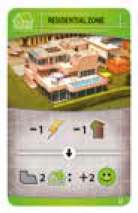
The new residential zone needs power and water. Capacities for each are reduced by one. On top of that, there have been a lot of reported burglaries, raising the crime rate by one.
If the residential zone is constructed in a district where the services "healthcare" and "education" are being offered, Happiness will increase by one and two new residents will be added to the employment.
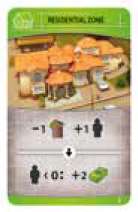
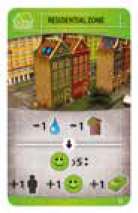
In the new residential zone, garbage is piling up. Garbage capacity is reduced by one. The influx of residents raises the available workforce by one.
If the value on the employment bar is under "0", you get two money tokens for your city treasury.
The new residential zone consumes power and generates garbage. The power and garbage capacity are each reduced by one.
If the residential zone is built in a district where there are already at least two other residential zones, the residents feel good and Happiness increases by two.
The new residential zone consumes water and generates garbage. The water and garbage capacity for each are reduced by one.
If you have a Happiness bar value of greater than five, one additional labor unit is available to you. Also, Happiness increases by one and you get one money for the city treasury.
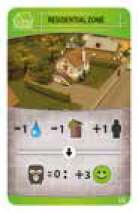
The new residential zone consumes water and generates garbage. The water and garbage capacity for each are reduced by one and you have one additional labor unit available. If there is no crime, the residents feel good and Happiness increases by three.
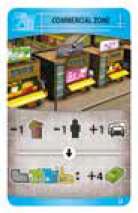
The new commercial zone generates more garbage. Garbage capacity is reduced by one. The value on your employment bar is reduced by one, since there are fewer people available for employment due to the hiring of workers.
Since customers are visiting the new stores in their own cars, traffic increases by one.
If the new commercial zone is built in a busy district where there is already at least one residential zone, one other commercial zone, and one industrial zone, these bring four money tokens to your city treasury in the form of taxes.
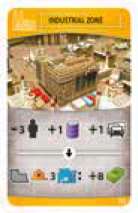
More people are employed in the new industrial zone. That means that fewer people are available for work and the value on your employment bar drops by three.
The industry pollutes the environment and increases the volume of traffic. The values for pollution and traffic increase by one each.
If the new industrial zone is built in a district where there are at least three commercial zones and there is fire service available, a lot of business gets done, taxes are collected, and your city treasury is richer by eight money tokens.
For Costs and Rewards:

City treasury: If money has to be spent and there is not enough money in the treasury, the card may not be played.
Power, Water, Garbage:
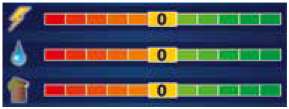
If a marker has to be moved past the last square in the red area, the card may not be played. If a marker has to be moved past the last square in the green area, the card may be played.
The marker remains on the highest value, however.
Pollution, Traffic, Crime:
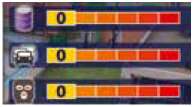
If a marker has to be moved past the last square in the red area, the card may not be played. If a marker has to be moved below zero, the card may be played. The marker remains on the "0" space.
Employment Bar:

If the marker has to be moved beyond "-5" or "5", the card may not be played.
Happiness Bar:
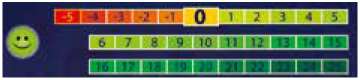
If the marker has to be moved beyond the "25" square, it remains on "25". The remaining points are immediately transferred to the overall Happiness Skyline display.
Important: If the Happiness marker has to be moved to "-5" or beyond, you immediately lose the game!
After a building card has been played, it goes back into the box. It is thereby out of play.
Draw a New Card:
The player adds to his or her card display by drawing one card from any of the three face-down piles (Stage I, II, or III) of the player's choice.
Note: The effects of the cards increase in accordance with costs and rewards.
Instead of drawing a face-down card, the player may select any card from the face-up exchange pile, which will be created in the course of the game. Then it is the next player's turn.
Important: If all three piles are empty, the next player has to end the current Milestone and the game ends.
This happens even if the prerequisites are not met and some game board pieces are still face down.
Exchange a Construction Card
The player pays two money tokens from the city treasury to exchange exactly one of his or her construction cards. He or she then places the card on a face-up pile next to the three face-down Stage I, II, or III piles.
The first card to be exchanged begins the Exchange Pile. This card is not returned to the box.
Note: You can look at the cards in the exchange pile whenever you like.
Then, the player draws a new card from any of the three Stage I, II, and III piles he or she likes, and places it in his or her card display. If there are already cards in the exchange pile, he or she can take any card from there.
Ending a Milestone
A player is allowed to end a Milestone if there is at least one tile in each district.
If a player is ending the current Milestone, he or she takes the starting player token and performs the following steps:
-
Power, Water, and Garbage Utility Bars:

For each step under "0" (in the red range), the marker must be moved one square back on the Happiness bar. Note: The markers for the utility types are not changed as a result.
Example: You have attained a value of nine on the Happiness bar. Since you are two squares in the red for power and one square in the red for waste, you must move three squares back on the Happiness bar to six.
-
Happiness Bar:

Next, the current value of the Happiness bar is transferred to the overall Happiness display and the Happiness indicators are repositioned accordingly. The double-digit values are on the left, the single-digit ones on the right.
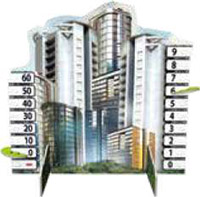
Example: The new Happiness value of six is transferred to the Skyline.
The left display remains at "0", while the right one is shifted to "6".
That gives you an overall Happiness of six.
If the overall Happiness is negative, the indicator is set to
 on the left. Then, the numbers on the right count as negative values.
Important: If the indicator has to be positioned on "-10" or beyond, you immediately lose the game!
-
Employment Bar:

For each step away from "0" your working population moves, whether below or above, you will have to pay one money from the treasury at the end of a Milestone. Note: The marker is not changed as a result.
Example: You have reached the value of "-2" on the employment bar. That means that there is not enough workforce available in your city, and you have to pay two money from the treasury.

-
New Milestone:
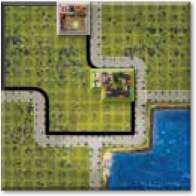
When, a new game board piece is turned over. It has to be adjacent to a game board piece that is already face up. You will also have to pay the development costs displayed.
If you have a choice, decide together which game board piece you want to continue with. If you cannot agree, the person with the starting player token gets to decide.
Example: You pay five money and turn over adjacent game board piece E.
With the new board piece, the city districts grow. Existing services in an enlarged city district can now be used in the whole larger district. Of course, you can also keep building on the old game board piece.
-
Exchange Construction Cards:
Starting with the player who has the starting player token, each player may place any number of his or her cards on the exchange pile and draw an equal number of cards from any of piles I, II, and III - just not from the exchange pile.
For each of these cards, one money has to be paid into the stockpile from the treasury. Note: You may discuss among yourselves who will exchange how many cards.
-
Game Play Resumes:
Then, the player with the starting player token continues the game.
End of the Game
To end the last Milestone and thus the game, all board game pieces must be revealed and in each district there must be at least two tiles of any kind.
After the last Milestone has been assessed, you still have to see how many squares you are away from "0" on the pollution, traffic, and crime bars. For each square, you will have to reduce the overall Happiness of your residents by one.
Then, take a look at the success table on the final page to see what status you were able to help your city attain. All results in the green range count as a successful game.
Failed City:
It sometimes happens that you lose the game. This will be the case if any of the following situations apply:
- Costs have to be paid, but you don't have enough money in your treasury.
- During a player's turn, he or she cannot perform any of the possible actions.
- The Happiness marker on the administration board has dropped to "-5" or the overall Happiness reaches "-10".
Continue Reading
