Components
- 1 Black Angel gameboard, the frigate
- 4 player boards in the player colors
- 7 double-sided Space strips
- 1 Planet Spes tile and 1 Planet Spes token
- 1 Frigate figurine, the Black Angel
- 20 ship figurines
- 64 robot figurines in the player colors
- 18 dice
- 12 Starting Technology tiles
- 48 Technology tiles 16 Advanced Technology titles
- 60 Mission cards
- 30 Ravager cards
- 8 discs
- 40 resources
- 30 Damage / Debris cubes
- 1 First Player
- 12 cards for Hal in the solitaire variant
- 4 player aids
- Rulebook
Note: The robots are limited to those included. However, ships, resources, and Damage/Debris cubes are unlimited; if you run out of them, find a suitable substitute
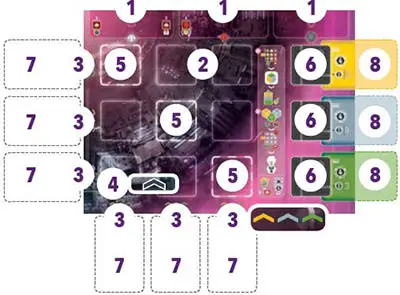
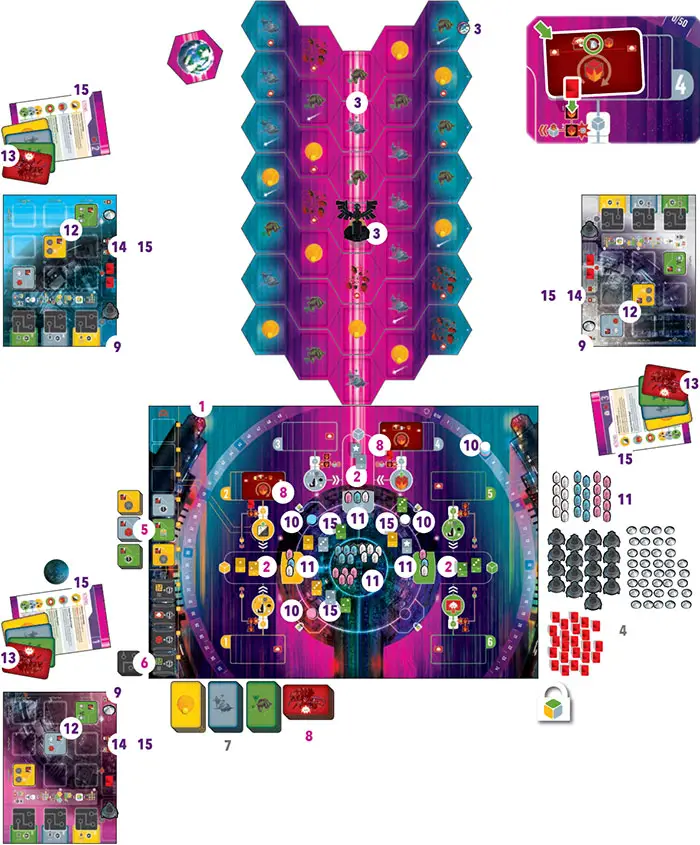
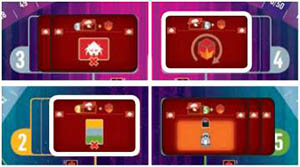
The action areas on the Black Angel board are characterized by a color. This color is linked to the type of action that you can perform there: green for destroying Ravagers and for missions to the ships of the valiant Tsoths, gray for repairing damage to the Black Angel and for missions to the stations of the skillful Xhavits, orange for technological advances and missions to planets inhabited by the ingenious Meluriens.
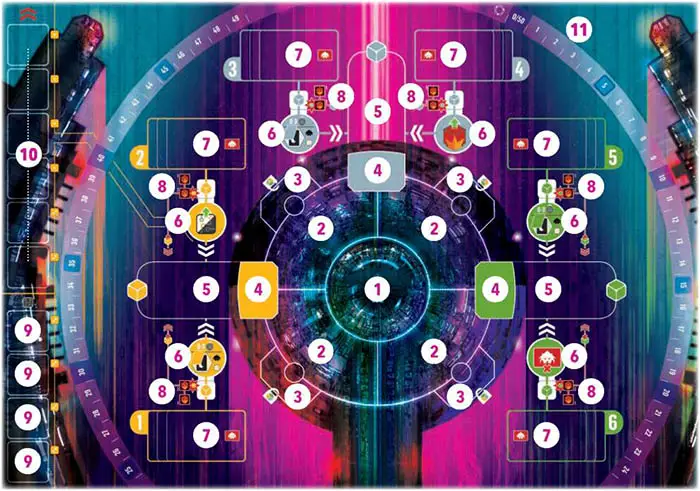
- Break room.
- Player compartments - standard area.
- Player compartments - high-security area.
- Workstations (orange, gray, and green).
- Die supply areas (orange, gray, and green).
- The 6 Actions.
- Locations for Ravager cards.
- Spaces for Damage cubes.
- Spaces for Advanced Technology tiles
- Technology tile display.
- Score track.
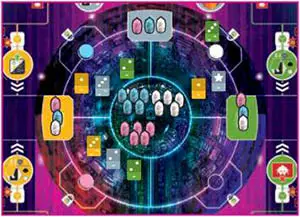
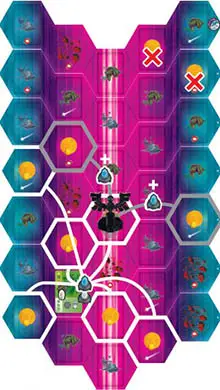
Space Board
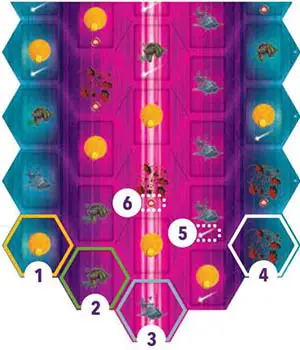
- Hex with a Melurien planet (orange
- Hex with Tsoth ships (green).
- Hex with a Xhavit station (gray).
- Hex with an asteroid field.
- Hex with a comet (see Playing Solitaire
- Hex with a Ravager Ship.
Player Board
- Storage area (resources, debris, ships).
- Technology grid (3x3).
- Color arrows (Technology).
- Black arrows (Advanced Technology).
- Spaces for Starting Technology tiles.
- Spaces for ejected Advanced Technology tiles
- Spaces to play a card.
- Spaces for ejected Mission cards.
Each robot of your color in a workstation on the Black Angel board permits you to roll one die, which represents its ability to take action.
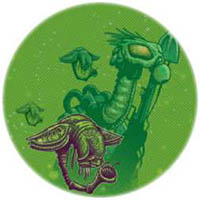
The Meluriens

This is probably the most evolved species known to date, and certainly the most mysterious. It is unknown why the Meluriens nourish an extreme distrust of other galactic species, and a lack of enthusiasm for sharing their knowledge.
They claim that they protect certain secrets in order to maintain the balance of the universe.
Although, given their technological sophistication, they could live in structures with no equal in the galaxy, they prefer to gather on inhospitable planets, on which only they can reside.
The Xhavits
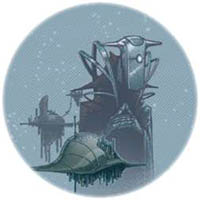
With its very particular metabolism, this species lives aboard immense galactic stations with tightly controlled atmosphere.
In addition to being skilled merchants, they are admirable technicians, who specialize in recovery and recycling of the waste and debris that clutter space.
This is also how they continually expand their galactic stations and create new ones.
It is rumored that by salvaging everything that is discarded and recycling what they consume, the Xhavits have traversed a very long path to become the wealthiest species in the known universe.
The Tsoths
This species, now nomadic, formerly occupied numerous planets of a distant galaxy, until the day when the terrible Ravagers reduced their brilliant federation to cinders.
The descendants of the few survivors of this tragic event traveled the galaxies aboard their ships, applying all their knowledge to researching combat technology, in hopes of putting an end to the military domination of the Ravagers.
Certain Tsoths occasionally offer their combat abilities to help other species... for a fee
The Ravagers - The Common Enemy
The Ravagers are a legendary and particularly aggressive species, pursuing only one goal: destruction of the other species.
Myths recount that their origin is linked to the Tsoths, who, eager for domination, sought to conceive an absolute weapon by creating artificial beings, devoted entirely to combat.
The legend says that the Ravagers escaped control of their creators. In reality, we know very little about them.
They are not the best fighters, nor are they the most evolved, but they have two major things going for them: their numbers and their determination.
Setup
-
Place the Black Angel gameboard in the middle of the table.
-
Sort the dice by color, and place them on the supply areas of the Black Angel game board.
Note: For a 3-player game, use only 5 dice per color; for a 2-player game, use only 4 dice per color; return the unused dice to the box.
-
Tile the Space strips in a chevron-shaped line pointed toward the Black Angel board, in order to build the Space board. Neither the order of the strips, nor the numbers on them, nor which side of any given strip is face up matters.
Place the Spes token on the number of the strip furthest from the Black Angel gameboard. Place the Black Angel figurine on the middle hex of the center strip.
Note: For a 2-player game, use only 5 Space strips; return the unused strips to the box.
-
Place the ship figurines, resources, and Damage/Debris cubes near the Black Angel gameboard. These form the supply.
-
Sort the Technology tiles according to their color (orange, gray, green), standard side up (this is the face with the
 icon in the upper-left corner); then shuffle each color and place them in 3 face-up stacks beside the Black Angel gameboard.
Next, draw 1 Technology tile of each color, and place them randomly on the first 3 spaces of the display (i.e. the first 2 spaces with a cost of 2, and the first space with a cost of 1).
Note: Ignore the information depicted on the other side of these tiles; this info is only used for the advanced rules.
-
Shuffle the Advanced Technology tiles face down, then place them as a face-down deck beside the gameboard . Next, place 1 tile face up on each of the 4 Advanced Technology slots on the Black Angel gameboard.
-
Sort the Mission cards according to their color (orange, gray, green), then shuffle each color face down to form 3 decks; place them near the Black Angel gameboard.
-
Shuffle the Ravager cards face down to form a deck; place it near the Black Angel gameboard.
Note: Remove 6 Ravager cards from this deck for a 3-player game; remove 12 Ravager cards from this deck for a 2-player game; return the removed cards to the box.
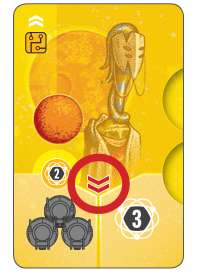
Draw the first card from the Ravager deck, and place it face up on the slot beside the action of the Black Angel that this card targets (the actions are numbered 1-6).
Then place a Damage cube on the first Damage space of that action. Repeat this operation for a second Ravager card. If it targets the same location as the first card, place it atop the first card, offset a little, and place the Damage cube on the second Damage space of this action.
Each player chooses a player color and proceeds as follows:
-
Take the player board of your color and place it before you.
-
Take the 2 discs of your color. Place one of them on the 5 VP space of the score track. Then claim player compartment closest to where you are sitting, by placing your second disc on it: This compartment now belongs to you.
-
Take 8 robots of your color. Place 5 of them in the break room of the Black Angel, and 1 in each of the three workstations. Place your other 8 robots in the supply.
-
Randomly place the 3 Starting Technology tiles of your color face up on the highlighted slots of your player board.
-
Take 1 Mission card of each color (orange, gray, green ) and 1 Ravager card into your hand.
-
Take 1 resource, 1 Damage/Debris cube, and 1 ship, and place them in the corresponding storage areas on your player board.
-
To finish the setup (15), choose a first player, who takes the First Player token (this token will be used when the end of the game is triggered). Give each player the player aid with the number corresponding to their position in the turn order (first player, then clockwise).
In turn order, each player rolls a die of each color (orange, gray, green); place your three dice in the standard area of your compartment.
Each of you (except for the first player) then receives an advantage indicated in the upper-right corner of your player aid, which depends on your position in the turn order.
Game Play
A game of Black Angel plays out over a series of rounds, in which each player in clockwise order gets one turn. On your turn, you must choose one of the two following sequences and resolve step by step:
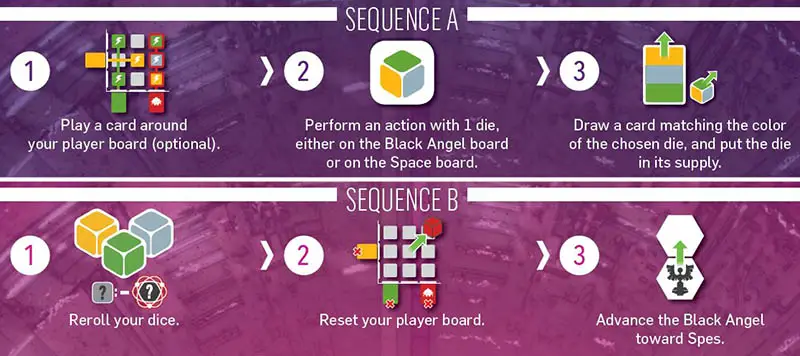
Note: If you are unable to perform sequence A, you must perform sequence B.
SEQUENCE A
1. Play a card around your player board
You can place a Mission card or a Ravager card from your hand face down on one of the six slots around your player board, as long as that slot does not already have a card in it. By doing so, you activate one or more Technology tiles in the same row/column as the space on which you placed the card. What you do next depends on the type of card you placed:
If you played a Mission card: This card activates only the Technology tiles in that row/column that are the same color as this card.
If you played a Ravager card: This card activates all of the Technology tiles in that row/column, regardless of their color.
Notes:
You may activate your Technology tiles in any order you wish.
Advanced Technology tiles are never activated (they only take effect at the end of the game).
The cards played around your board are face down: Only the card type (Mission or Ravager) and color (in the case of Mission cards) are important.
It really takes alien know-how to make your own technologies work.
Example:: Noelie plays a green Mission card from her hand on the corresponding slot in the second row of her technology grid. Thus she can activate her 2 green Technology tiles in this row.
If she had played a Ravager card, she could have activated her orange Technology tile in this row, as well.

2. Perform an action with 1 die
First, you must select a die. This die can come from your compartment or from another player's compartment.
If the die comes from another player's compartment, you must buy it.
In order to buy it, it must not be reserved, and you must pay 1 resource from your storage area to the die's owner, who cannot refuse the transaction.
Then, you must use this die to perform either an action on the Black Angel board or an action on a Mission card that has been played in an Alien territory on the Space board. Each action is activated as many times as the value of the die.
For example, a die of value 2 allows 2 activations. With a die of value 0, you cannot perform any actions, except for part of the Command Your Ships action.
Note: The dice used in this game have the following composition: 0 (the face with a star), 1, 1, 2, 3, and 3. Opposite faces always have a difference of 2.
Each AI knows that deploying the right number of robots to the right place at the right time is essential to the Black Angel completing its mission at optimal efficiency.
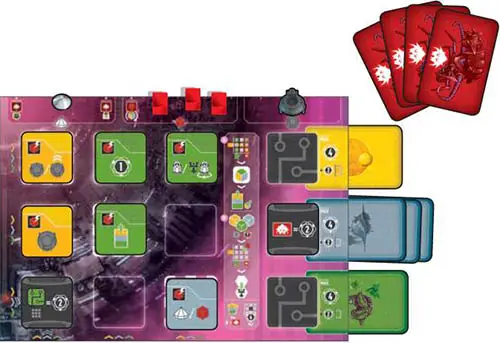
Performing an action on The Black Angel Board
The Black Angel board offers six actions, two in each color (orange, gray, green). In order to perform an action, the color of your die must match the color of the action.
Place your die on the space designated for the action you want. Then verify that your action is neither damaged nor affected by a Ravager card before performing it.
Damaged Action
If there are 2 Damage cubes on the action, the action is damaged, and the activation value of your die is reduced by 1. If there is only 1 Damage cube on the action, there is no consequence.
Notes:
There will never be more than 2 Damage cubes on an action.
A value-0 die keeps its 0 value even if the action is damaged.
Ravager Cards
If there are any Ravager cards on the Ravagers space in front of the action, you must resolve the permanent effect of the topmost Ravager card before performing the action.
If and only if you cannot resolve the effect of the Ravager card, you can still perform the action, but you must lose 1 VP on the score track.

Action: Discover Technology
For each activation of this action, you may take 1 Technology tile of your choice from the display, except for the 2 tiles at the beginning of the display, and the Advanced Technology tiles; each of those tiles requires require two activations.
Notes:
Technology tiles taken are not replaced, and tiles remaining in the display are not moved.
Advanced Technology tiles taken are immediately replaced by the top tile from the deck. If the deck is empty, the slot remains empty.
You are allowed to have duplicates of any technology, even advanced technology.
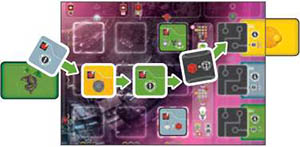
"Inject" your new Technology tiles, one by one, in whatever order you choose, into the grid of your player board; each Technology tile must follow the direction of one of the 6 color arrows; each Advanced Technology must follow one of the 2 black arrows. T
he new tiles will shift any tiles already present. This may result in tiles being ejected from the grid. Keep ejected tiles near your player board; they can become valuable later in several ways.
Note: If a Technology tile with debris on it is ejected, reclaim the debris and place it in your storage area.
It is important to understand that alien technologies are indispensable to the success of our mission. Even if how some of these work is a bit mysterious to us right now, we must redouble our efforts to master them!
Example: Noelie has placed her orange die showing a 3 to perform a Discover Technology action. Before performing the action, she verifies whether this action is damaged and/or affected by a Ravager card.
Because there is only 1 Damage cube there, the action is undamaged; however, there is 1 Ravager card there, so Noelie must resolve its effect (in this case, she must discard a Mission card) before performing her action.
Example:
With her orange die showing a 3, Noelie can:
- Take 3 Technology tiles that cost 1 each.
- Take 1 Technology tile that costs 1, and 1 Technology tile that costs 2.
- Take 1 Technology tile that costs 1, and 1 Advanced Technology tile, which always costs 2.
Because there is only a single Technology tile that costs 1 in the display, Noelie takes the second option.
Ejection of an Advanced Technology Tile
When an Advanced Technology tile is ejected, you must immediately place it on one of the 3 Advanced Technology spaces on your player board (only 1 tile per space). The space you choose determines the maximum VP this tile can earn during final scoring.
This maximum starts at 4 VP, but each of your cards ejected from the Space board (see page 12) that you place beside this space increases this maximum by 2 VP.
Each Advanced Technology tile that is not ejected at the end of the game, and each Advanced Technology tile that is ejected after all 3 spaces are occupied by Advanced Technology tiles, can earn you a maximum of only 4 VP at the end of the game.
The missions you perform in space increase your knowledge of aliens, allowing you to improve upon their most advanced technologies.

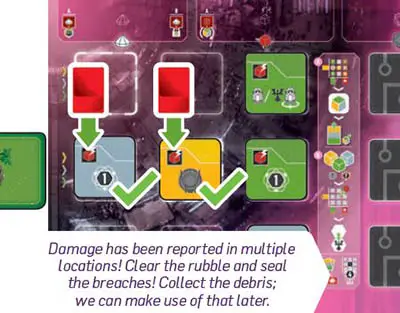
Action: Repair The Black Angel
For each activation of this action, you may remove 1 Damage cube of your choice from the Black Angel (from an action or a die - see notes below) and transform it into debris (the Damage cube is now considered a Debris cube).
You can then place this debris either on the Lightning space of a Technology tile to immediately activate its effect (the debris remains there, preventing another activation using another Debris cube), or in the Debris storage area on your player board.
Notes:
A die from a supply with a Damage cube on it is said to be a "damaged die".
Damage can be repaired from actions, as well as from damaged dice.
If an action has 2 Damage cubes, you must remove the one damaging the action first.
You are not required to remove all of the damage from an action at the same time.
Example: With her gray die showing a 2, Noelie removes 2 Damage cubes from the Black Angel, and transforms them into debris that she can use to activate the effects of 2 Technology tiles on her player board.
Noelie chooses to activate a gray Technology tile that enables her to gain 1 VP, and an orange Technology tile that permits her to take 1 ship from the supply.

Action: Destroy Ravagers
For each activation of this action, you may destroy 1 Ravager card of your choice (among any of those attacking actions of the Black Angel) and take the card into your hand.
However, if there are multiple Ravagers in the same location, you absolutely must destroy all of those Ravagers at the same time.
Do not neglect the Black Angel's defense: The longer you put it off, the rougher a time you will have in combat! Besides, once destroyed, the carcasses of their ships can be put to good use!
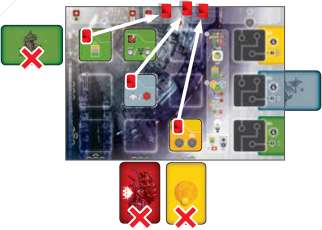
Example: With her green die showing a 2, Madeline can destroy 2 Ravager cards.
She chooses to destroy the Ravager card in location 2 and the Ravager card in location 4. She could have opted, instead, to destroy the 2 cards in location 3.
However, Madeline could not have chosen to destroy 2 cards from location 5, because there are 3 Ravager cards at this location (and all 3 cards must be destroyed at the same time).
Action: Command Your Ships
There is one of these actions for each of the 3 colors. This action allows you to move 1 (and only 1) of your ships in space; move it 1 hex per activation. Then place a Mission card on the Alien territory where your ship ends its move on the Space board.
When you perform this action, you must carry out the 4 following steps:
-
Move one of your ships
You can move one of your ships a number of Space hexes less than or equal to the value of the chosen die. You cannot traverse or stop in a hex with an asteroid field.
You can use one of your ships already in space, or launch a new ship. If you launch a new ship, take one of your robots from the break room of the Black Angel and place it in the cockpit of a ship from your storage area (place your robot in the notch of the ship).
This ship starts its move from the Black Angel's hex.
Notes:
You can use a star die (value 0) to perform this action, but if you do, you do not move a ship; however, you still can perform steps 2 - 4 of this action.
Unlike your ships, the Black Angel can move through or stop in a hex with an asteroid field (its shields easily protect it from these little celestial bodies). If and only if the Black Angel is in an asteroid hex, your ships can traverse or stop in the Black Angel's asteroid hex, thanks to the protection of its shields; however, if the Black Angel leaves this hex, any ships remaining there are destroyed.
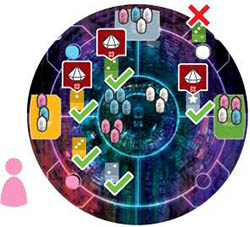
Each Space hex can only accommodate 2 ships, which must belong to different players.
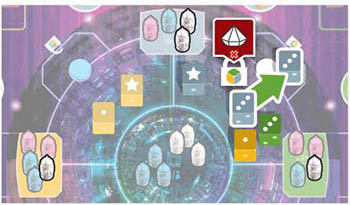
Example: With her orange die showing a 3, Madeline can either move her ship already in space up to 3 hexes, or launch a new ship into space and move it up to 3 hexes away from the Black Angel.
Because she wants to reach a Melurien planet, she has 8 potential destinations, 2 of which can only be reached with a new ship.
-
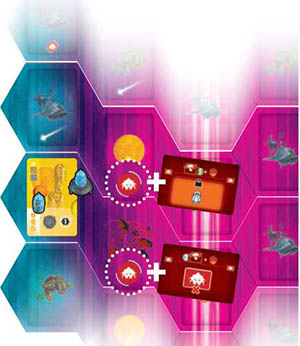
Place a Mission Card
If your ship ended its movement on a hex that matches the color of your die, you may also place a Mission card (from your hand) of the same color on the hex (because the Mission targets the aliens that reside there).
After playing the card, you must place a robot on the card's reward (see example) before taking the benefit. From now on, you are considered the owner of this card.
The robot must belong to you and it must come from the Black Angel's break room (and not from the supply or one of the three workstations). The rewards available include gaining VP, robots, resources, or ships.
Notes:
Tuck the Mission card under your ship, so your ship is slightly overlapping the right edge of the card.
You can only place 1 card, at the very end of your move, no matter how many activations your die provided.
You can skip placing a Mission card if you only want to move the ship. If you do this, skip steps 2 - 4. If you used a Star die (value 0), you must place a Mission card.
If you do not have the ships and/or robots necessary to perform this action, you cannot perform this action.
Each Mission card can accommodate a maximum of 2 ships. Each player can only occupy 1 space per card.
A ship being on a hex does not prevent you from placing a card on this space. If you do, the extant ship will be placed on the card and will offer its owner the possibility to use the card later.
Encountering benevolent alien species is, without any doubt, one of the major events of the voyage of the Black Angel. Maintaining a trusting relationship with each of them will probably be the key to our mission's success.

Example: Once she reaches the Melurien planet Madeline places an orange Mission card from her hand there, and places her ship on the designated space to the right of the card.
She then takes one of her robots from the Black Angel's break room, and places it on the reward, which she immediately receives (in this case, 1 VP).
-
Ravagers Appear
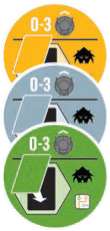
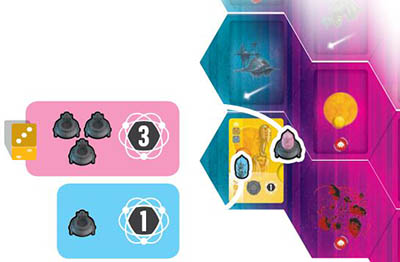
Placing a Mission card can attract Ravagers, whose one goal is to destroy the Black Angel. Count the total number of Ravager Ship icons visible on all of the hexes adjacent to the hex where the card was placed.
Place as many Ravager cards as there are visible icons, following this procedure for each Ravager card:
Draw the first card from the Ravager deck.
Place it face up on the Ravagers location beside the action on the Black Angel board indicated by this card.
Then place a Damage cube on the first empty Damage space of this action. If this action already has 2 Damage cubes, place the cube on a die in the same-color supply. If that supply is empty, or all of the dice there already have a Damage cube (a die can have at most 1 Damage cube on it), ignore this damage.
Notes:
If any Ravager cards are already on this space, place the new card overlapping any existing cards, slightly offset, so you can always count the number of cards on this space. Only the topmost card's permanent effect has any impact on that action's action.
Each action's Ravagers space can only accommodate 3 Ravager cards. If you must place a Ravager card on a space that already has 3, discard it, and draw and place the next Ravager card instead.
Ravager Ship icons can be found in the card space of the Space hexes. Placing Mission cards can thus cover Ravager Ship icons, rendering them ineffective.
Example: Madeline counts the number of Ravager Ship icons visible on the hexes adjacent to the hex where she placed her card: There are 2. Madeline draws the top card of the Ravager deck, and places it on the Ravagers location indicated on the card (in this case, location 5).
She immediately places a Damage cube there. Madeline then draws a second card and places it on the Ravagers location indicated on this card (in this case, location 3). Because this location already had 2 Damage cubes, she must place the cube on a gray supply die.
-
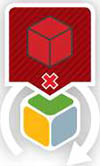
New Technology Tiles Appear
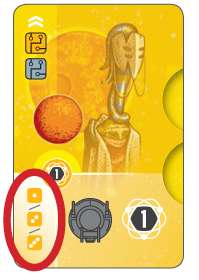
Each Mission card placed in space makes 1 or 2 Technology tiles appear in the display (according to what is depicted in the upper- left corner of the card).
Take these tiles from their respective decks and place them in the order shown on the card (from high to low) in the tile display. Tiles injected into the display can push tiles that are already there. If some tiles are ejected from the display, place them in a discard pile.

Performing an action in an alien territory on The Space Board
You can perform the action offered by a Mission card placed in space. There are two types of Mission card:
Neutralization Mission
Cards with neutralization missions cannot be activated, but instead their effect will be triggered when they are ejected from the Space Board.
Activation Mission
Cards with activation missions can be activated. If you choose to activate a card with an activation mission, you must respect the following conditions:
You must use a die of the same color as the mission.
You must have a robot or ship on this card.
If you respect these two conditions, for each activation of this Mission card, you can apply the card's effect (see appendix for details on the effects of Mission cards).
Important: If you activate a card with an activation mission that is not yours (you don't own the robot placed on this card), the owner of this card can perform one (and only one) activation of this card (without needing to use a die) after you have performed your action.
Example: With her orange die showing a 3, Noelie decides to activate Madeline's card (she can do this because she has a ship on this card). She immediately gains 3 ships and 3 VP.
Madeline, because she owns the card, also gets 1 activation, and thus gains 1 ship and 1 VP.
3. Draw a card matching the color of the chosen die, and put the die in 3 its supply
Draw a card matching the color of the die you just used to perform your action, and add it to your hand. Return the die to its supply to make it available again.
Important: At the end of your turn, you must not have more than 6 Mission cards in hand. Do not count any Ravager cards. Discard the excess Mission cards of your choice.
Note: If a Mission card deck becomes empty, shuffle the discards of this color to form a new deck. If there are no discards of this color, then there simply will be no more Mission cards of this type.
Debris
At any point in your turn when you perform Sequence A, you can spend debris from the storage area on your player board to flip 1 die in your compartment over to the opposite face.
Notes:
- Debris on your Technology tiles cannot be used.
- Opposite faces of a die always have a difference of 2.
Important: You cannot flip a die that you just bought from an opponent.
Sequence B
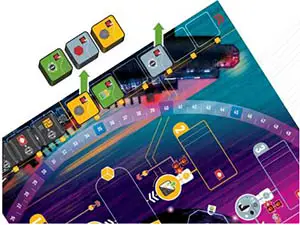
1. Reroll Your Dice
You can choose Sequence B even if you still have dice in your compartment, BUT you must lose VP equal to the total value displayed on those dice. Then put them back in their respective supplies.
Each of your robots placed in a workstation gives you the right to roll a die of the color associated with that workstation. Take these dice from their respective supplies (limited by their availability), roll them, and place them in the standard area of your compartment.
Notes:
It is possible that the number of available dice of a color is less than the number of robots you have in the workstation of this color; in this case, you simply roll fewer dice than the number of robots of this color.
It is possible that one or more dice are damaged. For each damaged die you must roll, you lose 1 VP; return the Damage cube to the supply.
You cannot choose not to roll a die, regardless of whether it is damaged.
You can reserve one and only one of your dice by spending 1 resource (the resource goes to the supply). Move it to the high-security area of your compartment.
Example: Valentin chooses to perform Sequence B. Because he only has a gray die showing a star, he can do this without losing any VP.
After returning this gray die to his supply, Valentin takes one die for each of his robots at the 3 workstations of the Black Angel: 1 orange die, 2 gray dice, and 1 green die. The only orange die available is damaged, so he loses 1 VP to take it.
Valentin then rolls these 4 new dice, and opts to reserve his gray 3 by paying 1 resource to the supply. He moves this die to the high-security area of his compartment.
2. Reset Your Player Board
Discard all the cards played in the 6 slots around the lower-left corner of your player board (Mission cards and Ravager cards).
Be careful not to discard your ejected cards tucked under the right of your player board. Also move all Debris cubes from your Technology tiles to their storage area on your player board.
3. Advance The Black Angel toward Spes
To finish Sequence B, proceed as follows:
Advance the Black Angel one space in a straight line (away from the Black Angel board) on the Space board.
Eject all Mission cards from the 1st Space strip (the one closest to the Black Angel board) from the Space board. Any ejected Mission cards with neutralization missions are triggered; resolve their effects (order does not matter).
The freshly ejected cards are not taken into account when resolving these effects. After resolving them, return each card to its owner, who tucks it under their player board (in the same-colored slot on the right). Return any robots and ships on these cards to the supply.Take the 1st Space strip, flip it over, and place it as the last strip; then shift all the Space strips toward the Black Angel board.
Important: If the Planet Spes token is on the 1st Space strip (the one from which cards were just ejected), remove it.
After flipping this strip over and placing it in the last position, cover its middle hex with the Planet Spes tile. Now the planet Spes is in sight! The objective of this long voyage will soon be attained!
End of the Game
When either of the following situations occurs, finish the round in progress, and then play one final round:
- The Black Angel figurine arrives on Spes (during a Sequence B).
- The Ravager card deck becomes empty (during a Sequence A).
After the final round is complete, tally your scores as follows:
To the VP you gained over the course of the game, add the VP earned through your Advanced Technology tiles.
Each Advanced Technology tile that was not ejected from your grid, and each one that was ejected after your slots were all three full can earn you a maximum of 4 VP.
Each of the three ejected Advanced Technology tiles in your three spaces has a maximum of 4 VP plus 2 VP per recovered card of the color corresponding to its space.
If the Black Angel has reached planet Spes, you can each exchange robots (from the Black Angel's break room) / resources / ships (from your storage area) you still have for VP.
Each "set" of 2 things of any type(s) is worth 1 VP (add them all together before converting them 2:1 into VP, rounded down). On the other hand, if the Black Angel has not reached planet Spes, then robots, resources, and ships are not worth any VP.
The player with the most VP wins. In a tie, the tied players share the victory.
Notes:
As soon as the end of the game is triggered, the Black Angel advances no further. Sequence B can still be chosen, but skip phase B.3 (thus, no further cards will be ejected).
If the game ends by depleting the Ravager deck, shuffle the discard to form a new deck.
At the end of the game, all the debris placed on your Technology tiles is automatically moved to your storage area.
If you have several copies of the same Advanced Technology tile, the elements used for them (tiles, debris..). must be different for each tile scored.
Important: During the final turn of the game, if you are required to perform Sequence B, you may choose simply to pass your turn instead.
Example:: At the beginning of the final scoring, Noelie has 34 VP on the score track.
On her player board, Noelie has 2 Advanced Technology tiles. The first of them grants her 2 VP per green Technology tile she has in her technology grid. Because it has not been ejected (it is still in her grid), Noelie gains only 4 VP, despite her 3 green tiles.
The second one grants her 2 VP per Ravager card in her hand. Because this one has been ejected, and is placed by the gray slot where Noelie has collected 3 gray cards, she can gain a maximum of 10 VP (4 VP + 2 VP per card there). Unfortunately, she has only 4 Ravager cards, and thus gains only 8 VP. Her total is now 46 VP.
The Black Angel has reached Spes, so Noelie can exchange robots (from the Black Angel's break room) / resources / ships (from her personal supply) she has for VPs, at a rate of 2 things per VP. Thus, her 3 robots in the break room, 1 resource, and 1 ship earn her 2 additional VP]
Her final score is 48 VP.
2-player Game
During setup (step 11), place 1 robot of an unused color in each workstation. The first player rolls the neutral player's dice and places them in a compartment not used by either of the 2 players.
Over the course of the game, you can buy a die from the neutral player. To do so, pay the resources to the supply. As usual, the neutral player's dice cannot be flipped over.
Each time a player performs Sequence B, that player also rerolls all of the neutral player's dice that either have been used or are showing their star face (unused dice showing 1, 2, or 3 stay where they are).
Whenever a player adds a robot to a workstation, remove the neutral player's robot there (if any) from the game. As a result, over the course of the game, it is possible that the neutral player ends up with no more robots in workstations, and thus there will be no more need to roll dice for the neutral player.
Continue Reading
