Components
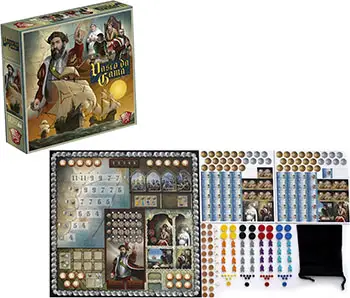
- 1 Game board
- 1 Round Marker
- 1 First Free of Charge Action Marker
- 35 Project/Ship Tiles
- 6 Merchant's Ship Tiles
- 4 Scoring Markers
- 4 Character Tiles
- 1 Label Sheet
- 9 Vasco Da Gama Tiles
- 22 Sequence Numbers
- 16 Action Discs
- 4 Additional Action Discs
- 28 Captains
- 32 Sailors
- 6 Missionaries
- 48 Coins
- 1 Cotton Bag
- Instructions
Object of the Game
The winner is the Player with the most Victory Points at the end of the game.
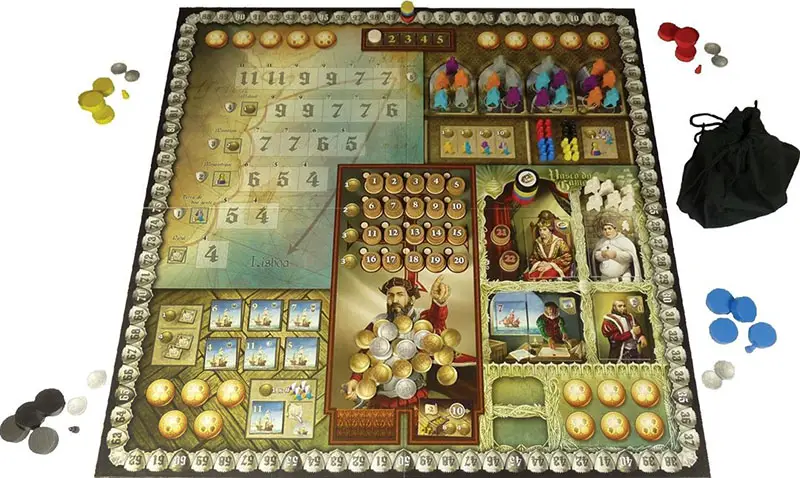
Setup
If the game has less than 4 Players, remove the Action Discs, Captains, and Scoring Markers of unused colors and place in the box.
-
Lay the Game Board on the table. The board is subdivided in 4 Areas: Recruiting, Characters, Purchase Projects and Navigation.
-
Place the Round Marker over Number 1 of the Round Track.
-
Each Player chooses a color (yellow, red, black or blue) and he/she receives 1 Scoring Marker of the chosen color, to be placed on the board, over Number «0» (zero) of the Scoring Track.
During the game, every time the Player earns Victory Points, he will move the Scoring Marker accordingly.
-
Each Player also takes and places in front of him, in order to create his supply:
- 4 Action Discs of his own color,
- 1 Captain of his own color,
- 10 Reals

-
The Recruiting Area is subdivided in 4 Sections.
When playing with 2 Players, 2 Sections will be active, when playing with 3 Players, there will be 3 Active Sections, with 4, all 4 Sections will be active.
When playing with fewer than 4 players, place 1 Additional Action Disc of an unused color on each non-active Section.
Place the 32 Sailors in the bag. Extract and deploy 5 Sailors in each Active Section. Each Player places the 6 remaining Captains of his color in the appropriate space.
-
The Player who has travelled to the farthest destination in the last year becomes the First Player and receives immediately the Bartolomeu Dias Tile and 2 Victory Points.
Distribute remaining Character Tiles to other Players, in clockwise order, as per the table below. Give:
- 1 Missionary to the Player possessing the Francisco Alvares Tile,
- 1 Merchant Ship to the Player possessing the Girolamo Sernigi Tile. This Ship must be immediately placed in the Navigation Area. See ahead "Girolamo Sernigi Character",
- the Additional Action Disc of his color to the Player possessing the Manuel I Tile.
Place remaining Missionaries, Additional Action Discs, and Sequence Numbers 21 and 22 in the appropriate spaces.
Form a deck with the Merchant Ships Tiles and place them face down in the appropriate square on the board. Place the first Tile face up on the top of the deck.
If playing with fewer than 4 Players, place Character Tiles which were not distributed on the appropriate squares on the board.
2 Players 3 Players 4 Players 1st Player Bartolomeu Dias Bartolomeu Dias Bartolomeu Dias 2nd Player Girolamo Sernigi Francisco Alvares Francisco Alvares 3rd Player Girolamo Sernigi Girolamo Sernigi 4th Player Manuel I -
Place the coins on the board, to create the common supply.
Place the Sequence Numbers from 1 to 20 following the numbering on the board.
Shuffle Vasco da Gama's Tiles (from now on, VdG's Tiles) and place the deck face down in the space on the right. Pick the first Tile and place it face up on the top of the deck.
-
Divide the Project/Ships Tiles into 3 decks using the Roman numeral on the Project side, with the Project side face up.
Place the decks next to the board, so that they remain visible to all Players.
Place the first 7 Ship/Project Tiles from the first deck (I) with the Project side face up in the spaces on the board.
The Tile placed in the space in the bottom right corner of the Area is called the Sao Gabriel Project (see Purchase Projects Action).
When a Player, during the game, has to pay money for any reason, put the paid Reals in the common supply.
At any time, during the game, he will be able to exchange 5x 1 Real coins of his supply with 1x 5 Reals coin of the common supply and vice-versa.
The Reals are not limited. It is highly unlikely that it will happen, but if the Reals are exhausted note them on a sheet of paper.
Game Play
The game lasts for 5 Rounds. Each Round is made up of the following Phases (always in the same order):
- Phase 1. Place action discs
- Phase 2. Take actions
- Phase 3. Navigation
Phase 1: Place Action Discs
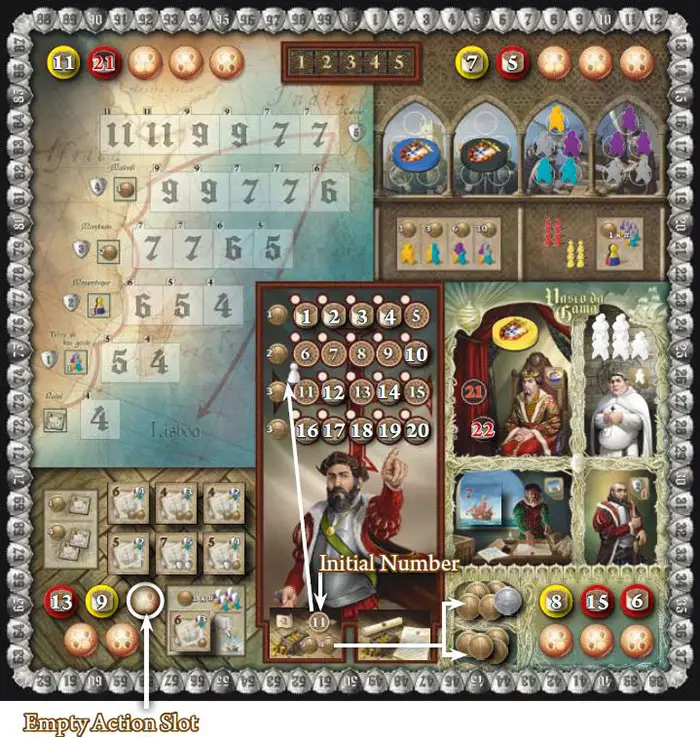
Move the top face-up VdG's Tile from the deck on the right, and place it face up on the left space over any other Tiles possibly already there.
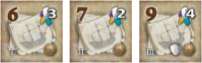
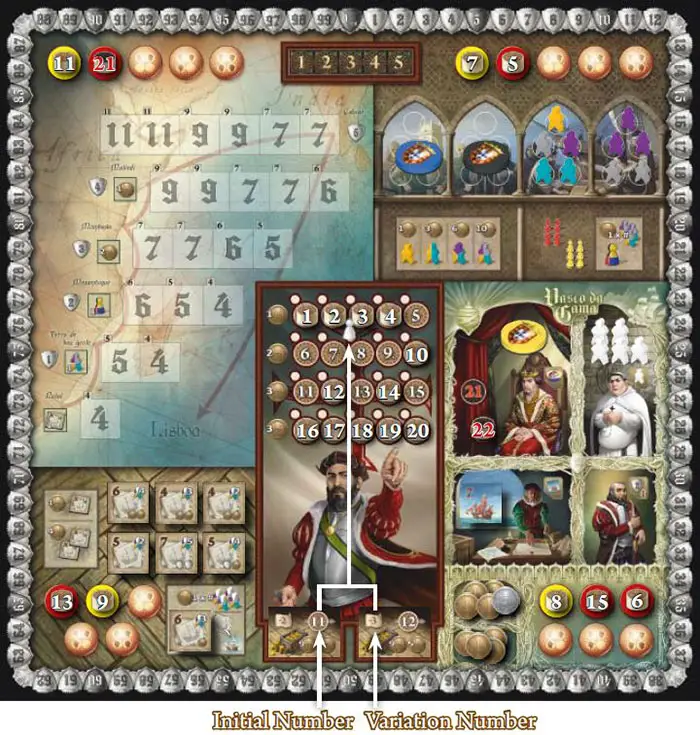
Place the First Free of Charge Action Marker in the Numbers Zone according to the upper right number of the Tile, from 4 to 12 (from now on, the "Initial Number").
The smaller numbers below this on the Tile indicate the amount of Reals that Vasco da Gama puts at the Players' disposal for the Round. Draw the corresponding amounts from the common supply and place them in the appropriate Slots in the Characters Area.
In every Round, each Player will place his 4 Action Discs (5 if he is in possession of the Manuel I Tile. See ahead). By doing this, he options the actions which he intends to take during Phase 2.
Starting with the First Player and continuing clockwise, each Player, in turn:
-
picks a Sequence Number of his choice from the Numbers Zone,
-
places it over one of his Action Discs and
-
places them both in 1 empty Action Slot (i.e. in which there are currently no Action Discs placed) if there are some available, in the Area of the action the Player intends to take: Characters, Recruiting, Purchase Projects, or Navigation.
Once placed, the Action Disc and the Sequence Number associated with it may not be moved.
Available Action Slots vary depending on the Number of Players:

Playing with 2, only the ones marked with the symbol will be available.
Playing with 3, also the ones marked with the symbol will be available.
Playing with 4, all Slots will be available.

Sequence Numbers 21 and 22 will only be used by the Player owning the Manuel I Character and therefore the Additional Action Disc (See ahead Manuel I).
Phase 1 is over when all Action Discs of all Players have been placed.
Phase 2: Take Actions
After all Action Discs have been placed, pick the top face-down VdG's Tile from the deck on the right and place it face up on top of the deck.
Then, move the First Free of Charge Action Marker by a number of steps corresponding to the Number shown in the upper leftof the VdG's Tile just uncovered (Variation Number). This number ranges from - 3 (minus three) to + 3 (plus three).
The Free of Charge Action Marker will move backward if minus and forward if plus.
The Number by which the Marker will be placed indicates the First Free of Charge Action Number in the current Round.
Note: all other numbers available on the Tile just uncovered (Initial Number and Reals) are relevant to the next Round and won't be used in the current Round.
Each Player can take, in each Round, up to 4 actions (5 if he is in possession of the Manuel I Tile. See ahead). Actions will be resolved following the numerical order of Sequence Numbers (from the lowest to the highest).
One at a time, call Sequence Numbers placed on the board (from the lowest to the highest). The Player whose Action Disc is placed with the called Number must now declare whether he wants to perform the action of the Area in which the Disc was placed (See ahead Actions description) or otherwise give it up.
If he decides to perform the action the Player must first check whether or not he has to pay in order to perform it.
The right to take an action is:
-
paid for if the Sequence Number is lower than the First Free of Charge Action Number: in this case, the Player, before taking the action, must pay an amount in Reals equal to the difference between the First Free of Charge Action Number and the Sequence Number, or
-
free of charge if the Sequence Number is equal or higher than the First Free of Charge Action Number: in this case, it will not be necessary to pay to take the action.
In both cases, the action is performed immediately (i.e. before calling the next Sequence Number).
If the player decides to give up his action (i.e. he does not want to, or cannot, perform the action), in exchange for his giving up he immediately receives many Reals (drawn from the common supply) as shown in the Numbers Zone on the line corresponding to his Sequence Number.
The player may give up an action which would be free of charge, and receive the money. If the Number called is 21 or 22 the player can give up the action but does not receive any money.
After taking or giving up the action, the Sequence Number called is repositioned in its space in the Numbers Zone and the Action Disc is immediately returned to the Player supply.
If a Character is hosted, the Action Disc is placed instead in the Characters Area in the taken Character's space and returns to the Player supply only at the end of the Round (see ahead).
The following Sequence Number is then called. Phase 2 ends when all Sequence Numbers have been called.
Available actions: Purchase Projects, Recruiting, Expedition, Characters.
Note: The fact of having paid for the right to perform an action does NOT affect in any way the cost that the Player pays for the fulfillment of the action.
(For example, in order to perform the Purchase Projects Action and buy 2 Projects the Player will have to pay 4 Reals (see Purchase Projects Action) regardless of whether or not he had to pay, and how much, for the right to perform it).
Purchase Projects
In the Purchase Projects Area the Players can buy Projects to order the building of Ships.
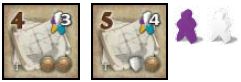
On the Tiles there are:
-
the Navigation Limit (from 4 to 11). Ships can occupy only Ship Slots of value lower or equal to their Navigation Limit (see ahead Expedition Action and Navigation Phase),
-
the number of crew (from 1 to 5), all of different colors among them, who must create the Ship's crew.
-
the deck to which they belong(from I to III) (see Initial Setup and End of round operations),
-
possibly the amount of Reals
 and/or of Victory Points
  the Ship will earn its owner during Phase 3 if it is in the Navigation Area (see ahead Phase 3).
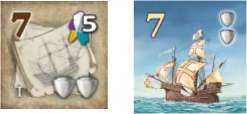
Example: This Project belongs to the 1st deck.
It must have a five-member crew (all of the different colors), and has a Navigation Limit of 7.
If during Phase 3 this Ship is in the Navigation Area, its owner will receive 2 Victory Points.
A single Purchase Projects Action allows Players to:
-
Purchase 1 or 2 projects, from those positioned in the 6 upper spaces of the Area, at the cost of:
- 1 Real for 1 project;
- 4 Reals for 2 projects
OR
-
Purchase the Sao Gabriel Project, in the special space, at a cost equal to the number of crew needed to form the Ship crew (as in the upper-right number on the Project side of the Tile)

The Player performing the action, having paid the relevant price, picks from the board the Tile or Tiles he purchased and places them in front of him in his supply:
- with the Project side face up if the Tiles are purchased from the 6 upper spaces;
- with the Ship side face up if it is the Sao Gabriel Project.
Each Tile purchased from one of the 6 upper spaces will show the Project side until the Ship is launched.
In order to launch a Ship the Player must own the complete crew. Ship's crew must be composed by Sailors and/or Missionaries all of different colors among them. The Player is free to choose which colors to use, provided they are all different in the same crew.
The Players can decide to launch 1 or more Ships in their possession at any time during the game (it is not necessary to own the complete crew before purchasing the Project, nor are Players compelled to launch any Ships when they own a complete crew).
It is not compulsory to own and board a Captain in order to launch a Ship (but it is compulsory in order to send it. Look ahead to the Expedition Action section).
When a Player, at any time during the game, has the necessary crew in his supply and decides to launch one or more Ships in his possession he will have to:
- turn the Tile to show the Ship side and
- return to the bag the Sailors he decided to use and/or return to the Characters Area any Missionary used.
The Sao Gabriel Project is immediately and automatically launched as soon as purchased (and therefore placed directly with the Ship side face up). The Player does not contribute to any crew members.
Example: Yellow bought 1 Project requiring 3 crew and 1 Project requiring 4 crew.
When buying he did not have necessary crew. (He just has 1 Missionary and 1 Violet Sailor).
In the course of the Round he performs the Recruiting Action and buys 1 Orange, 1 Grey, and 2 Turquoise Sailors. He then decides to launch his 3 crew Ship with 1 Orange and 1 Turquoise Sailor and 1 Missionary.
He returns the Sailors to the bag , puts the Missionary back in the Characters Area and flips the tile so that the Ship side is face up.

Recruiting
In the Recruiting Area a player can recruit Sailors and/or 1 Captain of his own color. Captains are the same color as the Players. Sailors are of 4 different colors.
A single Recruiting Action allows the recruitment of Sailors from a single Section and/or 1 Captain of the Player's color.
The Player performing the action must choose from which Section he wants to recruit Sailors.
The cost for Sailors is as follows (regardless of the quantity recruited):
- 1 Real for (any number of) Sailors of 1 color (from a single section),
- 3 Reals for Sailors of 2 different colors,
- 6 Reals for Sailors of 3 different colors,
- 10 Reals for Sailors of 4 different colors.
The Captain costs 1 Real for each recruited Sailor (regardless of their color). The Player can decide how many Sailors to recruit for each color (it is therefore not compulsory to take all Sailors of the color chosen).
The fewer Sailors recruited, the lower the cost of the Captain. If the player opts not to recruit Sailors he may take 1 Captain free of charge. The Player is not compelled to recruit a Captain every time he recruits Sailors.
The Player pays the relevant cost, picks the recruited Sailors from the chosen Section (and only from that) and/or 1 Captain of his own color from the relevant space and places them in his supply.
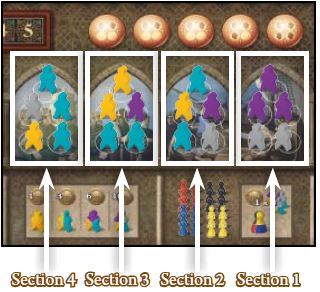
Example: Yellow decides to recruit just Sailors. He selects the 4th Section, pays 3 Reals (for 2 different colors) and recruits 1 Orange and 3 Turquoise Sailors.
Red decides to recruit Sailors from the 3rd Section and 1 Captain.
He pays 6 Reals (for 3 different colors) and recruits 1 Orange, 2 Turquoise and 1 Violet Sailors = a total of 4 recruited sailors. He then pays 4 Reals to recruit 1 Red Captain. Blue decides to recruit just Sailors.
He selects the 1st Section, pays 1 Real (for 1 color) and recruits 3 Violet Sailors.
Black decides to just recruit 1 Captain. He pays nothing and recruits 1 Black Captain.
Expedition
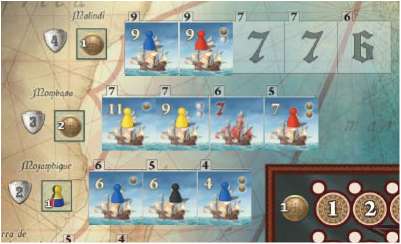
In the Navigation Area Players can send their Ships towards the 6 Landings: Natal, Terra de Boa Gente, Mozambique, Mombasa, Malindi and Calicut.
A single Expedition Action allows a Player to send 1 or more Ships from his own supply to a single Landing. The Player performing the Action chooses how many Ships to send and to which Landing.
The Player can send only Ships that were launched (see Purchase Projects Action) and that have a Captain of his color on board.

Ships can only occupy Ship Slots of value equal to or lower than their Navigation Limit.
An 11-Limit Ship can, therefore, occupy any Slot, a 7-Limit Ship can occupy Slots valued 7, 6, 5, or 4 but not those valued 9 and 11, and so on.
A 4-Limit Ship will never be sent to Mombasa as the smallest Ship Slot there is valued 5.

First, the Player performing the action places a Captain of his own color (to be drawn from his supply) on the Ship Tile of each launched Ship that he wants to send.
Then, he chooses a Landing and places all Ships that he wishes to(and can) send there. The Player is not compelled to send all Ships in his possession.
Ships can only occupy empty Ship Slots (i.e. Slots in which there are currently no Ships placed) the value of which is lower or equal to their Navigation Limit.
If there is more than one Slot of appropriate value, the Player can choose where to position his Ship. Ships of more than one Player can be placed in the same Landing. If there are no empty Slots in a Landing, or only Slots bearing a value which is higher than its Navigation Limit, a Ship cannot be placed there.
For each Ship sent, the Player immediately receives:
-
the number of Victory Points indicated on the Ship Slot occupied by the Ship (regardless of the value of its Navigation Limit).
-
a free of charge "bonus" (usable immediately) as shown on the coast of the Landing it was sent to:
- 1 Project (taken, if available, from one of the 6 upper spaces in the Purchase Projects Area) for each Ship sent to Natal;
- 1 Sailor (taken from the Recruiting Area or, if the Player chooses, picked from the bag) for each Ship sent to Terra de Boa Gente;
- 1 Captain of his own color (taken, if available, from the Recruiting Area) for each Ship sent to Mozambique;
- 2 Reals (taken from the common supply) for each Ship sent to Mombasa;
- 1 Real (taken from the common supply) for each Ship sent to Malindi.
Once all Slots in a given Landing are occupied, the Landing is defined as "complete". In the example, the Malindi Landing is "complete".
All Players having Ships in "complete" Landings will receive additional Victory Points during Phase 3 (see ahead). In addition, Ships in "complete" Landings can navigate further up to the next Landing.
Characters
In the Characters Area Players can accept favors offered by Characters or take the money put at their disposal by Vasco da Gama.
A single Characters Action allows a Player to:
-
take one of the two amounts of Reals made available by Vasco da Gama for the current Round. The Player who performs the action picks the coins from the space of his choice and places them in his own supply.
OR
-
host one of the Characters and benefit from his power.
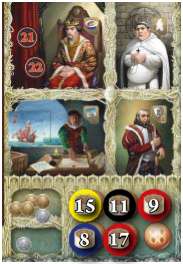
Example: At the beginning of the Round the Character Tiles had the following distribution:
- Blue had Francisco Alvares
- Yellow had Girolamo Sernigi
- Black had Bartolomeu Dias
- Red was in possession of the Manuel I Tile
The Player performing the action takes the Tile of the Character he intends to host (either from the board or from the Player owning it at that time), places it in front of himself, and immediately enjoys the benefit of the Character power.
The Player places his Action Disc over the space on the board corresponding to the Character taken, to indicate that no other Player can host that same Character for the current Round. The hosted Character Tile will stay in front of the Player until another Player takes it during a following Round.
The Player who is already in possession of a Character Tile (because he hosted it in a previous Round or received it at the beginning of the game -See Initial Setup), can use the action to host the same Character in the current Round.
He puts his Action Disc in the space corresponding to the Character which is already in his possession so that no other Player will be able to take it from him during the current Round.
If Bartolomeu Dias or Francisco Alvares are involved, the Player will receive immediately 2 Victory Points or 1 Missionary respectively. If Girolamo Sernigi is involved, the Player gets the right to send the Merchant Ship.
There is no limit to the number of Characters that a Player can have in front of him.
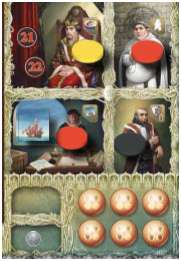
In the current Round Blue decides to take the money offered by Vasco da Gama: he takes 9 Reals from the upper space and places them in his supply.
Red opts to host Francisco Alvares. He places his Action Disc in the appropriate space, asks Blue to give him the relevant Tile and places it in front of himself: he receives immediately 1 Missionary.
Black chooses to keep hosting Bartolomeu Dias. He places his Action Disc in the appropriate space to indicate that no other Player will be able to claim it for the current Round and he immediately receives 2 Victory Points.
Yellow opts to host Manuel I. He places his Action Disc in the appropriate space, asks Red for the relevant Tile and places it in front of himself: he receives immediately the yellow Additional Action Disc.
Red has still one action to perform: he chooses to host Girolamo Sernigi. He places his Action Disc in the appropriate space, asks Yellow to give him the relevant Tile, places it in front of himself and decides to send the Merchant Ship immediately.
Manuel I (The King)

The Player hosting Manuel I immediately takes the Additional Action Disc of his own color from the board, together with the Sequence Number 21 or the Sequence Number 22 (he must immediately choose one of the two options) and places them both on the Board on an empty Action Slot (i.e. in which there are currently no Action Discs positioned) in the Area relevant to the action he intends to take.
When the chosen Number is called (see Take actions), the Player may perform his Additional Action. If the Player does not want to, or cannot, perform this action, he can give it up, but he will not receive any money in exchange.
If one of the Players owns the Manuel I Tile at the beginning of the Round (because he hosted it in a previous Round or received it at the beginning of the game -See Initial Setup) he will be able to use his Additional Action Disc (with Number 21 or 22) already in Phase 1.
If during Phase 2 another Player gets possession of the Manuel I tile, the new owner can immediately use the Sequence Number remaining in the Characters Area.
Bartolomeu Dias (The Leader)

The Player opting to host Bartolomeu Dias immediately receives 2 Victory Points.
The Player in possession of the Bartolomeu Dias Tile at the end of the Round (see End of Round operations) will again receive 2 Victory Points and will be the first player for the next Round.
Francisco Alvares (The Priest)

The Player hosting Francisco Alvares immediately receives 1 Missionary taken, if available, from the Characters Area, and places it in his supply.
At the end of each Round (see ahead End of Round Operations), the Player owning the Francisco Alvares Tile will again receive 1 Missionary to be drawn, if available, from the Characters Area and places it in his supply.
If there are no Missionaries in the Characters Area the Player does not gain one.
The Missionaries can be used as Crew members for the launching of Ships (see Purchase Projects Action).
Girolamo Sernigi (The Merchant)

The Player opting to host Girolamo Sernigi achieves the right to send the Merchant Ship. The Player can choose whether to send it immediately or at the beginning of Phase 3 (see ahead).
If he decides to send it immediately, then he picks the Merchant Ship placed face up on the top of the deck in the Characters Area and places it in a Ship Slot of the appropriate value at a Landing of his choice.
The Merchant Ship is completely financed by the Merchant. To be sent, it needs neither Captain nor crew. It can be placed in a empty Ship Slot having a value lower or equal to its Navigation Limit.
The Player immediately receives the "bonus" reported on the coast of the Landing in which he will place it (see Expedition Action for the "bonus" description). The Player does not receive the Victory Points indicated on the Ship Slot.
Once placed, the Merchant Ship will follow the same navigation rules as Ships owned by the Players (see ahead Phase 3).
During the first Round the Player who is in possession of the Girolamo Sernigi Tile having received it at the beginning of the game (see Initial setup) must send the Merchant Ship at the beginning of the first Round, before Phase 1.
Phase 3: Navigation
After all actions have been taken, Players must check if the Merchant Ship was sent during Phase 2.
If the Merchant Ship was not sent (it is still face up on the top of the deck in the Characters Area), the Player owning Girolamo Sernigi must send it at the beginning of this Phase.
The Player picks the Merchant Ship from the Characters Area, places it in a Ship Slot of the appropriate value at a Landing of his choice, following the standard positioning rules, and receive the "bonus" reported on the Landing coast in which the Ship was placed.
Once placed, the Merchant Ship will follow the same navigation rules as the Ships owned by the Players, but not being the property of any Player it earns neither Reals nor Victory Points.
Next, Victory Points and/or Reals are earned by Players whose Ships are in the Navigation Area.
Each Ship in the Navigation Area earns its owner the amount of Reals and/or Victory Points shown in symbols on it, if any, (regardless of its Navigation Limit and the value of the Ship Slot in which it is positioned).
Then, Victory Points are given to the owners of Ships in "complete" Landings.
Each Ship in a "complete" Landing earns its owner the Victory Points reported on the coast of the Landing in which it is positioned (regardless of its Navigation Limit and the Ship Slot occupied).
Therefore, for example, every Ship in the complete Landing of Mombasa gains 3 Victory Points for its owner.
The Landing is "complete" when all its Ship Slots are occupied.
Once Victory Points are assigned, the Ships positioned in "complete" Landings will navigate further up to the next Landing or are removed from the game.
Ships which remain in the game during this Phase, have the chance to earn further Reals and/or Victory Points during the Phase 3 of the following Round.
Starting from Calicut downwards, the status of each Landing is checked (so that Players check, in order: Calicut, Malindi, Mombasa, Mozambique, Terra de Boa Gente and finally Natal):
If the Landing is NOT "complete" (i.e. there are empty Ship Slots) the Ships that are in it do not navigate. They therefore just stay at their place. The Landing is skipped and the check is done on the Landing immediately lower.
If the Landing IS complete (i.e. all its Ship Slots are occupied) the Ships placed there MUST move.
The first Ship to move will be the one placed in the furthest left Slot, followed by the other Ships from left to right.
-
The moving Ship will navigate to the next Landing, (i.e. the one placed immediately higher. For example, the next Landing beyond Mozambique is Mombasa) if there are empty Ship Slots of a value which is equal or lower to its Navigation Limit.
The Ship is then placed in an empty Slot of appropriate value at the next Landing. If there is more than one Ship Slot of appropriate value, the Ship must be placed in the extreme left Slot.
-
If there are no empty Slots in the next Landing, or there are only Slots with a value higher than its Navigation Limit or if the Ship is already at the complete Landing of Calicut, the moving Ship will stop its navigation and is immediately removed from the game.
Any Captain that was possibly on board returns to the appropriate Player's supply to be used for following Rounds.
Phase 3 is over when all the Landings have been checked.
End of the Round
At the end of 1st, 2nd, 3rd and 4th Rounds:
-
Remove any Projects which were not bought in the Round just concluded and discard them from the game.
Place 7 new projects (with the Project side face up) in the Purchase Projects Area drawing them from the lowest value deck placed beside the board (the Project on top of the deck must be placed in the Sao Gabriel Project space within the square, the other 6 Projects in the 6 upper spaces).
When one of the decks is consumed, draw the Projects from the next deck, following the numerical order (I -> II -> III).
-
Pick the first Tile of the Merchant Ships deck in the Characters area and place it face up on the top of the deck.
-
Remove any coins possibly remaining in the Characters Area and put them in the common supply.
-
Move the Round Marker one step to indicate the number of the Round that is about to start.
-
Refill Recruiting Area Section: Starting from the extreme right Section, draw 3 Sailors from the bag for each active Section of the Recruiting Area.
If there are fewer than 3 empty spaces in the Section, Sailors will be placed to fill just available spaces (i.e. up to a maximum of 5 Sailors for each Section). If there are no more sailors in the bag the refilling operation stops immediately.
-
The Player in possession of the Francisco Alvares Tile receives 1 Missionary from the Characters Area, if available, to be placed in his own supply. The Player in possession of the Bartolomeu Dias Tile will be the First Player for the next Round and receives 2 Victory Points.
-
Return Action Discs in the Character spaces back into the Player supplies.
-
If the Manuel I Tile has changed hand during the Round, the Player who lost it must return his Additional Action Disc to the Characters area.
End of the Game
At the end of the 5th Round, the Player with the Francisco Alvares Tile will get 1 Missionary (taken from the Characters area, if available, and placed in his supply) and the Player with the Bartolomeu Dias Tile gets 2 Victory Points.
Players can now launch any projects that are still in front of them provided they have the necessary crew, and board a Captain, if they have any. The game then ends.
Each Player receives:
- 1 Victory Point for each 3 Reals in his own supply and
- 3 Victory Points for every launched Ship with a boarded Captain in front of him.
The winner is the player with the most Victory Points.
In case of ties, the Player with the most Ships in the Navigation Area is the winner. In case of further ties, the Player with the highest number of Sailors in front of him is the winner.
The winner is given the honor of inscribing his name in the prestigious Hall of Fame!
Continue Reading