
Components
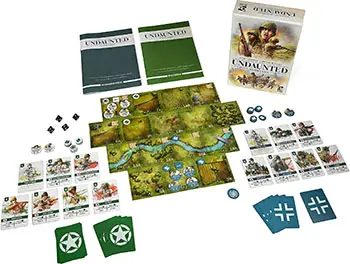
- 54 US cards
- 11 US combat counters
- 4 US spawn markers
- 1 US target marker
- 18 US control markers
- 54 German cards
- 11 German combat counters
- 5 German spawn markers
- 1 German target marker
- 18 German control markers
- 1 radio marker
- 1 initiative marker
- 18 board tiles
- 14 objective markers
- 4 ten-sided dice
Units
A unit is a small group of soldiers represented by three to five combat cards and a single combat counter.
Combat cards and counters in the same unit have the same title and squad designation.
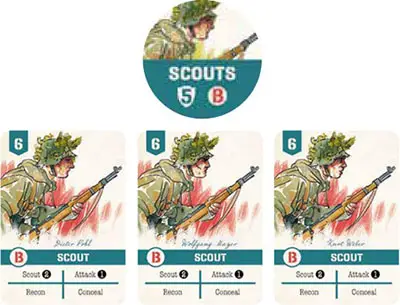 The unit of Scouts from squad B |
Cards
Each card in your deck represents a soldier on the field, a leader commanding them , or the chaos and confusion of the battlefield. You will begin the game with some cards in your deck and others in your personal supply, as specified by the scenario.
Playing cards from your deck will let you seize the initiative, move your units across the board , take control of crucial objectives, and fire upon the enemy.
Command cards, such as your Platoon Sergeant, will let you bolster your forces by adding cards from your supply into your deck - but with every casualty you take from enemy fire, you must permanently remove a card from your deck.
Combat Cards
Combat cards represent the soldiers in your platoon, and each is associated with a combat counter.
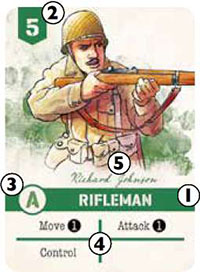
Title: the unit type of the soldier.
Initiative: the value of the card when it is used to bid for initiative.
Squad designation: the squad of the soldier. The Sniper and Mortar cards don't have a squad designation.
Actions: the possible effects from playing the card.
Name: the name of the soldier, which has no gameplay effect.
Command Cards
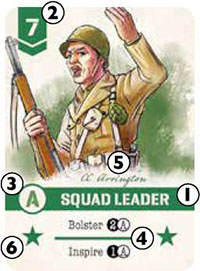
Command cards represent the non-commissioned officers in your platoon. They are not associated with a combat counter.
Title: the unit type of the soldier.
Initiative: the value of the card when it is used to bid for initiative.
Squad designation: the squad of the soldier. The Platoon Sergeant and Platoon Guide cards don't have a squad designation.
Actions: the possible effects from playing the card.
Name: the name of the soldier, which has no gameplay effect.
Command stars: the indication that this is a command card.
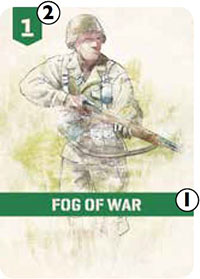
Fog Of War Cards
Fog of War cards represent the breakdowns in communication caused by the chaos of battle, made worse by enemy deception tactics and by spreading the platoon over a large area.
Fog of War cards cannot be used for anything except to bid for initiative, and to remove them from the deck you need Scouts.
Title
Initiative: the value of the card when it is used to bid for initiative.
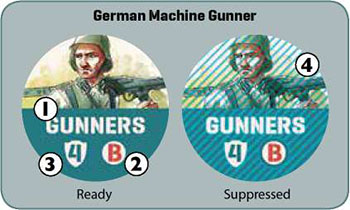
Combat Counters
Combat counters represent your units on the board, which you will control through your combat cards.
Title: the unit type.
Squad designation: the squad of the unit. Sniper and Mortar counters don't have a squad designation.
Base defence: the value your opponent must roll to successfully hit this unit with an attack.
Ready/suppressed: the status of the unit. If the counter is face down, it is suppressed and cannot take other actions until it has been flipped to its ready side.

Board Tiles
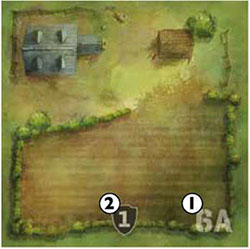
The board tiles represent the hedges , villages , and open fields in which your platoon will be fighting . Each scenario will specify which tiles to place and where to place them.
-
Tile designation: the unique designation of t he tile , always composed of a number and a letter. Each tile has an A and a B side ,but the number is always the same on both sides.The designation is only used during setup.
-
Cover bonus: the bonus added to a unit's defense when it is attacked on this tile.
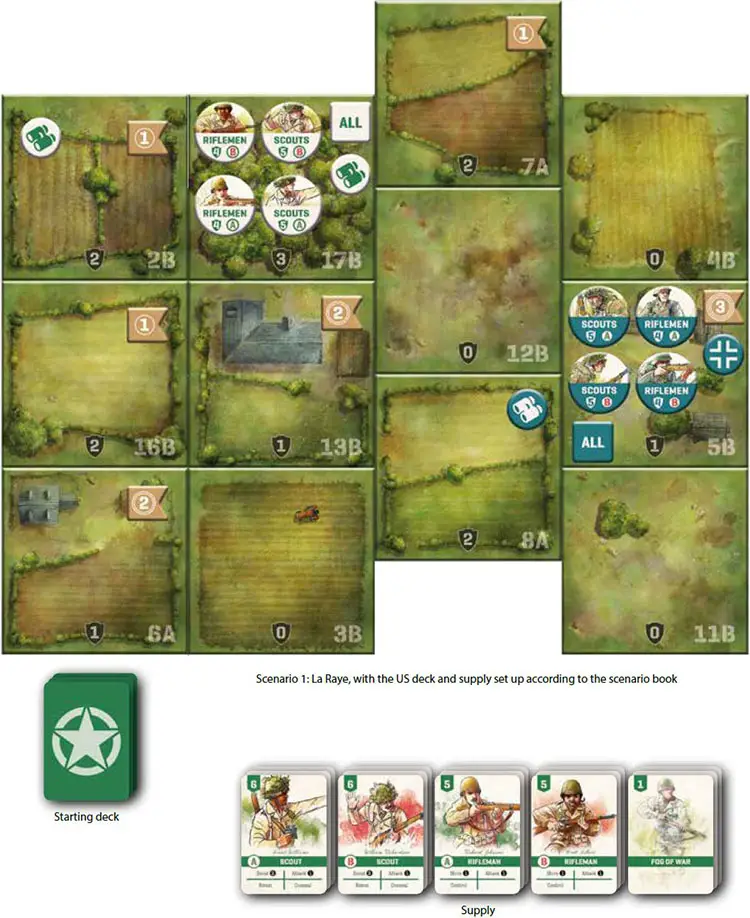
Setup
-
Choose a scenario: Pick a scenario from the scenario book. We recommend that you play the scenarios in order, starting with scenario 1: La Raye, but they can be played in any order.
-
Place tiles: Find the tiles listed under the chosen scenario and place them as indicated. Each tile has an A and a B side, but the number is the same on both sides, so if you need to place tile 14B, it is on the other side of 14A. All unused tiles can be returned to the box.
-
Place objective markers: Place the objective markers as indicated in the scenario book. All unused objective markers can be returned to the box.
-
Place radio marker: If you are playing scenario 10: Critical Intelligence, place the radio marker as indicated. Otherwise, return it to the box.
-
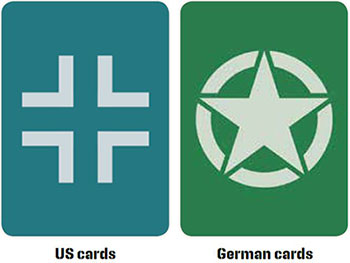
Choose a side: Both players choose a side and take all the cards, combat counters, control markers, and spawn markers indicated in the scenario book for their chosen side.
-
Place tokens: Place all combat counters, control markers, and spawn markers on the spaces indicated in the scenario book. Make sure that all tokens are the correct side up. Any unused spawn markers can be returned to the box.
-
Take initiative: Give the initiative marker to the side indicated in the scenario book.
-
Assemble decks: Find the 'Starting Cards' table in the scenario book for your side, take all the cards marked
 , shuffle them, and place the deck face down.
 -
Assemble supplies: Find all the cards marked
 for your side and place them nearby, face up. Sort the cards in your supply by card title. The content of your supply is open information.
 -
Return remaining cards: All leftover cards for your side can be returned to the box.
Game Play
Play takes the form of a series of rounds, during which both players will play cards to move units, attack the opposing forces, and grab objectives. Each round consists of the following three phases:
- Draw cards
- Determine initiative
- Player turns.
Once the last phase has been completed, the round is over and the next round begins. This continues until a player has won.
Draw Cards
Both players draw four cards from their deck to form a hand.
Whenever you need to draw a card and your deck is empty, shuffle your discard pile into a deck. Never shuffle cards in your play area into a deck.
Determine Initiative
Both players secretly select one card from their hand and reveal it simultaneously. The player who selected the card with the highest initiative takes the initiative marker. That player will perform actions first this round.
In the case of a tie, the player who has the initiative marker keeps the initiative.
Both players discard their chosen card.
Player Turns
The player with the initiative marker plays cards from their hand, one at a time, into a play area in front of them. Once they have no more cards in their hand that they can or wish to play, their turn ends.
All cards left in their hand and all cards in the play area are moved into that player's discard pile. The player without the initiative then takes their turn in the same way.
You cannot save cards in your hand for future rounds. Each card played can be used to do one of the following:
- Card action: choose one of the listed actions and perform it in full.
- Hunker down: return the card to your supply.
Fog of War
You cannot play Fog of War cards during your turn. You can select a Fog of War card when determining initiative.
The only way to remove a Fog of War card from your deck is through a Scout's Recon action.
Normally a Fog of War card will stay in your hand until the end of your turn, when you will discard it as normal.
Suppressed
If a combat counter is face down - showing its suppressed side - that unit is suppressed and cannot perform actions.
When you would have taken an action with a suppressed unit, flip that counter face up to its ready side, but don't take the action. Place the card in the play area as normal.
Suppressed units can still hunker down, but doing so doesn't flip the counter to its ready side.
Placing Combat Counters
When you would take a card action with a combat card and the corresponding combat counter is not on the board, immediately place the counter on the board on the space indicated by the relevant spawn marker. Then perform the action as normal.
Do not place a combat counter when you hunker down.
Hunker Down
When you hunker down, return that card to your supply. It is then removed from the deck until you choose to take a Bolster action to add it to your deck again.
Be careful when hunkering down with a card that has the Bolster action, as you may not be able to add it to your deck later!
You cannot hunker down with Fog of War cards.

Actions
When an action's name is followed by
, that means the action will have a numerical value.
When an action's name is followed by
, that means the action will have a numerical value and may also have a squad (A, B, or C).
Movement Actions
-
Move
Move the unit's combat counter up to
tiles.The tile you move onto must be scouted or controlled by your side.
If you move your Mortar combat counter, remove your target marker from the board.
-
Guide
Move any combat counter up to
tiles.The tile you move onto must be scouted or controlled by your side.
If you move your Mortar combat counter, remove your target marker from the board.
You cannot move a suppressed combat counter.
-
Scout
Move the unit's combat counter up to
tiles.If either tile you move onto does not have one of your control markers on it, place a control marker there on its scouted side. For each control marker placed, take a Fog of War card from your supply and place it in your discard pile.
If you need to take more Fog of War cards than are available in your supply, take as many as there are available.
-
Stalk
Move the unit's combat counter up to
tiles. The tile you move onto does not need to be scouted or controlled by your side.

Support Actions
-
Bolster
Take up to
cards from your supply and add them to your discard pile. If the card specifies a squad, only cards from that squad in your supply may be taken. -
Command
Draw up to
cards from your deck and add them to your hand. Those cards can be played as normal this turn.If your deck runs out of cards before you have finished drawing, shuffle your discard pile into a deck and continue drawing. Do not shuffle any cards in your play area into your deck.
-
Conceal
Take a Fog of War card from your opponent's supply and place it in their discard pile. If there are no Fog of War cards in their supply, this action has no effect.
-
Control
Take control of the tile that the unit's combat counter is on by flipping the control marker to the controlled side.
If your opponent controls that tile, flip their control marker back to its scouted side.
You cannot take control of a tile that an enemy combat counter is on.
-
Inspire
Choose up to
cards from your play area and add them to your hand. Those cards can be played as normal this turn.If the card specifies a squad, only cards from that squad in your play area may be taken.
-
Recon
Choose a Fog of War card from your hand and remove it from the game. Then draw a card from your deck. That card can be played as normal this turn.
If your deck is empty, shuffle your discard pile into a deck and continue drawing. Do not shuffle any cards in your play area into your deck.
If you have no Fog of War cards in your hand, you cannot take this action.
-
Target
Place your target marker on a tile that is three or more tiles away from your Mortar combat counter. If your target marker is already on a tile, move it to another tile.
If you move your Mortar combat counter, remove your target marker from the board.
Combat Actions
Attack / Suppress / Blast
When you perform any of the combat actions listed above, take the following steps:
-
Choose Target
Choose a target for the attack:
For an Attack or Suppress action, choose any enemy combat counter on the board.
For a Blast action, all combat counters on the tile with the target marker are targeted, including any of your own counters. Perform a separate attack against each combat counter on that tile, taking the steps below for each counter. If the target marker is not on the board, the Blast action cannot be taken.
-
Determine Total Defense Value
A combat counter's total defense value is the sum of its base defense, the tile's cover bonus, and the range bonus.
Base defense: the value printed on the combat counter.
Cover bonus: the value printed on the tile that the combat counter is on.
Range bonus: the number of tiles away from the attacking combat counter that the defender is, not including the attacker's tile.
No range bonus is granted against a Blast action.
-
Roll Attack Dice
Roll the number of dice equal to the value of the Attack, Suppress, or Blast action.
If any of the dice show a number equal to or greater than the defender's total defense value, the attack is successful.
How many dice are successful does not matter.
A die showing '0' is always successful, no matter how high the defender's total defense value.
-
Determine Casualties
If the attack is successful, you have inflicted casualties on the selected unit!
Your opponent must find a card from the attacked combat counter's unit and remove it from the game.
-
If possible, they must remove the card from their hand.
-
If they don't have a card of that unit in their hand, they must remove it from their discard pile.
-
If they don't have a card of that unit in their discard pile, they must remove it from their deck. They must then shuffle their deck.
-
If they don't have a card of that unit in their deck, they must instead remove the combat counter from the board.
-
You only ever remove one card after an attack, no matter how many dice were successful.
You can always check cards that you have removed from the game. You cannot check your opponent's removed cards.
If the attack was a Suppress action, no casualties are inflicted. Instead, flip the attacked combat counter to its suppressed side. If it is already suppressed, the attack has no effect.
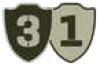
Hills
Some tiles have '3/1' listed as their cover bonus. These are hill tiles, and they have a variable cover bonus.
If a combat counter on a hill tile is attacked by another combat counter on a hill tile (whether the tile is the same or different), or if the attack is a Blast action, the cover bonus is 1.
Otherwise, the cover bonus is 3.
Removing Combat Counters from the Board
As units suffer casualties, they may have their combat counters removed from the board. By bolstering them and later playing them, these units may return to the board.
Remember that when a combat counter returns to the board, it is placed on the tile with the appropriate spawn marker, not the tile it was removed from.
End of the Game
Each scenario in the scenario book specifies the victory condition each side must reach. As soon as the condition is reached, the game ends immediately, without completing the round. The possible victory conditions are capturing objectives or pinning your opponent's force.
Capturing Objectives
The scenario will specify the number of objective points required for victory. To claim this victory, the total objective points on all the tiles you control must equal or exceed the required total.
Pinning The Enemy
If your opponent has no Riflemen combat counters on the board, you have successfully pinned the enemy.
If both sides are pinned but neither side has won, the game ends and the player with the most objective points wins. In the case of a tie, the player with the initiative marker wins.
Beyond All Hope
It is possible, but rare, that you can no longer win the scenario by scoring the required objective points. If this happens, you count as pinned.
If your opponent's objective is to pin you, they immediately win.
If your opponent's objective is to capture objectives, count how many objective points they currently control. If your opponent controls more than you, they immediately win.
Otherwise, keep playing until your opponent controls more objective points than you (at which point they win) or until they are pinned, at which point the winner is decided in the same way as when both sides are pinned.
Continue Reading
