You do not have to read through all the ingredient books. You only need to read the sets that are in the game, and only when new books are put onto the table.
Pumpkin
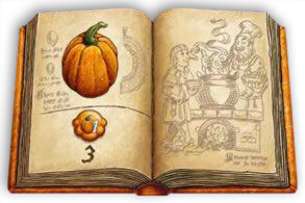
Cost: An orange 1-chip costs 3 coins.
Bonus: None. A 1-chip in the pot has no particular function other than filling the pot by 1 space. It is the least expensive chip in the game.
Crow Skull
Set 1
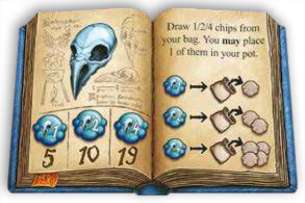
Cost: A Blue 1-chip costs 5 coins, a 2-chip costs 10, and a 4-chip costs 19.
Bonus: If you draw a blue chip from your bag, put it in your pot. You can then take chips out of your bag according to the number shown on the chip.
- For a 1 -chip, take out 1 chip.
- For a 2-chip, take out 2 chips.
- For a 4-chip, take out 4 chips.
From the chips drawn, you may lay down 1 of them as your next chip. Put the other chips back into the bag. If you do not like what you see, you may put them all back into the bag. If the newly laid chip also has a bonus, it can also be carried out immediately.
Set 2
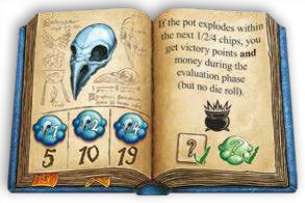
Cost: A Blue 1-chip costs 5 coins, a 2-chip costs 10, and a 4-chip costs 19.
Bonus: When you place a blue 1-chip in your pot, if your potion explodes with the next drawn chip then you receive both victory points and coins for shopping. However, you still cannot roll the Bonus Die if your potion explodes.
If you place a blue 2-chip, the above still applies even if your potion explodes in the next two drawn chips. If you place a blue 4-chip, the above applies for the next 4 drawn chips. The actions do not add up. If a blue chip is placed after another blue chip whose bonus is not yet over, you get the better bonus of the blue chips, not both.
If a blue 4-chip is placed after a blue 2-chip, the bonus only applies for the next 4 drawn chips, not 5. If a blue 2-chip is the third placed chip after a blue 4-chip, the bonus only applies for the next 2 drawn chips.
Set 3
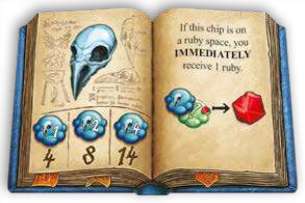
Cost: A Blue 1-chip costs 4 coins, a 2-chip costs 8, and a 4-chip costs 14.
Bonus: If you place a blue chip on a ruby space, you immediately receive 1 ruby. The values of the blue chips are of no significance.
Set 4
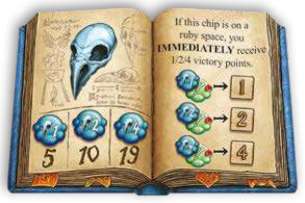
Cost: A Blue 1-chip costs 5 coins, a 2-chip costs 10, and a 4-chip costs 20.
Bonus: If you draw a blue 1-chip from your bag and have to place it on a ruby space, you immediately receive 1 victory point. You receive 2 victory points for a 2-chip and 4 victory points for a 4-chip.
Toadstool
Set 1
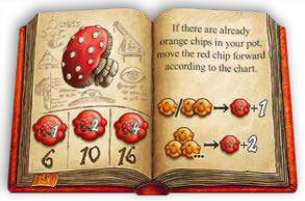
Cost: A Red 1-chip costs 6 coins, a 2-chip costs 10, and a 4-chip costs 16.
Bonus: If you draw a red chip from your bag and there are no orange chips in your pot, move the red chip forward only according to the value depicted on it. If there are already 1 or 2 orange chips in your pot, move the red chip an additional 1 space forward irrespective of its value.
If there are 3 or more orange chips in your pot, move it an additional 2 spaces forward. It does not matter where in your pot the orange chips are.
Set 2
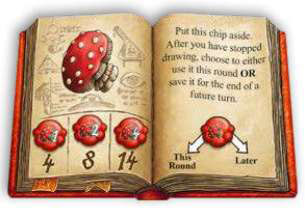
Cost: A Red 1-chip costs 4 coins, a 2-chip costs 8, and a 4-chip costs 14.
Bonus: If you draw a red chip from your bag, place it next to the pot off to the side. After you have stopped drawing chips (whether of your own choice or your pot has blown up) you have the option of placing the red chip in this turn after the last placed chip.
Or, you can save it for a later turn and leave it beside the pot. In all following turns you have the option of placing it in your pot after you have stopped drawing chips. If you have multiple red chips next to your pot, you can decide individually for each chip whether or not you want to place them.
The Evaluation Phase begins only after every player has decided what to do with their red chips. You can also choose to put the chip back into your bag at any time.
Set 3
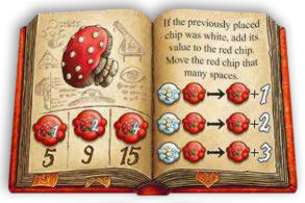
Cost: A Red 1-chip costs 5 coins, a 2-chip costs 9, and a 4-chip costs 15.
Bonus: If you draw a red chip from your bag, check if the last chip you placed in your pot was white. If so, you add the value of the white chip to the value of the red chip and move the red chip that many spaces forward in the pot. A red 1-chip drawn directly after a white 2-chip would therefore move 3 spaces.
Set 4
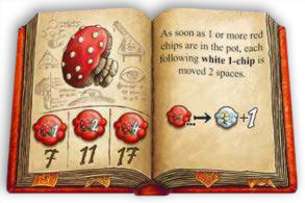
Cost: A Red 1-chip costs 7 coins, a 2-chip costs 11, and a 4-chip costs 17.
Bonus: As soon as at least 1 red chip is in your pot, every white 1-chip that is drawn later is moved not 1 space, but 2 spaces. Any further drawn red chips have no effect. White 2-chips and 3-chips are not affected by the action. The value of the white 1-chip does not change when determining if the pot explodes.
Mandrake
Set 1
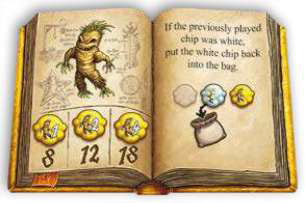
Cost: A Yellow 1-chip costs 8 coins, a 2-chip costs 12, and a 4-chip costs 18.
Bonus: If you draw a yellow chip from your bag directly after a white chip, you may put the white chip (regard- less of its value) back into the bag. This applies only if the white chip was drawn directly before the yellow chip.
The space where the white chip was stays empty and the yellow chip does not fall back. For example, if a white 2-chip is on space-2 and then a yellow 1-chip is placed on space-3, the white chip may be put back into the bag. The yellow chip remains on space-3.
Set 2
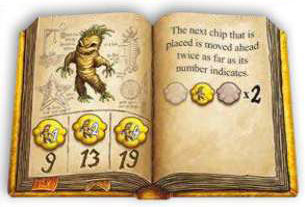
Cost: A Yellow 1-chip costs 9 coins, a 2-chip costs 13, and a 4-chip costs 19.
Bonus: If you draw a yellow chip from the bag, move the next chip that you draw twice as far. For instance, a 2-chip that is drawn after a yellow chip is moved 4 spaces forward. The values of the yellow chips are of no significance.
Set 3
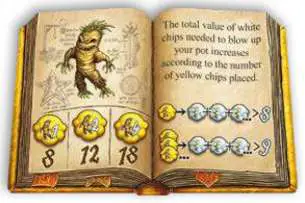
Cost: A Yellow 1-chip costs 8 coins, a 2-chip costs 12, and a 4-chip costs 18.
Bonus: When you draw the first yellow chip from the bag, the threshold for blowing up the pot with white chips rises from 7 to 8.
After drawing 3 yellow chips, the threshold for blowing up the pot rises to 9. The values of the yellow chips are of no significance.
Set 4
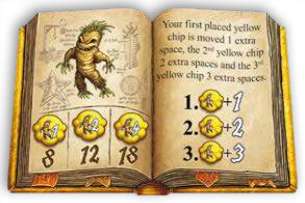
Cost: A Yellow 1-chip costs 8 coins, a 2-chip costs 12, and a 4-chip costs 18.
Bonus: If you draw a yellow chip from the bag, check how many yellow chips are already in your pot:
- If this is your 1st drawn yellow chip, you can move it 1 more space than the number on the chip.
- Your 2nd drawn yellow chip can be moved 2 more spaces.
- Your 3rd drawn yellow chip can be moved 3 more spaces.
For all further yellow chips drawn there is no more bonus.
The values of the yellow chips are of no significance.
The bonuses of the following books only take effect after everyone has stopped drawing chips. These are then carried out consecutively during Evaluation Phase B.
African Death's Head Hawkmoth
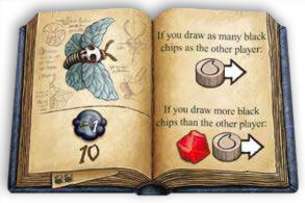
(This card is for a 2-player game).
Cost: A black 1-chip costs 10 coins.
Bonus: In Evaluation Phase B, count up the black chips in your pot.
If you have drawn the same number of black chips as your opponent, move your droplet 1 space forward. If you have drawn more black chips than your opponent, move your droplet 1 space forward and receive 1 ruby..
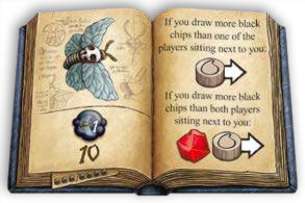
(This card is for a 3+ player game).
Cost: A black 1-chip costs 10 coins.
Bonus: In Evaluation Phase B, count up the black chips in your pot.
If you have drawn more black chips than either the player to your left or right, move your droplet 1 space forward. If you have drawn more black chips than both the players to your right and left, move your droplet 1 space forward and receive 1 ruby.
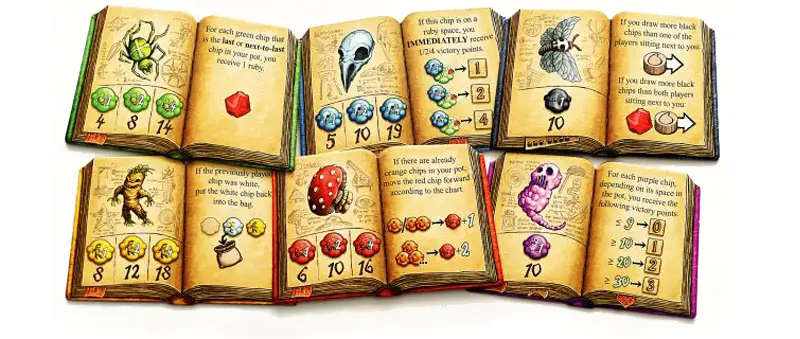
Garden Spider
Set 1
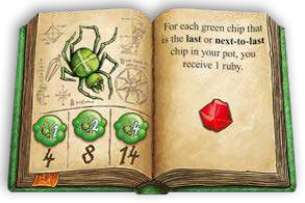
Cost: A Green 1-chip costs 4 coins, a 2-chip costs 8, and a 4-chip costs 14.
Bonus: In Evaluation Phase B, you receive 1 ruby for every green chip (irrespective of its value) that was either the last chip placed in your pot or next to last. You do not receive any rubies for any green chips that are not on your last or next to last space.
Set 2

Cost: A Green 1-chip costs 6 coins, a 2-chip costs 11, and a 4-chip costs 18.
Bonus: In Evaluation Phase B, you receive an additional chip in your bag for every green chip that was either the last chip placed in your pot or next to last:
- For a green 1-chip you can put an orange 1-chip in your bag.
- For a green 2-chip, you can put a blue 1-chip or a red 1-chip in your bag.
- For a green 4-chip, you can put a yellow 1-chip or a purple 1-chip in your bag.
Set 3
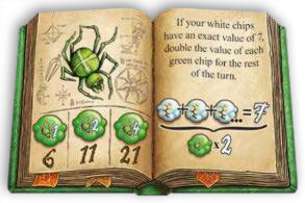
Cost: A Green 1-chip costs 6 coins, a 2-chip costs 11, and a 4-chip costs 18.
Bonus: In Evaluation Phase B, check if all the white chips in your pot amount to exactly 7. If they do, add up the value of all the green chips in your pot and then move your very last chip that many spaces forward. For example, if you have 3 green chips in your pot with a total value of 6, you can move your last chip (regardless of its color) another 6 spaces.
Set 4
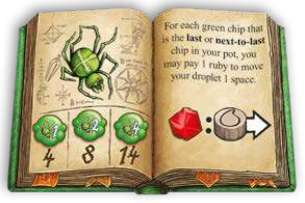
Cost: A Green 1-chip costs 4 coins, a 2-chip costs 8, and a 4-chip costs 14.
Bonus: In Evaluation Phase B, you may pay 1 ruby for every green chip (irrespective of its value) that was drawn last or next to last and move your droplet 1 space forward. For example, if a green chip is on the next to last space, you may pay 1 ruby to move your droplet 1 space forward. You cannot pay more than 1 ruby per green chip (so a maximum of 2 rubies if both the last and next to last chips are green).
Ghost's Breath
Set 1
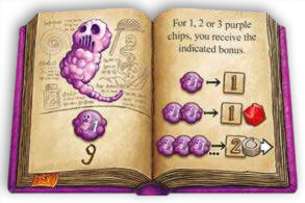
Cost: A purple 1-chip costs 9 coins.
Bonus: In Evaluation Phase B, count up the purple chips in your pot. If there is 1 purple chip, you receive 1 victory point.
- If there are 2 purple chips, you receive 1 victory point and 1 ruby.
- If there are 3 or more purple chips, you receive 2 victory points and you may move your droplet 1 space forward. There is no added bonus for 4 or more chips. However, it is always possible to use a lower action. For example, you can take the bonus for 2 purple chips even though you have 3 chips.
Set 2
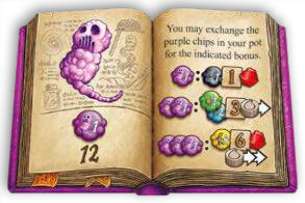
Cost: A purple 1-chip costs 12 coins.
Bonus: In Evaluation Phase B, you can discard drawn purple chips and exchange them for the following bonuses:
- For 1 purple chip you receive 1 black 1-chip, 1 victory point and 1 ruby.
- For 2 purple chips you receive 1 green 1-chip, 1 blue 2-chip, 3 victory points and may move your droplet 1 space forward.
- For 3 purple chips you receive 1 yellow 4-chip, 6 victory points, 1 ruby and you may move your droplet 2 spaces forward.
You are not allowed to trade in 4 purple chips to take advantage of the action for 2 purple chips twice. However, you can always trade in less chips than you have drawn. For example, you can trade in 3 chips, even though you have drawn 4.
Set 3
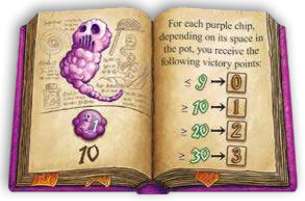
Cost: A purple 1-chip costs 10 coins.
Bonus: In Evaluation Phase B, check where the purple chips are in your pot. For each purple chip in spaces 0 to 9, you receive 0 victory points. For each purple chip in spaces 10 to 19, you receive 1 victory point. For each purple chip in spaces 20 to 29, you receive 2 victory points, and for each purple chip in spaces 30 or higher, you receive 3 victory points.
Set 4
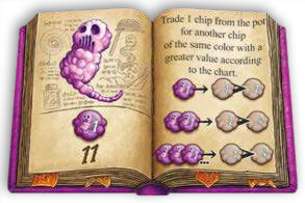
Cost: A purple 1-chip costs 11 coins.
Bonus: In Evaluation Phase B, count up the purple chips in your pot.
- If there is 1 purple chip in your pot, you may trade in one 1-chip from your pot in exchange for one 2-chip of the same color.
- If there are 2 purple chips in your pot, you may trade in one 2-chip from your pot in exchange for one 4-chip of the same color.
- If there are 3 or more purple chips in your pot, you may trade in one 1-chip from your pot in exchange for one 4-chip of the same color.
The upgraded chips are put immediately into your bag.
For 4 purple chips, you cannot use the action for 1 purple chip and 3 chips. However, it is always possible to use a lower action. For example, if you have drawn 2 purple chips, but do not have a 2-chip in your pot, you may convert a 1-chip into a 2-chip.
Continue Reading

