You now have a basic understanding of how to resolve turns. However, there are other rules you need to know before you can play the game, including how to resolve skill tests, combat, bounties, and jobs.
Skill Tests
Characters and crew can have training in a variety of different skills, from Piloting to Tech. A character's skills define the sorts of things that the character is experienced in doing. For example, a character with the Piloting skill is a veteran pilot who can usually outmaneuver their enemies.
You, as a player, have all skills shown at the bottom of your character card plus any shown on your crew.

A Skill on a Crew
Many cards ask you to test a skill (for example: "Test Piloting") to see whether you successfully perform that task. You can always perform a skill test, even if you do not have the specified skill (you are just less likely to succeed).
When you test a skill, roll two dice to determine whether you pass or fail the test. You need to roll at least one of the necessary results in order to pass. The results needed depends on whether you have that skill.
Unskilled (you don't have the skill): You need at least 1 crit (
 ) to pass.
Skilled (you have the skill once): You need at least 1 crit (
) or hit ( ) to pass.
Highly Skilled (you have the skill more than once):
You need at least 1 crit (), hit (), or focus ( ) to pass.
The effect of passing or failing a test is defined on the card that initiated the test. If a test only has a pass effect or only has a fail effect, the outcome of the missing effect is simply that nothing happens.
Combat
Combat arises when a card instructs you to fight a combat (such as a bounty, explained later) or when you encounter a patrol (see "Encounter a Patrol" on page 9). Players cannot attack each other unless a card specifically allows a player to fight combat against another player.
Ground And Ship Combat
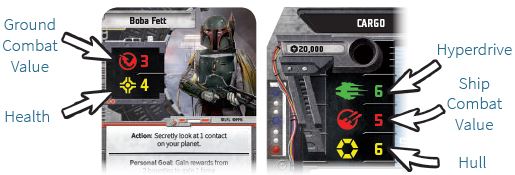
There are two types of combat: ground combat and ship combat. In ground combat, use your character's ground combat value ( ) and your character's health value (
 ). In ship combat, use your ship combat value (
 ) and your ship's hull value (
 ).
).
When a card instructs you to fight combat, it will specify whether it is a ground or ship combat. When fighting a patrol, the combat is always a ship combat. When fighting combat against another player (when allowed by a card), fight a ground combat if you are on a planet, or a ship combat if not on a planet.
Resolving Combat
The basic rules of combat are simple. The attacker (the player currently taking their turn) rolls a number of attack dice equal to their combat value and totals the amount of damage rolled. Each hit () rolled is 1 damage, and each crit ( ) rolled is 2 damage. Focus () results deal no damage, but may be used by card abilities.
After the attacker totals their rolled damage, the defender performs the same process. Then, each player suffers damage equal to the amount of damage rolled by their opponent.
When a character suffers damage, place a number of damage tokens on that character card equal to the amount suffered.
When a ship suffers damage, place a number of damage tokens on that ship sheet equal to the amount suffered.
The combat ends after both sides suffer their damage. If either player has an effect that requires a winner to be declared (such as a bounty that has an "if you win" effect), the winner is the player that rolled the most damage. If both players roll the same amount of damage, the attacker wins.
Combat Against Patrols And Cards
When you are fighting a combat against a patrol or card, the player seated to your left rolls dice and makes decisions for that defender.
Unlike players, patrols and card enemies do not have a health or hull value, so they do not suffer damage. Instead, they have effects based on whether they win or lose the combat.
Defeated
When your character suffers damage equal to your health, or your ship suffers damage equal to your hull, you become defeated. Tip your character standee over in your current space. Then lose 3,000 credits and discard all of your secrets (place the encounter cards on the bottom of their respective decks).
When you become defeated, finish the current step of your turn, but skip any actions or steps you have not started resolving.
 A Defeated Character |
During your next planning step, you must choose the option to recover all damage instead of moving, gaining credits, or using a "Planning" ability. Stand your character back up on the map-you are no longer defeated.
If an ability allows you to recover damage before the planning step, and this causes you to no longer have enough damage to be defeated, stand your character back up on the map.
Personal Goals
Each character has a personal goal on the front of their character card. By completing this goal, you gain 1 fame (as listed on the card), and then flip the card over. Once flipped over, the goal is replaced by a new ability that you can now use.

Most goals require you to perform a certain task a number of times. To track this, place a goal token on your character card each time you complete the task. When you flip the card over, discard all goal tokens on it.
Ship Goals
All ships bought during the game have ship goals listed on them. These goals function just like personal goals. By completing the goal on a ship, you can gain fame and flip the sheet over to gain a new ability (and a legendary name).
Jobs
Jobs represent secret missions and heists that can grant a huge windfall of credits and fame. Some characters start with a job card, and more can be gained from the  market deck.
Above each job's name is a list of the skills that will be tested when attempting it. Some of these skills are italic, which denotes that failing this test will likely result in failing the job. By collecting crew, you can build a diverse set of skills so that you are able to more easily complete jobs. However, remember that even if you do not have a skill, you can still test that skill (though you are less likely to pass).
Attempting a Job
To attempt a job, you must be in the destination listed on the card at the start of your encounter step. As your encounter for the turn, you may follow the instructions on the job card. This will often instruct you to resolve a specific databank card.
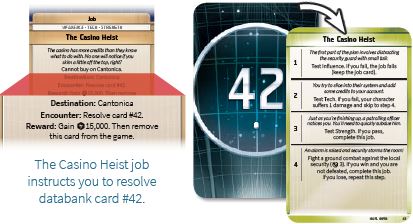
The databank card lists a series of steps you must perform to complete the job and gain your reward. Read the card aloud, starting with step #1 and stopping if you are required to perform a test or fight a combat.
After resolving a step on the card, continue to the next consecutive step unless instructed to do otherwise. If you are defeated, the job fails. When a job fails, your turn ends (do not resolve any more steps on the card).
Return the databank card to the deck, but keep the job card-you can attempt it on a future turn. An effect on the card will instruct you to complete the job.
When you complete a job, return the databank card to the deck and gain the reward specified on the job (usually credits, fame, and/ or reputation). The reward will also instruct you to either discard the job card or remove it from the game (read the "Discarding and Removing from the Game" sidebar on the right).
Combat During Jobs
Many jobs require you to fight a combat against an enemy on the databank card (the player to your left rolls for the enemy).
If you are defeated, the job fails. If you are not defeated, continue resolving the job. The databank card may specify other instructions based on whether you won or lost the combat.
Bounties
Bounties represent missions to track down and capture (or eliminate), specific contacts. Some characters start with a bounty card and more can be gained from the  market deck.
To gain rewards from a bounty, first you need to find the contact specified on the card, and then you need to fight it.
Each contact token has a class on its back (a number of colored pips), which is also shown on its bounty card. Use this information to help you find your target (for example, if you are looking for a green contact, avoid planets that do not have green contact tokens).
Normally, when you encounter a contact, you draw and resolve that contact's database card.
However, if the contact token matches one of your bounty cards, you can choose to fight it instead of drawing the contact's databank card.
The contact's combat value is listed on the bounty card, as well either a ship or ground combat icon (fight this type of combat). The player seated to your left rolls dice for the contact.
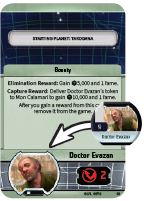
If you win the combat, choose to either eliminate the contact (remove the token from the game) and gain the elimination reward, or capture it (place the token on the bounty card).
You can deliver the captured contact token to a specific planet to gain the capture reward. After you deliver the captured token, remove the token from the game.
If you win the combat and become defeated in the same combat, you eliminate or capture the contact before you become defeated.
After you gain the reward from a bounty, remove the card from the game (do not just discard it). If you lose the combat, you keep the bounty card and the contact token remains on the planet.
Discarding and Removing from the Game
Many effects during the game can discard cards. When an encounter, market, or AI card is discarded, place it facedown on the bottom of its deck. When a databank card is discarded, return it to the deck in the proper place.
Some effects remove cards or tokens from the game. When a card or token is removed from the game, return the component to the game box. It will not be used for the rest of the game.
Bounties on Crew
Sometimes you will have a bounty for a contact that is not on the map because a player has recruited that contact as a crew card.
If you have a bounty for your own crew card, you can fight a combat against that crew as your encounter during your encounter step. The crew uses the combat value on your bounty card as normal.
If you win, return the crew card to the databank and either capture or eliminate its contact token. If you lose, the crew escapes to the nearest planet (return the crew card to the databank and place its contact token in the nearest empty contact space).
When you are fighting a combat against one of your own crew, you cannot use that crew's abilities or skills.
If you have a bounty for another player's crew card, you can fight a combat against that crew as your encounter during your encounter step, but only if you are in that player's space. At the start of combat, that player chooses whether they wish to protect the crew.
If they protect the crew, you fight a combat against that player instead. Fight a ground combat if you are on a planet; fight a ship combat if you are at a navpoint space or the Maelstrom.
If they do not protect the crew, fight the combat against the crew. The player to your left rolls dice for the crew, using the combat type and value on your bounty card.
Regardless of whether they protect the crew or not, if you win the combat, discard the crew card and either capture or eliminate its contact token. If you lose, they keep the crew and there is no additional effect.
Extended Game Option
Experienced players may wish for a longer, more epic game. When using this option, a player wins by acquiring 12 fame instead of 10. If using this option, make sure that all players know how much fame is needed to win the game before setup.
Modular Map Option
For experienced players who like having to adapt their strategies, this option can be used to create a wide range of different maps. Before setup, if all players agree to use this option, perform the following steps instead of using the map.
Take all 6 map tiles, and randomize them in a facedown stack. Because these tiles have slightly different shapes, we suggest randomizing them with eyes closed.
Flip over the top tile, and attach it to the Rebel and Syndicate patrol endcap.
One at a time, draw a map tile and connect it to the previously drawn tile. Connect the Hutt and Imperial endcap to the last tile placed to finish the map.
Due to the unknown nature of the modular map, it is not as tightly balanced as the basic map. That being said, some players prefer this option because it provides a new experience every game.
Continue Reading


