This section lists additional rules that are needed to play the Tutorial. This includes using special abilities, suffering damage, and more.
Abilities
Abilities are found on Hero sheets, Deployment cards, Class cards, and within mission rules.
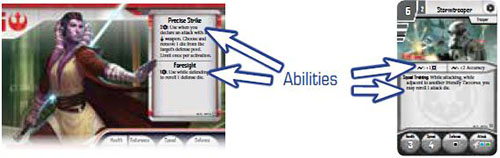
Abilities provide special effects that can be performed above and beyond the standard rules of the game. For example, an ability may let a figure perform an additional attack or allow it to break the rules in certain situations.
Some abilities are prefaced by icons that function as follows:
 : The hero must suffer the amount of listed before the (strain) icon to use the ability.
 : The Imperial player must spend the amount of (threat) listed before the icon to use the ability. Threat is not used in the tutorial and is described later.
 : These abilities can be used as an action.
 : These abilities can be used by spending (surge) results during an attack. The number of the attacker can spend during the attack is equal to the amount of rolled minus the number of
  (evades) rolled.
Note: While performing an attack, a hero may spend up to 1 to recover 1 .
Strain and Endurance
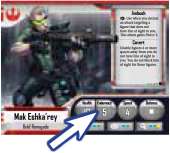 A Hero's Endurance |
All heroes can overexert themselves by suffering (strain) to perform superior feats. The two most common reasons to suffer are to use abilities and to move additional spaces.
A hero can only optionally suffer an amount of up to his Endurance. If any game effect forces a figure to suffer that would exceed its Endurance, the figure suffers  equal to the amount of excess .
Additional Movement
At any point during his activation, a hero may suffer to gain movement points. For each he suffers, the hero gains one movement point, which is added to the total of movement points he possesses. Only heroes can suffer to gain movement points. A hero can do this up to two times per activation.
Suffering and Recovering
When a hero suffers (damage) or (strain), he places the appropriate number of corresponding tokens on his Hero sheet. For other figures, this amount of tokens is placed on the map next to that figure.
Many game effects allow a figure to recover or .
When this happens, discard the appropriate number of corresponding tokens from the figure (either from the hero's Hero sheet or next to the figure's base).
Note: If a hero recovers in excess of the number of strain tokens he has, the hero recovers equal to the amount of excess .
Damage and Health
Attacks and abilities can cause a figure to suffer (damage). When a figure has suffered equal to its Health, that figure is immediately defeated. A figure cannot suffer in excess of its Health (any excess is ignored).
 Damage Token |
Defeated
When a figure has suffered damage equal to its Health, it is defeated. When a hero is defeated, he becomes wounded (see below). When any other figure is defeated, it is removed from the map.
When the last figure in a group is defeated, the corresponding Deployment card is returned to the Imperial player's hand.
Wounded
When a hero is defeated for the first time during a mission, he discards all damage tokens from his Hero sheet and flips his Hero sheet to the wounded side.
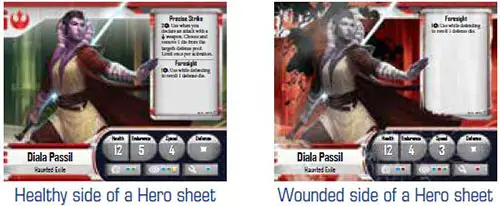
The wounded side of a Hero sheet is similar to the healthy side, but certain abilities may no longer be present, and many values for statistics and attributes may be changed. If there are more strain tokens on his Hero sheet than his Endurance value he discards the excess strain tokens.
A hero who is wounded follows all rules for activation and can still suffer H. If a wounded hero is defeated, he withdraws.
Withdrawal
A hero who withdraws removes his figure from the map. His figure can no longer activate and is eliminated from the mission.
Movement Restrictions
In most situations a figure can spend one movement point to move into an adjacent space. There are, however, two main elements that can restrict movement: terrain and hostile figures.
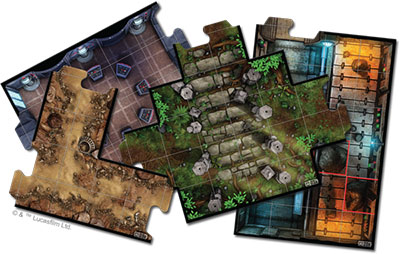
Movement Through Terrain
Some spaces on the map have a terrain type as defined by a color- coded line around the space. These spaces have the following effects on gameplay:
-
Walls
Indicated by a black line that most often appears on the edge of map tiles. Two spaces separated by a wall are not adjacent. Figures cannot move through or trace line of sight through walls.
Wall
-
Impassable
Indicated by a dotted red border between spaces on the map. Figures cannot move through dotted red lines. Two spaces separated by impassable terrain are adjacent, and line of sight can be traced through impassable terrain.
Impassable Terrain
-
Blocked
Indicated by a solid red border surrounding a space. Figures cannot enter or trace line of sight through spaces of blocking terrain.
Blocked Terrain
-
Doors
Indicated by a door token between spaces on the map. Two spaces separated by a door are not adjacent. Figures cannot move through or trace line of sight through doors.
-
Difficult
Indicated by a solid blue border surrounding a space. A figure must spend one additional movement point to enter a space of difficult terrain.
Difficult Terrain
Movement Through Figures
A figure can move into a space occupied by a friendly or neutral figure at no additional cost. A figure can move into a space occupied by a hostile figure, but must spend one additional movement point to do so.
A figure cannot end its movement in a space containing another figure.
Keywords
Keywords are used as shorthand for certain abilities. The keywords "Blast", "Cleave", "Pierce", "Recover", and "Reach" are used in the tutorial.
For information, see the Rules Reference Guide or the included Reference card. Other keywords, "Bleed", "Stun", and "Focus", relate to conditions. For the purposes of the tutorial, ignore all abilities that use conditions. They are described in detail later.
Continue Reading


