Players take the roles of heroes trying to fight their way through hordes of demons so they can defeat the Demon Lord. Although the heroes strive toward the same goal, they each have different motivations. Thus, players are competing to see who can fight the best.
Players take turns. On your turn, you can move through the land, fight the demons who pursue you, or rest from your struggles. When you travel, you attract demons.
When you fight and defeat them, they grant you level advancements and powerful magic items. When you Rest, you can equip these items and you restore the stamina and focus you need to continue on.
The game takes place over several acts. In each act, the demons get tougher, but they offer more levels and better items.
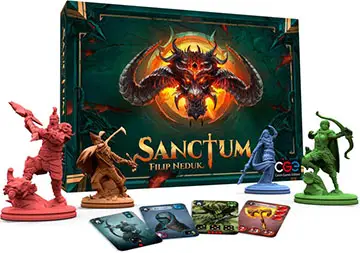
Components
- 3 double-sided act boards
- 6 starting bonus cards
- 4 player boards
- 3 divine intervention tiles
- 18 double-sided potion tiles
- 4 quick reference sheets
- 1 achievement board
- 28+ stamina tokens
- 4 player figures
- 12 achievement tiles
- 28+ focus tokens
- 5 rage tiles
- 1 hordes board
- 84 gems in four colors
- 4 health counters
- 84 demon cards
- 12 skill tiles
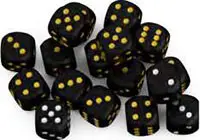
- 24 dice
- 33 Demon Lord cards
- 18 fury cards
- 28+ hit markers
- 24 skill cards
- Rulebook
Object of the Game
When players reach Act V, they fight to breach the Walls of Sanctum. The first player to do so sets out on a path all must follow - the path to confront the Demon Lord. Their performance in this final confrontation determines which of them wins the game.
The Four Heroes

The Huntress
As the Springlands lay burning and blighted, she wept for her home.
The gods felt her tears and granted her the powers of the Huntress. Too late to defend her homeland, she seeks vengeance.
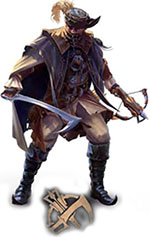
The Outlaw
He was a guardsman who dared to speak against King Yurik's rule.
His sentence was death by poison. Somehow, he survived. Tormented by the foulness in his veins, he seeks a cure in the ruins of Sanctum.
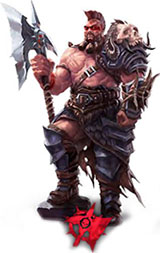
The Slayer
His people are the keepers of the old stories. They knew this time would come.
Trained from birth, bound by destiny, the Slayer is sent to defeat the evil.
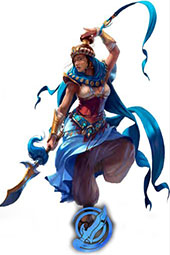
The Dancer
She is King Yurik's elder sister. Ten years ago, she escaped his assassins and found refuge among the Battle Dancers.
Now fully trained, she returns to claim the throne.
Setup
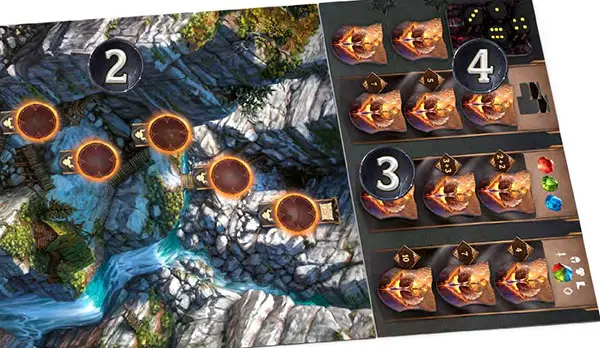
 Hordes Board
These are the demons who are plaguing the land.
Demon Decks
All the demon cards should have the demon face up. Sort them into three decks according to the demon icon in the upper right corner. Cards with the same number of dice will be in the same deck. Red, green, and blue cards will be mixed together. Shuffle each deck and place it on the hordes board.
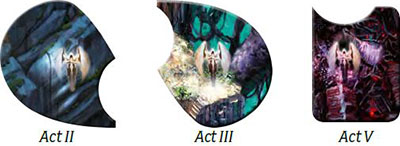
 Act Boards
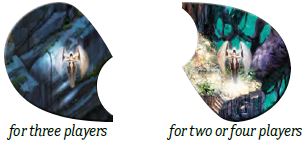
The game is played in several acts, each with its own board. Games with fewer players use fewer boards:
- four-player game: play all 6 acts in order
- three-player game: skip Act III
- two-player game: skip Act II and Act IV You only need two boards at a time.
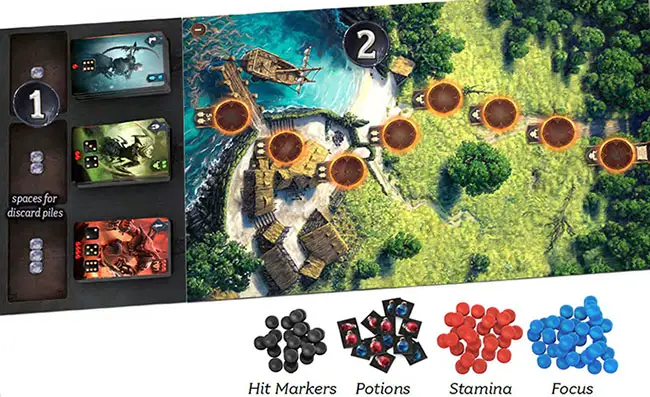
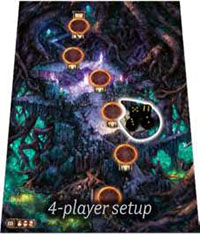
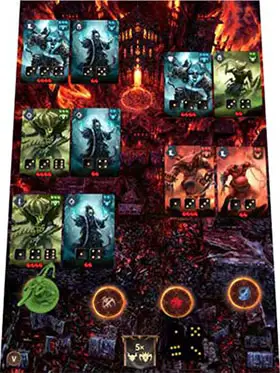
Table Layout
Player boards can sit around the central board like this. Their setup is explained on the following pages.
Dice
Most of the dice have gold pips. Use these for all setup on this page. The silver -pipped dice are special.
 Achievement Board
 Achievement Tiles
Shuffle achievement tiles face down. Distribute 11 of them randomly on the spaces of the achievement board and return the twelfth to the box.
Two-player game: Three achievement spaces will not be used. In each level, choose a random space by rolling a die. Put the die in the corresponding space. Once you have blocked one space in each level, deal 8 achievement tiles to the remaining spaces. Then remove the dice you rolled. Return the 4 unused tiles to the box.
 Divine Intervention Tiles
You have 3 divine intervention tiles, but you will use only two of them. During the game, divine intervention will give each player a new die.
The Act V tile is always used. Place it on the achievement board. Put dice on it, one die per player.
Two-player game: You start with boards I and III. Put the Act III tile on board III now and put 2 dice on it. (Return the Act II tile to the box).
Three-player game: You start with boards I and II. Put the Act II tile on board II now and put 3 dice on it. (Return the Act III tile to the box).
Four-player game: You start with boards I and II. Set board III aside, and put the Act III tile on it. Put 4 dice on the tile. (Return the Act II tile to the box).
 These cards will not be used until much later in the game. Set them aside for now. |
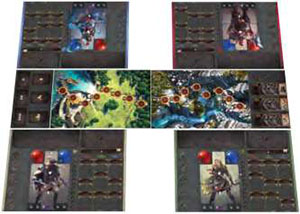
Setup - Player Board
Assigning Boards
Each character in the Sanctum story has a unique set of skills. We encourage players to try them all. You can choose boards however you like, but often the best solution is to assign them randomly.
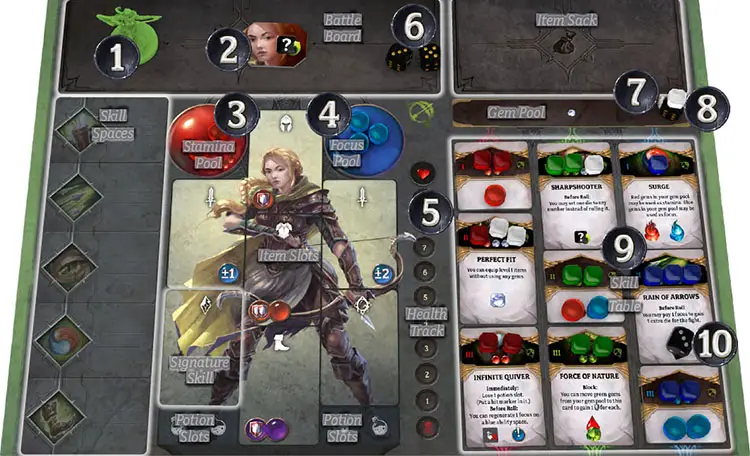
1 Take the figure matching your board.
2 Place your rage tile on your board, as shown, with the active side up.
3 Your stamina pool starts with the number of red stamina tokens printed on the board $.
4 Your focus pool starts with the number of blue focus tokens printed on the board.
5 Take your health counter and place it on the top space of your health track.
6 You start the game with 2 dice. Keep them in front of you.
7 Take a third die and place it on the angel icon in your gem pool. Right now, this does not count as one of your dice. You will receive it during the course of the game.
8 Place 1 white gem in your gem pool, atop the die.
9 Set up your skill table.
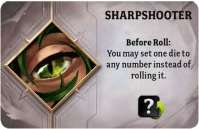
10 Each player gets one silver-pipped die. Put yours on the skill with the die icon. You will be able to use your silver-pipped die only if you gain this skill.
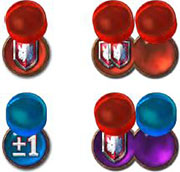
Stamina & Focus
Stamina is used on red ability spaces to block damage. Focus is used on blue ability spaces to help you hit demons. Purple ability spaces can use either one, as you can see if you put stamina and focus together and hold them up to the light.
Skill Breakdown

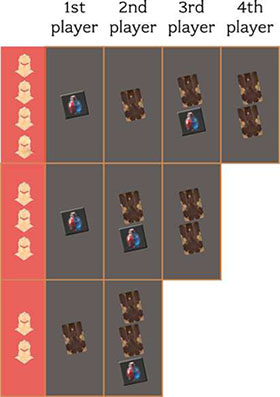
Starting Bonuses
Choose the starting player randomly. You will play in clockwise order. Deal random starting bonus cards or potions to each player as indicated in the table:
If you get a potion, flip it as though it was a coin - that determines whether it is red or blue. Then put it in one of your potion slots.
Your Skill Table
The skill table is what makes your character unique.
- Take the nine skills belonging to your character. (Some are cards. Some are tiles).
- Lay them out according to their Roman numerals. Red numerals go in the column on the left, green in the middle, blue on the right. They go in order, I, II, III, with the level I skill at the top.
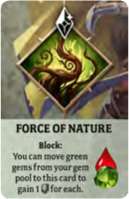
- Give each skill the appropriate number of gems in the indicated colors.
- Some skills will have stamina or focus tokens - or both. Place the appropriate tokens on the flame symbols.
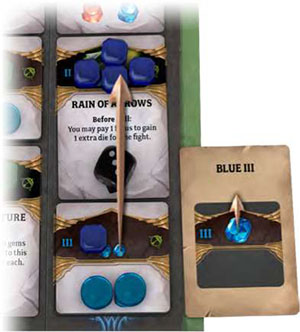 For example, if you get this card, move a blue gem from blue skill III to blue skill II |
Game Play
Players will take turns going clockwise around the table. On your turn you choose one of these three actions:
- Move
- Fight
- Rest
The game plays out over several acts. Characters travel along the act boards and become more powerful. Act V begins when one player reaches the Walls of Sanctum. The rules will begin to change, leading to Act VI, the confrontation with the Demon Lord.
Whoever comes away from this battle in the best health will win the game.
Start
Difficulty Level
Sanctum can be played at various difficulty levels. Experienced Sanctum players should choose a difficulty level before they start the game. New players should try the Normal difficulty first. The difficulty level does not come into play until Act VI, so we will explain it then.
Your First Action
Your first action of the game must be a Move.
The first player puts his or her figure on the first space of the Act I board. This is the first step of a Move action, which is explained on the following pages. Once that player's action is complete, the second player takes a Move action to the front of the line, and so on.
Once everyone has taken a turn, everyone's figure is on the board.
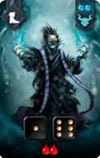
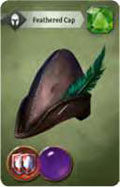
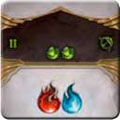
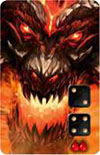
Demon Card Breakdown
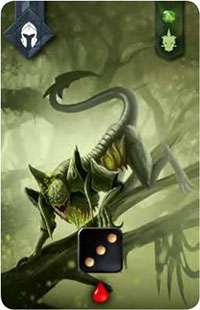
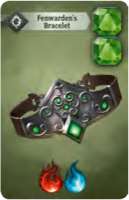
When you kill this demon, you will gain a green helmet.
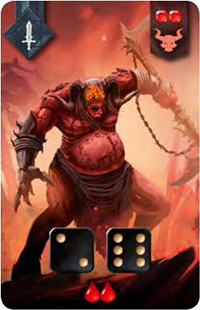
The two red gems tell you that you will gain 2 levels for defeating this demon. The icon tells you which deck it belongs to. All level 2 demons are in the same deck.
The die icons are hit locations.
If you hit them both, the demon is defeated.
Blood drops represent the damage the demon will deal unless you defeat it.
I. Move
When you Move, you advance the game and you acquire more demons to fight. Perform these steps in order:
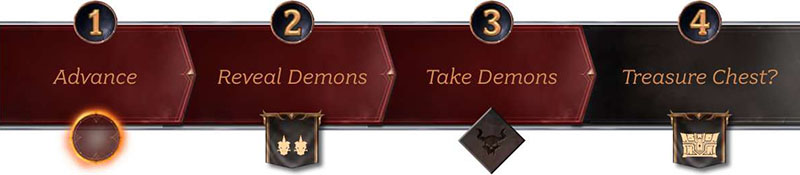
1. Advance
If you are already in front, move ahead one space. If someone else is in front, move to the space ahead of them. No matter how far behind you are, you always move to the front of the line.
2. Reveal Demons
The icons at the space you moved to will tell you how to add demons to your current board.
The first player to arrive on the board will deal 5 sets of demons. Some demons are dealt in pairs. Some may be dealt alone.

If you are not making the first move onto the board, the space will ask you to add 1 set of demons. Again, this set may have two demons, or it may have just one.
3. Take Demons
You always have 5 sets of demons to choose from. Take 1 set and place it on your battle board. Demons that were dealt in pairs must be taken together. A demon that was dealt alone must be taken alone.
The demons you take during your moves accumulate on your battle board, pursuing you until you fight them.

4. Treasure Chest

The last space of the board has a treasure chest. When you Move here, you discover the chest at the end of your turn.
The chest holds a wealth of items players can choose from. Flip all remaining demon cards over to the item side. Beginning with you, and continuing in the current marching order of your figures on the boards, each player chooses one of these items and puts it in his or her item sack.
Note that each player takes only one item, even if it was in a set of two. No one gains levels for these items, and they can be equipped only in the usual way, during a Rest action.
Clear all remaining cards off the board. If you have not done so already, place the board for the next act on the table.
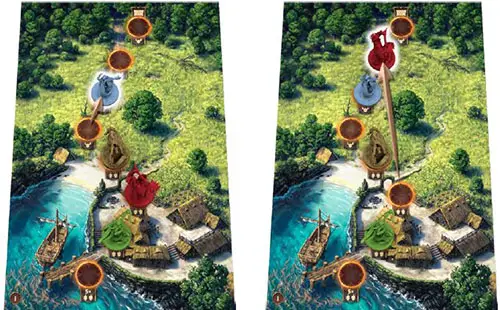
The Next Board
The next board depends on the number of players:
- 4-player game: use all the boards in order, I through VI
- 3-player game: skip from board II to board IV
- 2-player game: skip from I to III and from III to V
 Icons remind you to skip the board when you have a certain number of players.
When everyone is on the next board, you can remove the old board and slide the remaining board over. Then put the new board in place. You never need more than two boards. If necessary, you can remove a board from under figures that have fallen two boards behind and line them up on the hordes board.
Divine Intervention
In a four -player game, you need to put the Act III divine intervention tile on the board when you add board III to the table. In a two- or three-player game, you placed a divine intervention tile on its board during setup. The tile should have one die per player.
When someone Moves to the space marked by the divine intervention tile, all players gain an extra die, which they will roll during fights for the Rest of the game. The tile can be discarded.
II. Fight
With the Fight action, you attempt to kill your demons so you can gain levels and items. Perform these steps in order:
Your First Fight
You will not use potions in your first fight. Skip ahead to step 2 and roll your dice.
When explaining the game to new players, you don't need to explain potions until they have fought their first fight
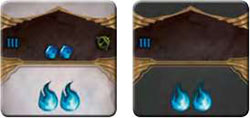
Abilities
Abilities help you attack or block. Most are on items, but you start with some in item slots. Some abilities have one space, some have two. An ability space can be red, blue, or purple.
To use an ability, move stamina or focus onto it. The token spent must match the ability space 's color. A purple space is matched by either stamina or focus.
This ability uses 1 stamina.
This ability uses 1 focus.
This ability can use either 1 stamina or 1 focus.
This ability uses 2 stamina.
This ability uses 2 stamina, 2 focus, or 1 of each.
This ability uses 1 stamina plus another token which could be stamina or focus.
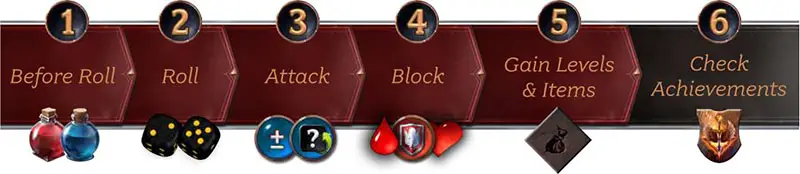
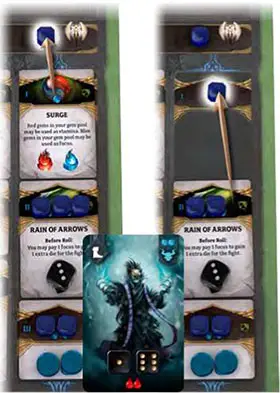
1. Before Roll

Some players start the game with a potion. You can also get potions when you Rest. Potions can be used at the beginning of a fight to regenerate stamina and focus spent in previous fights.
Before you roll the dice, you may discard as many of your potion tiles as you want. For each red potion discarded, regenerate 1 stamina. For each blue potion discarded, regenerate 1 focus. You regenerate by moving a token from an ability space back to the appropriate pool. The token is once again available to be spent.

It is legal to regenerate only one space of a two -space ability. The regenerated token becomes available again, but the remaining token prevents you from using the ability.
Tip: Don't be afraid to drink potions. They can give you an edge when it counts, and you will be able to get more later, when you Rest. Saving potions may actually mean you are wasting them, because the space to carry potions is limited.
2. Roll
You start the game with two dice. During the course of the game, you will gain more. Roll all these dice at once.

3. Attack
You want to use your dice to hit the demons. You are trying to match the dice shown at the bottom of their cards.
For example, you can hit this demon with a 1 or a 6. If you match both die icons, you will kill it and gain levels and an item.
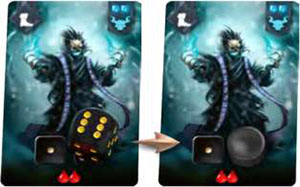
If you are lucky, you might simply roll all the hits you need. If not, you may be able to get those numbers by using abilities to modify your dice.

When this side of your rage tile is up, your rage is active. You can use your active rage to set any die to a value of your choice. When you use your rage, flip the token over to the inactive side. Inactive rage cannot be used.
Assigning Hits
Assign your hits by placing your dice on the matching die icons on your demon cards. The die must match exactly, or it is not a hit. Each die can only be assigned to one hit location.

At the end of your Attack, if there are still demons left to kill and you have dice you did not assign, you become enraged. Flip your rage tile back to its active side - you will be able to use it in your next fight. (If your rage was already active, then nothing happens. Maybe you should have used it).
4. Block
A demon is dead if you have hit all its hit locations. Dead demons will not hurt you.

If you have any demons that are not dead yet, they will deal the full amount of damage shown at the bottom of the card.
You block damage by using abilities with one or more shield icons. Each shield icon blocks 1 point of damage. If you can generate shields that equal or exceed the damage, you will take no wounds.
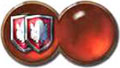
Many block abilities have 2 spaces. You use the ability by putting two tokens on it. Each token must match its space.
Each point of unblocked damage becomes 1 wound. For each wound, move your health counter one space down the health track. You want to avoid wounds. They lower your final score, and there is no easy way to heal them.
If your health counter reaches zero, your figure falls dead on the path and you drop out of the game. This is unlikely to happen before Act VI unless you are intentionally careless.
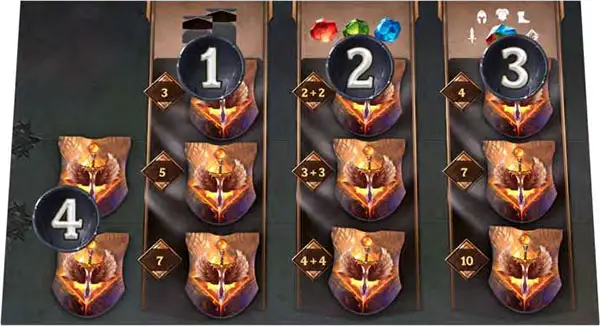
5. Gain Levels & Items
Gain levels equal to the levels of each demon you killed.
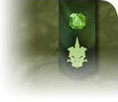
The gems in the upper right corner depict the levels you gain. For each gem on the card, you move one gem in your skill table up to the next space. The gem you move must match the color of the gem on the card.
However, white gems match any color. For example, if you defeated this demon, you could move 1 green gem or 1 white gem.
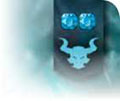
When you defeat this demon, you move 2 gems, blue or white. You could move the same gem twice.
After gaining levels from a demon, flip it over. The other side has an item. Keep this in your item sack for now. Your sack can hold any number of items. You can equip them only during a Rest.
Don't flip the demon card until you have gained the levels. This helps you track which ones you have already done and which ones you have left to do.
Demons that were not killed remain on your board. If you have assigned them any hits, record those hits by replacing your die with a hit marker.
The hits you assign during one fight carry over to all future fights, so you will never need to hit the same location twice.
6. Check Achievements
An achievement is a reward for being the first player to accomplish a particular goal. If you gain an achievement, take the tile from the achievement board.
Each achievement offers a hidden blessing. You can look at your blessing, but keep it hidden for now. Blessings cannot be used until you face the Demon Lord.
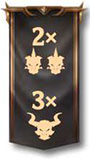
Achievements come in three categories, plus one bonus category, as depicted on the achievement board.
1 Skill Mastery is the achievement for gaining skills. You gain an achievement if you are the first player to have 3, 5, or 7 skills. This achievement counts all skills you have gained, whether cards or tiles.
2 Gem Mastery is for gaining gems. In particular, you need gems of two different colors, and white gems do not count. If you are the first player to have gained at least 2, 3, or 4 gems in each of two different colors, you get a Gem Mastery achievement.
3 Equip Mastery is for equipping items. Count the levels of all items you have equipped. (An item's level is the number of gem icons it has). If you are the first player with 4, 7, or 10 levels equipped, you gain an Equip Mastery achievement.
4 Higher Level Mastery is an achievement you get if you are the first player to achieve a level II or level III mastery in skills, gems, or equipping.
It is possible to get multiple achievements at once.
Skill Table
Gaining Levels
At the end of a fight, you gain levels for each demon you killed. The levels are represented by gems in the upper right corner of the card.
For each gem on the card, you get to move a matching gem in your table up one space. Thus, you can move a gem from skill III to skill II, from skill II to skill I, or from skill I to your gem pool. This process allows you to gain gems and skills.
The gem you move must match the color of the gem on the card. However, white gems match all three colors, which means you can move a white gem in any column.
Note: The stamina and focus tokens on your skill tiles do not move. You earn the tokens when you gain the skill.
Gaining Gems
Once you move a gem into your gem pool it is available for equipping items during a Rest action.
Gaining Skills
When you move the last gem off a skill, remove the skill from the skill table. It is now a skill you have. If it's a card, flip it over to see where it goes on your board. If it's a tile, take the tokens, flip it over, and keep it nearby in case you need to doublecheck your token count.
Skills are explained in detail in the next section. Skills do not have to be gained in order; you can have a level II or level III skill without ever earning any skill of level I. Note, however, that when you move a gem off a level III skill, you move it onto a level II skill, which makes that skill harder to get.
The space that held the skill still counts as a space in your skill table. For example, if you have removed your level II skill, a gem moving from your level III skill will move into the level II space.
Even when you gain multiple levels, you still move your gems one by one. Thus it is legal to move the last gem off a level II skill, remove it because it has no gems, and then move a gem into the vacated space.
Note: If you have gained so many levels in a particular color that you no longer have any gems you can legally move, then any more gains in that color are wasted.
Skill Overview
The skill tiles offer you stamina, focus, or both. During setup, you should have put the stamina and focus tokens on these tiles. When you gain the skill, move these tokens to their pools.
You now have extra stamina and focus to spend. Flip the tile over and keep it nearby in case you need to check how much stamina and focus your board should have.
Some skills give you an effect that can be used at certain times during the game. When you gain the skill, perform any immediate effect.
Then flip the card over and place in the corresponding skill space on the left side of your player board. The card will tell you what it does and when you can use it.
Each character has a signature skill that goes in the slot marked by a diamond.
Using Skills
Some skills have effects that alter the mechanics of the game just for you. Others have a special effect that can be used only during a certain step of a Fight.
Particular skills are explained on your quick reference sheet.
III. Rest
The Rest action helps you prepare for more combat. Perform these steps in order:
Note: You can Rest even if you have demons on your battle board.
1. Restore
When you Rest, move all the stamina and focus tokens you spent back to your stamina and focus pools. All your abilities become available to use again. All your stamina and focus are once again available to spend.
Note: Resting has no effect on your rage nor on the demons on your battle board.
2. Equip Items
To equip an item, you need gems that match the gems depicted on the item. Gems come in three colors, plus white. When equipping, white gems match any color.
Put the item in the slot with the matching item icon. (If it's a weapon, you have 2 slots to choose from). Put the gems on the matching spaces on the card. While the item is equipped, you will be able to use its abilities in a fight.
Each item slot can hold only one item. Items that are not equipped can be saved in your item sack for later or they can be spent to buy potions.
Your First Item
When you equip your first item you gain the die in your gem pool. Add it to your dice. It will be yours for the Rest of the game.
Note: You start with a white gem in your gem pool to make it easy for you to equip your first item.
Reorganizing Items
If you already have some items equipped, you may reorganize them all freely during your Rest action. Items can be moved to your item sack, and their gems can be used to equip different items.
Increased Stamina and Focus
Some items give you stamina or focus. For each red flame icon, add 1 extra stamina to your stamina pool. For each blue flame icon, add 1 extra focus to your focus pool. You keep these extra tokens as long as you have the item equipped, and you return them to the center of the table if you remove the item.
Whenever you reorganize your items, doublecheck your stamina and focus totals to be sure you have the right amount.
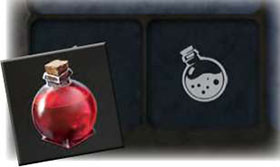
3. Buy Potions
You can buy potions during a Rest by discarding items. For each item discarded, gain one potion. You choose red or blue, regardless of the item's color. You gain only one potion, regardless of the item's level.
You can carry at most one potion in each of your potion slots. Usually, you have four potion slots, but some characters have skills that may change this number.
If you don't have an empty potion slot, you can discard a potion of one color to make room for a potion of the other color, but this is wasteful.
4. Achievements
See Achievements above.
Act V - The Walls of Sanctum
Beginning of Act V
 The Huntress arrives at the Walls of Sanctum. All players will now gain one more die. |
The first player to move onto board V deals out 5 pairs of demons, as indicated, and chooses one pair to add to his or her battle board.
The Act V divine intervention tile is removed from the board and each player receives one more die.
When you Move onto board V, place your figure on the matching space. You have arrived at the Walls of Sanctum. Only the first player adds demons. Players who Move onto the board later will have fewer pairs to choose from.
Players at the walls can Move no farther. On their turns they can only Rest or Fight, trying to defeat all their demons.
Breaching The Walls
A player at the Walls of Sanctum who starts a turn with no demons may breach the walls.
Note: The only other option is to Rest, which you would do only if you wanted to get an Equip Mastery achievement.
To breach the walls, the player advances to the cathedral space.
The Demon Lord Appears
The player who breached the walls removes the achievement board and replaces it with board VI. It is no longer possible to gain achievements. The player then shuffles the Demon Lord deck and places it on the matching illustration. That player ends his or her turn by placing the top two cards on the cathedral, as shown.
Call To Arms
On their turns, the other players can choose to answer the call to arms by discarding all remaining demons and entering the city. This option is available even to players who have not yet reached board V. If all players answer the call to arms, it is time for Act VI.
If you answer the call to arms immediately (on your first turn after the walls are breached ) you advance to the cathedral with the player who breached the walls. But this is not required. You could choose to Fight or Rest. And if you are not yet on board V, you can choose to Move to the Walls of Sanctum.
Each time the player who breached the walls gets a turn, he or she adds a new Demon Lord card to the board, below the cathedral, as shown. Players who answer the call move to the card most recently laid down. Players who have already answered the call do nothing on their turns.
The act ends when all players have answered the call to arms. If the board gets a second card below the cathedral (as shown in the final illustration) then all remaining players must answer the call.
A Brief Respite
After the end is triggered, everyone takes their final Rest action of the game. You are not allowed to gain new achievements during this Rest, so you can probably all do this simultaneously.
This is your last chance to equip anything. It's a good idea to check your stamina and focus totals to be sure you have all the tokens you are entitled to.
Buy all the potions you can, and discard any remaining unequipped items. You can also sweep everything off your skill table - you won't need it anymore.
Move your achievement tiles to your newly emptied gem pool. Turn them all over to reveal your blessings. Take a deep breath and prepare to face the Demon Lord.
The Demon Lord's Answer
At the end of Act V, the Demon Lord shakes the city of Sanctum with his mighty power.
Each Demon Lord card has an effect printed on the face-down side. One at a time, turn over each Demon Lord card and resolve its effect. Applicable blessings can be used at this time.
Tho se at the cathedral are affected only by the two cards at the cathedral. Players who answered the call later are affected by all cards that were already laid down when they answered the call.
Act VI - The Demon Lord
Battle Board Setup
Shuffle the deck of fury cards. Deal 5 Demon Lord cards and 4 fury cards to each player, alternating across the top of their boards as shown.

These cards should be dealt randomly, and no one should choose their order. No one is allowed to look at the other side of their cards at this time.
After the deal, the fury deck can be set aside. It will no longer be needed. Keep your rage tile in your gem pool. Start the Final Battle by putting your figure on the leftmost card of your battle board.
The Final Battle
The Final Battle is divided into rounds. In each round, all players take one Fight action. (You can do this simultaneously). There is no more Rest. Between rounds, all players will suffer the Demon Lord's wrath.
Fighting the Demon Lord
Each round of the battle is like a normal Fight action, but with these modified rules:
You can use blessings. Their effects are described on page 22. Once you use a blessing, turn it face down.
You must defeat each card in order. You can assign hits only to the card your figure is on.
When you have hit all locations on a card, move your figure to the next one.
As you move onto a fury card, flip it over. Resolve the card's effect immediately. It applies only to you. Now you must defeat this card before you can move on. (Its effect will not trigger again, even if it survives to the next round).
When blocking damage, you face all the damage on your current card and also the damage on all cards ahead of it. (Note that fury cards only deal damage if their hidden side has been revealed). Cards you have defeated do not deal damage.
 In this situation, you would be facing 8 damage. |
Everything else follows the usual rules. In particular:
You can use potions at the start of any Fight
You can assign hits to multiple cards before your Block step. (But they have to be hit in order).
Dice that could not be assigned as hits will activate your rage.
After you Block, replace your dice with hit markers and take your dice back. You don't have to worry about cards you have already defeated, and hits on those that were not defeated will carry over into the next round.
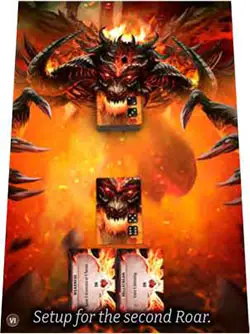
The Demon Lord Roars
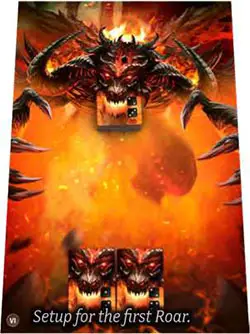
Once everyone has fought one Fight, the Demon Lord unleashes an earth-shaking attack!
Deal two Demon Lord cards in a row along the bottom of the Act VI board.
One by one, reveal each card in the row and resolve it. If players feel their decision depends on what others do, decide in play order, starting with the player who breached the walls. Do not discard the cards in the row.
After each round of Fights, the Demon Lord roars again. In each Roar phase, you deal one less card than you dealt before. In a Normal game, you will have a round of Fights, a 2-card Roar, a round of Fights, a 1-card Roar, and then just rounds of Fights until everyone is dead or victorious.
Victory
If you defeat all cards on your battle board, in order, you are victorious. If others are still in the Final Battle, they continue to play until they are victorious or eliminated. You are no longer in the game and you cannot be affected by any cards.
Defeat
Of course, it's also possible to take so many wounds that your character dies. This knocks you out of the game.
End of the Game
All players keep fighting until they are eliminated or until they have defeated all their cards. Then it is time to evaluate the Final Battle's outcome.
-
If everyone dies
A foul smoke rises over the battlefield. No earthly creature survives to bear witness to your destruction. But your names live on. And perhaps your story will inspire others to take up the cause. They will be more successful. You could not defeat the Demon Lord, but you surely did weaken him.
If everyone dies, the winner is the one who defeated the most cards in the Final Battle. Break ties in favor of the player who got the most hits on his or her current card. Players still tied remain tied.
-
If anyone is victorious
As the Demon Lord falls, the flames rise higher, burning brighter. The ruins of Sanctum are swept by a whirlwind of embers and ash. But the breeze is cool. The flames are quenched.
In the sky above Sanctum, the black clouds part, giving way to a single sunbeam that shines on the erstwhile battlefield to illuminate a jade sarcophagus.
Among players who defeated the Demon Lord, the winner is the one with the highest health.
Your score for the game is the number under your health counter. Break ties in favor of the player who earned more achievements during the game.
Players still tied remain tied. And anyone who defeats the Demon Lord can claim victory. The winner is simply more victorious than the others.
Difficulty Rating
To make the game more challenging, add more cards to the initial row:
- Normal: 2-card row.
- Hard: 3-card row.
- Nightmare: 4-card row.
- Inferno: 5-card row.
If you want to try a rating more difficult than Normal, you should agree to that at the beginning of the game.
Final Battle Cards
Demon Lord cards have two jobs. On your board, these are cards you must defeat in a Fight, and the effect on the other side never comes into play.
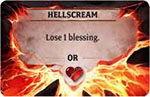
On the Act VI board, they are a deck of devastating attacks the Demon Lord makes at the end of Act V and between rounds in Act VI. These attacks apply to all players.
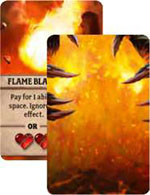
Fury cards are used only on players' boards. When it is time to fight that card, it is flipped over and the effect applies immediately. The effect applies only to you and only for your current Fight.
Continue Reading