RUBIK'S Cube is just one of a series of exciting puzzles designed to challenge your mind and capture your imagination. With amazing movement of color and pieces, each puzzle offers an intricate challenge that is hard to put down.
And just in case it has you stumped, this 7-Step Solution Guide will help you master the challenge.

Components
- Rubik's Cube
- Plastic Stand
- Booklet
Object of the Game
Each of the 6 sides is painted a distinct color (red, orange, yellow, white, blue, green), and the goal of the puzzle is to return the cube to a state in which each side has a single color after it has been randomized by repeated rotations.
Most cubes can be solved in only 17 moves and theoretically there is no cube that requires more than 20 twists to solve. Some people can solve the cube in under 45 moves from any scrambled position; and a few can even solve the cube blindfolded!
Game Play
Each step involves a sequence of twists of the cube to move a particular square. To solve the cube, just repeat the steps!
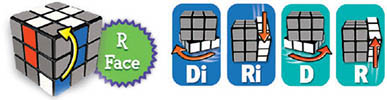
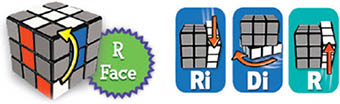
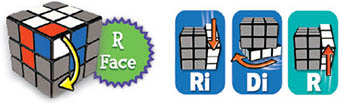
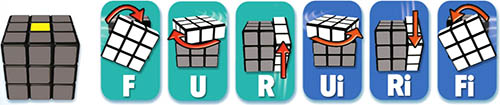
Each face of the cube is assigned a letter (shown below). Each step is made up of a sequence of twists (a one quarter-turn of the face of the cube).
To complete the sequence for each step, twist one face of the cube, then twist the next face, and so on, for the complete sequence.
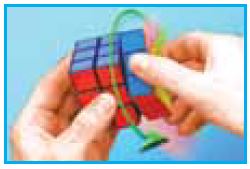
The letter 'i' means inverse, or counter- clockwise. Before you start each move, be sure to place your thumbs on the Fside of the cube, as shown in the illustration. This will ensure that your cube is properly oriented to execute the move.
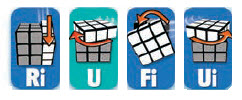
Turn Clockwise
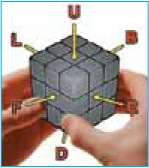
- R - Right Face
- L- Left Face
- B - Back Face
- D - Down Face F - Front Face
- U - Upper Face
- i - Inverse (turn Counter- clockwise)
Important: To turn a face clockwise, imagine you are facing that side of the cube.
How Each Step Works?
B - Twist the Back Face a quarter turn clockwise.
Ri - Twist the Right Face a quarter turn counter-clockwise.
Each step can be used to solve up to FOUR pieces if there are none solved when you start the step. Please note that these illustrations display a sample of a situation on your cube for ONE of the possible FOUR pieces needing to be solved.
In many cases, you will need to rotate the cube to a new starting face (with red, orange, yellow or white center square) and repeat the instructions in order to place/rotate all of the pieces in that step before moving on.
The end result will only come AFTER all four sides of the cube have been through that step's sequence and all the pieces are in their proper location and oriented properly to match the surround- ing center square colors.
As such, you may have to repeat the same step a few times with different sides as the starting face until all the pieces are solved.
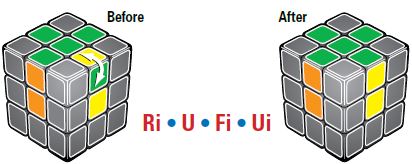
Step 1: Solve the Upper Green Cross
Hint: To solve the green cross, you have to solve each green edge piece on your own, one-by-one. The tricky part is not messing up the ones you've already solved.
First solve the red-green edge, then the white-green edge, then the orange-green edge, then the blue-green edge. You have to figure out this part for yourself.
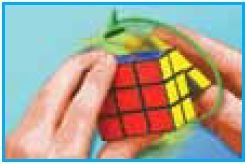
Should you ever have an edge piece in the correct place but flipped the wrong way, use this step to flip it without affecting the other three green edges. Just hold the cube with the piece in the upper-right position as in the picture below, and do the sequence Ri • U • Fi • Ui.
The edge piece will now be solved, and you can work on the next edge piece.
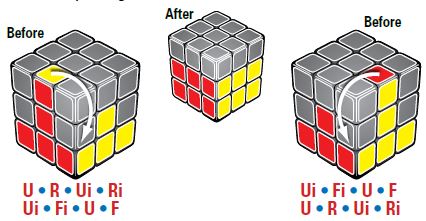
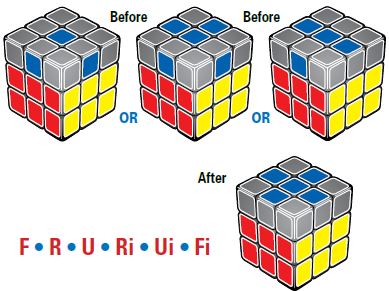
Step 2: Solve the Green Corners
Hint: Find a corner piece in the bottom layer that belongs on top. Turn the bottom layer until that piece is directly below its home in the top layer.
Hold the cube with the piece at the lower-front-right and its home at the upper-front-right, as in the picture, and then do the sequence Ri • Di • R • D, 1, 3, or 5 times until that corner is solved.
If you find a corner piece that's already in the top layer but it's in the wrong spot or flipped the wrong way, just hold the cube with that piece in the upper front right position, and do Ri • Di • R • D once.
Now the piece is in the bottom layer, and you can solve it as described above.
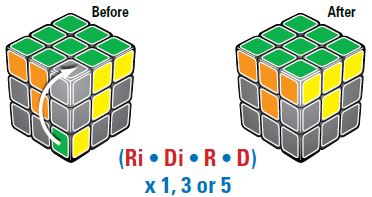

Tip: If a Corner with a WHITE tile is in the UP face, move it to the BOTTOM layer.
Step 3: Solve the Middle Layer Edges
Hint: Now flip the cube over so green is on the bottom. Try to find the red-yellow edge piece. If it's in the top layer, turn it until the edge matches one of the pictures below.
Then do the corresponding sequence to solve it. If the red-yellow edge piece is somewhere in the middle layer, but it's in the wrong place or flipped the wrong way, hold the cube so that the red-yellow edge is in the front-right position, and do either sequence once.
This may require you to rotate the cube to a new face). After the move, the piece is in the top layer, and you can solve it as described above. Repeat this for the other 3 middle-layer edges.


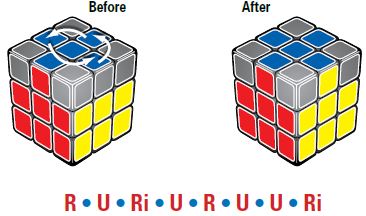
Step 4: Solve the Upper Blue Cross
Hint: Turn the top layer until the edges match one of these pictures. If you do the sequence below once and you still don't have a blue cross, then repeat this step until you do.
It doesn't matter which face you start with. Note: In this step, there will be other blue pieces show- ing on your cube that do not appear in these diagrams.

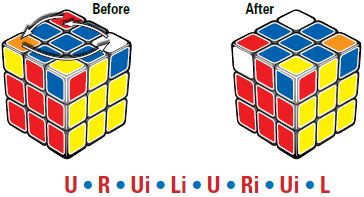
Step 5: Solve the Top Edges
Hint: Hold the cube with red in front. Turn the top layer until the red and blue edge piece is solved as in the picture, and then repeat the sequence below until the yellow and blue edge piece is also solved, on the right side.
Now turn the whole cube so that white is the "Front" face. If the top white edge isn't solved, just do the sequence once more, followed by "U" to position all the edges properly.

Step 6: Solve the Top Corners
Hint: Find a corner piece that's in the right place, and hold the cube with that piece above your right thumb. In the picture, this piece is the blue, yel- low, and red piece.
Don't turn the top layer at all, because you will mess up the edges that you just solved in step 5. Now do the sequence below once or twice to put the other 3 corners into the right places.
If you can't find a corner piece in the right place, just do the sequence below once before you start this step.
Step 7: Solve The Top Corners
Hint: Hold the cube with red in front. Keep turning the top layer until the upper-front-right corner needs to be flipped, to have blue on top, like in the picture.
Do the sequence below either 2 or 4 times to flip the corner so that blue is on top. Note: As you work through this step, lower layer colors may become scrambled.
Don't worry, just keep going! With red still in front, keep turning the top layer and do the sequence again whenever needed to flip the upper-front-right corner piece. When all the corners have been flipped, just turn the layer to solve the cube. Congratulations, you've done it!
Continue Reading