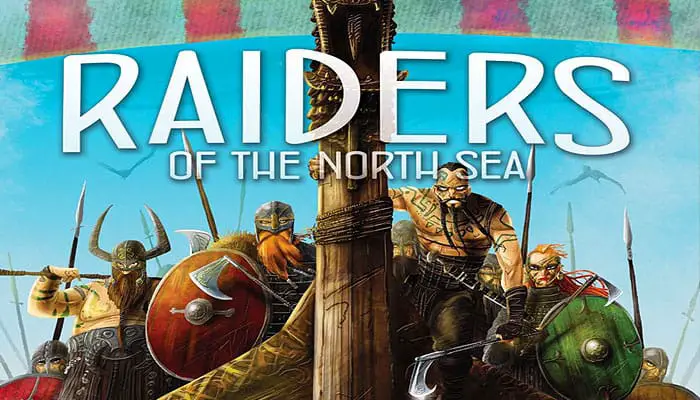
Raiders of the North Sea is set in the central years of the Viking Age. As Viking warriors, players seek to impress the Chieftain by raiding unsuspecting settlements.
Players will need to assemble a crew, collect provisions and journey north to plunder gold, iron and livestock. There is glory to be found in battle, even at the hands of the Valkyrie. So gather your warriors, it's raiding season!
Object of the Game
The aim of Raiders of the North Sea is to impress the Chieftain by having the most Victory Points (VP) at the game's end. Victory Points are gained primarily by raiding Settlements, taking Plunder and making Offerings to the Chieftain.
How players use their Plunder is also vital to their success. The game ends when either 1 Fortress raid remains, all Valkyrie are removed, or all Offerings have been made.
Components
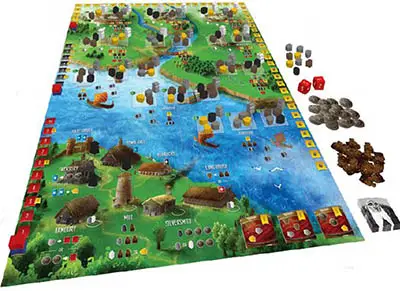
- 16 Offering Tiles
- 12 Score Markers
- 18 Valkyrie
- 18 Gold
- 32 Silver
- 18 Iron
- 26 Livestock
- 32 Provisions
- 71 Townsfolk Cards
- 4 Ship Cards
- 7 Black Workers
- 11 Grey Workers
- 12 White Workers
- 2 Avering Dice
- 1 Black Bag
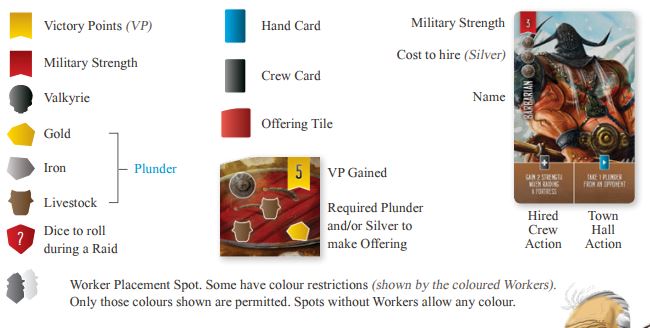
Game Iconography
Before getting started, players should familiarize themselves with the board, cards and their icons.
First Time Players
When playing for the first time or teaching others, there is one simple concept to understand:
Players always start and finish their turn with 1 Worker in hand. Each player starts their turn with 1 Worker. On their turn they will place their Worker on the board to take an action.
After doing so, they will pick up a different Worker for a second action. Regardless of which actions they take, this will always be true.
Setup
Follow these steps to setup Raiders of the North Sea:
1. Place the game board in the centre of the playing area.
2. Shuffle all 71 Townsfolk Cards into 1 deck and place facedown within reach of all players. This forms the Townsfolk Draw Pile. Allow space for a Discard Pile also.
3. Shuffle all 16 Offering Tiles and stack them facedown to the side of the board. Turn over the top 3 Tiles, placing them faceup to the right of the Long House (the 3 spaces at the bottom right of the board).
4. Place all Valkyrie and Plunder (Gold, Iron and Livestock) into the Black Bag and give them a good mix. Randomly draw and place the required number for each raiding space. (Green icon at the top left of each raiding space). Remove all remaining Valkyrie and Plunder from the bag. These should be placed alongside the board to form the Main Supply.
Note: Raiding spaces are the transparent rectangular boxes over each Settlement (Harbours, Outposts, Monasteries and Fortresses).
5. Place all White and Grey Workers on their required raiding spaces (Worker icon at top right of each raiding space). These are collected during raids. Place 3 Black Workers in the Village. These should be on the Gate House, Town Hall and Treasury (buildings with a blue card icon).
6. Place all Silver and Provisions to the side of the board in the Main Supply. The dice can be placed here also.
7. Each player receives 2 Silver, 1 Black Worker, and 1 Ship Card in their chosen colour (with the 50 VP side facedown).
8. Place 1 Score Marker of each player's colour on the 3 '0' spaces around the board's edge. These track each players Armour  , Valkyrie
  and Victory Points
  .
.
9. Along with the Black Bag, place any unrequired Black Workers, Player Cards and Score Markers, back into the box.
10. Deal 5 cards from the Townsfolk Draw Pile to each player. Before beginning, each player must choose 3 of the 5 cards to keep in their hand. All other cards are placed facedown at the bottom of the Townsfolk Draw Pile.
11. Each player rolls both dice to determine a starting player. The highest roller starts the game.
The Main Supply
The Main Supply is limited to its current resources (Silver, Provisions and Plunder). Players can only claim what resources are available at the time.
The Offering Tile Stack
Offering Tiles are shuffled and kept facedown. Should this stack ever run out, the game is over. Making Offerings to the Chieftain is a vital part of scoring Victory Points. To do so, players need to collect varying sets of Plunder and Silver, as shown on each Offering Tile.
Player Supplies
Players are limited to holding no more than 8 Silver, 8 Provisions, and 8 cards in their hand at the end of their turn. However, they may collect more than this during their turn. There is no limit to how much Plunder players may hold.
Game Play
Proceeding clockwise from the starting player, each player takes their turn in full. On their turn, players may choose to Work or Raid. Players continue to take turns until 1 of the 3 end-game conditions have been met (See page 10). Regardless of their choice, each turn will always follow the same pattern:
- Place Worker and resolve its action
- Pick up a different Worker and resolve its action
Working
Having a good Crew and enough provisions are vital to successful raiding.
So before making any raids, players will need to do some work to prepare their Crew and collect supplies. This is all done in the Village, at the bottom of the board.
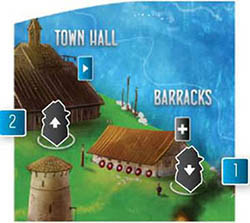
There are 8 different buildings, with various actions. At the start of the game, there are Workers in the Gate House, Town Hall and Treasury. These buildings are currently blocked for placing a Worker. On their turn, players place their Worker in an available building. It is important to note that there are 3 different Worker colors. In some cases, the Worker's color alters the building's action.
The starting player could place their Worker in either the Mill (to gain 1 Provision), Barracks (to hire 1 Crew Member), or Silversmith (to gain 3 Silver). The Armory and Long House require a Grey or White Worker. After placing their Worker, and resolving the building's action, they then pick up a Worker from a different building and resolve its action also. Players hold onto the Worker they picked up, as they will place it on their next turn.
For example, the starting player decides to place their Worker in the Mill to gain 1 Provision. This is taken from the Main Supply, and added to their own. They then decide to pick up the Worker from the Gate House. They draw 2 new cards from the Townsfolk Draw Pile and add them to their hand.
- Players cannot pick up the same Worker they just placed.
- Players may choose to place or pick up a Worker without taking the building's action.
- Players can only take each building's action once on their turn (with exception of the Sage/Long House).
After picking up their new Worker and resolving any action, their turn is over. Play then continues with the next player, in a clockwise fashion. As before, the current player can either Work or Raid.
Raiding
Once players have hired enough Crew and collected Provisions, they may choose to raid on their turn. To raid a Settlement (Harbour, Outpost, Monastery or Fortress), players need to meet 3 requirements. They must have:
- A large enough Crew.

- Enough Provisions
 (and Gold
  for Monasteries/Fortresses).
 - The required Worker color.
Each Settlement has a different set of requirements.
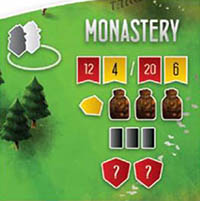
For example, this Monastery requires a minimum of 3 hired Crew, 3 Provisions, 1 Gold and either a Grey or White Worker.
Once a player decides to raid a Settlement, they must follow these steps: Ignore step 3 when raiding Harbors (these always score 1 Victory Point).
Place their Worker on 1 of the Settlement's Worker Spots (it will remain there for the rest of the game).
Pay required Provisions and Gold to the supply.
Roll the required dice and add up their total Military Strength to determine any Victory Points gained.
Receive additional Victory Points from Hired Crew.
Pick up their new Worker and Plunder, adding it to their supply.
Resolve any Valkyrie actions.
Note: Steps 3-6 will be explained over pages 8-9 (Scoring Raids).
After picking up their new Worker, along with their Plunder and resolving any Valkyrie actions, their turn is over. Play then continues with the next player, in a clockwise fashion. As before, the current player can either Work or Raid.
For example, a player decided to place their Grey Worker in the Monastery shown above. They first make sure they have at least 3 Crew Members. As they do, they pay the required 3 Provisions and 1 Gold to the Main Supply. They then roll 2 dice and add up their Military Strength to determine any Victory Points gained. After scoring, they take their Plunder and new Worker, adding them to their supply.
Scoring Raids
There are 3 different ways to score Victory Points during a raid:
- Military Strength
- Hired Crew
- Plunder and Valkyrie
1. Military Strength
Each Settlement (except Harbors), offer 2 or 3 levels of Victory Points. These are all paired with a set level of Military Strength.
For example, the Monastery shown to the right will reward players 4 Victory Points if they raid with at least 12 Military Strength. Should they have 20 or more Military Strength, they will instead gain 6 Victory Points. Likewise, if they raid with less than 12, they will gain no Victory Points for their Military Strength.
When raiding, players will roll 1 or 2 dice, as indicated by the Settlement (not applicable for Harbors).
After doing so, they add up their total Military Strength to determine any Victory Points gained. Each player's Military Strength is made up of the following:
Rolled dice - Note: 1 die guarantees a minimum of 2 Military Strength, while 2 dice guarantees at least 4.
Hired Crew Strength (shown at the top left of each Hired Crew card).
Hired Crew Actions (shown at the bottom left of each Hired Crew card) - Some Crew offer additional Military Strength when raiding specific Settlements. Players should check these when raiding.
Armour - This can be bought at the Armory with Iron or Silver. It is never spent during a raid. Rather, it offers constant Military Strength to players' Crews.
Military Strength = Rolled Dice + Crew Strength + Crew Actions + Armour
After totalling their Military Strength, players determine how many Victory Points they gained, if any. These are scored immediately by moving the current player's Score Marker around the Victory Point Track.
Should players ' scores ever reach 50 Victory Points, they should turn over their Ship Card, revealing the 50 VP side. Players loop their Score Marker back around to the 0 mark and continue scoring as normal. Their total score now equals 50, plus their score on the Victory Point Track.
2. Hired Crew
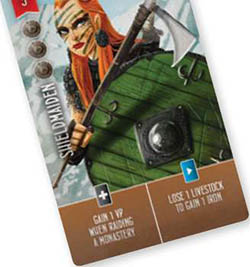
Some Hired Crew offer additional Victory Points when raiding specific Settlements.
These are additional to any Victory Points gained for Military Strength (even if they scored none), and are added to the Victory Point Track in the same manner.
3. Plunder And Valkyrie
After scoring any Victory Points for Military Strength and Hired Crew, players pick up their new Worker and Plunder.
Players must take 1 of the remaining sets of Plunder from the raided Settlement.
Once all Plunder has been taken, players can no longer raid that particular Settlement (there will be no available Worker Spots anyway).
Plunder is worth Victory Points at the game's end. 
However, it can also be spent throughout the game to help make further raids, or gain additional Victory Points. For now, players take the Plunder, adding it to their supply.
Some raids may also include 1 or more Valkyrie with the Plunder. Although taking Valkyrie result in the death of hired Crew Members, they also offer another way of scoring Victory Points. When taking Valkyrie, players should follow these steps:
-
For each Valkyrie taken, players must lose (discard) 1 hired Crew Member of their choice. Some Hired Crew allow players additional actions if killed during a raid. These actions are resolved immediately.
If players take more Valkyrie than they have Hired Crew, they cannot claim the excess Valkyrie for further scoring. Extra Valkyrie are removed without action, and placed back into the Main
-
Players move their Score Marker 1 space up the Valkyrie Track
for each Valkyrie taken during a raid. At the game's end, players will score Victory Points for the total amount of Valkyrie they've taken during the game.Players may take more than 7 Valkyrie throughout the game (still losing Crew), but will only score a maximum of 7 (15 VP) at the game's end.
-
Players place all collected Valkyrie into the Main Supply (they do not keep them).
End of the Game
There are 3 ways the game can end:
There is only 1 set of Plunder left in the Fortresses (1 of the 6 Fortress raids remains).
The Offering Draw Pile has been emptied.
There are no Valkyrie left on the board.
Once 1 of these 3 conditions have been met, the current player finishes their turn, resolving any unfinished actions. Each player (including the current player) has 1 final turn before the game ends (1 final round).
Scoring
Once the game has ended, players score additional end-game Victory Points. These are recorded by moving players' Score Markers around the Victory Point Track. End-game scoring consists of:
Valkyrie Track -
Players score Victory Points based on how high their Score Marker is on this track. Victory Points gained are shown on the right side of the Valkyrie Track.Armory Track -
This is scored in the same manner as the Valkyrie Track.Collected Offering Tiles - These are revealed and their values added to the Victory Point Track.
Hired Crew - Some Crew Members earn Victory Points, as shown on each card.
Plunder - Players score any Plunder they hold: 1 Gold = 1 Victory Point, 1 Iron = 1 Victory Point, 2 Livestock = 1 Victory Point (1 Livestock scores nothing on its own)
After each player has added all their end-game scores to the Victory Point Track, the player with the highest final score is declared the winner!
In the case of a tie, the player furthest up the Valkyrie Track is the winner. If still tied, the player furthest up the Armory Track is the winner.
Continue Reading


