Ragusa: a maritime republic and Mediterranean port that sees thousands of ships pass through its walled harbor.
Here, in the midst of the 15th century, Ragusa is at its peak - it is the sole rival to Venice as a trading gateway between the Eastern and Western civilizations, a neutral zone where merchants from all corners of the globe come to show their wares.
But Ragusa is nothing - and was nothing - without you: the builders. By strategically building lumber mills, vineyards, towers and warehouses around and within the city, you built - and must continue to build - the foundations of wealth and commerce that will be this city's legacy...
Components
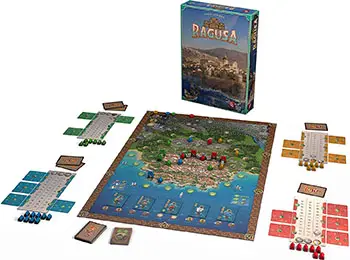
- 1 Game board
- 5 Player Mats
- 30 Counting Cards
- 26 Ship Cards
- 16 Secret Mission Cards
- 10 Solo AI Cards
- 66 Wooden Houses
- 75 Wooden Towers
- 5 Wooden Discs
- 22 Wooden Walls
- 16 Transparant Tracker Beads
- Instructions
Object of the Game
In the game, players are building Ragusa in the 15th century. By strategically placing buildings, they gain access to resources and produce commodities to trade for other goods and victory points.
They also gain points by building walls and towers to defend the city. The winner is the player with the most victory points at the end of the game.
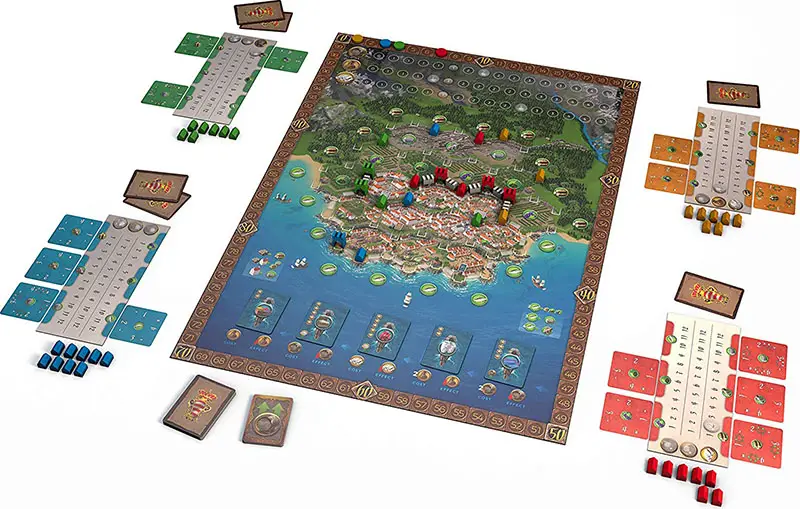
Setup
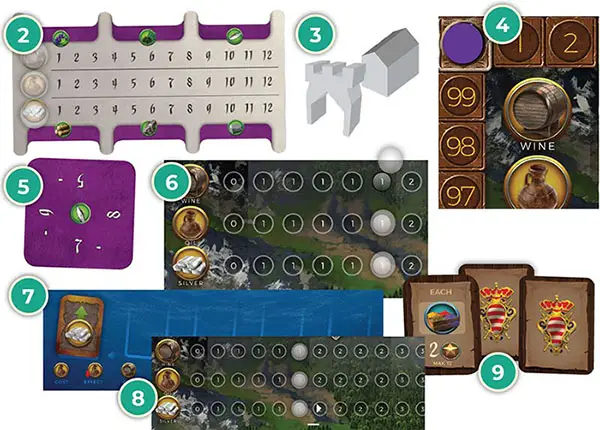
1 Place the board in the center. There are 2 sides, one with simplified graphics for learning the game or playing in low light.
2 Give each player one player board and 3 tracker beads. Place a bead on each Commodity symbol (on the left side of their board).
3 Give players the Towers in their color and the following number of houses:
- 2 players - 12 houses each
- 3 players - 12 houses each
- 4 players - 10 houses each
- 5 players - 9 houses each
4 Place the disc of each player's color on square zero of the scoring track.
5 Keep the resource tracker cards nearby (6 for each player, in their color).
6 Place one tracker bead on the indicated starting spaces (the right most '1') of the three commodity value tracks at the top of the board.
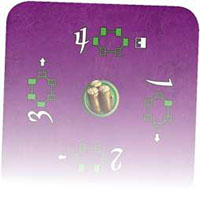
7 Shuffle the ship cards, and place five on the spaces indicated at the bottom of the board, ship side down. Place the deck nearby, ship side down.
8 For each card, move the corresponding commodity value marker to the right by one or two spaces according to the number of arrows (e.g. if the card has a wine symbol and two arrows, move the wine marker right twice). Then, flip the card to the ship side.
9 Shuffle the bonus deck, and give each player three cards face-down. Each player must pick one and discard the other two cards face down.
10 Shuffle the discarded bonus cards back into the bonus deck. Place the Bonus deck face down, near the board.
11 Randomly select a starting player.
Resources and Commodities
The game has 6 kinds of resource: Fish, Wood, Stone, Silver Ore, Grapes and Olives. Players use tracker cards to denote how many of each they have access to. The last three of those are used to produce three types of commodities: Silver, Wine and Olive Oil.
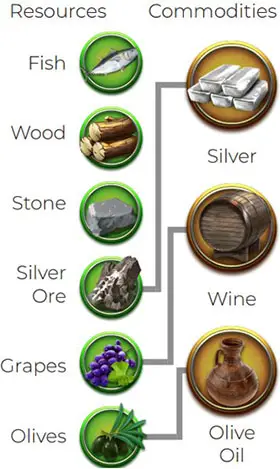
Resources are gained but not spent in Ragusa. Think of them like supply lines : a measure of your access to that resource . They influence how much of a commodity you can create, but do not expire when that commodity is created.
Commodities, however, are finite, and once sold will be removed from your inventory.
Players track both resources and commodities on their boards. Commodities can be sold for victory points (at a variable value) or traded for goods that are brought into Ragusa by ships at the bottom of the board.
Each type of good is worth a fixed number of victory points, and trading them will influence the market value of commodities.
When producing commodities, move the corresponding piece right by the amount produced. When spending commodities, move the corresponding piece left. You can store up to 12 units of each commodity in your warehouse. Additional units will be wasted.
Game Play
Players take turns, going clockwise. On their turn they place one of their houses in one of the available spaces on the map (a space is available if there is not already an house on it. Towers do not block a space).
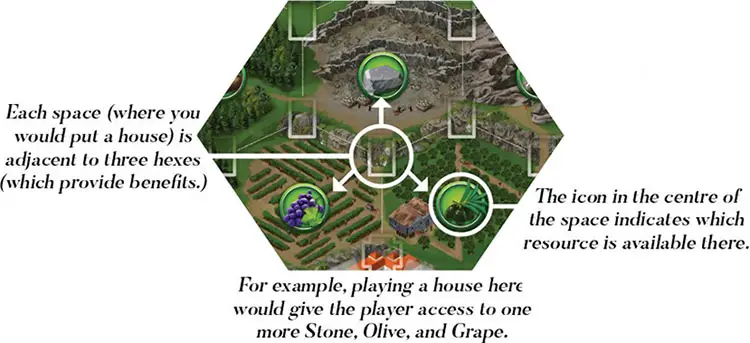
Each space is adjacent to three hexes, and each hex provides a benefit. In order to place a house on a space, its requirements need to be fulfilled (see below).
Rural
Each hex outside the city walls provides one resource (e.g. Fish, Wood, Stone, etc).
When placing a house next to one of these, place a tracker card next to your player board (or rotate/flip it if there is already a card there) to indicate how many of each resource you now have access to.
Each card has 1-4 on each edge on one side, and 5-8 on the other. Simply ensure that the correct number is aligned with the corresponding resource on your player board, and flip it when you go from 4 to 5 of a resource.
When you place a house next to a resource, place a tracker card next to the appropriate resource on your player board. When you gain more of the same resource, rotate/flip the card so that the appropriate number is next to it.
Remember that resources are never spent but can be traded for other resources.
City
 Each city hex provides a unique benefit. |
Hexes within the city walls have specific actions.
When the hex has a clockwise arrow symbol beneath the title (circled in the image on the left), the player will complete the action before allowing the respective owner of each other house around the hex, going clockwise, to activate the action.
When you build between Rural and City regions, activate each of them according to their own rules. On 'cross' shaped spaces, Towers can be built, but these do not block the house space beneath.
Building Requirements
When you place a house, it will border 3 hexes. You must check that you have the building requirements for each hex (not for the space itself). If you don't meet the requirements for all three, you may not build there. You will need Wood to build next to rural hexes, and Stone for city hexes.
The building requirement is simple: the amount of houses you have around a single hex may not exceed the amount of the relevant resource (Wood / Stone) you have available to you.
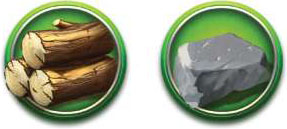
Wood is required for Rural hexes, and Stone for City hexes.
For example: your first house around a rural hex will require 1 Wood. If you already have two houses around a rural hex, you will need 3 Wood to place your 3rd house there.
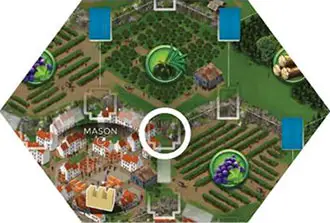
If Blue is building on the circled space:
It's their 1st house around the Mason, so they only need 1 Stone.
It's their 2nd house around the vineyard, so they need at least 2 Wood.
It's their 3rd around the olive grove so they need at least 3 Wood.
So, Blue would need at least 1 Stone and 3 Wood to be able to build there.
These resources are not consumed, and can be reused across hexes (e.g. if you are building a house adjacent to 3 rural hexes where you have no houses, you can use 1 Wood to meet the requirements for all 3).
You start with no resources, but the resources gained by placing a house can be used to 'pay' for that house: thus, your first house must always be placed adjacent to a hex that provides Wood.
Some city hexes have further, special requirements, detailed in this rulebook on pages 12-15.
Important!
Requirements of all 3 hexes must be met in order to build, but the same resources can be reused for 2 or more hexes, and the resources provided by one hex can be used to fulfill these needs too. Note that sea hexes do not require extra resources.
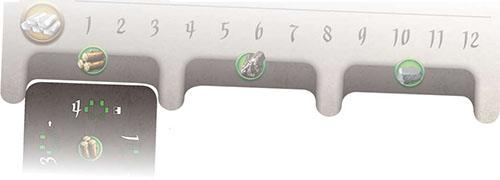
The cards used to track Wood and Stone stocks also have handy indicators of your current house limits for country (wood) and city (stone) hexes.
City Buildings
Below is a list of buildings within the city limits, their requirements, and effects.
-
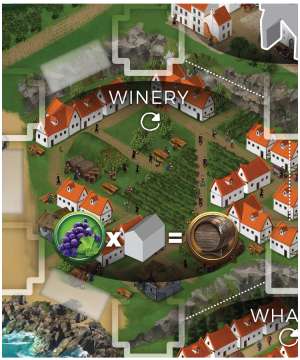
Winery
Requires one or more

The owner of the house moves the Wine marker on their player board equal to the amount of Grapes they have access to. (If a player has access to 3 Grapes, and 2 houses on the Winery, they would gain 6 Wine total).
If houses have already been built adjacent to the Winery, activate them in clockwise order (following the new house).
-

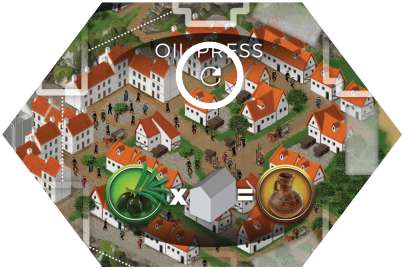
Oil Press
Requires one or more

The owner of the house moves the Oil marker on their player board equal to the amount of Olives they have access to. (If a player has access to 1 Olive , and 1 house on the Oil Press, they would gain 1 Oil total).
If houses have already been built adjacent to the Oil Press, activate them in clockwise order (following the new house).
-
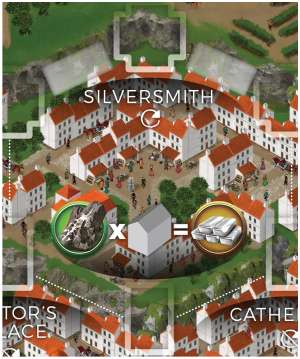
Silversmith
Requires one or more

The owner of the house moves the Silver marker on their player board equal to the amount of Silver Ore they have. (If a player has access to 3 Silver Ore and 3 houses on the Silversmith, they'd gain 9 Silver total).
If houses have already been built around the Silversmith, activate them in clockwise order (following the new house).
-
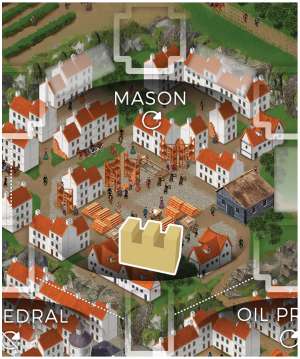
Mason
No Special Requirements.
Place 1 wall between 2 house spaces along the city limits (regardless of whether there are houses there). Immediately gain 1VP for the wall (regardless of what is adjacent ) +1VP for each House / Tower of your color directly adjacent to the wall.
If other houses have already been built adjacent to the Mason, activate them in clockwise order (following the newest house).
-

Architect
No Special Requirements
Place 1 tower in your color on one of the available tower spaces along the city limits, regardless of whether or not there is a tower there. Spaces with a tower are still available for houses, and vice versa.
Towers contribute to scoring for city walls, both during the game and at the end. If other houses have already been built adjacent to the Architect, activate them in clockwise order (following the newest house).
-
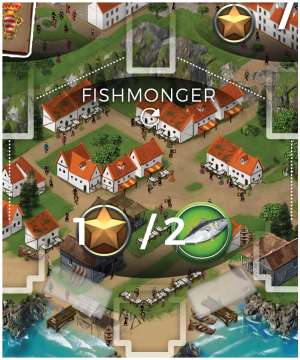
Fishmonger
Requires one or more

Each house on the Fishmonger immediately scores 1 VP per 2 Fish available to the owner of the house at that time. Example: A player has access to 5 Fish and has 2 houses on the Fishmonger. Each house will score 2 VP for a total of 4 VP.
Important: In order to place a house on the Fishmonger, the 2 Fish must be available after trading Fish to meet the build requirements, if you do so.
-
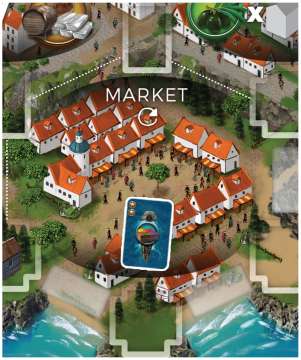
Market
Requires one or more commodity
When a house is placed on the market, the owner of each house ( starting from the newly placed one going clockwise) may purchase one of the available Ship cards.
Each slot has a base cost (2 Wine, 2 Oil, 1 Silver, 1 Wine, or 1 Oil. Some Ships have an additional cost (for example, Pearls and Gems cost one additional Silver ). When purchasing Ships, the active player must have the required commodities and will spend them by moving the corresponding marker on their board left.
Under the Ship card is a commodity with a downwards arrow. When the Ship is purchased, the corresponding marker on the Market Value track will be moved down. The commodity on the card does not affect the market price.
After 1 Ship is purchased, the remaining Ships to the right will slide left, and a new card will be placed on the rightmost slot. Before it is placed, look at the symbol on the back of the new ship and increase the specified commodity value by 1 or 2 according to the number of arrows on the card.
Ship cards purchased by the players will immediately score VP equal to the number of stars depicted on them.
-
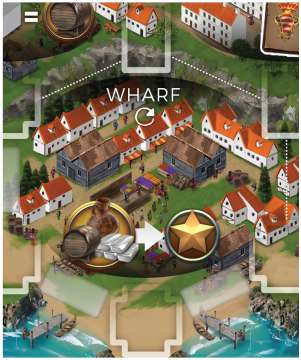
Wharf
Requires one or more commodity
When a house is placed next to the Wharf, each player may sell 1 unit of either Wine, Oil or Silver per house they have on this space.
The commodities sold must be available on the corresponding player board, and if they are sold, the relevant marker must be reduced accordingly.
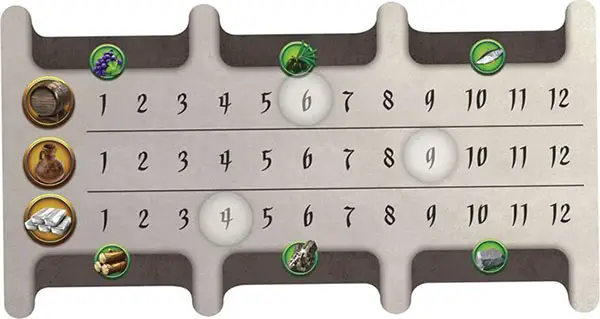
Each commodity sold scores VPs equal the current market price of the relevant commodity (see below).

The space that the tracker is on will indicate how many VPs the player receives for selling that commodity. On the above board, Wine will earn 2 points, Oil will earn 1, and Silver will earn 3.
-

Rector's Palace

No Special Requirements
When placing a house next to the Rector's Palace, you may draw the top 2 Bonus cards, choose 1 to keep, and return the other to the bottom of the deck.
These Bonus cards will award points at the end of the game (see Appendix for the full list of cards ). Note: Existing houses adjacent to the Rector's Palace are not activated.
-
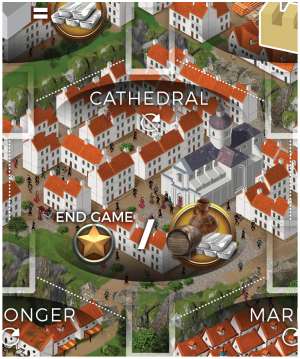
Cathedral
No Special Requirements
Houses next to the Cathedral score points at the end of the game, each house allowing the player to score a set of 1 Silver, 1 Wine and 1 Oil at the endgame market price.
Note: Existing houses adjacent to the Cathedral are not reactivated.
Fish Exchange
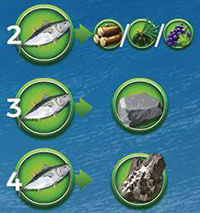
At any time during the game, players may exchange 2 or more Fish for another type of resource according to the following exchange rates. The exchange is permanent.
2 Fish = 1 Wood / 1 Grape / 1 Olive
3 Fish = 1 Stone
4 Fish = 1 Silver Ore
Important: This may happen at any time, including right after gaining the Fish and before activating a tile. For example, the same Fish gained by placing a house on the Winery may be exchanged for a Grape in order to produce more Wine.
The exchange can also happen on another player's turn, e.g. when a player places an house on the Oil Press, other players that already have an house there can trade Fish for Olives before their house activates.
End of the Game
The game ends when all players have placed all their houses. Scoring then proceeds as follows:
City Walls
Look at each player's longest uninterrupted stretch of wall (i.e. where each house space between two wall pieces is empty or has a house or tower of your color). Each player scores 1 VP for each wall piece, tower and house (of their color) in their longest stretch.

Cathedral
For each house on the Cathedral, players score VPs for 1 set of Silver, Oil and Wine (1 of each) at the end-game market values.
Example: If the values of Silver, Wine and Oil are 4, 3 and 2 respectively, a player with 2 houses on the Cathedral who still has 3 sets of commodities on their board will score 18 VP (2 x (4+3+2) - they can only score for 2 sets with 2 houses).
Important: The commodities will be still available when scoring the Bonus Cards.

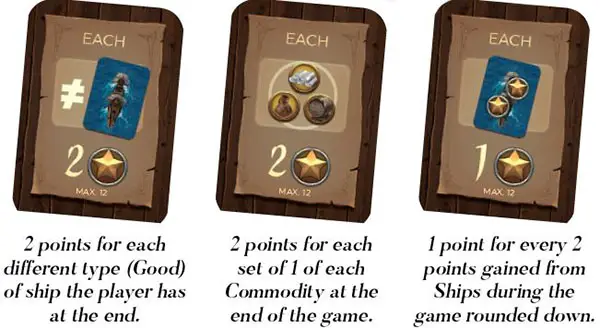
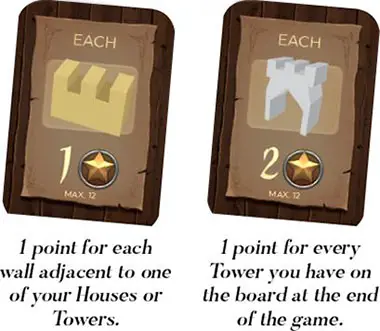
Bonus Cards
Finally, each player reveals their bonus cards and adds the victory points awarded by them.
Important: The maximum number of VP you may score from any 1 Bonus Card is 12.
Each of these gives the player the indicated number of points for each of the relevant resources they have on their player board at the end of the game. You may swap Fish for other resources at this stage, but not after you have scored, for a Fish bonus card.
These cards work similarly but refer to goods bought from ships. Any icon with a blue background indicates that it comes from a ship. For each ship of that type (such as Spices, on the far left) the player will gain the points indicated on the card.
Winner
The player with most victory points wins the game. In case of a tie, look at the market value of the commodities in each player's warehouse: the player with the highest value wins.
Continue Reading
