
Welcome to the middle of the 22nd century. After 300 years of excess, denial, and recklessness, rising water levels engulfed the last pieces of dry land. Fighting for their lives, survivors have settled above sea level in colonies that grow ever higher, sustained by remnants of the past recovered from the depths.
As a member of the Otys colony, send your best divers into the depths of the ocean to retrieve the most useful resources. Your divers each have their own specialty, but it is up to you to match them with the benefits allocated by the Colony.
The oxygen supplies of your divers are limited, so plan their return to the surface carefully. Remember to upgrade your equipment to outdo your opponents.
Components
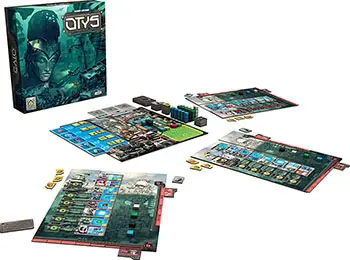
- 1 Colony Board
- 4 Player Boards
- 32 Contract Cards
- 4 Player Markers
- 1 First Player Marker
- 5 Sponsor Tiles
- 4 Sets of 8 Diver Tiles
- 16 Key Tokens
- 24 Battery Tokens
- 40 Credits
- 32 Reward Tokens
- 1 Bag
- 80 Resources
- Rulebook!
Object of the Game
Thanks to your team of divers, you explore the ruins of sunken cities to find resources that will help the colony prosper.
To win, you must be the most efficient player: when a player reaches 18 Prestige points on the Score track, the game ends at the end of the round and the player with the most Prestige points wins the game.
During the game, you gain Prestige points when you:
- complete contracts, by gathering the necessary resources.
- upgrade your diver's equipment.
- sell resources to the Store.
- use Reward tokens that are worth Prestige points.
The Boards

Setup
Player Board Setup

1 Take a player board of a color of your choice and place it in front of you; this represents your search zone.
2 Take a set of 5 Key tokens (numbered 1 to 5) matching your color and place each token in each level space of your player board (i.e. place the token numbered "1" on level 1, the token numbered "2" on level 2, etc).. Slide them to the left so that they cover the number of each level. Then, take the X Key token matching your color and place it on its space on your player board.
3 Take a set of 2 Technician tiles. 3a Place the Mechanic tile to the right of your player board, 3b and place the Hacker tile below yourplayer board on their starting spaces (as shown above).
4 Take a set of 8 different Diver tiles and randomly place each one on the different Diver spaces of your player board with their Basic side faceup. Slide them to the left.
5 Take 1 resource of each color, and randomly place one of them on a resource space of each level of your search zone, except for level 1.
6 Take 3 Credits and 1 Battery token, place them near your player board.
Colony Board Setup
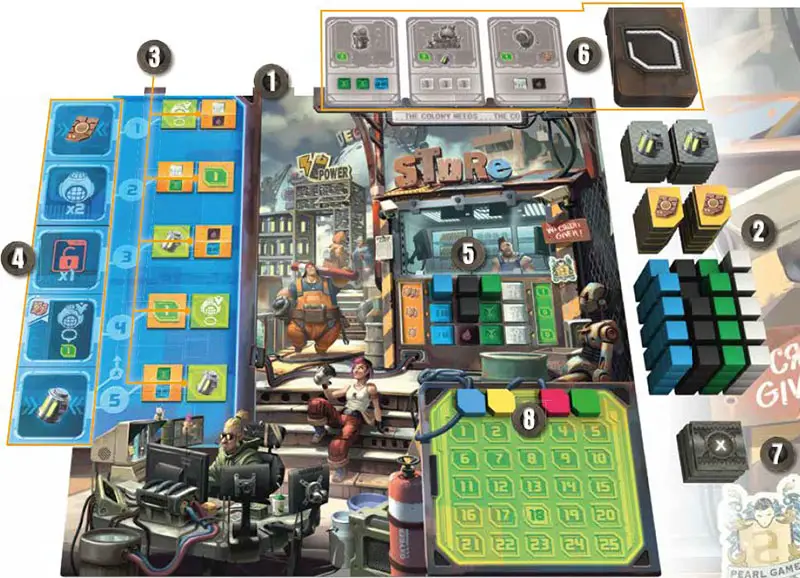
1 Place the Colony board in the center of the play area.
2 Sort the Credit tokens, the Battery tokens and resources into piles to form the supply.
3 Place all Reward tokens in the bag. Then, draw 2 tokens for each level of the board and place them with their Immediate Effect side faceup on their spaces on the Colony Display.
4 Randomly place the 5 Sponsor tiles on the Colony Display, to the left of the Colony board.
Note: Sponsor tiles are double-sided; a Basic side and an Advanced side (showing a  . If this is your first game, flip the Sponsor tiles to their Basic side. Otherwise, randomly determine which side will be used for each Sponsor tile.
5 Take 2 resources of the same color, 1 resource of a second color, and 1 resource of a third color, and place them on the spaces of the Store matching the type of each resource starting from the top row. For example: 2 fuel, 1 metal, and 1 plant.
6 Shuffle the Contract cards and place them facedown near the board to create a deck. Then, draw the top 3 cards of the deck and place them faceup in the Contract card spaces located above the board. These contracts are public.
In a two-player game, draw the top 2 cards instead.
7 Place the neutral X Key tokens in a pile near the board.
8 Place each player's marker on space "0" of the Score track.
Note: There is an unlimited amount of resources, credits, and batteries.
Game Play
A game of Otys is played over a series of rounds. Each round, players take turns in clockwise order. The player with the greatest lung capacity takes the First Player marker, and starts the game. That player keeps the First Player marker for the entire game.
On your turn, choose one of your available Key tokens (i.e. currently on your player board) and follow these steps:
Step 1
Slide the Key token to the right so that it touches the Diver tile on the same level. You may immediately use the effect of the Sponsor tile located on the same level on the Colony Display.
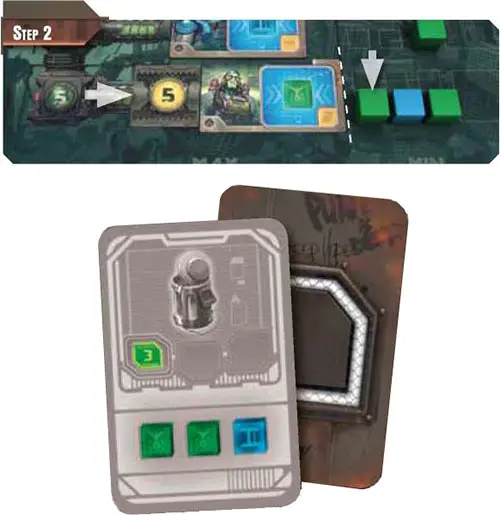
Step 2
Continue sliding the Key token so that it pushes the Diver tile to the right. That diver is activated; you may immediately use the diver's effect.
Step 3
Finally, flip the Key token and place it below your player board on the leftmost free space of the Hacker track (that Key token is no longer available). Then, your diver must resurface: place the activated diver on the topmost level of your player board by shifting the other Diver tiles down to make space for it.
If placing a Key token would cause it to reach (or overlap) the Hacker tile, instead immediately return all your Key tokens to their matching spaces on your player board, making sure to flip them back.
Return any neutral X Key tokens to the supply (the X Key token matching your color is always returned to your player board). Note: Using the effects of a Sponsor and Diver tile is optional.
Example:
Step 1 - Noelie chooses her "1" Key token. She slides it to the right but chooses not to use the effect of the Sponsor tile on the same level on the Colony Display (it would allow her to return a Key token of her choice to her player board).
Step 2 - Then, Noelie slides the Key token to the right, which pushes the diver she wants to activate-the Engineer. She uses the Engineer's effect to spend 1 Credit and improve her Mechanic: from now on, her divers' propellers have a maximum movement value of 2.
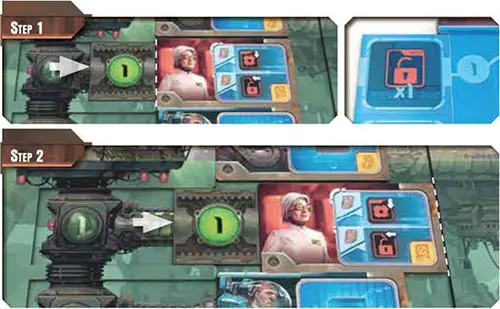
Step 3 - Noelie ends he turn by flipping her "1 Key token and placing it on her Hacker track. Because it reaches the Hacker tile, she immediately returns her Key tokens to her player board (she does not have any neutral X Key tokens). Finally, she moves her Engineer to the surface.

X Key Tokens
Instead of choosing one of your available Key tokens, you can spend one X Key token (your own or a neutral one). If you do, instead of following Step 1, place the X Key token on your player board to the left of the diver you want to activate.
Then, you must update the Colony Display by moving the Sponsor tile from level 5 to level 1 and shifting all other Sponsor tiles down one level.
You may now use the effect of the Sponsor tile located on the same level as the X Key token. Then, proceed as usual with Step 2 and 3.
Note:
You may place the X Key token on any level, whether or not you have an available Key token at that level.
At the end of step 3, flip the X Key token and place it on the Hacker track, as if it were a regular Key token.
Example:
Step 1 - Pauline chooses her X Key token to act as the "2" Key token she already used.
She places her X Key token on level "2" and immediately updates the Colony Display: she takes the Sponsor tile on level 5 and places it on level 1, shifting the other Sponsor tiles down.
Then, she uses the effect of the Sponsor tile on level 2 of the Colony Display: she chooses to return her "4" Key token to her player board.
Step 2 - Pauline then slides the X Key token to the right to push and activate her Fuel Expert: she takes 1 fuel (purple) from the supply and immediately places it on a resource space on the Fuel Expert's current level. Because the Fuel Expert is upgraded, Pauline also gains 1 Battery token.
Step 3 - Pauline ends her turn by flipping her X Key token and placing it on her Hacker track. Finally, she moves her Fuel Expert to the surface.


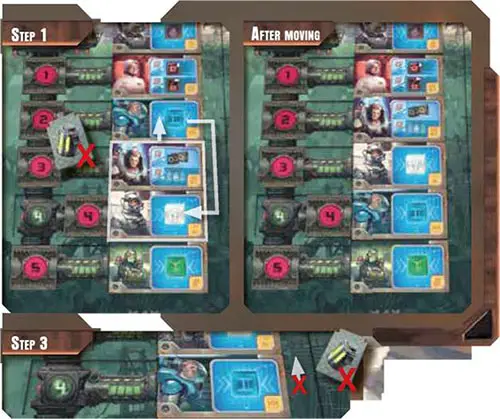
Battery Tokens
-
During Step 1, you may spend 1 Battery token to activate one of your divers' propeller.
If you do, you can move one of your Diver tiles (up or down) a number of levels equal to or less than your maximum movement value, as indicated by your Mechanic tile. Shift the other Diver tiles (down or up) to make space for the Diver tile.
-
During Step 3, you may spend 1 Battery token to activate your diver's oxygen reserve. If you do, the activated diver does not resurface and simply slides back into its space.
Note: You can spend multiple Battery tokens during the same step.
Example:
Step 1 - Delphine chooses her "4" Key token. She slides it to the right and uses the effect of the Sponsor tile on the same level on the Colony Display: she immediately gains 1 Credit.
Then, she decides to spend 1 Battery token to activate one of her divers' propeller. Her maximum movement value is 3 so she moves her Metal Expert down two levels and shifts the other divers up one space to make space for the Metal Expert's tile.
Step 2 - Then, Delphine slides the Key token to the right, which activates the Metal Expert: she takes 1 metal (blue) from the supply and immediately places it on a resource space on the Metal Expert's current level.
Step 3 - Delphine ends her turn by flipping her "4" Key token and placing it on her Hacker track. Finally, she spends 1 Battery token to activate the Metal Expert's oxygen reserve so that he does not resurface.
Complete a Contract
As soon as you gather on a single level of your search zone all the resources required to complete a Contract card in your hand (private contracts) or above the board (public contracts), you may complete that contract.
Completing a Contract does not count as an action. You can complete multiple contracts during the same turn if able.
When you complete a contract, immediately gain the number of Prestige points indicated on the card (1-5 Prestige points depending on the contract); advance your marker on the Score track accordingly.
Then, return the required resources to the supply. If you have other resources on the same level of your search zone, they stay in place. Finally, discard the completed Contract card. If it was one of the public contracts, replace it with the top card of the deck.
Note: There are five levels in your search zone and each level has a different depth. The number of resource spaces of each level is different and increases with depth (3 spaces on level 1 and 2, 4 spaces on level 3, 5 spaces on level 4, and 6 spaces on level 5).
As a result, more diff cult contracts can be completed only at deeper levels.

Example:
Step 1 - Rodrigue chooses his "5" Key token. He slides it to the right and uses the effect of the Sponsor tile on the same level on the Colony Display: he immediately gains 1 Battery token.
Step 2 - Then, he slides the Key token to the right to push and activate his Plant Expert: Rodrigue takes 1 plant (green) from the supply and immediately places it on a resource space on the Plant Expert's current level.
Rodrigue now gathered on this level all the resources required to complete a contract, he returns 1 metal (blue) and 2 plants (green) from this level to the supply and immediately gains 3 Prestige points.
Step 3 - Rodrigue ends his turn by flipping his "5" Key token and placing it on his Hacker track, and by moving the Plant Expert to the surface.
Contract Cards
There are two types of Contract cards:
- Cards that require a specific combination of resources
- Cards that require a specific number of different resources
Note: Some Contract cards have a one-time effect that you resolve immediately when you complete the contract. Depending on the card, you may gain 1 Credit, 1 Battery token, or 1 Credit and 1 Battery token.
Specific Combination
To complete this contract, you must gather on the same level of your search zone the resources that are indicated on the card.
Specifc Number
To complete this contract, you must gather on the same level of your search zone the number of resources indicated on the card. You can choose which color of resources to use. However, these resources must be different for each number indicated.
End of the Game
When a player reaches or exceeds 18 Prestige points on the Score track, finish the current round so that each player takes the same number of turns. The player with the most Prestige points wins.
In case of a tie, the tied player with the most resources remaining in his search zone wins. If there is still a tie, the tied players share the victory and should play again!
Note: At the end of the game, players do not gain Prestige points for their Credits, Battery tokens, and remaining resources.
Continue Reading

