
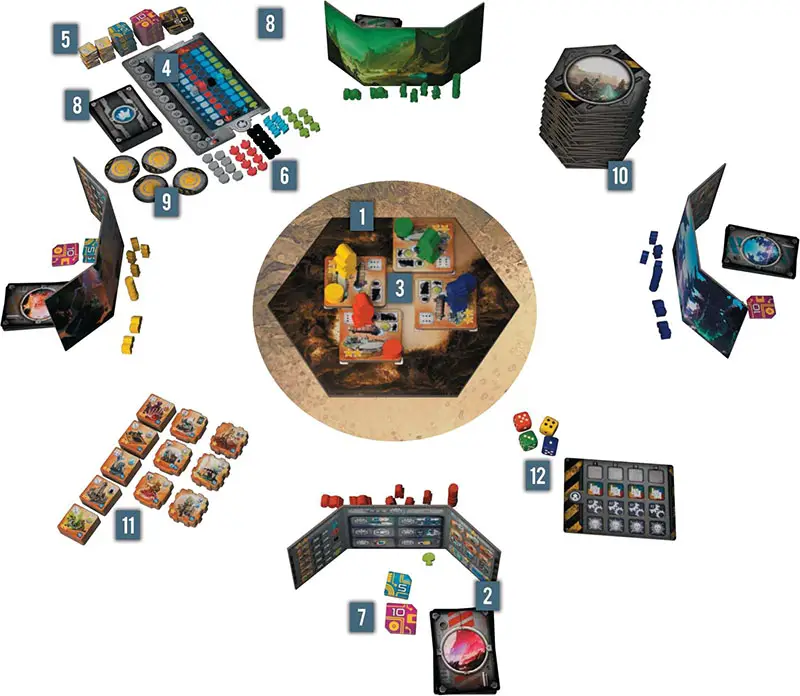
Components
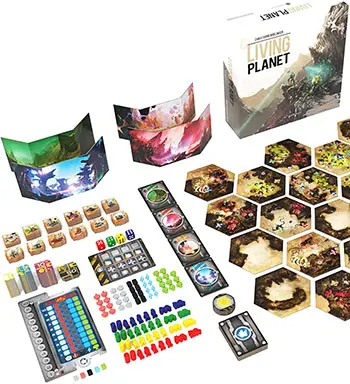
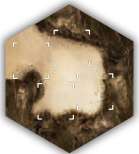
- 24 Hexagons
- 1 Stock Market board
- 1 Leader board
- 25 Stock market cards
- 4 dice
- 4 Fate Control tokens
- 5 Stock Market indicators
- 43 resource meeples
- 60 coins
- 58 building tiles
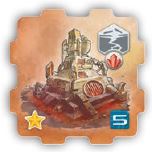
- 30 factory buildings
- 12 protective buildings
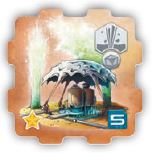
- 4 Spaceports
- 12 Stock Market buildings
- 4 sets of player's material
- 5 Scientists
- 2 Motorized Scientists
- 10 Automation chips
- 1 deck of 6 Planet cards
- 1 player's help/screen
- Instructions
Object of the Game
In Living Planet, each player represents one of the major Galactic Corporations exploiting the planet Myceliandre. Each one of them is eager to industrialize the planet and generate as much profit as possible before the planet self-destructs.
At the end of the game, each player will earn victory points based on how many Mega-Credits they possess and how many buildings and vehicles they control.
Setup
To set up the game, follow the steps described below, with the help from the example on page 5. Note, the setup may be different based on the planet you will explore (i.e., depending on the chosen scenario). The setup described here relates to the discovery of the first Living Planet, which is the normal game.
-
Use the 4-player Starting Hexagon (shown here).
Place the tile at the center of the table. It will be referred to as the Landing Zone.
-
Each player chooses a color and takes all the elements matching their color: 1 screen, 1 deck of 6 Planet cards, 5 Scientists, 2 Motorized Scientists, 10 Automation chips, 1 Spaceport.
The players set up their screens in front of themselves and place all their cards behind the screen in a face-down pile. All the wooden pieces are placed in front of their respective player's screen, so that all other players can see them.
Money, resources and unplayed cards are the only pieces to be kept hidden behind the players' screens.
-

Each player places their Spaceport tile on one of the square sections of the starting hexagon, along with an automation chip and a Scientist on it.
The Automation chip should be placed on the 10 MC value of the Spaceport since this information won't be used in the normal game.
-
Place the Stock Market board on one side of the playing area. Place the five colored wooden cubes on the 5 MC value of each column. Make sure to match the cube with the color of the column (see component list). Assemble the Planet's exhaustion track to the Stock Market board.
-
Place all the coins above the Stock Market board to create the bank.
-
Place all the remaining resources under the Stock Market board. This is the resource pool.
-

Each player takes 20 MC from the bank and 1 Mycelium resource from the resource pool.
Players must hide their money and resources at all times behind their screen. We suggest you take one 10 MC coin and two 5 MC coins.
-
Shuffle all the Stock Market cards together to create a face-down draw deck (the Stock Market Deck) and place it on the left of the Stock Market board.
The face up discard section of the Stock Market cards will be on the right side of the Stock Market board.
-
Place the 4 Fate Control tokens beside the resource

-
Take all 23 remaining hexagons and shuffle them together in a face-down pile called the Hex Deck. Place it somewhere on the table close to the Landing Zone.
-
Sort all buildings by type so that players can easily pick the one they need during their Construct action. There are 11 different types of buildings, so there should be 11 piles of different buildings (different artwork). This is called the pool of buildings.
-
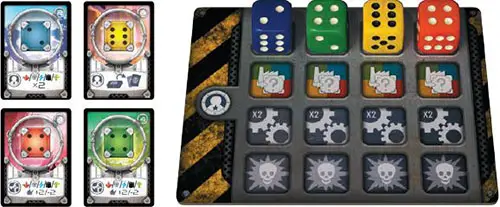
The last player who ate mushrooms becomes the Leader, taking the Leader board and the 4 dice and placing them in front of themselves, so all players can see it.
-
The first turn may now begin.
The Leader Role
In clockwise order, players will alternate taking the Leader role each turn. The Leader will have important choices to make at the beginning of the turn, but most of all, their task will be to clearly announce the sequence of play so as to ensure that the turn is played in the proper order.
The Leader takes the Leader board with the 4 colored dice and places it in front of themselves at the beginning of the turn. How to use it will be explained later.
Game Length
The game is played in 12 turns. At the end of the 12th turn the planet explodes.
However, for your first few games we strongly suggest that you play only 8 turns when playing with 2 or 4 players, and 9 turns when playing with 3 players.
Game Play
Each turn follows a preset sequence that must be followed step by step. When you are done with step 5, the turn is over and a new turn begins, starting with step 1. Repeat this process 12 times for a complete game.
-
Planet card selection (All players simultaneously).
-
Leader's actions (Leader only).
-
Leader board sequence, from left to right (Leader calls for play)
- Production (All players).
- Actions (Active Player only).
- Cataclysms (All affected players).
-
Planet exhaustion (Leader only).
-
Pass the Leader board and the 4 dice to the player on your left.
Each of these 5 steps will now be described in detail.
Step 1 - Planet Card Selection
This step is played simultaneously, with all players acting at the same time.
All players take in hand all the Planet cards they have available behind their screen. If a player has no cards behind their screen at that moment, they take the Planet cards in their discard pile back into their hand.
From those cards in hand, each player chooses one card to play face down in front of them. When every player has done so, proceed to step 2.
Step 2 - Leader's Actions
One after the other and in any order, each player reveals the Planet card they played and announces clearly the die value and the color shown on the card played.
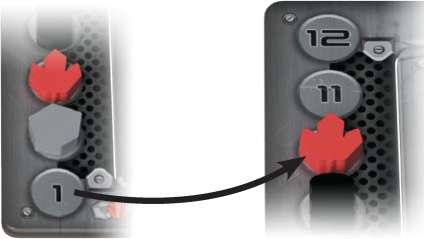
The Leader sets the same color die with the upper face showing the value announced and play proceeds with the next player until all players have revealed their cards including the Leader. Once this is done, the value of the 4 dice are set and the Leader must now decide in which order the play will occur.
To do that, they arrange the four dice on the four dice icons, on the first row of the Leader board in the desired order of play. For example, if the blue die is placed in column 1, then the blue player will go first.
And if the red die is placed in column 4, then the red player will go last. When the Leader has placed the 4 dice on the 4 icons, proceed to step 3.
All revealed Planet cards remain in one face up pile in front of each player's screen, so that all players can only see the last Planet card played by each player. The remaining Planet cards that have not yet been played are kept behind the players' screens.
Example: Each player reveals their card (Blue 2, Yellow 6, Red 4, Green 4). The Leader places the corresponding dice in the order they desire on the Leader board.
Planet Card Special Effect
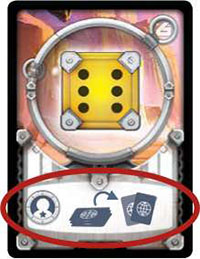
Each Planet card has a special effect described on it. This special effect is triggered only when played by the Leader. Do not trigger the effects of the planet cards played by players other than the Leader.
The list of all the special effects from the planet cards are detailed at the end of this rulebook, after the scoring section.
Some special effects must be used by the Leader during step 2 (cards with die value 2-5-6), others are to be used during step 3 (cards with die value 1 -3-4).
Step3 - Leader Board Sequence
Starting with the first column on the left and progressing right one column at a time, the Leader moves down each die until all 4 dice are aligned on the bottom row (Line C - Cataclysms  ).
).
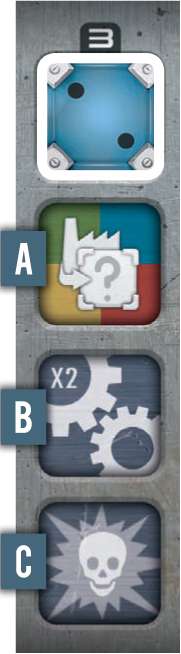
Production
First, the die on the top row of the first column goes down one row to the multicolored production icon.
Once all players have completed their production (because the icon is multicolored), the Leader moves down the die one row and reaches the Action icon.
Actions
The Leader has moved the die to the row below, on the Actions icon. In this example, the Blue player now performs their two actions.
When done, the Leader continues and moves the d ie one more row down to reach the Cataclysm icon.
Cataclysms
If cataclysms are triggered, resolve them now. Then the Leader proceeds to the second column, moving the die there row by row and all the way down, following the same procedure as the one described here above.
When all four dice have reached a Cataclysm icon, proceed to step 4.
The Leader Leads the Game
Each time a die reaches a new icon, the Leader must announce aloud what is happening next. For example, when the Blue die displaying a 2 Value is moved down to the Production icon, the Leader should say: "Production for everybody with a building value of 2".
When the same die reaches the Action icon the Leader should announce: "Blue, it is your turn to perform two actions".
And finally, when it reaches the Cataclysm icon they should announce cataclysms on any hexagon with a 2 Blue die icon. Then they should proceed to the 2nd column, moving down the die in the same manner.
Line a - Production
During this phase, depending on the die value and the situation, each player may be able to:
- Produce resources
- Fix the automation of a factory building
- Add a new unit to their Spaceport
When a die reaches a Production icon, the Leader announces the value of the die, which gives the production value for all players. The color of the die on the Production icon is of no importance at that moment; only the value shown on the die matters.
Starting from the Leader player and going clockwise, each player resolves their production until all players are done.
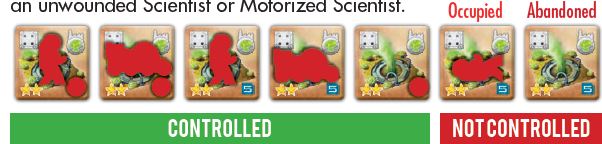
To produce a resource, players need to control a Factory Building showing the same production die number on it. If they do, then they take 1 resource of the type produced by this Factory from the resource pool.
If the resource pool has ran out of this type of resource, then the player receives nothing, but the Stock Market value of this resource goes up 1 MC on the Stock Market board for each resource that couldn't be taken. If a player controls more than one Factory building with the same production number, each one of them produces the corresponding resource.
A player controls a building when it has an Automation chip or an active unit on it, or both.
If there are none of these elements, the building is not controlled. It is either abandoned (if it is empty) or simply occupied (if there is only a wounded Scientist on it).
A Unit is either a Scientist or Motorized Scientist. An active unit is either an unwounded Scientist or Motorized Scientist.
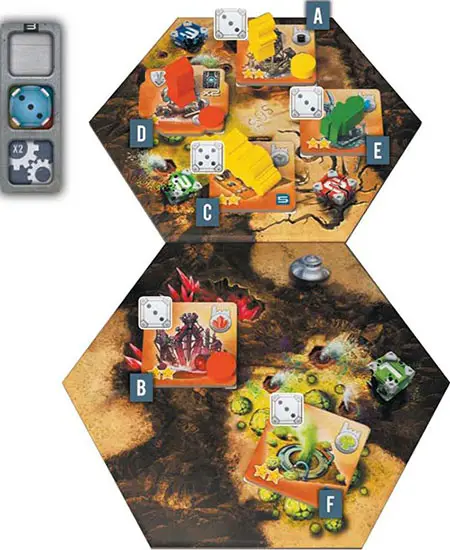
Example of production: The production die has a value of 3.
- The building is controlled and produces 1 Oil.
- The building is controlled and produces 1 Vibrium.
- The building is controlled but doesn't produce (it only produces on a 5).
- The building is controlled but it is not a Factory building.
- The building is not controlled (occupied by a wounded Scientist).
- The building is not controlled (abandoned Factory).
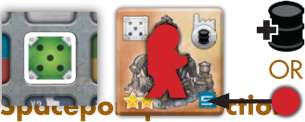
Fixing the Automation of a Building During Production
If a building with the corresponding production number is occupied by an active unit but has no Automation chip on it, then the controlling player may elect to repair the automation system instead of taking the production for this building.
To do so, they place one of their Automation chips on the building and this counts as their Production action for this building for this phase.
With a production die value of 5, Red can use the Oil Drill they occupy with their active Scientist. Red can either produce 1 Oil or fix the automation of the building.
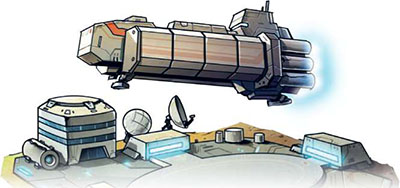
In most games, a starting building is the Spaceport. It doesn't really produce resources. It is more like a spaceport attracting and receiving new scientists, workers and their equipment.
When a "6" in production is announced by the Leader and if a Spaceport has no unit, the player can spend 1 Mycelium resource from behind their screen to recruit a new Scientist and place it onto their Spaceport. Alternatively, they can spend 1 Oil resource to get a Motorized Scientist instead.
Players may use a resource that they have just produced this phase to add a new unit to their empty Spaceport.
The Leader announces a 6 for this production phase. Only Red receives a new Scientist because:
- Green's Spaceport is already occupied.
- Blue doesn't have a Mycelium to spend.
- Yellow doesn't wish to spend a Mycelium.
Line B - Actions
When a die reaches the Action icon, the Leader invites the player controlling this die color to perform up to two actions. This player will be named the Active Player. The Active Player cannot perform the same action twice, and can do less than 2 actions.
Note: For explanation purposes, the value indicated by the Active Player's die is given as X.
Type of Actions:
- Explore
- Move
- Construct
- Trade
- Grants
- Fate Control
Click here for more information about the actions.
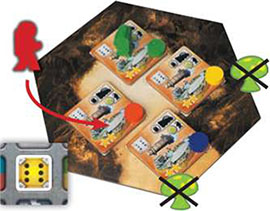
Line C - Cataclysms
When a die reaches the Cataclysm icon, the Leader announces the color of the die and its value. Then, the players locate on the hexagons the die icons of the given color and value. If there is no such die on the hexagons, then nothing happens and the game proceeds to the next step.
If there is at least one matching die icon, the Active Player must trigger a minimum of one cataclysm on the whole map. All or some of them (with a minimum of one) may be triggered, at the Active Player's discretion.
If the Active Player decides to trigger more than one cataclysm, the Leader chooses the order of resolution for all cataclysms.
There are three different types of cataclysm: Tornadoes, Geysers and Earthquakes. Each one of them can be recognized by its effect on the dice icons on the hexagon.
-

A Tornado is represented by a die caught in a sand tornado.
-
An Earthquake is represented by a cracked dice caught in the middle of huge cracks in the earth.
-
A Geyser is represented by a die with acid holes caught in the middle of geysers.
A Cataclysm affects all buildings and units in the hexagon, no matter their color.
Units Outside of a Building During a Cataclysm
A Scientist that is not on a building is immediately wounded. Lay the Scientist on its side to show its wounded state.
A Scientist that is already wounded is killed instead. Return the Scientist to the player's reserve in front of their screen.
A Motorized Scientist cannot be wounded. So, if it suffers from a cataclysm, it is immediately returned to the player's reserve.
Buildings Suffering From a Cataclysm
If a building only has an Automation chip, it loses its Automation chip. It goes back to its owner's reserve.
If the building only has an unwounded Scientist on it, the Scientist becomes wounded. Lay the Scientist on its side to show its wounded state. If the Scientist was already wounded then it is killed instead. Return the Scientist to the player's reserve.
If the building only has a Motorized Scientist, it is returned to the owner's reserve.
If the building has a unit and an Automation chip, then the controlling player decides whether it is the Automation chip that is removed or the Scientist that is wounded (or removed in the case of a Motorized Scientist, since Motorized Scientists do not have a wounded state).
If the building is abandoned, meaning no Automation chip or unit is on the building, then it is destroyed and returned to the pool of buildings available for construction.
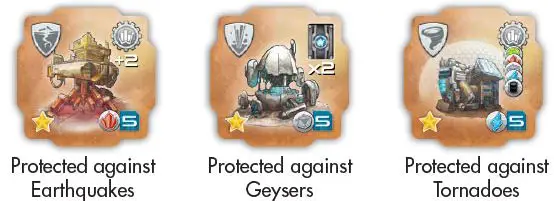
Protective Technologies
When a player is hit by a cataclysm on a hexagon, if this player has constructed a building providing protective technology effective against this particular type of cataclysm, they may use it to protect the buildings they control.
No matter where this Protective building is located on the map, as long as it is active, the controlling player may spend one required resource to protect all the buildings they control on the hexagon hit by the cataclysm, as well as the units and Automation chips on those buildings.
Units outside any building on a hexagon hit by a cataclysm cannot be protected and must suffer the effects of the cataclysm. The resources spent come from behind the screen of the player controlling the Protective building and are returned to the resource pool.
Reminder: a Protective building is considered active as long as it has an Automation chip or an active Unit on it (or both).
-
ENERGY FIELD BUILDINGS protect against Tornadoes at the cost of 1 Electricity resource per hexagon to be protected.
-
STEEL DOME BUILDINGS protect against Geysers at the cost of 1 Iron resource per hexagon to be protected.
-
SHOCK ABSORBER BUILDINGS protect against Earthquakes at the cost of 1 Vibrium resource per hexagon to be protected.
Players cannot use their Protective buildings to protect other players' buildings.
Protective buildings are not automatically protected. Thus, players must spend the required resource in order to protect them too, as well as other buildings on the same hexagon at the same time.
Each Stock Market Office is automatically protected against one type of cataclysm. The resource needed to protect those buildings is spent at construction time.
There is no need to spend any additional resources during the course of the game to protect those buildings against the type of cataclysm they are already protected against.
The suits and ties in those offices wouldn't work there if we didn't assure them that those buildings are protected, would they?
Step 4 - Planet Exhaustion
This step simulates the fact that the planet is being exhausted of its mineral resources. Electricity and Mycelium cannot be exhausted during this step, because they are directly connected to the planet's cataclysms. The more the planet is exploited, the more it generates cataclysms; winds and Tornadoes (which generate Electricity) or Geysers (the source of Mycelium).
During this step, the Leader has to take one available resource from the resource pool and place it on the next numbered spot available on the Planet's Exhaustion track. The Leader must choose one resource among Oil, Vibrium or Iron.
The planet's Exhaustion track is also used as the turn tracker. When the 12th resource is added to the track, it is the end of a normal game.
If there is no Oil, Vibrium or Iron to exhaust in the resource pool, the Leader must take the resource placed on the lowest number of the Planet's Exhaustion track and move it up to the next available number.
Example: At the end of turn 10, there are no more mineral resources in the resource pool, therefore the Leader takes the first resource placed on the exhaustion track, a Vibrium, and places it on the number 10.
Step 5 - Pass the Leader Board
The Leader passes the Leader board and the 4 dice to the player sitting to their left. A new turn now begins.
End of the Game
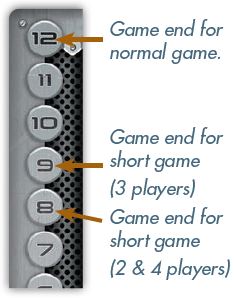
The game ends when a resource is placed on the number 12 of the planet's Exhaustion track, during step 4.
When that happens, the players proceed to the final scoring step.
Again, we strongly suggest that you play shorter games at first, such as 8 turns for a 2- or 4-player game, and 9 turns for a 3-player game.
Scoring
Each star represents 1 Victory Point (VP)
At the end of the game, players score Victory Points (VP) for the buildings they control and for the amount of money they possess behind their screen. Remaining resources do not provide any VP.
Reminder: A building is controlled if you have an Automation chip or an active unit on it (or both).
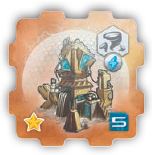
- Each Factory building is worth 2 VP.
- Each Protective building or Stock Market building is worth 1 VP.
- Each Spaceport is worth 2 VP.
- Each Motorized Scientist on the map is worth 1 VP.
- Each player also earns 1 VP per 5 Mega-Credit (MC) they possess.
The player with the most VP after the scoring step is the winner.
In case of a tie, the player with the most resources wins.
If there is still a tie, the player with the most money wins the game.
Variants
Negotiations Allowed
The players can talk, make deals, promises all while choosing to honor them or not. But most of all, they are allowed to offer resources or money to try to corrupt the Leader to change the order of play.
Any kind of deal, exchange, promise or corruption is allowed as long as players do not trade or give any of their units, Planet cards, or constructed buildings.
Continue Reading
