Components
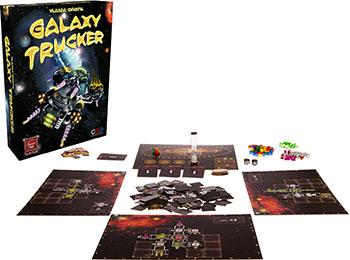
- 1 flight board
- 8 ship boards
- 60 adventure cards
- 64 cosmic credits
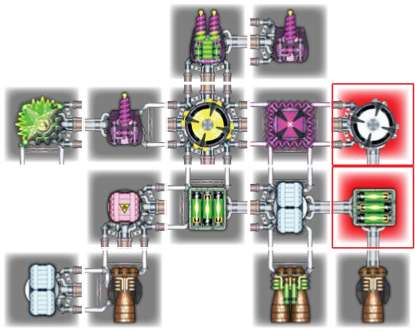
- 144 spaceship tiles
- 4 numbered tiles
- 40 white figures
- 8 alien figures
- 8 rocket markers
- 36 battery tokens
- 56 goods blocks
- 1 two-sided card with rules
- 2 dice
- 1 timer
- Instructions
Course of the Game
The game consists of three rounds. In each round, the players begin by rummaging through the Warehouse, trying to grab the best components and build the best space ship.
Once the ships are under way, the players try to avoid snares and obstacles, while grasping financial opportunities, each hoping to be the first to finish with an undamaged ship. In Round 1, players build Class I ships and fly them on a safe short hop.
In Round 2, they build larger Class II ships to take on a more daring journey. In Round 3, they build gigantic Class III ships and set out for the farthest, most dangerous corners of the Galaxy.
Object of the Game
The goal of the game is to have the most cosmic credits at the end of Round 3.
Your First Ship
You can play Round 1 without reading all the rules beforehand. Read the section on building ships - and build one. Read the section on preparing for launch - and prepare for it.
Read the section on test flights - and take the test flight. Only then do you need to read the rest of the rules so you can play Rounds 2 and 3.
Setup
Each player takes a space ship board labeled "I". Place your starting component on the square with this "I".
It represents your pilot cabin. There are four of these, each in a different color. For fewer than four players, leave the extra ones in the box.

Turn the other components face down and mix them up in a pile in the center of the table where everyone can reach them. This pile is the Warehouse.
Near this pile, place the tiles numbered "1" through "4" ("1" through "3" for three players or "1" and "2" for two players) in a row.
For now, you can leave the other game pieces in the box.
Grabbing Components
When everyone is ready, the boldest player says, "Go!" Everyone grabs a (face-down) component from the pile in the middle of the table. You can only take one at a time. Place it on your space ship board and turn it face up.
Now you have two possibilities: either add it to your space ship or return it face up to the center of the table. Thus, face-up components will appear on the table. Players can take these or grab a face-down component, hoping for something better.
Players do not take turns. You play as fast as you can grab, with the following rules:
You can only grab with one hand. The other hand has to stay above your space ship board.
You can't turn up a face-down component and look at it on the table. You have to keep it face down until it is above your space ship board.
Until you add the component to your space ship or return it to the center of the table, you cannot grab another one.
You can't move a component once it has been added to your space ship, but you can move your newest component around while deciding whether to add it and where. Until you grab another component, you can change your mind about where to put your newest component or whether to keep it at all.
Building Ships
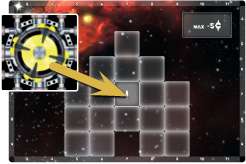
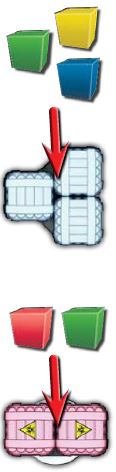
You start with one starting component and add new ones as you go. Each new component must be placed on an empty square next to one already placed. Components can only be placed on the indicated squares.
Each component has a functional part and 1 to 4 connectors. Connectors can be simple, double, or universal.
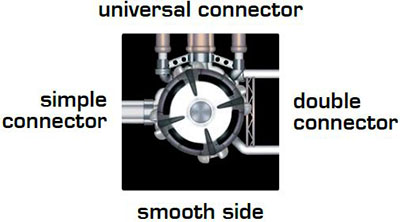
Any connector can join with another of the same type, and a universal connector can join with any type. A simple connector cannot join with a double connector. Sides with no connectors are called smooth sides. Smooth sides cannot join with any connectors.
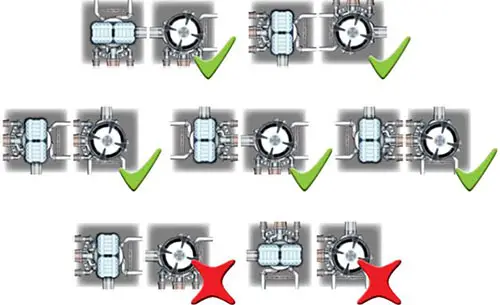
Each component you place must join with the rest of your space ship. If it touches the ship on multiple sides, all connectors must legally join. Two smooth sides may sit next to each other as long as the piece being added makes a legal connection on another side. Your ship must hold together at all times.
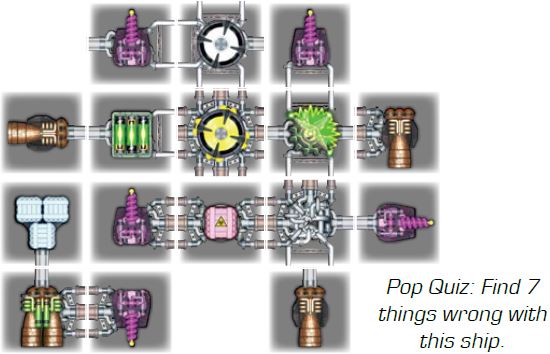
The Well-built Ship
Above all, your ship must be built according to the rules. In addition, it should be solid, bristling with cannons and engines, full of cabins, batteries, and holds, and completely protected by shields.
Exposed Connectors
Connectors that are not connected, i.e., those not adjacent to another component, are considered to be exposed.
 This ship has 8 exposed connectors |
Exposed connectors are allowed, but they increase the risk of damage to your ship and in some cases, they can slow it down. The ends of exposed pipes get warped in transit, so Corporation Incorporated pays a bonus for ships that arrive with few exposed connectors.
Finishing your Ship
Once you are happy with your ship (or once you run out of good places to add on more components ) you can finish your ship. You do not have to place a component on every square of your ship board.
To finish your ship, simply take the number tile with the lowest remaining number. If everyone else finishes before you, you will be left with the highest- numbered tile, but you will have as much time to finish your ship as you want.
(In the full game, there is a time limit, but for your first game, we assume that anyone taking an unreasonably long time can be persuaded to finish by gently thumping the box lid against his head).
The tiles determine the order in which the space ships will launch. It is not enough to build a perfect space ship with lots of everything and no exposed connectors . You want to be the first.
But, before taking that tile, double-check to be sure your ship is built according to the rules. In your first game, we can be lenient. If you see a mistake, just remove a component so that it no longer violates the rule, and play on.
Typical mistakes include:
- A simple connector adjacent to a double.
- Any type of connector adjacent to a smooth edge.
- An engine not pointing toward the rear.
- A component placed immediately behind an engine.
- A component placed immediately in front of a cannon' s barrel.
- A component outside the indicated building area.
- A component or part of the ship not attached to the rest.
Preparing for Launch
Spot Check
Check everyone else's ship to be sure they are all built according to the rules. Anyone found to have violated a ship building rule must return his or her number tile and fix the mistake.
Redistribute the number tiles among those with legal ships so that the highest numbers are left for those who are rebuilding.
Bank
Now you can take the sack and dump out all the figures, blocks, markers, and dice. This is the bank. You want to keep these things accessible but out of the way.
The Flight Board
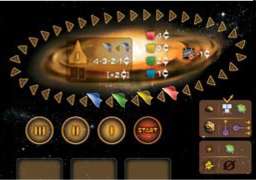
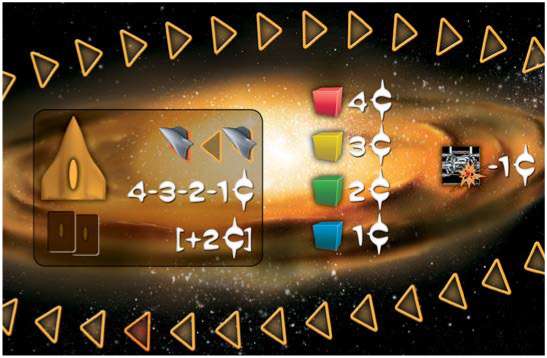
Remove all the remaining components from the center of the table and lay down the flight board. In the center of the light board is a price list and a graphical summary of the rules or Round 1.
Around these information boxes is a circle of triangular shapes. These are the spaces of the game board which will indicate the relative position of your ships. Each space represents one day of flight.
Take the two space ship markers in your color. Set one in front of you and put the other one on the flight board.
The rules summary depicts the initial separation between your space ships: The player with tile number 1 puts his or her ship on the indicated starting space and the player with tile number 2 puts his or her ship 2 spaces behind it.
(That is, with one empty space between, as shown in the diagram on the game board). The other players go behind the first two with the same amount of separation.
You can set the number tiles aside now. Your figures on the flight board represent your order of flight, which can change during the course of the game. The player in front will be referred to as the leader.
Preparing your Ship
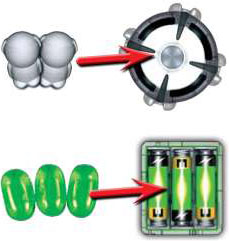
In each cabin, place 2 grey figures. These are humans in grey space suits. (The ones in the other colors are aliens, but you don't have to worry about them right now).
On each battery component , place 2 or 3 green tokens (depending on how many E-cells are depicted).
Adventure Cards
The adventure cards represent various dangers and opportunities that you may encounter on your journey.
From the deck labeled "I", take the eight cards marked with an asterisk in the lower left corner. Shuffle these eight cards and set them near the flight board.
Cosmic Credits

And now the best part: take the cosmic credits and place them in neat stacks near the bank. On your journey, you can look at them from time to time and anticipate just how much money you are going to make.
When you earn cosmic credits, you set them in front of you face down to keep your total hidden.
The Flight
The test flight shows who built the best ship. It consists of 8 adventure cards.
(In the full game, these cards will be chosen at random, but for your first flight, we use the 8 with asterisks to ensure that you will meet with every type of event). The adventure cards have various effects.
What Can Happen to you
Hits to your Ship
A box in the corner of the game board depicts the possible dangers your ship might face. Each threat comes from a certain direction in a specific row or column . This will be explained in greater detail later, but here is a summary:
-

You can protect your ship from small meteors by building it well (they just bounce off unless they hit an exposed connector) or by using a shield (which will cost you 1 battery token).
-

You can protect your ship from large meteors by shooting them with a cannon.
-

You can protect your ship from light cannon fire with a shield (which will cost you 1 battery token).
-

Nothing protects your ship from heavy cannon fire.
If your ship is hit (because you can't or won't protect it) the component that was hit must be removed. This might cause some other components to become disconnected. Remove them as well. If your ship is broken into two pieces, you decide which piece you will pilot to your destination and which piece will be lost.

Lost components are placed in your discard pile, on the right side of your ship board.
When you reach your destination, you will have to forfeit 1 cosmic credit for each lost component. Any playing pieces (crew, battery tokens, goods) on lost components are returned to the bank.
Gaining and Losing Flight Days
Some cards have a number in the lower right corner. This tells how many days you will lose if you use the card.
Whenever you lose flight days, voluntarily or not, move your marker back that many empty spaces.

If Blue loses 3 flight days, he will end up in the space just in front of Red.
Similarly, when you gain flight days, move your marker that many empty spaces forward. There can never be two markers on the same space.
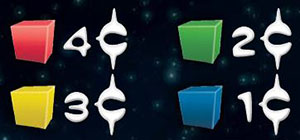
Getting Goods

When a card enables you to load goods onto your ship, take the indicated colored blocks from the bank and place them in your cargo containers.
(Each cargo hold has 1 to 3 containers).
Each container can only hold 1 block. Excess goods have to be dumped into space (returned to the bank). The price list will help you decide what to keep and what to dump.
Red blocks are the most valuable, but they are hazardous materials and must be kept in the reinforced containers found in special cargo holds. If you don't have enough reinforced containers, you have to discard excess red blocks.
As long as you have enough space, you should take everything you can get - even if you have to put cheap goods in special cargo holds.
When you load new goods, you can always re-arrange or discard any amount of cargo.
Loss of Goods or Crew

If a card requires you to give up goods, you must return the most valuable goods to the bank.
If you don't have enough goods to cover the indicated loss, you must give up green battery tokens to make up the difference. Once you are out of goods and battery tokens, they can't take any more from you.

If a card requires you to give up crew, return that many figures to the bank.
If you don't have enough, just give up all you have. (In the full game, not having enough crew to meet the card 's requirement would be a bigger problem ).
Parameters of your Ship
Sometimes you have to count up the strength of your engines or cannons.
Double engines and double cannons need power . Each time you have to calculate the strength of your engines or cannons , you must decide which double engines or cannons you will power and spend batteries for them.
Engine Strength
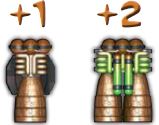
Each simple engine counts as 1.
Each double engine on which you spend a green battery token counts as 2.
Cannon Strength
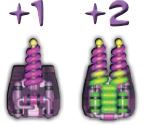
Each forward-pointing simple cannon counts as 1.
Each forward-pointing double cannon on which you spend a green battery token counts as 2.
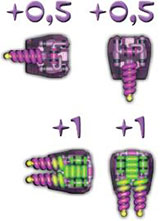
Each cannon pointing to the side or to the rear counts at only half value (1/2 for a simple cannon or 1 for a double cannon on which you spend a green token).
Adventure Cards
The leader (initially, the player with tile number 1) turns up the first adventure card. This card is dealt with as described below or on the following pages.
(Each adventure will come up once, so you can read about them one-at-a-time as the cards are turned up). Next, the leader (which may be a different player if the adventure mixed up the order) turns up the next card, and so on, until all eight adventures have occurred.
Read here all the detailed information about the adventure cards.
Journey's End
Your trip is over once the last of the eight adventure cards has been dealt with.
Rewards and Penalties
The information in the center of the flight board depicts the rewards and penalties you receive at the end of your flight. You should deal with these in order from left to right: first bonuses, then sale of goods, and finally penalties.
Bonuses
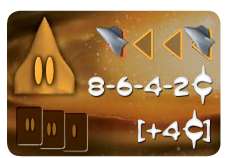
The rules box in the center of the game board depicts the bonuses available for Round 1.

The numbers separated by dashes tell how many credits you get based ' on the order in which you land at your destination.
So, after the last adventure card has been dealt with, the leader gets 4 cosmic credits, the second-place finisher gets 3, and so on.

The number in square brackets gives the bonus for the player who lands with the best looking ship. Count up the number of exposed connectors on your ships. (Each exposed connector only counts once, regardless of whether it is simple, double, or universal).
Whoever has the fewest gets the indicated bonus. (If there is a tie for the fewest, all those players receive the bonus).
Goods
Return all your goods to the bank, and take the number of cosmic credits indicated by the price list.
Losses

Now you have to deliver the components of your ship to Corporation Incorporated. For each component, you lost along the way you lose 1 cosmic credit.
(When you lost components, you placed them in the discard pile on your space ship board, so it is easy to keep track of how many you lost).

Fortunately, the Department of Stellar Vehicles requires every space ship to be insured, so there is a limit to how much you can lose. This maximum is given in the discard area of your ship board.
(For Class I ships, the limit is 5 cosmic credits). Even if you lost more components than this, you only have to pay this many cosmic credits.
Pangalactic Insurance Company will pay the difference to Corp Inc. just as soon as they can get a claims adjuster out to the edge of the Galaxy.
However, if you lose over twice this many components ... well, then you still just pay the maximum. But Corporation Incorporated will fire the guy who signed you up for this job. How you assuage your guilty conscience is up to you.
End of the Round
Congratulations on completing your first flight. Return all tokens , blocks, and figures to the bank.
Take all your space ship components except your pilot cabin and put them in the Warehouse pile in the center of the table. The adventure cards can be returned to the box: in the next rounds you will be using different cards.
Keep your cosmic credits . You should stack them in a tidy pile face down in front of you so that no one else can see them. (The other players should be trying to make their own money, not staring longingly at yours).
Now you can read the full rules and either play Rounds 2 and 3 or start a new game from the beginning.
Full Rules
The following text assumes that you have already made your first flight. This section gives only the additional rules that are used in the full game. Use these rules for Rounds 2 and 3 in your first game. In later games, you use these rules in Round 1 as well.
Setup
In each round, use the ship boards with the corresponding number. (In Round 3, use board III, not IIIa).
Before you start building your ships, get out the flight board and set it near the Warehouse.
If this is the start of Round 2 or Round 3, find the appropriate rules card and place it on the board over top of the rules for Round 1.
Adventure Cards
In the full game, you may take advantage of Corporation Incorporated's prognostics division and look at the adventure cards while you are building your ship.
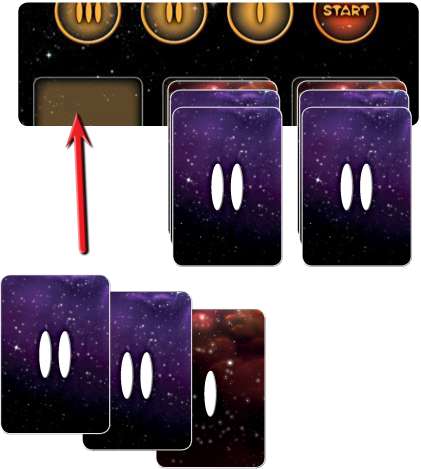
Before everyone starts grabbing for components, make three piles of adventure cards, chosen at random, and place them on the indicated squares on the flight board.
Each pile should contain the cards depicted in the lower left corner of the rules card. Each pile contains 2 cards from the deck corresponding to the current round and 1 card from each lower-numbered deck.
Looking at Cards
If you have added at least one component to your ship, you can take a break from building and pick up any one of the three piles to look through those cards.
When you return them, you can resume building or look through another pile. You can look at a pile for as long as you like, and you can pick it up as often as you like. Be sure to return each pile to the place where you picked it up to make it easier for everyone to tell which piles they have seen already.
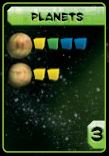
Of course, looking at the cards takes up time that could be spent grabbing components , but the information on what you might encounter in that part of the Galaxy can be very helpful. ( For example, if you see a lot of planets, you might want more cargo holds).
Preparing the Adventure Cards
When everyone is done building, you add a pile of cards that no one has seen yet. Make a fourth pile of cards the same way you made the other three. Put all four piles together and shuffle thoroughly.
If the number on the top card does not match the number of the round, keep shuffling until it does. ( This won't be an issue in Round 1, of course).
In Round 1, you will have three piles of two cards each. When you mix in the fourth pile, you will have 8 cards, just as you did in the test flight. In later rounds, you will have more cards because they are longer flights.
The Timer
Saying "go!"

In Round 1, the boldest player says "Go !" In Rounds 2 and 3, this role falls to the player who landed first in the previous round.
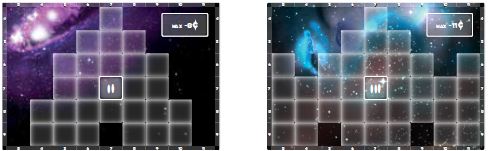
In addition to saying "Go!" this player must start the timer and put it in the circle on the flight board that corresponds to the round number.
Turning Over the Timer
The timer measures how much time is left for building ships. When time runs out, any player may turn the timer over and place it on the next circle (from a higher number to a lower). Usually, this is done by someone who is progressing well and doesn't want to give the others a chance to catch up.
The Last Flip

When the time runs out on the timer sitting in circle number 1, it can be flipped over one last time and set in the circle marked "Start". However, only a player who has finished building and taken a numbered tile may do this.
The last flip measures how much time the rest of the players have to complete their ships.
When that time runs out, no one can add another component. Everyone stops building and takes a numbered tile. (The lowest numbered remaining tile goes to whoever grabs it first).
In Round 1 of a full game, the situation is as follows: the boldest player sets the timer on circle 1 while saying "Go!" The first player to finish building takes tile number 1.
By this time, the timer has probably run out, so the player turns it over and sets it on the circle labeled "Start", thus giving the other players their final countdown. (If it is still running, of course, the player has to wait until it is done).
In Round 2, the timer starts on circle 2. When it runs out, anyone can turn it over and place it on circle 1. You can't flip it over from circle 2 directly to the "Start" circle, not even if you have finished building and taken a numbered tile. You have to let it run out in circle 1 first.
Setting Components Aside
While building, you can have up to two components set aside. These go in the upper right corner of your ship board ( i.e., your discard pile). No one can take
these from you, but you cannot return them to the Warehouse. The only thing you can do with them is to add them to your ship. When you add one of them, you have room to set a new component aside, but you can never have more than two set aside at one time.
If you set aside a component and then fail to add it to your ship, you leave it in your discard pile. It counts against you at the end of your trip as a component lost along the way.
Aliens
Life Support Components
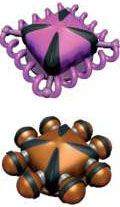
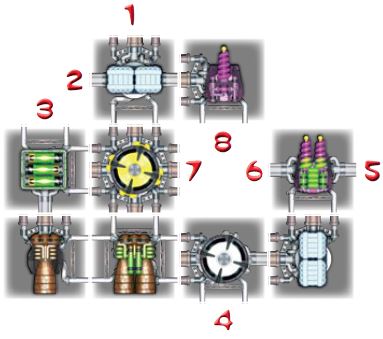
So what are those funny components that we refused to explain earlier? The orange and purple components are life support systems for aliens.
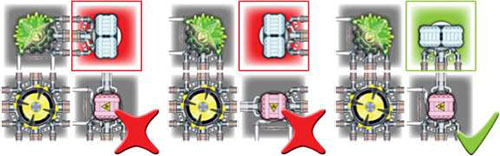
In order for the life support system to have any effect, it must join with a cabin. This makes the cabin inhabitable by aliens of the corresponding color. (But you can't put an alien in your starting component, the pilot cabin).
Humans, in grey space suits, don't need any special life support components and can go in any cabin.
Placing the Crew
Crew figures are placed according to the following rules:
The pilot cabin gets 2 humans. (Neither of these is "you". But they will be your close roommates on a long voyage, so after a while, you might start thinking they are you).
A cabin that is not joined to a life support system gets 2 humans.
A cabin joined to a life support system gets 2 humans or 1 alien of the corresponding color.
A cabin joined to one life support system of each color gets either 2 humans or 1 purple alien or 1 orange alien.
Your ship can have no more than 1 alien of each color.
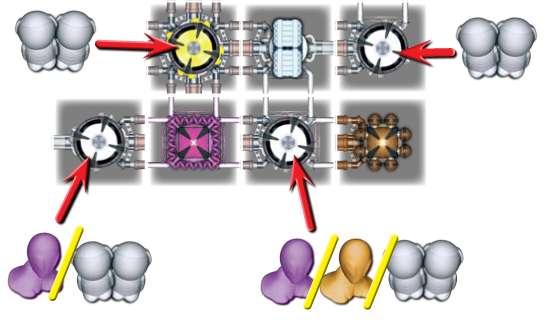 Possibilities for placing crew. |
Players decide how to place their crew one at a time, starting with the player with tile 1.
Alien Abilities
Aliens are crew members and are counted as such in a Combat Zone or an Abandoned Station. You can send them away on an Abandoned Ship or give them up to Slavers.
The disadvantage of taking an alien on board is that it takes up the space of two humans. But, of course, there are some advantages.
-

Purple aliens are a war-like species. If you have a purple alien, you get +2 to cannon strength. (If your cannon strength without the alien is 0, you don't get this bonus. It's not going to fight a space battle with its bare teeth).
-

Orange aliens are good mechanics. If you have an orange alien, you get +2 to engine strength. (If your engine strength without the alien is 0, you don't get this bonus. It's not going to get out and push).
Hits on Life Support Systems
If your ship loses a life support system and this leaves an alien in a cabin that can no longer support it, return the alien to the bank. (It leaves in an emergency escape pod, of course).
Ship Building Mistakes
If you find that you have added a piece illegally, there is nothing you can do (unless you just put it there and have not picked up a new one). The problem will be dealt with during the spot check, before launch.
Spot Check
The penalty for an illegal ship is much harsher in the full game. During the spot check, make sure that your ship is built according to the rules. If your ship is in violation, you have to remove one or more components so that the result conforms to the rules.
This does not count as extra building (you keep your number tile) but you can't add any new components. The removed pieces are placed in the pile of components lost along the way. You will have to pay a penalty for them when you reach your destination.
This ship has a mistake. To fix it, the player must remove either the cabin or the battery. He wants to put an alien in the cabin, so he removes the battery.
When he does so, he also loses one of the engines. Both components are placed in his discard pile on his ship board.
Flaws Discovered During Flight
If someone discovers that your ship is illegal in flight (any time after the first adventure card has been revealed) you must immediately correct the mistake as described above and pay 1 cosmic credit to the bank for violating the laws of physics.
Advanced Enemies
In the full game, you will also encounter Pirates and Slavers. When you defeat them you don't gain goods; you gain cold, hard cosmic credits. Move your ship back the indicated number of empty spaces and take the credits from the bank.
If you don't want to lose flight days, you can choose not to take the credits (or goods in the case of Smugglers) and leave your ship where it is. Either way, no other player may collect the reward once the enemy has been defeated.
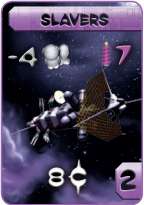
If the Slavers defeat you, they force you to give up some of your crew. You choose which humans or aliens to surrender in exchange for your own freedom.
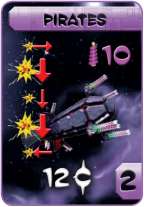
If the Pirates defeat you, your ship gets shot at.
(The card indicates the size and direction of the cannon fire). Keep track of all the players who were defeated and then have the first defeated player roll two dice to determine the row or column of each shot.
This roll applies to all defeated players. Light cannon fire can only be stopped by a shield oriented in the correct direction and powered by a battery. Heavy cannon fire cannot be stopped. (See Combat Zone).
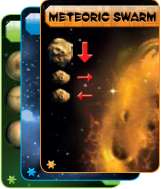
Meteoric Swarm
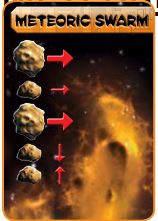
In later rounds, meteors can come at your ship from the left or right.
Large meteors coming from in front of you can only be blown up by a forward-pointing cannon in the column from which they are approaching, but large meteors from the side can be blown up by a cannon pointing toward that side in the same row or in an adjacent row.
(The ship accelerates or decelerates just enough to shoot the meteor). This doesn' t apply to small meteors, which are too small to be hit by cannon fire.
Special Events
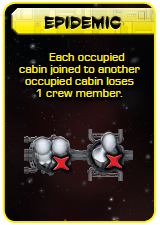
An Epidemic can strike in Round 2 or 3. This adventure card makes you remove 1 crew member (human or alien ) from every occupied cabin that is joined to another occupied cabin.
The safe thing to do is to build your ship so that no two cabins are joined. If you do have connected cabins, you can try to empty one of them before the epidemic strikes. (It is very helpful to know if Epidemic is among the adventure cards for that round
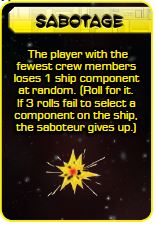
Sabotage can occur in Round 3. This adventure card blows up a random component on the ship with the smallest crew. (If multiple ships are tied for the smallest crew, the one in front is sabotaged).
To select the component, the affected player rolls 2 dice to determine the column and 2 dice to determine the row. If there is no component at those coordinates, roll again for new coordinates.
If there is no component there, roll again. If three sets of coordinates are rolled without hitting a component, the saboteurs give up and nothing happens.
If the saboteurs blow up a component, it is set aside as lost in flight, as are any others that fall off as a result of this loss. A hit to the center of the ship can be devastating.
Giving Up
In the full game, you might have to give up before you reach your destination. Sometimes you might even choose to give up. Fortunately, you can always find a Corp Inc. warehouse nearby.
If you give up:
-
Remove your marker from the game board. You are just a spectator for the rest of the round and none of the cards can affect you.
-
You don't get any bonuses for the order in which you finished (because you didn't finish, obviously). When giving bonuses for the ship with the fewest exposed connectors, your ship does not count.
-
You do get to sell your goods, but only at half the total price. Add up the total full sale price of all your goods and take half that many credits. (Roundup).
-
You have to pay the penalty for the components you lost along the way. (Anything you haven't lost yet can be returned to Corp Inc. without penalty, so only pay for those in your discard pile. Don't forget that there is a limit to how big your penalty can be).
If you are the only one left after everyone else has given up, you can keep going and try to go through the remaining adventures by yourself. In this case, ignore the Combat Zone and Sabotage adventures (which penalize the player with the fewest engines, cannons, or crew members).
Losing All Humans
You have to give up if an adventure card leaves you without any humans on board. (Aliens can't run the ship by themselves).
This could be due to taking a hit that destroys your last occupied cabin, to losing crew after encountering a Combat Zone or Slavers, or to voluntarily sending your last crew member off on an Abandoned Ship.
If this happens in a Combat Zone, you cannot withdraw your ship from the race until all effects of the card have been dealt with.
Open Space Without Engines
Thanks to inertia, your ship can finish the journey even without engines as long as you don't encounter Open Space.
When confronted by an Open Space card, you have to give up if your engine strength is zero (which could be due to having no engines or to having only double engines and no battery power left).
Don't forget that the orange alien does not add to your engine strength when you have none to begin with.
Getting Lapped
If the leader laps you (i.e., you are more than 1 full circle behind) you must give up.
Choosing to Give Up
Sometimes, it might be better to give up and cut your losses. You can decide to give up, but you must do so before the next adventure card is revealed. (If you decide to give up after seeing an adventure card, you must suffer through that adventure first).
End of the Game
The game ends after Round 3, once all the rewards have been collected and all the penalties paid. Add up all your cosmic credits. If that number is 1 or more, you win!
Your goal was to make money, and you did. So what if some other jokers made more?
Of course, the player who has the most credits is a bit more of a winner than everyone else.
Continue Reading


