Open Space

Open Space is like a wide-open drag strip. The leader announces the strength of his or her engines. (See Parameters of Your Ship above).
The leader must decide whether or not to spend battery tokens on any double engines. Then the leader moves his or her marker ahead of a number of spaces equal to the engine strength.
In order, each player decides which engines to power, announces strength, and moves his or her ship forward that many empty spaces.
Any player overtaking another will pass him or her because occupied spaces are not counted. (See What Can Happen to You - Gaining and Losing Flight Days, above).
Planets
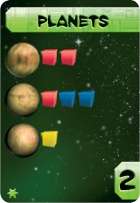
A Planets card has 2 to 4 rows of goods representing planets where you can land to pick up goods. Landing on a planet will cost you the number of flight days indicated in the lower right corner.
If you want to land, place your marker (the extra one that is sitting in front of you) on the planet you choose. Only one player's marker is allowed per row.
The leader chooses first, followed by the other players in order. No player is required to land. In fact, if there are few planets, the players in the lead may occupy all of them, preventing the others from landing at all.
The players who chose to land load the indicated goods on their ships. Goods can be re-arranged or discarded at this time. (See What Can Happen to You - Gaining Goods, above).
It is legal to land just to take the opportunity away from other players, even if you can't take any of the goods (but be sure it is worth the loss of flight days).
Once everyone has decided whether to land, those who landed move their markers back that many empty spaces with the player who is farthest behind moving first. (See What Can Happen to You - Gaining and Losing Flight Days, above).
Abandoned Ship
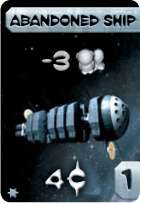
If you find an abandoned ship, you're in gravy! There is some sort of protocol for reporting these things, but what the heck.
Surely some of your crew are sick of you by now and have been saving for a ship of their own. Fix up the abandoned ship and sell it to them for a fair price.
Only one player can use this opportunity. The leader decides first. He or she can return the specified number of crew figures to the bank and take the indicated number of cosmic credits.
This also costs a certain number of flight days.
If the leader chooses not to take advantage of the opportunity, it falls to the next player in line, and so on. Once someone decides to fix up the space ship, the remaining players are out of luck.
Abandoned Station
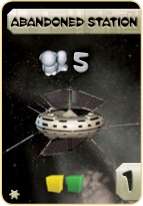
When fleeing the tragic disaster that befell this space station, the inhabitants probably left behind some good loot. It will take a big crew to search for it, though. To use this opportunity, you must have at least as many crew on board as required by the card.
Only one player can use this opportunity. The leader decides first. If the leader has
enough crew, he or she can dock and get to work. If the leader can't or won't, the opportunity falls to the next person in line, and so on. Once someone decides to dock, the others are out of luck.
When you dock with a space station, take the indicated goods and place them on your ship. (You can re-arrange or discard goods. See What Can Happen to You - Gaining Goods ). Move your marker back to the indicated number of empty spaces. (See What Can Happen to You - Gaining and Losing Flight Days).
Note that on an abandoned space station you lose no crew. (The crew symbol does not have a minus sign, as it does on an abandoned ship).
Meteoric Swarm
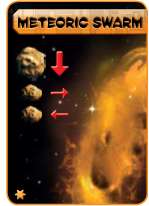
A meteoric swarm can really mess with your paint job. This card depicts several large and/or small meteors and the directions they come from. Meteors are dealt with one at a time. They affect every player simultaneously.
For each meteor, the leader rolls two dice. The roll determines which row or column the meteor can impact (rows for meteors with left or right arrows, columns for meteors with up or down arrows). T
he row and column numbers are given on the edge of your ship board. Each player checks to see which component is threatened by the meteor. For some die rolls, it could miss your ship entirely. If it does not, proceed as follows:
-

A small meteor will harmlessly bounce off of a well-built ship. It is only a problem if it hits an exposed connector (pipes pointing out in the direction from which the meteor is coming).
In this case, you can still avoid damage by powering up a shield if you have one that protects that side. You must pay 1 green battery token to do this.
If you can't or won't avoid the impact, the component the meteor hits is removed from your ship . (See What Can Happen to You - Getting Hit, above).
-
A large meteor is, of course, even more dangerous. It will damage even a well-built ship and shields cannot stop it. Your only hope is to blast it. You can only shoot it if you have a cannon pointed at it in the same column.
If it is a double cannon, you will have to pay 1 green battery token to use it. Large meteors tend to come from in front of you, which is why we recommended you pay special attention to cannons pointing forward.
If you don't shoot a large meteor, the component it hits is removed from your ship . (See What Can Happen to You - Getting Hit, above).
Enemies (Smugglers, Slavers, Pirates)
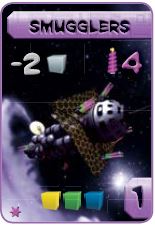
Enemies pose a threat to everyone, but they attack the players ' ships in order. First, they attack the leader. If they win, they attack the next player in line, and so on, until they have attacked everyone or until someone defeats them.
These cards are divided into two parts. In the darker top half is shown what happens to you if you lose. (If you lose to the smugglers, you must give up 2 goods - the most valuable ones).
In the lighter bottom half is shown what you get if you win. (If you defeat smugglers, you win the indicated goods).
The strength of the enemy is given by the number next to the cannon symbol. (These smugglers have strength 4).
The leader counts the strength of his or her ship (paying for any double cannons used). If this strength is greater than the enemy' s, the player wins and claims the reward.
This costs a certain number of flight days specified in the lower right corner. (See What Can Happen to You - Gaining and Losing Flight Days). If a player wins, the enemies go away and the remaining players are not attacked.
If the player loses (has a lower strength than the enemy), he or she pays the penalty specified in the upper half of the card.
In case of a tie (when the player has strength equal to the enemy's) nothing happens to the player. In either of these last two cases, the undefeated enemy moves on to attack the next player in line, according to the same rules.
Combat Zone
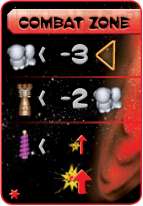
The true test of any space ship is to fly it through a combat zone. The Combat Zone card has 3 lines which are evaluated in succession.
Each line gives a criterion and a penalty for the player who is weakest in that area. (If multiple players are tied for being weakest, the one who is farthest ahead pays the penalty).
First, the player with the fewest crew figures loses 3 flight days. (See What Can Happen to You - Gaining and Losing Flight Days).
Next, the player with the weakest engines (see Parameters of Your Ship - Engine Strength) loses two crew members. Players count up their engine strength in order, starting with the leader, deciding whether or not to spend battery tokens on double engines.
Finally, the player with the weakest cannons (see Parameters of Your Ship - Cannon Strength) is threatened by light cannon fire from behind and heavy cannon fire from behind. Again, players decide in order, starting with the leader, which double cannons they will pay for.
Hits from cannon fire work like hits from meteors (see Meteoric Swarm) except they are more difficult to defend against. Each hit has a direction. The player rolls two dice to determine which row or column the hit is coming from, thus determining which component of the ship (if any) is in danger.
-

The only way to defend against light cannon fire is with a shield that protects against hits from that direction. This can be powered at the cost of 1 green battery token. Otherwise, the component is destroyed. (See What Can Happen to You - Hits to Your Ship).
-
There is no way to defend against heavy cannon fire. Your only hope against it is to roll high enough or low enough that it misses your ship entirely.
Otherwise, the component it hits is destroyed. (See What Can Happen to You - Hits to Your Ship).
Special Event: Stardust
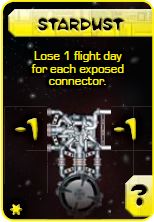
Yellow cards are special events. Their effect is written on the card.
The Stardust event says that every player loses 1 flight day for every exposed connector. (Each exposed connector only counts once, regardless of whether it is simple, double, or universal).
Starting with the last player, each player counts his or her exposed connectors and moves his or her marker back that many empty spaces. (See What Can Happen to You - Gaining and Losing Flight Days).
Continue Reading


