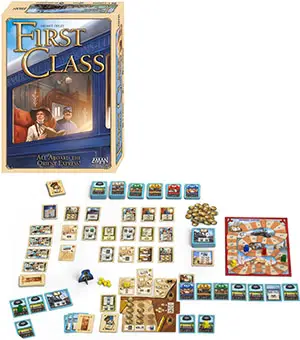
Components
Base game components (needed for each game)
- 94 Railroad Car cards
- 16 Mail Car cards
- 72 Base cards
- 21 Game End cards
- 12 Conductors
- 4 Locomotives
- 24 Scoring markers
- 48 Coins
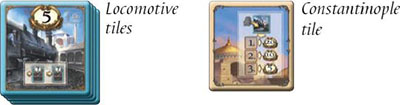
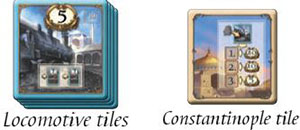
- 8 Locomotive tiles
- 1 Constantinople tile
- 4 Player boards
- 1 Score board
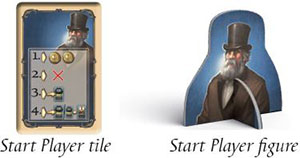
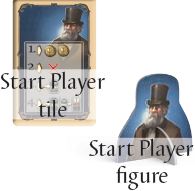
- 1 Start Player tile
- 1 Start Player figure
Module Components:
- 120 Module cards
- 4 Whodunit cards
- 26 Evidence tokens
Whenever you play a game of First Class, you will need the components from the base game and those from 2 modules. We strongly recommend using Modules A and B whenever there is a new player in the game. Your fellow players will thank you.
First Game:
- Module A: The Contracts
- Module B: Celebrities and Postcards
The remaining modules are not needed for the first game.
Setup
-
First, take all base cards (their ticket, found on both sides, shows an X). They are always included in the game, regardless of which modules you use. Add to these all cards from the 2 modules you have chosen to play with.
The modules are identified by the letter on their ticket (found on both sides). Seperate these cards into three piles, according to their color (number): green, blue, and red.
-
For each color, shuffle well the base and Module cards together, forming a separate face-down pile for each color. Place these piles on the table, somewhat off to the side. From now on, these cards will be referred to as Action cards.
-
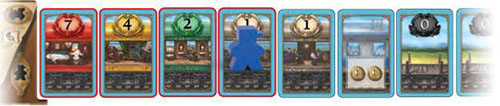
Take the Railroad Car cards and place them on the table accessible to all players. Sort these in ascending order: 0 - 1 - 2 - 4 - 7 - 12. There will be 6 piles of different railroad cars.
Note: The Railroad Car cards all come in a face-up/face-down pair. The pairs are as follows: 0/1, 2/4, 7/12. In other words, on the back of every 0-value railroad car is a 1-value railroad car, and so on. Consequently, when you change a 0-value railroad car into a 1-value railroad car, you can simply flip it. The same holds true for 2-value and 7-value railroad cars.
-
Place the coins in a general supply accessible to all players.

-
Sort the Locomotive tiles in ascending order (5 to 15) and place them in a pile (5 on top, 15 at the bottom) accessible to all players.
Place the Constantinople tile next to it.
-
Each player chooses a color and receives:
- 1 player board
- 1 coin
- 3 conductors
- 1 locomotive
- 6 scoring markers
- 4 mail cars
- 2 0-value railroad cars
-
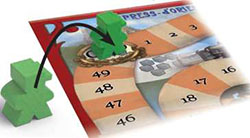
Choose a player to be scorekeeper during the game. Place the score board near them. Each player takes one of their conductors and puts it onto the 0/50 space of the score board.
They also put their 6 scoring markers next to the score board.
-
Choose a start player and give them the Start Player figure.

-
Shuffle the Game End cards face down. The player to the right of the start player draws a number of cards equal to the number of players + 1. That player chooses 1 card to keep and passes the rest to the next player in counter-clockwise direction.
Continue until all players have 1 Game End card. The remaining card is shuffled back into the pile. Keep your chosen card face down in a pile in the bottom left of your player board. It will come into play only at game end.
Finally, draw 4 more Game End cards and place them face up on the table. Place the remaining Game End cards as a face-down pile.
-
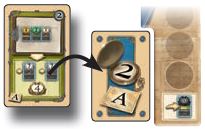
Take the first pile (green) of Action cards and place 3 rows of 6 cards, face up, in the middle of the table. You will have a total of 18 Action cards to choose from in the first round. Place the Start player tile to the left of the first card in the first row.
Player Board Setup:
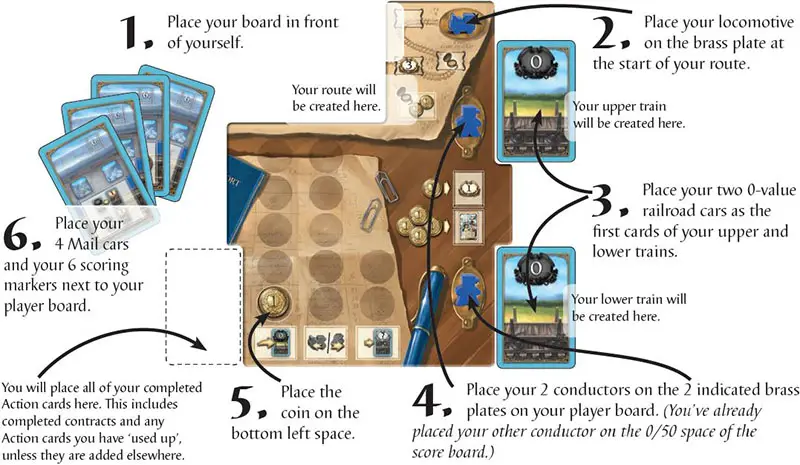
Once you have finished setting up your player boards, described on the next page, the game can begin.
Game Play
First Class is played over 6 rounds. Each round, you will have 18 face-up cards to choose from in 3 rows:
- In rounds 1 and 2, use cards from the first pile (green).
- In rounds 3 and 4, use cards from the second pile (blue).
- In rounds 5 and 6, use cards from the third pile (red).
Reminder: The cards for the first round were already laid out as part of game setup.
Playing a Round
Players play in clockwise order, starting with the start player. On your turn, choose one of the available Action cards and carry out the corresponding action. It is then the next player's turn. That player also chooses a card, carries out the action, etc.
The round is over once each player has had 3 turns and thus taken 3 Action cards.
A scoring phase takes place after every two rounds (after rounds 2, 4, and 6).
The game ends after six rounds, at which point the Game End cards are scored. The player with the most points wins the game.
During Your Turn
Whenever it's your turn, you must choose 1 Action card from those available or the Start Player tile. You can read more about the latter on page 9. You can choose any one of the available face-up Action cards on the table. There are two ways to use an Action card:
-
carry out the action indicated by the Action card. You may even choose a card whose actions you cannot carry out completely. In other words, you can partially carry out actions.
Note: You must always fully choose whether or not to carry out the actions indicated by the symbols on an Action card before obtaining any bonuses.
-
not carry out the Action card at all. In this case, you choose to completely forego all of the card's actions. Instead, you may increase the value of one of your railroad cars. You will learn about upgrading a railroad car's value on page 7.
Note: You cannot choose the Start Player tile and choose to forego becoming start player.
In either case, once you're finished place the Action card face down onto the space reserved for them near the bottom left-hand corner of your player board. The basic icons and their functions are explained on the following pages, whereas the module specific icons are explained in the supplement.
Clearing a Row
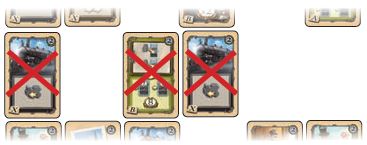
As soon as a number of cards equal to the number of players has been chosen (or removed) from a row, this entire row is then removed. The removed cards are out of the game and can no longer be chosen.
Remember: There are always 6 Action cards in each row at the start of a round.
This means that in a 4-player game, a row is cleared once 2 Action cards remain, since the other 4 cards have already been chosen.
Example (3-player game): After choosing your Action card, there are only 3 Action cards left in the row. Therefore, you remove the remaining cards and take these out of the game.
Important: The Start Player tile itself is not counted as one of the remaining cards and cannot be removed along with the remaining cards of a row. It stays in play until a player chooses it.
The Basic Symbols
We will now describe the individual basic symbols. You will encounter them throughout the game across the various game components.

Take New Railroad Cars
Lengthen a train or increase its value
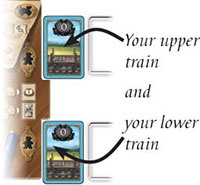
Over the course of the game, you will be adding railroad cars to the two trains next to your player board. Each train always starts with a 0-value railroad car.
At various times, you will add new railroad cars to your trains, or increase the value of your existing railroad cars, so as to score more points during each scoring phase.
Take a 0-value Railroad Car
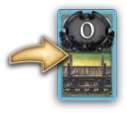
This symbol lets you take a new 0-value railroad car from the supply and add it to one of your two trains. That train is now one railroad car longer.
If a card shows this symbol more than once, then you can take as many railroad cars as the number of times the symbol is printed.
New 0-value railroad cars are always added to the end of a train (on the right); that card becomes the new last card in the train. For each railroad car you gain, choose which train you wish to add it to.
Upgrade a Railroad Car
In order to score more points over the course of the game, you will need to upgrade your railroad cars, which means getting better and more luxurious rolling stock.
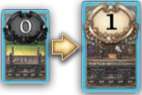
This symbol lets you upgrade a railroad car. More specifically, it lets you take a single 0-value railroad car and upgrade it to a 1-value railroad car.
-
You choose separately for each individual upgrade whether you want to upgrade your upper or lower train. So the first thing to decide is which train you want to upgrade.
-
The railroad car on the left side of the symbol is always the lower-value (less luxurious) railroad car (a 0-value railroad car in this example) that you are allowed to upgrade. The card must already be present in your upper or lower train.
-
The railroad car on the right side of the symbol is always the higher-value (more luxurious) railroad car (a 1-value railroad car in this example) that you are allowed to upgrade to. It replaces the lower-value railroad car.
-
Each symbols lets you upgrade exactly one railroad car to its next step in value. If you are allowed to upgrade multiple railroad cars then the symbol is shown multiple times.
-
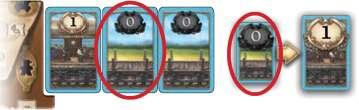
In your trains, a railroad car can never be of a higher value than the one to its left, but it can be of the same value. You can freely upgrade the first railroad car of each train since there is no other railroad car to their left.
-
If you have several railroad cars of the same value in the same train, you must always upgrade them in order from left to right.
Note: When you are allowed to carry out multiple upgrades, you can always split them between both of your trains. You can also upgrade the same railroad car multiple times, provided you have the right upgrade actions to do so.
The other upgrade actions all function in the same way.
You may not skip steps while upgrading. In other words, 0-value railroad cars must always be upgraded to 1-value, 1-value railroad cars must always be upgraded to 2-value, and subsequently 4-value, 7-value, and finally 12-value.
 You must always upgrade the railroad cars in this order |
Upgrade a Railroad Car of your Choice

This symbol lets you upgrade the railroad car of your choice. In other words, choose a railroad car in either of your trains and upgrade it exactly one step. You can also use multiple upgrades of this kind to upgrade the same railroad car multiple times.
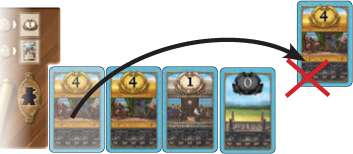
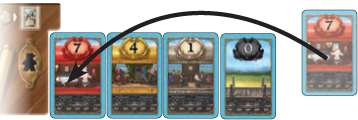
Note: You may also use upgrades of this kind to instead take a new 0-value railroad car from the supply and add it to the end of one of your trains.
Example:

You receive an upgrade of your choice action. You would like to upgrade one of your 4-value railroad cars by one step to a 7-value. You choose your lower train.
You must upgrade the leftmost railroad car in the train. You remove the corresponding 4-value railroad car from the train
You take a 7-value railroad car from the supply and add it to the now-empty space.
Note: You could have carried out the same upgrade with this symbol as well: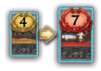
Move your Conductors
Each of you has 2 conductors (one each for your upper and lower trains). Reminder: Your third, conductor is your scoring figure and. is on the score board.
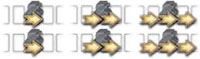
These symbols allow you to move both of your conductors to the right the same number of spaces.
The number of arrows indicates how many spaces both of your conductors move.

Symbols that show a single conductor allow you to move both of your conductors to the right a combined number of spaces.
Once again, the number of arrows indicates how many spaces they may move, however the movement may be split between them. Thus, movement is not automatic as it is with the double conductor symbols.
What happens when a conductor can still move but has reached the last railroad car?
If your conductor has reached the last (rightmost) railroad car of a train or the Locomotive tile (page 10), then you cannot move it any further. Any unused movement is lost.
Move Your Locomotive

The upper-left corner of your player board shows your Orient Express route and the stations your trains will visit. Some stations will earn you points while others will grant you bonuses. First, let's see how your locomotive can move along your route.

These symbols allow you to move your locomotive to the left along your route. The number of arrows indicates how many spaces your locomotive moves.
Your locomotive moves onto or past a bonus action station
When your locomotive moves onto or past a bonus action station, then you will receive the corresponding bonus action (shown on the space with the matching symbol  ) during each subsequent scoring phase.
The locomotive has reached a bonus action station. The corresponding bonus will be awarded during each subsequent scoring phase.
Your locomotive moves onto or past a points station
When your locomotive moves onto or past a points station  , then you immediately (and once only) receive the number of points indicated by the station. Points are scored on the score board. Move your scoring figure as many spaces forward as the number of points indicated.
Your locomotive has reached a points station. You score 8 points.
Note: The first 3 stations are printed on your player board. (The starting station does not count). If you want to move your locomotive further, you will have to expand your route.
What happens when your locomotive can still move but has reached the end of your route?
If your locomotive has reached the last (leftmost) station of your route, then you are not allowed to move it any,further. Any unused movement is lost.
Expand Route - Take new Route cards

You will want to expand your Orient Express route as much as possible, since it brings points and bonuses. Each new Route card you add can score you points as well as give you additional bonuses during each scoring phase.
Route cards are among the available Action cards. If you choose to take a new Route card on your turn, you add it to your player board. New Route cards are always added to the left of the end of your current route.
If it is your first Route card, you add it to the left of the pre-printed route on your player board. Your route always runs from right to left. Route cards have between 1 and 4 stations.
Bonus actions and points are only scored for Route cards once your locomotive has reached the various stations. More information on this above.
You put your first Route card to the left of the beginning of your route.
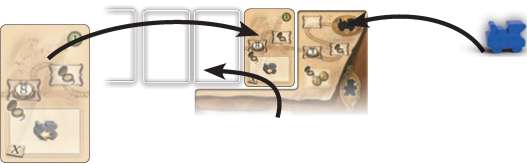 Place each new Route card to the left of the previous one. |
Your route starts in Paris. This is where your locomotive is at the beginning of the game.
The Contracts - Claim Additional Bonusess

Every module includes contracts. Here are the basic rules on how to use them. Fulfilling a contract is extremely useful as it can provide you with a bonus.
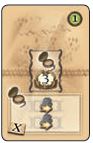
Contracts are recognizable by their vertical or horizontal clipboard.
If you choose a Contract card as your action, place it face up next to your player board.
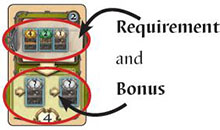
Each contract has a minimum requirement (upper part of the card) that you must meet to obtain its bonus (lower part of the card). Fulfilling the requirement allows you to get the bonus from the contract.
If you meet or exceed the minimum requirement, then you can fulfill the contract. You can do this before or after your regular action for the turn, or during a scoring phase.
Once the contract is fulfilled, you receive the indicated bonus. Depending on the type, you carry the bonus actions out immediately and only once. Any unused part of a bonus is lost.Turn the fulfilled contract face down and add it to your pile of "completed" Action cards (bottom left of your player board).
Note: Details about the different requirements are explained in the corresponding module in the supplement.
Hint: You are allowed to leave contracts unfulfilled for as long as you like. This can be very beneficial for those contracts that are worth more points later on. However, unfulfilled contracts are not worth any points at the end of the game.
The Start Player Tile
On your turn, you can also choose to take the Start Player tile instead of an Action card. Place it face up in front of yourself.
This lets you become the new start player at the end of the current round (after each player has chosen 3 Action cards). This means you will be the start player for the next Scoring phase.
When a player takes the Starting Player tile, some compensations are immediately distributed. The compensations are illustrated on the tile.
The Game End Cards

These only score points at the end of the game,
Each player received 1 Game End card at the start of the game, and 4 more Game End cards were set out on the table during setup.
How do you get more game end cards?
Whenever it is your turn, for each Game End card you wish to take, you can pay 4 coins to take 1 Game End card of your choice from those face up on the table. More details on page 12.
Taking a Game End card gives you a small one-time bonus. Take the bonus and then add the Game End card to your face-down Action cards (bottom left of your player board).
Once your turn is over, and only then, refill the Game End card selection to 4 cards.
Note: Certain Module cards will also give you Game End cards. Whenever you take one of these Action cards, take 1 Game End card of your choice.
As usual, you are also allowed to buy Game End cards for 4 coins each. Here too the rule stands: refill the selection only at the end of your turn.
When do game end cards score?
After the final scoring phase at the end of the game, you will score points for your Game End cards.
Special Cards
There are 2 kinds of special cards: the 4 Mail cars cards that were placed next to your player board during setup, and the Locomotive tiles. These special cards are added to your trains more or less automatically over the course of the game, as explained below.
The Mail Car
The 6th card in each train
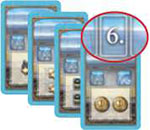
As soon as you add the 5th railroad car to one of your trains, you must immediately add one of your mail cars as the 6th car. You can choose from any of your available mail cars.
You will be able to add exactly 2 of your mail cars over the course of the game: one to your upper train and one to your lower train.
Note: Mail cars can never be upgraded. They also score no points during scoring phases.
Locomotive Tiles
The 10th card in each train
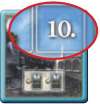
As soon as you add the 9th railroad car to one of your trains, you must immediately add one locomotive as the 10th and final car.
Once placed, each Locomotive tile provides an upgrade 1 or 2 railroad cars of your choice. These upgrades may be applied to any one of your trains, not only the one you added the Locomotive tile to.
Locomotive tiles also score their printed points during each scoring phase, but only if a conductor is on the tile.
Once a Locomotive tile is added to a train, you may no longer lengthen that train (i.e., you can no longer add cards to the right).
Of course, you can still upgrade any existing railroad cars in this train (following the usual restrictions).
Constantinople
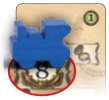
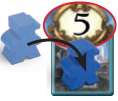
The conductor reaches a Locomotive tile.
Once one of your conductors reaches a Locomotive tile, it symbolizes that your train now reaches Constantinople and it earns the proper title of the "Orient Express". The sooner your conductor gets to a Locomotive tile, the more bonus points you score.
You placed the Constantinople tile near the Locomotive tiles at the start of the game because they are closely related. The first 3 conductors to reach a Locomotive tile will score additional points. The purpose of the Constantinople tile is to keep track of which conductors have reached their respective locomotives.
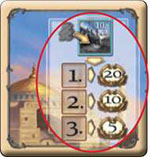
If you are the first player to have one of your conductors reach a locomotive, immediately put one of your scoring markers on the Constantinople tile and score 20 points on the score board.
The second player to have a conductor reach a locomotive immediately puts one of their scoring markers on the Constantinople tile and scores 10 points.
The third player to accomplish this scores 5 points, marked and scored in the same way as outlined above.
Note: You can score Constantinople bonus points twice, provided that both of your conductors are among the first three to reach their respective locomotives. In this case, you would end up with 2 scoring markers on the Constantinople tile.
The Coins
Small extra actions during your turn
On their player board, each player has an area composed of 12 spaces for coins. Players start the game with 1 coin. There are many cards that will give you coins, such as several of the Action cards in the various modules.

For each coin symbol shown, take 1 coin from the supply and add it to your player board.
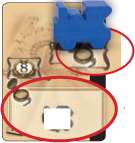
How to Place Coins
Coins must always be added to the lowest, leftmost, empty space on your player board. In other words, you have to fill all empty spaces in the first column before filling the spaces in the second column, and so on.
Important: If you receive multiple coins, you must be able to add them to your board all at once.
What happens when you receive more coins than you have room for?
If you would, choose an action that would earn you more coins than you have room for, you must first make space by using some of your coins. How to do that is explained, in the next section. Once you have made enough room, add. the coins to your player board as described above.
How do you spend coins and what are they worth?
-
You are allowed to spend coins freely during your turn. You are allowed to spend them before and/or after taking an Action card. Note that you must first complete / forego any actions the card allows you to carry out before spending any more coins. You may also spend coins during a scoring phase.
-
Coins give you small extra actions over the course of the game. To take an extra action, pay 1 coin from the corresponding column, returning it to the general supply. Depending on which column you chose, you can carry out one of the following actions:
- Column 1 (space for 5 coins): Take a 0-value railroad car.
- Column 2 (space for 5 coins): Move 1 of your conductors 1 space further or move your locomotive 1 station further.
- Column 3 (space for 2 coins): Upgrade one of your railroad cars by 1 step (the usual restrictions still apply).
- You can also pay 4 coins to take a Game End card from those lying face up on the table. You can pay with coins from multiple columns.
- You can pay 1 coin from any column to score 1 point.
-
Coins always stay on the space they were placed onto when they were first obtained. This means that once placed, coins do not get shifted over to fill in gaps that are created during the game.
-
You do not need to follow a specific order when spending your coins.
-
You are always allowed to spend as many coins as you like on your turn.
End of the Round
When is a round over?
A round is over when all players have had 3 turns; that is, all players have chosen 3 Action cards and/or the Start Player tile. Once the last player has taken their third turn, there will be just enough cards left to trigger the clearing of the last row (as seen on page 5). Once all of the Action cards are gone, the round is over.
New Start Player
Check to see which player took the Start Player tile.
That player returns the Start Player tile to the middle of the table and takes the Start Player figure from the current start player.
If nobody took the Start Player tile, then the start player remains unchanged. That player keeps the Start Player figure.
Important: If noboby took the Start Player tile, then no compensations are distributed.
New Round
After The first round with one of the piles
When you finish the first round with pile 1, 2, or 3, lay out another 18 Action cards from the same pile for the next round. These will be the available Action cards for the next round.
There will be 4 cards left over in the pile. These are removed from the game and will not be used.
The start player starts the next round. The round is played in the same way as the first round.
After the second round with one of the piles
When you finish the second round with pile 1, 2, or 3, the current pile will be empty and you proceed to a scoring phase (see the following section).
Once the scoring phase is finished, a new round begins. Lay out 18 Action cards from the next pile. The start player begins the next round.
Once the scoring phase after pile 3 is finished, game end follows. More details on pages 15 and 16.
Scoring Phase
During scoring phases, you first receive bonus actions for your route and then points for your trains. Starting with the (new) start player, each player, in turn, carries out the following steps.
1. Route Bonuses
-
You receive bonus actions for each bonus space (marked with
) that your locomotive has passed or is standing on.Reminder: The individual bonus actions are always shown in the spaces with the matching symbols.
The first bonus (take 2 coins) is printed on your player board.
-
You can freely choose the order in which you receive and use the bonus actions from cities you have reached on your route.
Note: You must always take the full bonus (everything on the space) you are entitled to before moving on to receiving the next bonus (next bonus space), although you can choose the order in which you receive an individual space's bonus.
If you cannot (or do not want) to carry out one of the bonus action provided by a space, that action is lost before you receive the bonus from another space.
-
Each bonus station provides its bonus exactly once per scoring phase.
Note: If you move your locomotive during the scoring phase, and it moves onto or past another bonus station, then that station's bonus is also activated. You will receive that station's bonus during the current scoring phase as well.
2. Score Points for Trains
-
Each of your railroad cars (other than mail cars) and Locomotive tiles can score you points.
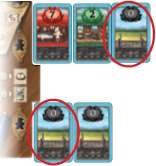
All red-bordered railroad cars will score, as they are the ones the conductor has moved onto or past.
-
The only railroad cars that score are those your conductor has moved onto or past. Any railroad cars to the right of your conductor (including your Locomotive tiles) score nothing, regardless of value.
-
Railroad cars that score are worth as many points as their value. So a 0-value railroad car scores 0 points, a 1-value railroad car scores 1 point, etc. Locomotive tiles are worth as many points as the number printed on them.

-
Add the value of each eligible railroad car and Locomotive tile and score those points.
If you score more than 50 points during the game, place one of your scoring markers near Paris on the score board to keep track. Note that since the scoring of both trains is identical, the following example only shows the upper train.
Important:
You can fulfill contracts and spend as many coins as you like before and during the various steps of the scoring phase, if it makes sense for you to do so. You score points only after every bonus has been received.
You can always fulfill contracts and spend coins, even if you don't receive any points or bonuses for doing so.
End of the Game
The game ends after the third scoring phase, i.e., once you have played 2 rounds each with piles 1, 2, and 3. Any unfulfilled contracts you have left at this time are worth 0 points and are removed from the game.
Game end scoring follows:

- Each coin you have left on your player board is worth 1 point.
- Game End cards are worth points.
First, take all of the cards in your pile of completed Action cards, fulfilled contracts, and Game End cards and sort them according to type. Not all of your cards will be worth points.
Remember: These cards are in a face-down pile at the bottom left of your player board.
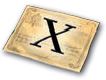
Then, to determine your Game End card points, you will need all of your Game End cards Ar th the base Action cards (the ones marked with an X). All of your other cards are worth nothing and are removed from the game.
How are game end cards scored?
Each of the Game End cards shows a type of Action card and a point value. Count up all of the matching Action cards (railroad car, locomotive, conductors) you chose over the course of the game and multiply the total by the number of points indicated on the Game End card.
Score the resulting amount on the score board. Proceed this way for each of the 3 types of Action cards.
Important: Only the number of cards is important; the number of symbols on each card is not.
The winner is the player with the most points.
In the event of a tie, then all tied players are winners.
A Finished Train
At the end of the game, your finished trains might look something like this:
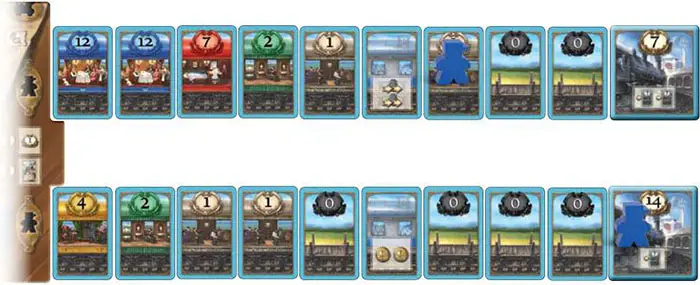
We don't want to scare you, should you not manage to accomplish quite this much during your first game. We just want to give you a sense of what can potentially be accomplished - or perhaps even more.
Continue Reading
