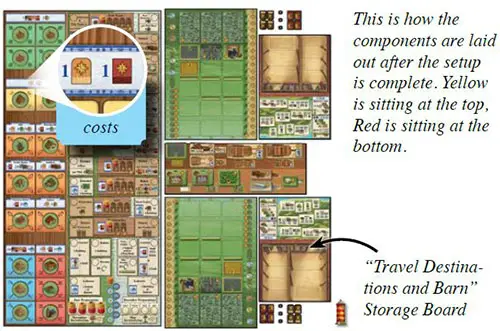
Overall Layout
Aside from your Home Board, you each receive a "Travel Destinations and Barn" Storage Board as well as a set of "Travel Destinations" in your player color.
Place the Travel Destinations on the appropriate spaces of your Storage Board. Your Barn appears below the Travel Destinations, and it starts empty.
You each receive an Overview Sheet showing the various actions of the game.
You each take 4 Wood, 4 Clay and 3 Peat and place them next to your Home Board in your personal supply. (An illustration on the Overview Sheet reminds you of these values).
Sort the remaining Building Materials, the "Wood/Timber" and the "Clay/Brick" tiles, as well as the wooden "Animal" and "Peat" tokens and place them handily on the side.
You (probably) will not need the Scoring Pad until the end of the game.
Get Started

In this game, you build a village and take care of the area around it. The following illustration shows the goals you try to accomplish. The wind roses indicate the number of Victory Points you get for the depicted actions. Yellow wind roses stand for Victory Points.
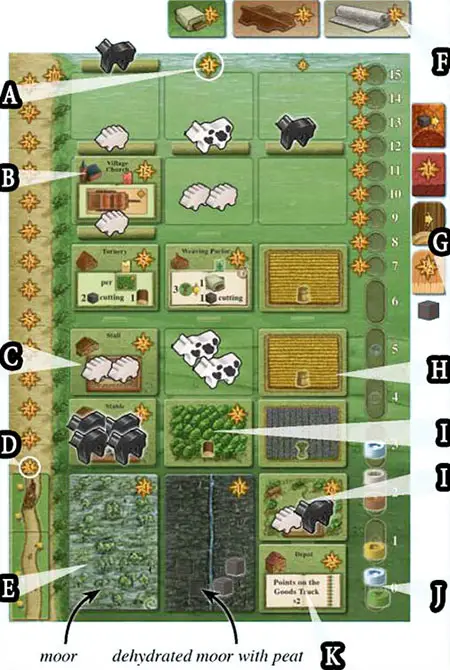
A Dike the Tidal Flat Area on your Home Board to get access to more Fields, Pastures and building land. (If you do not finish this process by the end of the game, you will lose points).
B Build Buildings. (They have a fixed number of Victory Points).
C You can breed Animals in Stalls and Stables. (At the end of the game, Stalls and Stables will be worth 2 and 6 Victory Points, respectively. Animals are also worth Victory Points). Animals can live in Stalls and Stables or graze outdoors: this is also covered below (*).
(*) Try to have about the same number of Animals of each type at the end of the game, so that your Animals will be effectively worth 1 Victory Point per Animal.
Empty Land Spaces (also called Pastures) can hold 2, Stalls 3 and Stables 6 Animals of the same type. Parks can hold 2 Animals of any type and each of your 5 Dikes can hold 1 Animal of any type.
D This is your Travel Experience Track. (The more villages and towns you provide with goods, the more points you will get.
E Dehydrate the Moor so that you can cut peat. As soon as you remove the last Peat Token from a Moor Tile, you can cultivate that Moor Section by removing the Moor Tile from your Home Board. (Until then, you lose points for it).

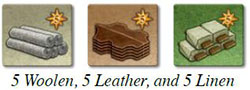
F Linen, Woolen and Leather are made out of the corresponding resources. (Each of these upgraded goods is worth 1 Victory Point). You can use them to craft Clothing to double their value.
G Wood, Timber, Clay and Bricks are represented by cardboard tokens. (The upgraded goods, Timber and Bricks, are worth Victory Points). Peat is represented by wooden tokens.
H Plow Fields to increase your income of Grain and Flax.
I Forests (worth 2 Victory Points) provide additional Wood. Later, you can upgrade them to valuable Parks (worth 6 Victory Points).
J Some goods are represented by tiles, but most of the goods are represented by Goods Indicators and tracked on your Goods Track. Food, Grain, Hides, Flax, and Wool are indicated on the Goods Track.
You can have at most 15 pieces of each of these types of goods due to the limitation imposed by the Goods Track. Only exception: Food is represented by 2 Goods Indicators (light blue), so you can have up to 30 Food.
K At the end of the game, you will get Victory Points for each type of good that you have a certain number of (indicated by the wind rose symbols on the Goods Track). You can double these points by turning one of your Stalls into a Depot.
You can build Plows, Peat Boats, and various Vehicles. These pieces of Equipment are stored in your Barn. (They are worth Victory Points at the end of the game).
L You only have so much space in your Barn.
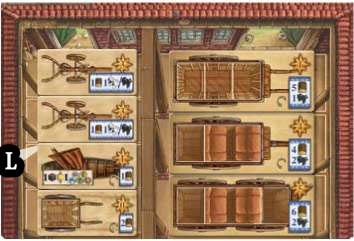
The Game Board indicates how many Tools of each type you have. (They are also worth Victory Points).
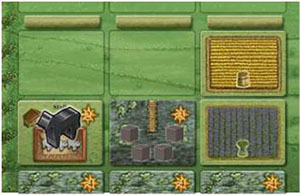
The Home Board
At the beginning of the game, you have access to 2 empty Land Spaces on your Home Board. (The other Land Spaces were covered by tiles during setup).
On these spaces, you can build Fields, Stalls, Buildings, and Forests. Directly above your Land Spaces is your Dike Line (this is what we call 3 Dike tiles lying in a row next to each other) and beyond that the Tidal Flat Area.
You cannot build there, because this area is flooded by the tide. However, during the course of the game, you can dike the Tidal Flat Spaces to reclaim land and get access to more Land Spaces.
To do so, you will move the Dike tiles upwards one by one. This will eventually move your Dike Line (i.e. the border between the Tidal Flat Area and the Mainland) upwards as well.

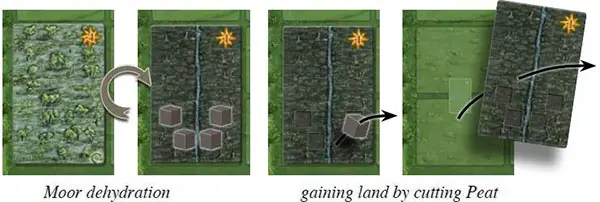
Another way to get access to more Land Spaces is to cut peat. Peat is cut in the Moor that is located below your developed Land Spaces. During the course of the game, you can flip the Moor Tiles over to show they were dehydrated.
Then you can cut peat there until you have removed all of the peat from the tile. It will immediately become cultivated and the Moor Tile will be removed from your Home Board.
From then on, you will have access to (1 or) 2 new Land Spaces. (See page 9 for the detailed rules on land reclamation).
Features of Your Home Board
The landscape on your Home Board consists of a Tidal Flat Area (above the Dike Line, i.e. above the 3 Dike tiles that are lying in a horizontal line) and the Mainland (below the Dike Line).
The Mainland
At the beginning of the game, you have 2 Land Spaces that you can build on by placing tiles of appropriate size on them, like Fields, Forests, Stalls, and Buildings. 4 Land Spaces are already covered by tiles.
Dike Building
At the beginning of the game, there are 9 potential Land Spaces in the Tidal Flat Area. The Dike Line indicates the border between this area and the Mainland.
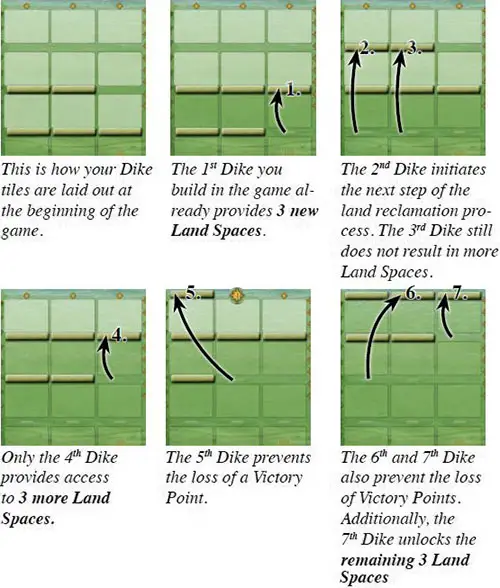
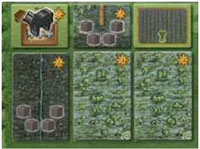
You have 5 Dike tiles. Each such tile is lying in the gap between 2 vertically adjacent spaces. Whenever you use a "+1 Dike" action, you move one of the bottom Dikes up into the next gap between two spaces (see the illustrations below). Some actions allow you to move more than one tile.
Whenever you create a new Dike Line above your old one, i.e. when there is a new horizontal line consisting of 3 adjacent Dike tiles, you immediately gain 3 new Land Spaces (also known as "polder spaces"). The following illustrations should shed some more light on this process:
A row consisting of one or two Dike tiles is irrelevant to the distinction between the Tidal Flat Area and the Mainland.
Cutting Peat in the Moor Area
At the bottom of your Home Board, there are 3 Moor Tiles. Use a "Dehydrate a Moor Section" or "Warden" action to dehydrate one of these Moor Sections so that you can cut peat there (see pages 12-13): turn the Moor Tile to its reverse side and immediately place 4 Peat Tokens on it.
Afterwards, you can use "Cut Peat" actions to take the Peat Tokens off the Moor Tile and place them in your personal supply. The Peat Cutter Action Space lets you do multiple consecutive "Cut Peat" actions depending on how many Spades you have).
As soon as you remove the last Peat Token from a Moor Tile, immediately remove that Moor Tile from play. This way you gain more Land Spaces on your Home Board to build on.
At the beginning of the game, you already have a dehydrated Moor Section with 4 Peat waiting to be cut. Dehydrate the other Moor Sections to get access to even more Peat.
Animal Husbandry Rules
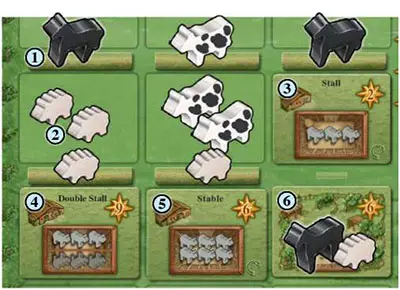
There are 3 types of Animals in this game: Sheep, Cattle, and Horses. You can get these Animals via various actions during the Work Phase and as newborns at the end of each Winter Half Year.
You can only keep your newly gained Animals if you can accommodate them on your Home Board. You can return Animals to the general supply (without substitution) at any time.
During the Work Phase, you can rearrange the Animals on your Home Board at any time according to the following rules:
Each of your Dikes can hold 1 Animal of any type.
Each empty Land Space of your Home Board can hold up to 2 Animals of the same type.
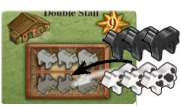 Double Stalls (reverse side of Stables) are considered two separate Stalls. (You can get them via the "Warden" and "Dike Warden" actions).
Each Stable can hold up to 6 Animals of the same type. (As with Stalls, try to have pairs of Animals in your Stables before Winter ends to maximize the number of newborn Animals you get. You can get Stables via the "Carpenter" action in Winter).
Each Park (reverse side of a Forest) can hold up to 2 Animals of the same or of different types. (You can get Parks via the "Warden" and "Dike Warden" actions).
Moving Components on Your Home Board
Animals can be moved at any time during the Work Phase of a Half Year, but they must always be accommodated on your Home Board. Dike tiles can only be moved as a result of specific actions.
All the other tiles on your Home Board (including Fields) can only be placed, turned, or removed via certain actions. (The tiles on your Home Board cannot change their position, except Dikes).
As the space in your Barn is limited, you can return Equipment to the Supply Board at any time (without substitution).
Limited Components
The Animals, Building Materials, Clothing, and Peat Tokens are considered to be an unlimited supply. Please improvise or use the Replacement Tiles if you run out of any of these goods.
Every other type of tile is limited by the provided supply. (If it runs out, you cannot get more. This is especially true for Grain/Flax Fields, Stalls, Stables, Peat Boats/Plows, and all the Vehicles).
Of course, when a player returns one of these tiles to the supply, it becomes available again.
The Goods Track
Indicate the amounts of Food, Grain, Hides, Flax, and Wool you have with the Goods Indicators on your Goods Track. The Goods Indicators cannot go above 15 or below 0.
You may move one of the Food Goods Indicators down on the track to move the other Food Goods Indicator up by the same number of spaces (i.e. you may distribute the total amount of Food you have between the two Food Goods Indicators any way you like).
You may want to do this at the end of the game to maximize the number of points you get for goods.
You can store up to 30 food and up to 15 units of every other good.
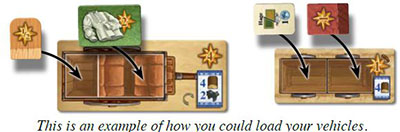
The Vehicles
Vehicles play a special role in this game and are available for purchase on the Supply Board. Once you own them, you can put them to work once per Half Year - outside the normal course of play.
The game is played over a total of 9 Half Years. You will need Vehicles to get access to Timber, Bricks, and Clothing, as well as to sell goods at certain Travel Destinations.
Continue Reading