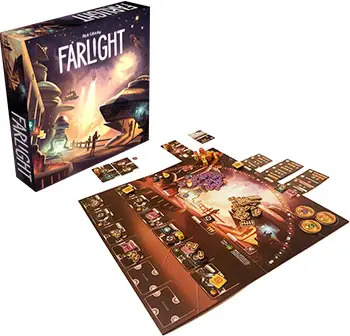
Components
- 1 game board
- 20 Engine dice
- 1 Victory card
- 57 Part cards
- 23 Mission cards
- 6 Primary Core cards
- 1 First Player marker
- 7 Industry Award tokens
- 37 Crew tokens
- 37 Science tokens
- 30 bidding tiles
- 6 score markers
- Instructions
Object of the Game
In Farlight, you'll work to establish your organization's influence over recently discovered but yet untapped regions of space by scoring the most points over a series of rounds. Players earn points by installing new parts to upgrade their ship and then launching that ship to complete missions to establish your dominance.
The game ends at the end of any round when either or both of these conditions are met:
- A climactic mission is completed.
- There are not enough parts to refill the station.
After the final round, your organization might be the recipient of one or more Industry Awards, and any remaining assets will be utilized to see who has best established themselves in this new frontier.
Setup
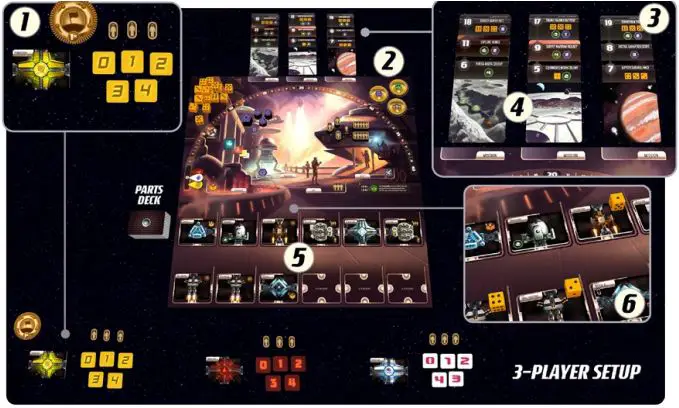
1 Each player chooses an organization to play as, taking the corresponding Primary Core card, five bidding tiles, score marker, and 3 crew from the supply. Place your Primary Core card in front of you. This is where you'll start when adding parts to your ship.
Place your score marker on the "O' space of the station's score track and hold the bidding tiles for the upcoming Bidding Phase.
2 Shuffle the seven industry award tokens face-down on the table. Flip three of them face-up and place one on each of the appropriate spaces on the game board. Return the four unused industry award tokens to the game box.
3 Separate and shuffle the climactic missions out of the mission deck and reveal three of them. Each of these will be the last (or bottom) mission in one of three mission stacks. Return the unused climactic missions to the game box.
4 Shuffle the remaining mission cards and deal either two (for 2-3 player games) or three (for 4-5 player games) mission cards on each of the mission stacks. This will make three stacks of three cards each for a 2-3 player game or three stacks of four cards each for a 4-5 player game. Return the unused mission cards to the game box.
Order the cards in each stack from lowest to highest point values where the lowest-valued mission is on top, and the highest-valued (the climactic mission) is on the bottom.
When there are two missions of the same point value in the same stack, order those missions alphabetically. (e.g. 'Cleomedes Moon Colony" would be placed on top of 'Mars Elevator"). Splay each stack down so that missions and their requirements can be seen at a glance.
5 Shuffle the parts deck and place a face-up part on each open card slot on the board, up to the current player count. For example, in a 4-player game, parts would be placed on each of the empty part spaces as well as spaces with "3-Players+* and '4-Players+* text.
This should result in the following number of part cards on the board:
- 2 players: 7 parts
- 3 players: 9 parts
- 4 players: 10 parts
- 5 players: 12 parts
Shuffle and stack the remaining part cards face-down near the board.
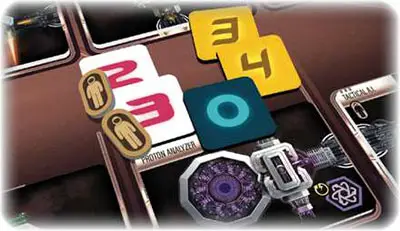
6 The youngest player counts the engine  icons among all of the available parts on the board and rolls that many dice. Match the highest die with the highest number available among all of the part cards and place the highest die on that icon.
Then, find the second-highest die and match it with the second-highest number. Continue until all of the rolled dice have been matched to a card. Place all remaining dice in the designated area on the upper-left portion of the game board.
Setup is complete! The player who lives the farthest away takes the First Player marker and begins the first round with the Bidding Phase.
Key Concepts
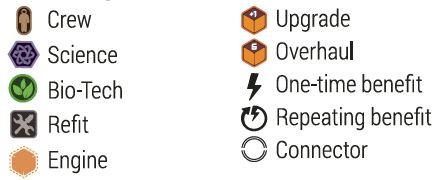
Icon Key
Farlight Station
The game board represents the interstellar hub known as Farlight Station. Here, you'll track your organization's standing and bid on various services, like hiring crew and acquiring parts.
For rule purposes, "Farlight Station" or "station" is used interchangeably with 'game board".
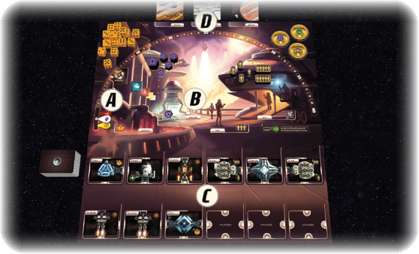
A: Scoring Track
Should you go beyond 40 points, flip your scoring marker to the *40' side and continue around the track.
B: Facilities
Facilities provide a variety of services you can bid on during the Bidding Phase. Facilities are always available to bid on.
C: Parts
Parts represent the various pieces of equipment you bid on to upgrade your ship in the Assembly Phase.
D: Missions
Missions are the various jobs posted at the station that needs to be completed. Completing missions is the primary way of scoring in Farlight.
Game Play
Each round of a game of Farlight is split into three phases:
- Bidding phase
- Assembly phase
- Launch phase
Bidding Phase
During the Bidding Phase, players will take turns bidding on the various parts, missions, and facilities around Farlight Station. Starting with the first player, take two bidding tiles and place them face-down in the bidding area for an available part, mission, or facility.
You may split your tiles between two bids or place both tiles on the same bid, but you must place two bidding tiles.
Repeat this process until all bidding tiles have been placed. Note that on the third time around for bidding, you'll only have one token to place.
One small step at a time: Players can only bid on the three available missions (one per stack) each round. Available missions are the lowest numbered card in a stack as well as the card closest to the top of the game board.
Whenever you place a bidding tile, you may choose to place one crew token on top of it. The crew token adds one to the value of the bidding tile when resolving bids. If you place both bidding tiles on the same bid, you may still add one crew token to each tile.
You can only place one crew on a bidding tile, and it must be placed at the same time as the tile. You cannot add crew to a bidding tile placed on a previous turn.
We did the math: Since players each have 5 bidding tiles totaling 10 in value (4+3+2+1 + 0), and can only add one crew token to increase the value of each of these five tokens by 1, a player can never exceed a maximum total bid of 15.
Assembly Phase
The Assembly Phase begins as soon as all players have placed their final bidding tile. Unlike the Bidding Phase, there are no turns during the Assembly Phase - all players move through the phase's three steps together.
Assembly: Determine Winning Bids
Flip all bidding tiles face-up. Resolve all bids for parts and facilities one-at-a-time. Do not resolve mission bids at this time - missions are resolved during the Launch Phase.
Add up the value of all of your bidding tiles, adding one to the total for each crew that was placed with the bidding tile(s). Compare all of the players totals, and the highest bid wins the bid.
If there is a tie for the highest bid, the player with the First Player marker (or closest in turn order to the First Player marker) wins the bid.
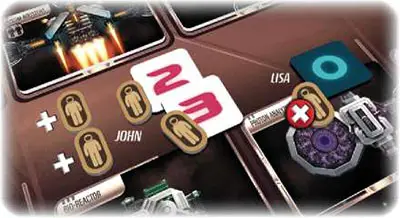
Example: All three players have placed bidding tiles on a Proton Analyzer card. John flips his tiles to reveal a '3" and a '2', each with a crew token that was placed with it, so his total is 1 Lisa flips her tile and reveals her bluff- a '0".
Sarah flips her tiles and reveals a "A" and a "3' for a total of 7. Since there is a tie for the highest bid, the player with (or closest in turn order to) the First Player marker breaks the tie and wins the bid.
Since Sarah has the First Player marker, she wins the tie and gains the Proton Analyzer.
Winning Parts
The winning bidder retrieves their bidding tile(s). Any crew they added to increase their bid are returned to the supply. Place the part card in front of you - you will install or discard it in the next phase.
Collect any bonus crew that was placed on the card in previous rounds (see Launch - Round Reset on page 9). You collect this crew even if you don't install that part.
Winning a Facility
When you win a bid on a facility, you immediately gain its associated benefit:
 Refit: Discard any number of parts from your ship.
 Hire: Gain three crew.
 Discover: Gain one science.
 Engineer: Add 1 to one of your engines. (to a maximum of 6)
Losing Bids
Players who did not win the bid retrieve all of their bidding tiles. Any crew they placed with their bid(s) is also retrieved - it does not go to the supply as with a winning bid. Those players receive one additional crew from the supply for each non-'O' bidding tile they retrieve.
Thus, gaining crew tokens in this way can sometimes make it more profitable to bid up a highly-contested card or space, only to lose it in the end.
Tanstaaf: You can never win a bid by only using your "0* bidding tile, even if no other players placed a bid.
However, if you placed a crew with the "0" tile to increase the value of by 1, you would be eligible to win the bid.
Example: Continuing the bidding example, since Sarah had the winning bid for the Proton Analyzer, John retrieves his '2'and '3'bidding tiles as well as the crew tokens he played with them.
John also receives an additional two crew tokens from the supply since he retrieved two of his bidding tiles and neither one of them was his '0' marker. Thus, John gains the two crew tokens he placed with his bidding tiles and an additional two for each of the non-'0' bidding tiles in the failed bid.
Lisa retrieves her 'O' bidding tile. She does not receive a crew token for that retrieved non-winning bidding tile since that was her 'O' marker.
Lisa doesn't gain any crew tokens (no crew token played with her bid, no crew token gained from retrieving the losing bidding tile since it was her 'O'marker) from her losing bid.
Assembly: Install Parts
Once all of the winning bids for parts and facilities have been determined, all players that won one or more parts may now install those parts on their ship. All players install parts simultaneously.
Each player starts with a Primary Core that has four connectors (up, down, left, right). Each new part that's installed will have between 1-4 connectors that each connect to one of these four types.
Additionally, some parts also have a crew cost in the upper-left corner of the card. You must pay this crew cost to the supply before installing the part.

To install a part, you must have an open connector available that matches a corresponding connector on their part (down matches with up, left matches with right, and vice-versa).
You do not have to match every connector on the card - you only need one connection to install a part (though this may result in blocking open connectors).
The slots above the title refer to the number of these cards in the deck with the same combination of connectors.
When an engine part is bid on and won, its dice stay with it at its current value. If you're unable to - or choose not to - install a part, discard the part to the game box.
When installing a part, you cannot rotate the card in any way - it must match the orientation of the rest of your craft.
Once a part has been placed, it may not be moved, re-installed, or rotated in any way. The only way to remove parts from your ship is to visit the Refit facility on Farlight Station.
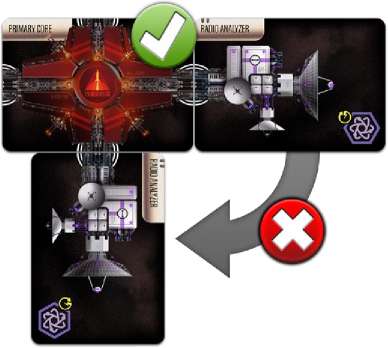
Important
Use only Genuine interocitor parts.
Part cards cannot be rotated and must match the orientation of the other parts of your ship.
Assembly - Gaining Benefits
After all parts have either been connected or discarded, all players simultaneously gain benefits according to the icons on their ship.
Benefits linked with a  icon are only collected once - in the same round the part is installed. They don't yield any benefits in future rounds.
Benefits linked with a  icon are collected during every Assembly Phase, including the phase they were installed.
For each science icon  on your ship, gain one science from the supply. For each crew
  icon on your ship, gain one crew from the supply.
For each upgrade  icon on your ship, you may increase one of your ship's engines by 1, to a maximum of 6. For each overhaul
  icon on your ship, you may change one of your ship's engines to a 6.
Launch Phase
Similar to the Assembly Phase, there are no turns - all players resolve the phase together. There are two parts to the Launch Phase: Completing Missions and Round Reset.
Launch: Completing Missions
Starting with the lowest-valued mission card, determine the winning bid as in the Assembly Phase.
Important
Waiver of Liability
Crew recovery rules only apply to bids on Farlight Station for parts and facilities. Crew tokens used for bidding on missions are never returned to players.
Additionally, players do not receive crew for losing bids as with parts and facilities.
Each player who bids on a mission will have an opportunity to either complete or pass the mission. The winning bidder has the first opportunity to complete the mission, followed by the second-highest bidder, and so on.
The first player to complete the mission earns points equal to the full value shown on the upper-left of the mission card. Subsequent players who complete the mission earn points equal to half of the mission's value (rounded up).
If at least one person completed the mission, discard the mission to the game box. If nobody completed the mission, it remains in play and can be attempted again next turn.
Mission cards will have one or more of the following requirements that must be met to complete the mission:
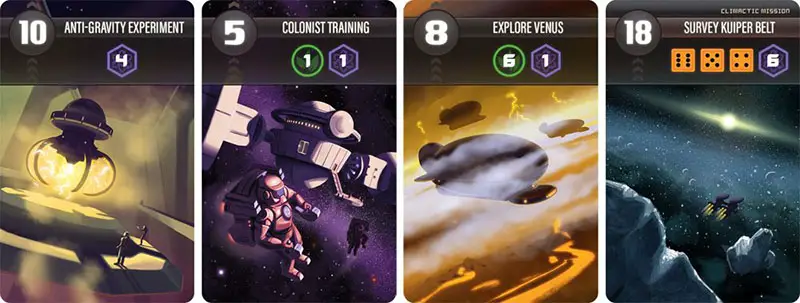 Mission Cards |
Engines
Missions that require engines of a certain power show one or more dice of specific values. To satisfy this requirement, you must match each die listed on the mission card with an engine on your ship of equal or greater value. You can only match each of your engines to one mission icon.
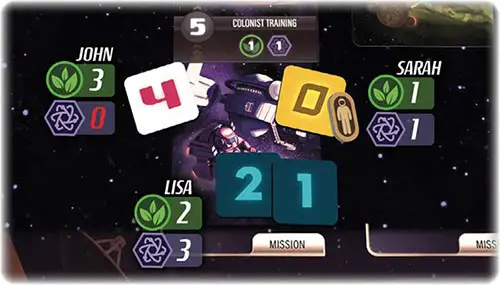
Example: John, Lisa and Sarah all bid on the 'Colonist Training'mission. John wins with a bid of 4, Lisa comes in second with a bid of 3, and Sarah comes in last with a total bid of 1 since she added 1 crew token when she placed her 'O'bid.
This mission requires 1 Bio-Tech, which all three players meet. It also requires 1 science. John does not have any science to pay, so he takes back his bidding tiles to his hand and alerts the other players that he is not completing it.
Lisa pays 1 science and scores 5 points, the full value of the mission. She gets full value even though she didn't die highest bid, but because she completed it first Sarah has a science available to pay, but since she would only be getting half value (3 points) for completing it, she decides to not pay and retrieves her bidding dies, deciding to save the science fora future mission.
Bio-tech
Missions that require Bio-Tech  show the total number of icons needed for the mission. To satisfy this requirement, the player adds up all of the icons on their ship and must have a total number of icons equal to or greater than the value shown on the mission card.
Bio-Tech is never "spent" while completing a mission, it is only ever totaled to compare against a mission's requirement.
Important
Re: Staff Reductions
You may pay 3 crew tokens to add one temporary  icon that is used for the sole purpose of meeting mission requirements during the current round.
This may be done multiple times, for example, a player could pay 9 crew tokens to gain 3 temporary icons for completing missions this round. These temporary icons are immediately lost once all mission bids have been resolved.
Science
Missions that require science show the total number of science needed for the mission. To satisfy this requirement, pay that amount of science to the supply.
We'll do it live: In aggressive games of Farlight, players will often bid on missions that they can almost but can't yet complete in the hope that they win the bids for the facility or part they'd need to be able to complete the mission in the Launch Phase.
This can be very risky, of course, because if the other players see what you are doing, they might try to outbid you on the parts you desperately need - but sometimes a quick score can earn you the win.
Launch - Round Reset
After the bids have been resolved for all missions, perform the following steps to prepare for the next round:
-
If a climactic mission was completed this round, proceed to Ending the Game below.
-
Place one crew token on each part still on the station. Parts may accumulate multiple crew over several rounds, so it sometimes may be beneficial to bid for a part you don't need just to gain the crew on it.
-
Fill any part spaces on the station that were emptied this round. If there aren't enough parts to fill all of the vacated spaces, proceed to Ending the Game below.
-
Remove all engines placed on parts at Farlight Station. Engines on a player's ship are never re-rolled or removed. Just as in initial setup, the youngest player rolls a number of dice equal to the number of
icons among all parts on the board.Find the highest engine number available among all of the part cards and place the highest die on that icon. Then, find the second highest Engine number and match it with the second-highest die, and so on until all of the
icons have one engine die placed on them. -
The First Player marker passes to the left.
If neither game end condition was met, all players begin a new round of bidding, assembling, and launching!
End of the Game
The game ends at the end of any round when any one of two conditions are met:
- A climactic mission is completed.
- There are not enough parts to refill the station.
Once either of these conditions have been met, proceed to scoring industry awards.
Industry Awards
Each industry award is worth 5 points and can be shared between two or more players in case of a tie (both sharing players receive the full point value). Only three of them are used in each game and are randomly chosen and revealed during setup.
-
Colonist
Awarded to the player with the most
icons on their ship. -
Commander
Awarded to the player with the most crew tokens.
-
Efficiency
Awarded to the player with the fewest open connectors on their ship. Note: Incomplete and blocked connectors count as open for this award.
-
Juggernaut
Awarded to the player with the most parts on their ship.
-
Potential
Awarded to the player with the most open connectors on their ship. Note: Incomplete connectors that are completely blocked do not count towards this award.
-
Researcher
Awarded to the player with the most science tokens.
-
Rocketeer
Awarded to the player with the highest total value in engine pips (EXAMPLE: John has 4 dice on his ship totaling 13 while Lisa has 3 dice totaling 16. Lisa wins the award).
Final Scoring
After all industry awards have been scored, players add up the total number of crew and science tokens they have and divide by 3, rounded up. Each player adds that total to their respective score.
The player with the highest score wins Farlight.
Be sure the winner takes a picture with the Victory card to commemorate their epic win.
Tiebreaker
In the case of a tie for highest score, randomly draw one of the unused industry awards, the award winner among the tied players wins.
If there is still a tie, randomly select another unused industry award to break the tie. Repeat this process until a winner is determined or all of the unused industry awards have been used.
If still tied after comparing all unused award tiles, the tied players are true equals indeed. A powerful and lucrative merger is formed between their successful organizations, and those players share the victory.
Continue Reading


