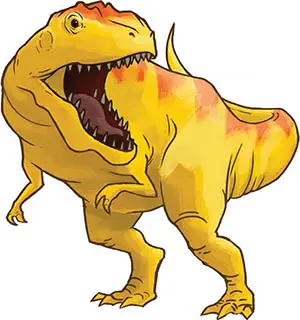
Several years ago, scientists discovered a way to clone dinosaurs from viable DNA preserved within the fossil record.
After a few mishaps along the way, the process has stabilized. Today, It's the museums that have gone practically extinct, as shrewd Investors have turned those Initial dinosaur sanctuaries into bustling theme parks, true meccas for dino fans the world over.
In Dinosaur Island, each player takes on the role of a park manager at one of these premier destinations. You've been handed the reins to a burgeoning operation - bring the fantastic creatures of the Jurassic, Triassic, and Cretaceous periods forward Into the modern-day.
Early retirement Is yours If you can make your park bigger and better than the competition!
It won't be a walk In the park, though. You will need to hire the right personnel, beat your competitors to perfecting the hottest dlno recipes, and gamble on which attractions will draw the most visitors.
And It'll all come crashing down If your security precautions aren't tight enough to keep your unruly dlno population under control. Welcome to Dinosaur Island.
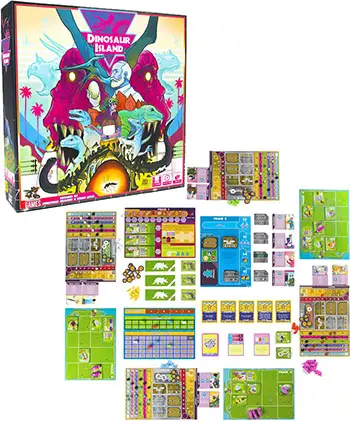
Components
- First Player Token
- Research Board
- Track Board
- Marketplace Board
- 4Park Boards
- 4 Lab Boards
- 10 DNA Dice
- 11 Plot Twist Cards
- 12 Modifier Tokens
- 12 Scientists
- 17 Solo Play Cards
- 17 Dino Recipe Tiles
- 20 Corporation Tokens
- 22 Specialist Cards
- 24 Limit Cubes
- 33 Lab Upgrade Tiles
- 36 Workers
- 39 Objective Cards
- 40 Marker Cubes
- 50 Dinosaurs
- 80 Visitors
- 81 Income Tokens
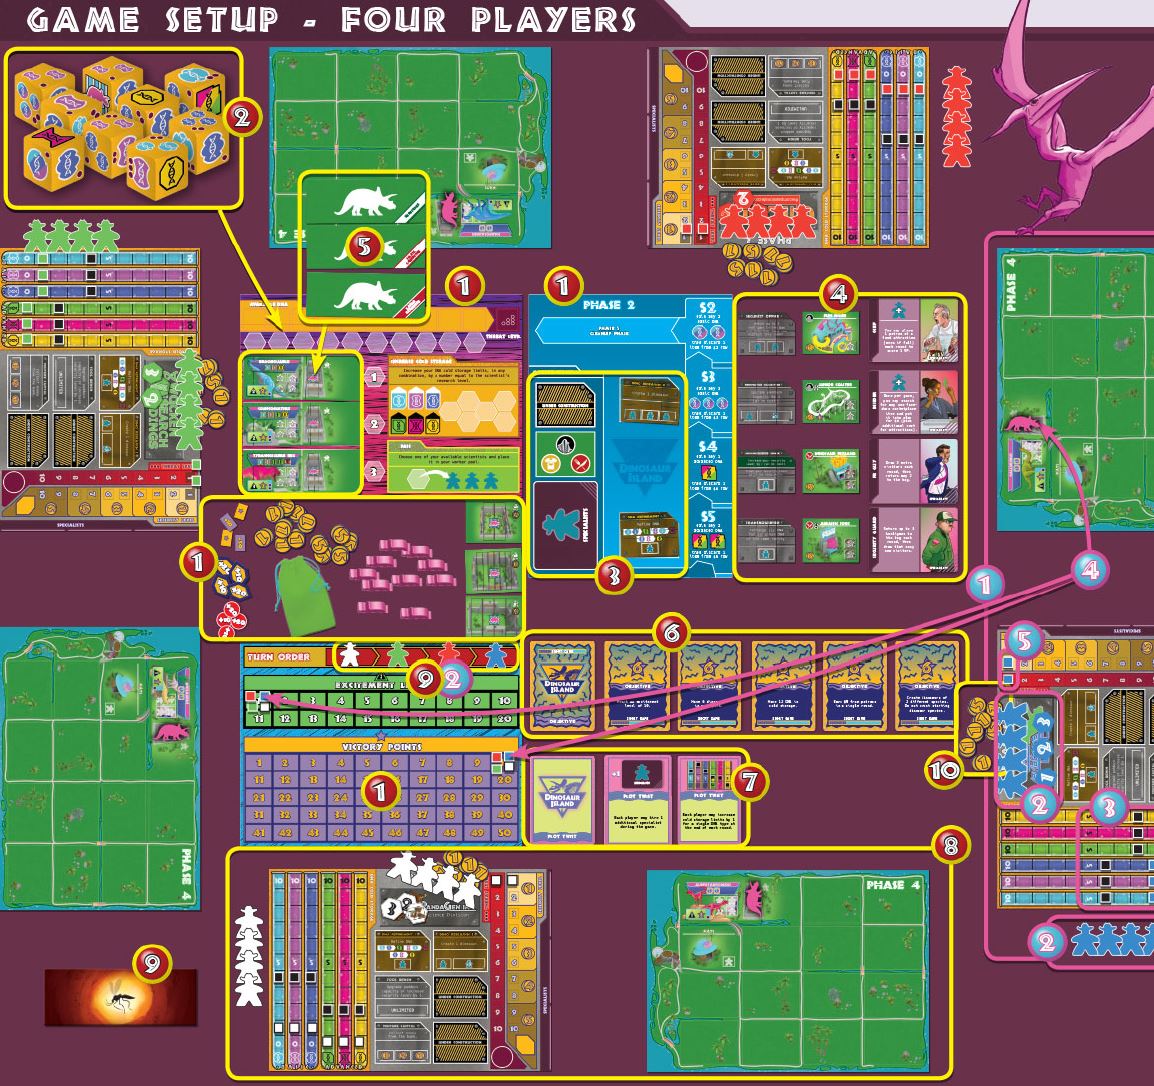
Main Game Setup
-
Map out the Game's Footprint
Position the marketplace board, research centerboard, and track board centrally, within reach of all players. Be sure to leave plenty of room along the edges for each player's individual area.
Off to the side, pile all 81 income tokens-, this is the bank. Next to the bank place the 50 dinosaurs, 29 paddock tiles, and 12 modifier tokens; this is the supply. Put all 80 visitors in the cloth bag and place the bag in the supply.
-
Establish the Dice Pool
At random, draw 2 DNA dice per player, plus 1 more die, to create the dice pool. Return any remaining dice to the box; they will not be used during this game.
-
Place the Market Stacks
Shuffle the 22 specialist cards and place the stack face-down in its corresponding slot in the marketplace. Shuffle the 30 attraction tiles and the 25 regular lab upgrade tiles and stack them in their corresponding slots.
(In a 3-player game, remove from these stacks any tiles marked as "4+". In a 2-player game, remove any tiles marked as "3+" or "4+"). Stack the 4 "Dino Research II" lab upgrade tiles and 4 "DNA Refinement II" lab upgrade tiles face-up in their reserved slots.
-
Seed the Market Rows
Draw the top 4 attraction tiles from the stack and place 1 in each of the market rows (to the right of the marketplace board), arranged by cost: most expensive in the $5 row all the way to least expensive in the $2 row.
Then, draw the top 4 lab upgrade tiles and place 1 in each of the market rows. Finally, draw the top 4 specialist cards and place 1 in each of the market rows.
-
Place the Research Stacks
Separate the 17 dino recipe tiles into 3 stacks by category (i.e., large carnivores, small carnivores, and herbivores).
Shuffle each stack, face- down, and place it in its corresponding slot on the research center. Then, flip the top tile from each stack face-up.
-
Reveal End-game Objectives
Separate the 39 objective cards into 3 stacks by type (i.e., short, medium, and long). Based on your desired game length, choose a single stack and reveal from it a number of objective cards equal to the number of players, plus one. Place them face-up off to one side. Return the other objective cards to the box.
-
Prepare the Plot Twists
Shuffle all 11 plot twist cards face- down, then draw 2 at random and place them face-up. The rules on these cards are now in effect for the remainder of the game.
(If the second plot twist card would contradict the first, discard the second and redraw. ) Return the other plot twist cards to the box.
-
Distribute Player Pieces
Each player takes 1 lab board, 1 park board, 9 workers, 3 scientists, 5 corporation tokens, and 10 marker cubes of their own color, as well as 6 limit cubes. Put any unused player pieces and limit cubes back in the box. (Continue with Individual Player Setup).
-
Choose a First Player
The player who most recently extracted DNA from a mosquito trapped in amber will be the first player.
If no player has successfully accomplished that task, the player who most recently visited a theme park will be the first player. Give that player the first player token. Arrange the turn order track so that turn order is clockwise from the first player.
-
Take Startup Cash
Give the first player $15 Each successive player in turn order receives $1 more than the previous (e.g., the second player receives $16, the third player receives $17, etc)..
Individual Player Setup
-
Situate Player Boards
Place your 2 player boards in front of you: your lab board should be on the left and our park board should be on the right. Leave enough room to the right of your lab board for specialist cards that you will hire during the game.
-
Place Workers and Scientists
Put 4 of your workers near the top of your lab (on the corporate logo), this is your worker pool. Put 4 more workers in the supply.
These are not available to you at the start of the game, but they can be gained later. Put the 1 remaining worker on the turn order track. Lastly, put your 3 scientists just above your lab; this is your research pool.
-
Gain starting DNA
Place a limit cube at "4" on each of the basic DNA tracks (t.e., blue, pink, purple) and at "2" on each of the advanced DNA tracks (t.e., green, red, orange) in the cold storage chart on the left side of your lab. Then, place a marker at "1" on each of the basic DNA tracks and at "0" on each of advanced DNA tracks.
-
Adjust the Public Tracks
In your park, there is a pre-printed dinosaur exhibit and paddock in the upper-left corner; place 1 dinosaur in the paddock.
Put 1 of your markers on the public excitement track on the track board, placing it at "1" on the track to indicate the initial excitement created by that 1 dinosaur. Then, place another marker at "10" on the score track, which is also on the track board.
-
Set Threat and Security Levels
The 1 dinosaur present in your starting paddock also represents a potential threat. Put 1 of your markers on the threat indicator on the right side of your lab, placing it at "1" to indicate the relatively low level of threat that this 1 dinosaur represents.
Then, put another marker at "1" on the security Indicator, which is also on the right side of your lab.
Game Play
Dinosaur Island is played in a series of rounds until the end of the game is triggered. In each round, there are five phases that occur in order:
- Research Phase
- Market Phase
- Worker Phase
- Park Phase
- Cleanup Phase
Note: In certain phases of the game, turn order is very important. In the first round of the game, players take turns in clockwise order, beginning with the start player determined during setup. In all subsequent rounds, turn order is determined by position on the score track.
1. Research Phase
To begin this phase, the first player rolls all dice in the DNA dice pool and places those rolled dice along the top of the research center, so that there is one die per slot. (It doesn't matter which die is in which slot).
Then, in turn order, each player assigns one of their scientists to research DNA, increase cold storage, or procure a dino recipe. (Passing is also allowed, and can even be a strategic move. ) Continue in this way, with each player assigning one scientist at a time, until each player has had three turns in this phase.
IMPORTANT I Only one scientist can be assigned to each slot.
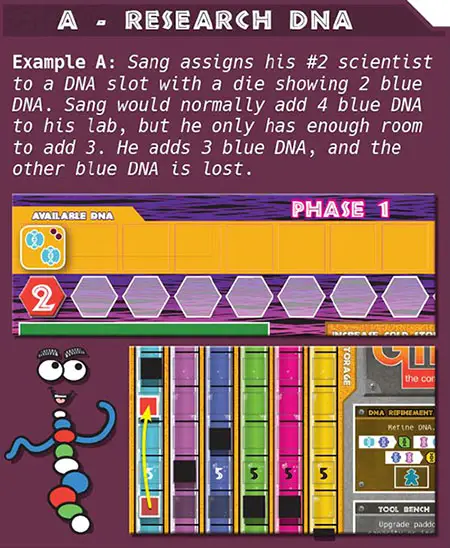
Research Dna
Assign a scientist to one of the slots at the top of the research center to claim the corresponding die. Multiply the number of DNA symbols on the die in that slot by your scientist's research-level.
Add that many DNA of that type to your lab. However, you can never have more DNA than your current cold storage limits allow.
There are two special and rare faces that may appear on the DNA dice during the game: the  and
and  . You must assign your #3 scientist to claim one of these dice, and you only get the benefit once (t.e., you do not multiply by the scientist's research level).
The
allows you to upgrade paddock capacity.The
allows you to gain one worker from the supply.
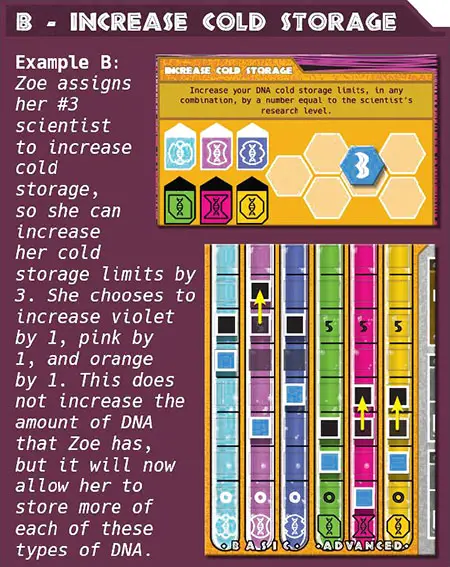
Increase Cold Storage
Assign a scientist to one of the six slots in this section of the research center in order to increase your cold storage limits for DNA.
When you do, you may immediately increase your cold storage limits, on any combination of your DNA tracks, by a number equal to that scientist's research level.
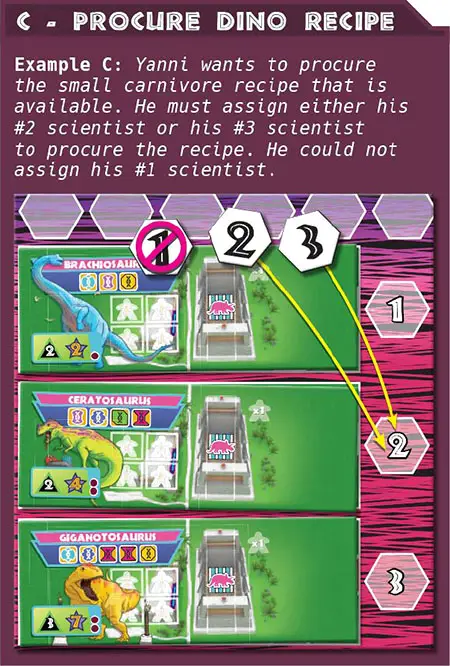
Procure Dino Recipe
There will be three dino recipe tiles available each round: an herbivore, a small carnivore, and a large carnivore. The number in the corresponding slot indicates the minimum research-level required for a scientist to be assigned to procure that recipe.
When you procure a dino recipe, immediately place the tile in your park so that it fills two available zones.
Pass
If you pass, choose one of your remaining available scientists (t.e., not a scientist you've already assigned this round) and place it in your worker pool; you can use that scientist as a worker during the Worker Phase later this round.
After all players have had three turns in this phase, evaluate the remaining DNA dice. Take the die with the most threat pips (1, 2, or 3) and move it to the holding area (in the top right corner).
That number will be added to all players' threat levels during the Park Phase. If no DNA dice were unclaimed, then no die is moved to the holding area.
2. Market Phase
In this phase, players visit the marketplace. In turn order, each player will have an opportunity to take action in the marketplace. (Passing is also allowed).
Continue in this way, with each player having one market action at a time until each player has had two actions in this phase.
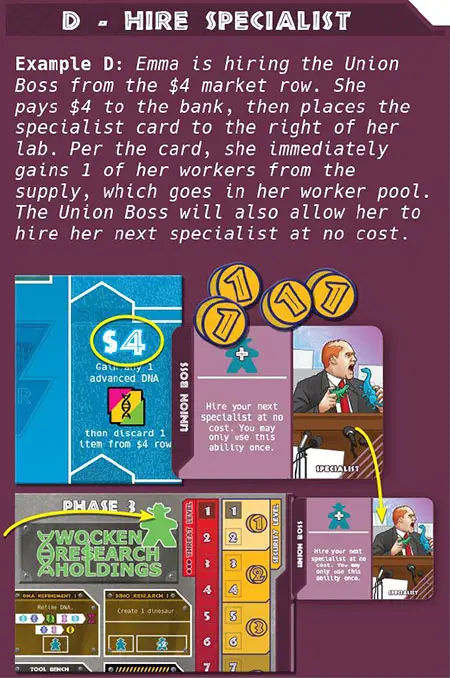
Hire Specialist
You can hire a specialist by paying the cost of the market row the specialist is tn. When you hire a specialist, immediately place the card to the right of your lab board and carry out any immediate effects, as listed on the card. This is the primary means of gaining more workers throughout the game.
Normally, you can have a maximum of three hired specialists. If hiring a new specialist would put you over this limit, you must immediately fire one of your specialists, discarding that card from the game and giving up any corresponding bonuses (including extra workers!).
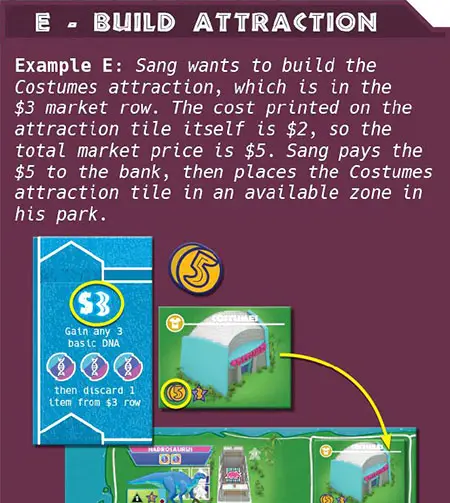
Build Attraction
You can build an attraction by paying the market price, which is the sum of the cost printed on the attraction tile itself and the cost of the market row that the attraction tile is in. When you build an attraction tile, immediately place it in an available zone in your park.
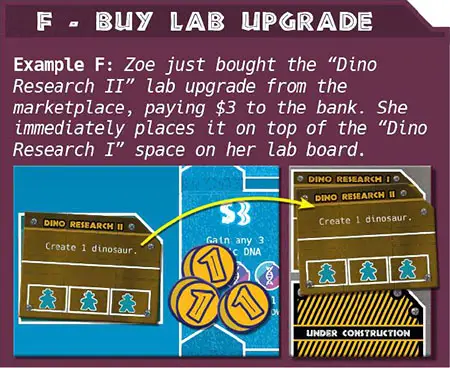
Buy Lab Upgrade
You can buy a lab upgrade by paying the cost of the market row the lab upgrade is in. When you buy a lab upgrade, immediately place it in one of the six spaces in your lab.
At the beginning, you will want to place new lab upgrades in the spaces labeled "under construction". If you have filled up those spaces, you will need to place your new lab upgrade on top of a previous lab upgrade (do not discard the previous lab upgrade, but it will no longer have any effect).
There are two special lab upgrade tiles, available in their own stacks in the marketplace: Dino Research II (cost: $3) and DNA Refinement II (cost: $5).
These tiles offer upgraded versions of the basic lab actions available to all players at the start of the game. If you buy one of these, you must place it on top of the corresponding space in your lab; it cannot go anywhere else.
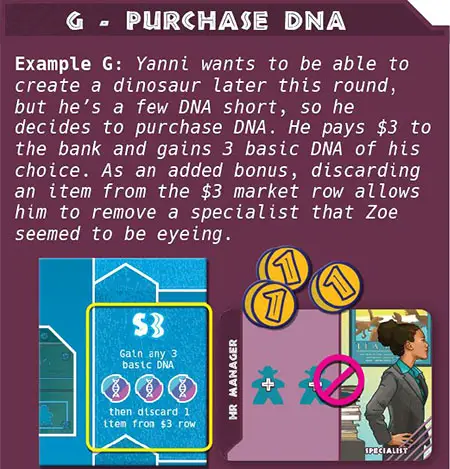
Purchase Dna
You can purchase DNA during this phase. To do so, pay $2- $5 to the bank, and then gain the corresponding number of DNA, as listed on the marketplace board. Once you have gained the DNA, discard any 1 item (not including special lab upgrade tiles) from the market row that corresponds to the amount of money you spent.
Pass
If you pass, either because you cannot take an action or do not want to take an action, you collect $2.
3. Worker Phase
In this phase, all players get to assign each of the workers from their worker pool in order to take lab actions.
Remember: Any scientist that you added to your worker pool during the Research Phase can now be used as a worker.
You are only concerned with your own park and lab during this phase and cannot affect your opponents, so this phase is performed by all players simultaneously. Each player resolves their lab actions in any order they wish.
Most lab upgrades, including those pre-printed on each lab board, have slots (i.e., workstations) for workers. Each slot can be activated only once per round, except those slots labeled "unlimited". Each slot requires a single worker, unless otherwise indicated.
Note: Some lab upgrade tiles have abilities denoted by a green background, which are passive abilities that activate once upon purchase and cannot be activated additional times by assigning workers.
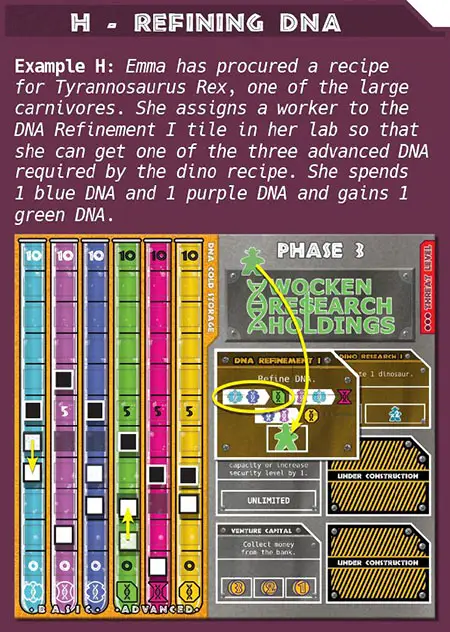
Refining Dna
Advanced DNA is much harder to come by than basic DNA. Fortunately, the DNA Refinement lab upgrade tiles allow you to mix down or "refine" basic DNA to make your own advanced DNA.
Each time you activate DNA Refinement, you can make exactly one of the listed conversions, spending the two required basic DNA and gaining the one resulting advanced DNA.
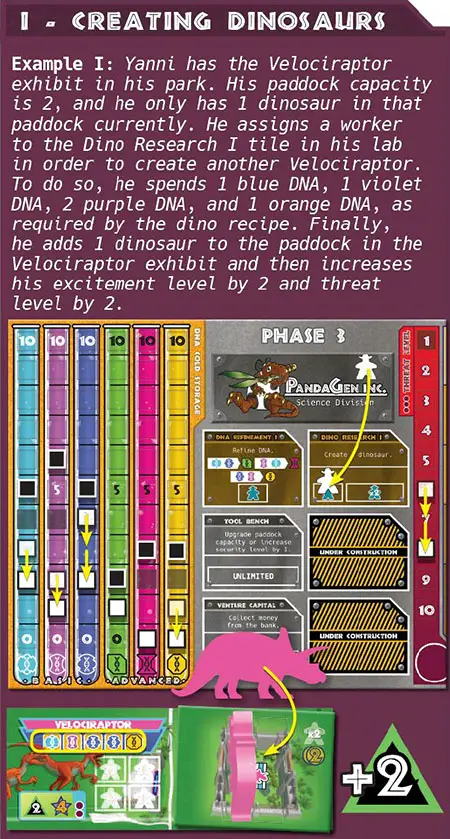
Creating Dinosaurs
Without dinosaurs, your dinosaur theme park won't be in business for very long! The Dino Research lab upgrade tiles allow you to create dinosaurs. To do this, you must spend, from your lab, the DNA required by a dino recipe that is in your park.
You must also make sure that the corresponding paddock has the capacity to support another dinosaur. If so, add one dinosaur from the supply to that paddock.
When you create a dinosaur, your excitement level increases by the number shown on the corresponding dino recipe tile. (Your excitement level can never exceed 20). However, your threat level also increases by the number of threat pips shown on the dino recipe tile. More dinos means more danger!

If your threat level reaches 11, take one of the "+1Q" modifier tokens and add it to your threat indicator to show this, then reset your marker to the top of the threat indicator.
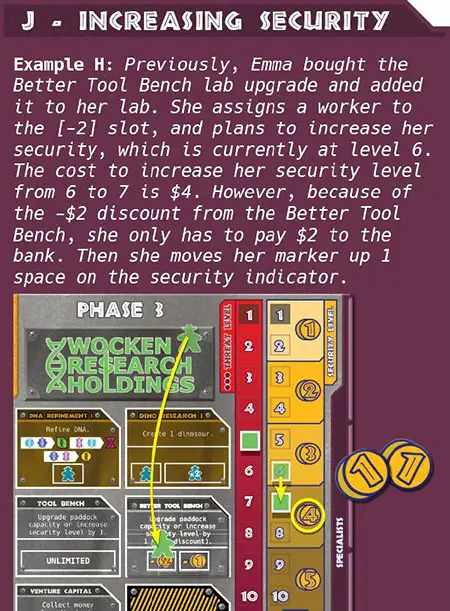
Increasing Security
Your park's security level is very important. If your security level is less than your threat level during the Park Phase, dinosaurs get loose and eat visitors in your park - that's not good!
Certain lab upgrade tiles allow you to increase your security level by one. To do this, you must pay the corresponding cost, listed in the cost chart along the right side of your lab.
If your security level reaches 11, take one of the "+10" modifier tokens and add it to your security indicator to show this, then reset your marker to the top of the security indicator.
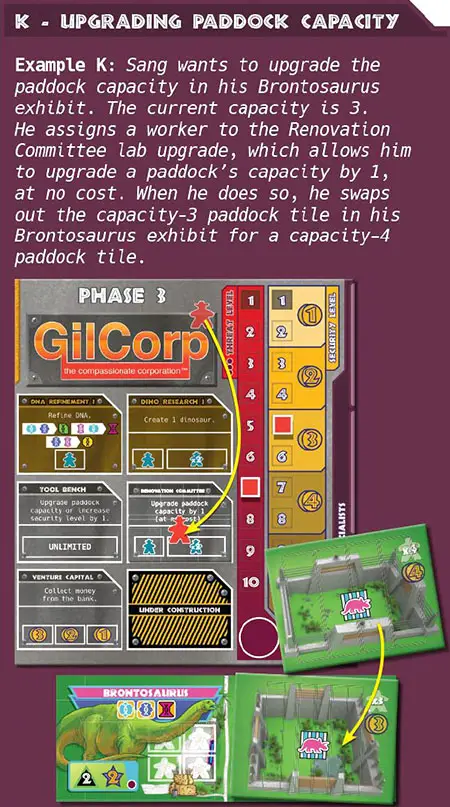
Upgrading Paddock Capacity
Each paddock in your park can only hold one dinosaur each, until you upgrade that paddock's capacity, via the actions of certain lab upgrade tiles.
When you upgrade paddock capacity, choose one dinosaur exhibit in your park and add a paddock tile for the next level up. To do this, you must pay the corresponding cost, which is equivalent to the new paddock capacity. The maximum paddock capacity is four.
4. Park Phase
In this phase, visitors will show up at each park, earning the player's money from admission fees. Then they will also line up to visit the various attractions and dinosaur exhibits, earning victory points - as long as they're not eaten by escaping dinosaurs!
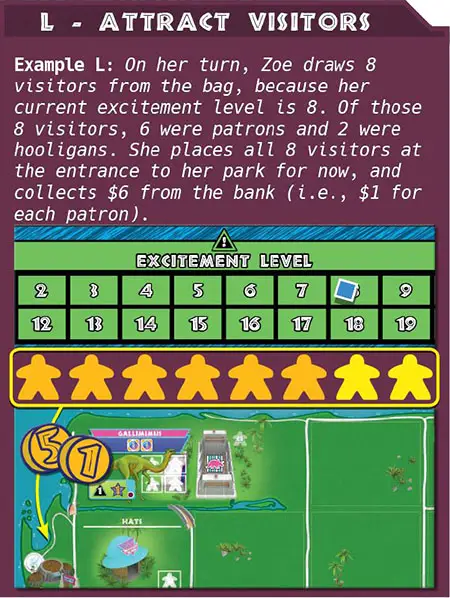
Attract Visitors
In turn order, each player draws a number of visitors from the bag equal to their excitement level. You might draw patrons (gold), who are the paying customers that keep your park in business.
But you might also draw hooligans (yellow), which is bad news: hooligans sneak into your park without paying! Once you've drawn your allotted visitors, place them all at your park entrance, and then collect $1 from the bank per patron.
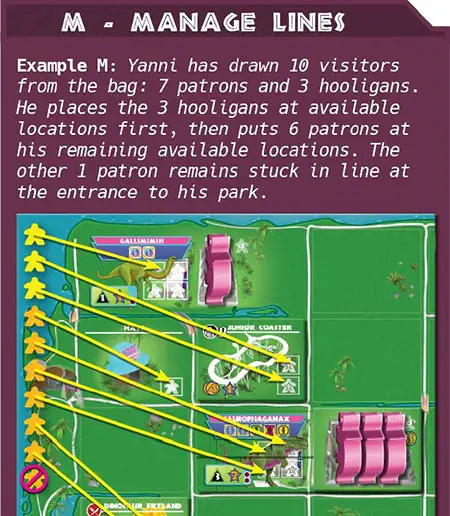
Manage Lines
As a park manager, one of your jobs is to make sure not to exceed visitor capacity in your park. Place all drawn visitors at available attractions and dinosaur exhibits in your park. Each dinosaur exhibit has space for visitors equal to the current number of dinosaurs in that exhibit.
Unfortunately, all hooligans that you drew must be placed first - they're pushy and elbow their way to the front! Any visitors that cannot visit attractions and dinosaur exhibits, due to not enough available locations, are stuck in line at the entrance.
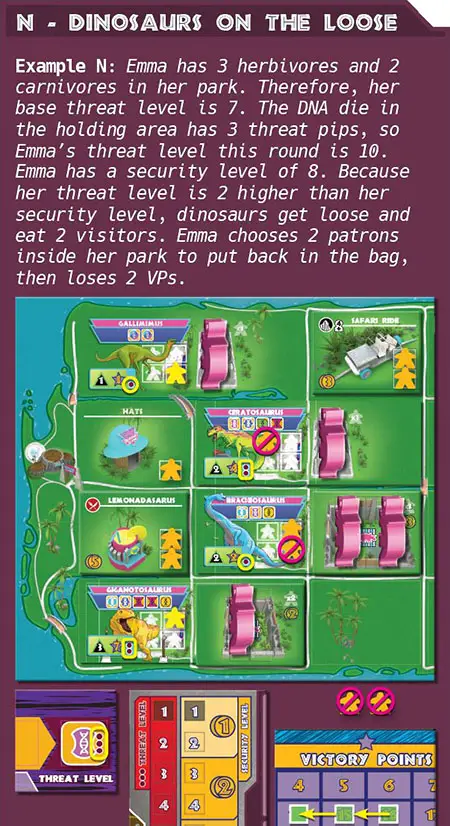
Dinosaurs on the Loose!
After all players have drawn their visitors and placed them, it's time to see if any dinosaurs get loose in your park and eat the visitors. All players can perform this step simultaneously.
To determine if any dinosaurs get loose in your park, check your base threat level, marked by the threat indicator in your lab. (Remember: each herbivore increases your threat level by 1, and each carnivore increases your threat level by 2).
Next, add to this number the threat pips from the DNA die that was set aside in the holding area during the Research Phase. This is your threat level for this round.
Finally, check your current security level, which is marked by the security indicator in your lab. (Be sure to take into account any security bonuses you may have. )
-
security level > threat level: Nothing happens - you're running a tight operation.
-
security level < threat level: Dinosaurs get loose and eat visitors at your park!
The number of visitors that are eaten is equal to the difference between your security level and threat level.
You choose which visitors inside your park are eaten, but all patrons must always be eaten before hooligans. (Those hooligans are sneaky, after all).
If the number of visitors to be eaten exceeds the total number of visitors inside your park, any visitors in line at the entrance are eaten next to make up the difference. Put all eaten visitors back in the bag, and subtract 1 VP from your score for each visitor eaten.
Score Victory Points
In turn order, players score 1 victory point (VP) for each surviving patron at an attraction or dinosaur exhibit. Do not score for hooligans inside your park, or for any visitors stuck in line at the entrance. For each patron at a food attraction, you choose whether to score the 1 VP or collect $2 instead.
During this phase, preparations are made for the following round by
- resetting turn order,
- refreshing the market,
- revealing new dino recipes,
- returning workers and scientists,
- removing visitors, and
- resolving plot twists.
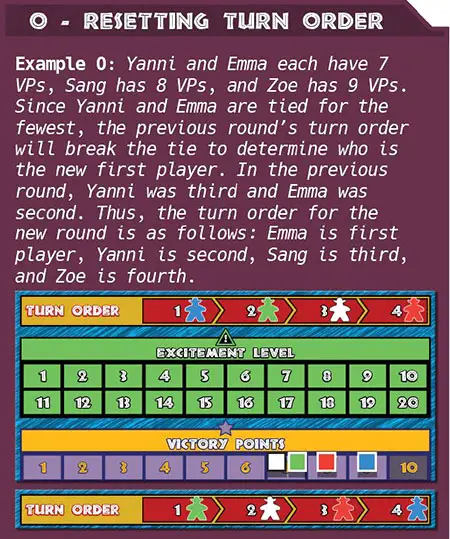
Reset Turn Order
Turn order is determined by current scores. The player who currently has the fewest VPs becomes the new first player, the player with the second-fewest becomes the second player, and so on. If two or more players have tied scores, their relative positions in turn order remain the same from the previous round.
Refresh the Market
Discard any items left in the $2 market row. Then, slide all remaining items in the market upward, so that the cheapest slots are filled. Next, fill any empty slots in the market from their corresponding stacks. If a given stack is empty, shuffle the corresponding discard pile to form a new stack.
Note: Do not rearrange the attractions in order of cost; that only occurs during the initial setup.
Reveal New Dino Recipes
Check each stack of dino recipe tiles on the research centerboard. Turn the top tile of each stack face-up. (If the top tile in a stack is already face-up, do nothing to that stack. )
Return Workers and Scientists
Each player takes back all of their workers and scientists that are in play, returning them to their starting locations: workers in the worker pool and scientists in the research pool.
Remove Visitors
All visitors (i.e., patrons and hooligans) who were at players' parks depart, and are put back in the cloth bag. This happens to visitors whether they made it to a park's attractions or were stuck in line at the entrance.
Resolve Plot Twists
The very last step of each round is to check the plot twists that are in play. If either has an ability that resolves "at the end of each round", do that now.
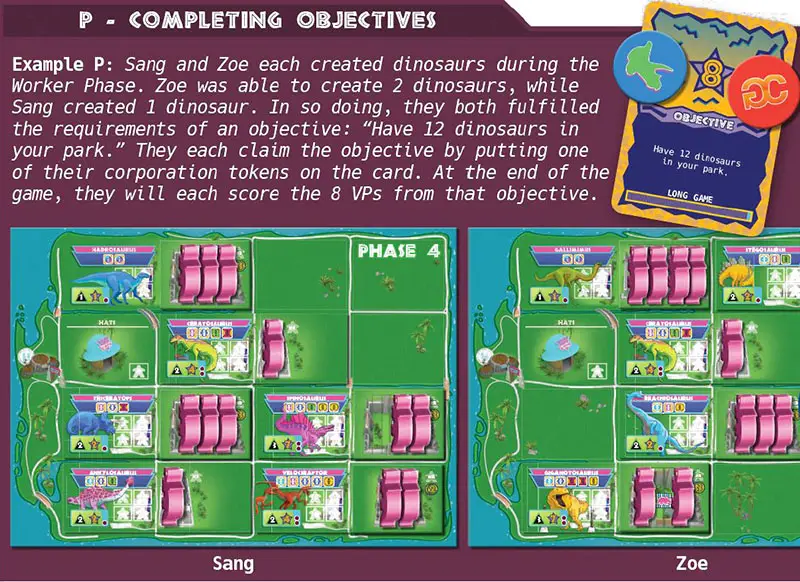
Completing Objectives
At any time, if a player fulfills the requirements of an objective card, they claim that card by putting one of their corporation tokens on the card. That objective cannot be claimed by any other players.
If multiple players fulfill the requirements of an objective card at the same time, they each claim the card by putting one of their corporation tokens on the card. That objective cannot be claimed by any other players.
Completing an objective is worth 6-8 VPs (scored at game end), and it also serves as a timer, pushing the game toward its conclusion.
End of the Game
The end of the game is triggered when there is only one objective card left unclaimed. Finish the current round, then proceed to final scoring.
Each player adds to their score the VPs for the attractions and dinosaur exhibits in their park. For each attraction, score the listed VPs. For each exhibit, multiply the listed VP value by the number of dinosaurs in that paddock; if there are no dinosaurs there, you lose 10 VPs for that exhibit instead!
Completed objectives are now scored at face value (6-8 VPs each).
Leftover money is scored at a ratio of $5 for 1 VP. In the case of a tie, the tied player with the most leftover money wins.
Variants
Predictable Systems Variant
Play without plot twist cards to ensure the viability of the most long- term strategies.
Chaos Threat Theory Variant
During the Park Phase, reroll the DNA die that was set aside in the holding area. The number of threat pips from this new roll result (instead of the original result) is added to each player's base threat level.
Continue Reading