Components
- The Basic Game Rulebook
- The Level Up! Rulebook
- The A to Zeds Book (Comprehensive Rules)
- The Farmingdale Dossier
- The Setup and Epilogue Book
- 1 double-sided game board
- 1 double-sided game mat
- 4 double-sided player aids
- 1 double-sided Zeds player aid
- 168 poker-sized cards
- 32 tarot-sized character cards
- 3 Countersheets
- 6 dice
Setup
Select either The Basic Game or one of the more challenging levels. They are listed in order of difficulty and complexity, and new players should tackle them in the order listed.
- The Basic Game
- Level I: Outbreak!
- Level II: Apocalypse!
- Level III: Brains!
- Level IV: Walking Zeds!
- Level V: Director's Cut!
- Versus Game
Each of the levels (and the competitive Versus game) is color coded to help you find components and information quickly. The Basic Game uses virtually the same components and many of the same rules as the Outbreak! level and thus has the same color scheme.
The Basic Game has self-contained rules. Later levels assume you have learned The Basic Game rules in addition to the rules from previous levels. They also provide new, additional rules and components. For example, ifyou play Level III: Brains!, you will also be using the components and rules from Th e Basic Game, Outbreak!, and Apocalypse! levels.
Once you have selected a level:
- Head to Th e Setup and Epilogue Book to set up the game and hurry back!
- Find the starting page for the level you picked to begin your nightmare (er, adventure).
- If you need more information while you play, consult: Your Player Aid, the Farmingdale Dossier for more information on units and markers, The A to Zeds Book for detailed rules.
- For Variants on any Level: Consult the Optional Rules chapter in Th e A to Zeds Book before beginning play (see Rule 13).
The Basic Game
Please refer to The Setup and Epilogue Book which contains all setup instructions for The Basic Game. This game uses the core systems (movement, combat, and foraging) as well as co-op game elements so you can have fun playing with your friends.
The first thing to do is relax! Ignore any Event instructions that do not make sense yet.
Ignore card instructions for:
- Infaction
- Supplies
- Healing
Dawn of the Zeds, 3rd edition is a heavily thematic game; it is not necessary to know every rule perfectly to play and have fun. So don't worry if something does not immediately make sense, or if you make mistakes while you play. Chances are the game will work just fine.
Important: Rules Conflicts: The rules text on cards and special level instructions supersede all other game rules when there is a conflict.
Game Play
Dawn of the Zeds is played in turns, until you either win or lose the game:
- Begin each Game Turn by turning over the top Event card of the Event deck; this is the Current Event card.
- Follow the Sequence of Play on the Current Event card and any Event instructions.
- When all of the card's Phases are completed, discard the card and then reset markers (this is the Housekeeping Phase).
- Draw the next Event card to begin the next turn.
1. Sequence of Play
Most Event cards have Phases which are conducted in order (from left to right on the Current Event card). For Th e
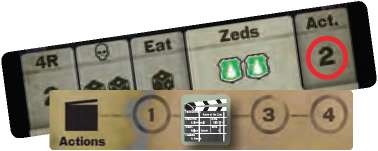
Basic Game, skip the first 3 tabs on the Event card (4R, Infection ( ), and Eat) and begin with:
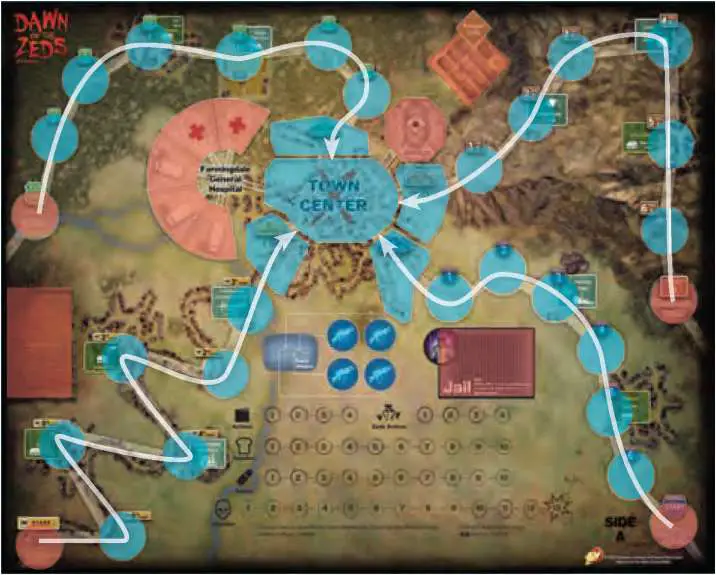
Step 1. Zeds Phase: This is the Phase where Zeds move towards Town Center.
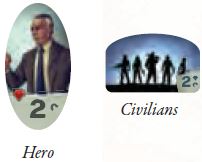
Step 2. Action Phase: This is the Phase where you, the Hero players, represented by the Heroes and Civilians, spend Actions to protect Farmingdale.
Step 3. Housekeeping Phase (see Rule 7): Discard the Current Event card and flip any spent Action markers in preparation for the next turn.
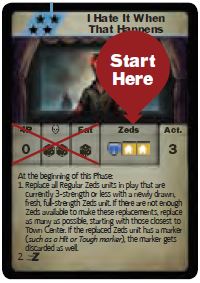
For The Basic Game, the first three tabs on the Event cards are not used.
The Event text on this card will occur during the Action Phase (as shown by the lighter-colored tab).
Events and Common Instructions
All cards have text that describes an Event. That Event happens during the Phase shown by the lighter-colored tab.
Complete the Event during the indicated Phase at the specified time. If an Event cannot be completed during its Phase for any reason that Event is skipped.
The Event text on this card will occur during the Action Phase (as shown by the lighter-colored tab).
Breaking Ties: If you have tied tracks or units, or if no track has an appropriate condition, you decide which of the tied tracks or units is affected by the Event.
Brains!: Regular Phases do not occur during this turn. Complete this card's brutal instructions and then proceed to the next Event card.
2. Fate Draw and Fated Events
Fated Events occur in all levels of Dawn of the Zeds. When an Event directs you to make a Fate draw:
-
Draw a Fate card.
-
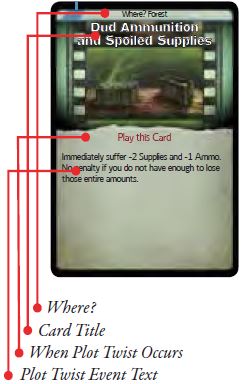
Where? Examine the top of the Fate card to determine the Fated track. That is the track where the Event will occur (e.g., Highway or Forest). Some tracks are described:
Most / Fewest Zeds Units: Compare the total number of Zeds units on each track. When there is a tie, it is your choice.
Player's Choice: Choose any track in play.
-
Complete the Fated Event on the Fated track.
-
The Plot Twist: After completing the Fated Event, examine the Fate card's text. This is the Plot Twist:
-
Play this Card: This is usually bad; you must perform this Plot Twist event immediately. After completing the Plot Twist, discard this Fate card.
-
Hold for Later: This is usually good; the card's instructions state when and how it may be played on this or any future turn. Unless otherwise instructed, the Fate card is discarded after its use.
Above-Ground Tracks: Some Events or Actions can only take place on above-ground tracks. When you are playing with the "A" side of the map, all the tracks are above ground.
-
-
Resume Play: Go back to where you left off when you had to make a Fate draw.
3. Zeds Pressure Events ( 
 )
)
Skip these if you are playing a solo game or a versus game with only 1 Hero Player.
If you are playing a co-op game or a versus game with more than 1 Hero Player (representing the Heroes and Civilians) :
In a solitaire game, ignore these multiplayer rules.
All Zeds Pressure Events ( @zz.jog and ) depend on the number of Hero players. A solo player gets no Zeds Pressure Events, but when there are more Hero players:
Th e number of events = total number of Hero players minus 1.
- For 4 Hero players: there are 3 Zeds Pressure Events
- For 3 Hero players: there are 2 Zeds Pressure Events
- For 2 Hero players: there is 1 Zeds Pressure Event
Zeds Movement Pressure ( )
stands for Zeds Movement Pressure. This is an extra movement for the strongest Zeds; the more players in the game, the faster the Zeds will approach Town Center.
The strongest Zeds units or Zeds Mobs are the ones activated to move.
Quick Version:
When players cannot agree on a course of action, they should roll a die (or flip a coin) to resolve these issues.
When the Event card says :
-
Determine how many Zeds units or Zeds Mobs will move: Total number of
= Number of Hero players minus 1. -
Follow these
instructions:-
The strongest Zeds unit or Zeds Mobs (when there are multiple Zeds on a space) will move, so, determine the total Strength of Zeds on each space by adding up the Strength for each Zeds unit on that space.
-
Move the Zeds unit or Zeds Mob with the highest Strength one space closer to Town Center. If it cannot move, pick the strongest Zeds unit or Zeds Mob that can move. If this is tied, move the one that is already closest to Town Center. If this is tied, it is your choice which of the tied spaces to activate.
-
Resolve any combat.
-
If you have more than 2 Hero players, move the next strongest Zeds Mob or unit that can move, and then repeat one more time if you are playing with 4 Hero players.
-
Zeds Placement Pressure ()
Quick Version:
stands for Zeds Placement Pressure. This places more Zeds units on the map. The more players in the game, the more Zeds will appear. The tracks with the fewest Zeds will get new Zeds.
When the Event card says :
-
Determine how many Zeds units to add: Total number of
= Number of Hero players minus 1 -
Follow these instructions:
For each Hero player other than you, draw 1 Zeds unit, one at a time, and place it on the Start space of the track where there are the fewest Zeds units). If this space already has 2 Zeds units, place the new Zeds on any other Start space with room.
If you are adding multiple Zeds units, the number of Zeds on the tracks changes with each new unit added (see example). In the event of a tie, you may choose on which track the new Zeds unit goes.
4. Zeds Phase Part 1
During the Zeds Phase, Zeds units on the indicated tracks move closer to Town Center. If a space they enter is occupied by your units, or in later levels other non-Zeds units, this triggers an immediate Hand-to-Hand combat.
 Zeds will move on the Mountain and Highway tracks. |
Zeds Phase Procedure
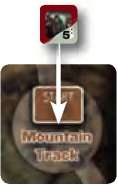
Track symbols in the Zeds section on the Current Event card show where Zeds will move or appear. Starting with the symbol furthest left and ending with the symbol furthest right, activate the indicated tracks.
-
Examine the Zeds section of the Current Event card and activate each track in the order listed on the card by placing or moving Zeds units on that track:
-
If there are no Zeds units on that track, place a new Zeds unit on its Start space.
-
Otherwise move each Zeds unit on that track. If there is more than 1 Zeds unit on a space, they all move forward together. More than 1 Zeds unit on a space is a Zeds Mob.
- Move the Zeds units 1 space forward towards Town Center in order from closest to Town Center to farthest away.
- If the Zeds units encounter any Hero or Civilians units, resolve Hand-to-Hand combat before moving the next closest Zeds, if any (see Rule 6).
- Spaces can only hold 2 Zeds units: If the space the Zeds are trying to enter already has a Zeds unit, only move forward as many new Zeds as will fit. The strongest Zeds will move forward, leaving weaker ones behind. (see Rule 4.6)
-
-
Examine the Zeds section of the Current Event card and activate the next track. If a Track Icon appears twice (
 ), then this track gets activated a second time during the turn. This is a Double Activation.
 -
Repeat until all the tracks listed on the Zeds section of the Current Event card have been activated.
All Tracks and Brains! cards: You determine the track order for Zeds unit activations, continuing until you have activated each track.
Fated x2 Track card: In this case, a Fate draw determines which track is being activated. The x2 means that the Fated track is activated twice (Double Activation).
Fighting
If any Zeds unit enters a space with any non-Zeds unit, Hand-to-Hand combat immediately takes place.
Village Spaces
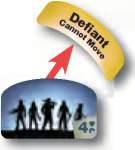
The first time a Village space is attacked by Zeds, remove the Defiant marker from that space. The Civilians unit which set up in that space is released and is now free to move during the Action Phase.

Village spaces have darker green signs with yellow borders and a house symbol.
Zeds Hello and Goodbye Movement Events
There are certain units and markers that have an immediate effect only when Zeds enter or leave a space. Keep these in mind while you are playing. In The Basic Game there are only two of these:
If a Zeds unit enters a space with Mr. Johnson, you may attempt to use his Traps ability (see his card).
A No Entry marker, which means exactly what it says; no unit can enter that space.
Town Center
If any Zeds unit enters Town Center, no final combat takes place - the Zeds win instantly!

If the Zeds shuffle their way to the Town Center space, you might as well smother yourself in Brown Sauce, Rookie, because it's all over.
You lost, but don't worry; you won't live long enough to get all weepy about it. The Zeds are relentless, and you'll have to be even more so to save Farmingdale - so pay attention!
Zeds Stacking Limit
This is how many Zeds units can be in one space. Stacking Limit on every Track and Start Space: 2 Zeds units maximum
Zeds Mobs: When there are at least 2 Zeds units on a space, they automatically form a Zeds Mob. A Zeds Mob uses its combined Strength for Zeds Movement Pressure and in Hand-to-Hand combat.
We're Full (Stacking Limit): Sometimes there is no room for more Zeds on a space or entry is prohibited for some other reason, such as when the No Entry marker is on that space. Regardless of the cause:
When Zeds move forward, they can only move as many units as the stacking limit allows. The weaker unit is always left behind. If they cannot enter a space, they remain where they are.
When Zeds are placed on a space that does not have room, they move back towards their Start space until they find a space with room.
When Zeds retreat, they must always move back towards their Start space until they find the first space with room for another Zeds unit. When the stacking limit does not allow for all the units to retreat into the same space, the strongest unit remains closer to Town Center, with the weaker unit continuing to retreat until it finds a space with room.
Start spaces: If there is no room to place a new Zeds unit or to retreat a Zeds unit into a Start space, place it on any available Start space. If all Start spaces are full, return that Zeds unit to the Zeds Cup.
= Zeds Movement Direction
=Track Spaces
= Not Track Spaces
Tracks: Each track has a name (eg., the "Foresttrack") and a corresponding Track icon (, _ •) that matches the track's symbols on the game board. Zeds move along these tracks going from the Start space towards Town Center.
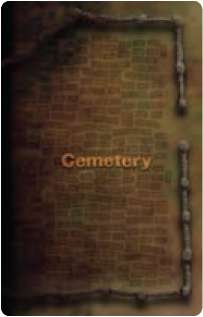
Track spaces include all the spaces along a Track as it runs from the Start space to Town Center, except for the Start space itself. Other spaces, such as Hospital spaces, Laboratory, Refugee Camp, and Cemetery are not considered Track spaces.
5. The Action Phase Part 1
The last Phase on an Event card, the Action Phase, is your chance to ensure the survival of Farmingdale. You spend Actions on your units so they may help defend Farmingdale by moving somewhere vital, attacking Zeds units, looking for more Ammo, etc...
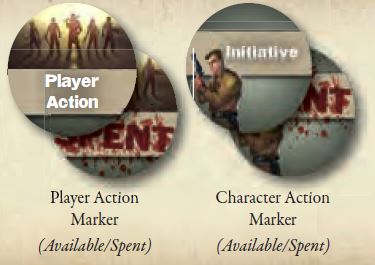
You get Actions from the Current Event card, from your Player Action markers (1 per Hero player), and from Character Action markers that come with some of the Heroes or other units in play.
Use the Event Actions marker on the Event Actions track to count down your Event Actions as you spend them.
This marker is a movie slate to evoke the phrase, "Annnnnnd . Action!"
Action Phase Procedure
-
Determine how many Event Actions: The Action Phase on the Current Event card shows the number of Event Actions you get this turn.
-
Conduct Actions in any order:
-
Spend Character Action markers (flip to show the Spent side) to conduct a unit's Character Action as described on that unit's card.
-
Spend Player Action markers and Event Actions to make any Player unit (any unit you control) do a normal Action. For example, you can spend your Player Action or 1 Event Action to move a Player unit or to have a Player unit Forage in a named space.
Player Action markers and Event Actions can also be spent so that a Hero or Heroic Civilians unit can use a special ability, where their card specifies that the ability can be conducted "as an Action".
- Spend Player Action markers by flipping them to their Spent side.
- Spend Event Actions by moving the Event Actions marker down the Event Actions track 1 space for each Action.
- Player Actions and Event Actions work exactly the same way and can be used interchangeably, but in a multiplayer game each player chooses how to spend their own Player Action, while Event Actions are decided on as a group.
- When you take an Action: Pay any additional requirements (in Ammo, Supplies, etc). first.
- Multiple Actions: A unit can conduct multiple Actions each turn, including the same Action multiple times in a single turn, as long as the Action (and any other) costs are paid.
-
-
When you have no more Actions available or do not wish to spend any more Actions, proceed to the Housekeeping Phase (see Rule 7). Unspent Actions do not carry over to the next turn and are lost.
When the rules say, "Spend 1 Action", this means that you must spend 1 Player Action marker or 1 Event Action before you can perform that Action.
Important: Who Am I?
When you spend an Event Action or your personal Player Action, you can activate any unit, not just your own.
This is how unassigned Hero and Civilians units get things done, or how your own unit can perform multiple Actions in a single turn.
For example, it is not unusual for a unit in a good Foraging location (e.g., the Mine space) to receive lots of Actions of all types from every player in an effort to scrounge up plenty of Ammo that turn.
Co-op Action Decisions: You do not need to spend your Player Action on your personal Hero unit. You canspend Actions on any Player unit.
Normal Actions
May be performed by any Player unit by spending a Player Action or an Event Action:
Move (may trigger Hand-to-Hand combat if unit enters a space with Zeds units)
Forage (for Ammo and Supplies)
Gunfire attack
In the abilities section of Character cards, some abilities have darkened triangles to the sides to show that they have a Character Action marker associated with the ability.
(The backs of the Character cards also show you which counters to pick up for the Character).
Move
Spending 1 Action allows 1 Player unit to move. Units get a certain number of Movement Points, as indicated on their cards and can move that many spaces on the map per Move Action. The spaces must be connected.
Now, don't get too friendly with your chosen Hero; you're in command of all the forces staring down the green-skins!
Even if it's Taps for your personal Hero, you keep going with everyone that's left.
How to Pick a Fight with Zeds: A Move Action can be used to move a Player unit into a space with Zeds, to fight them. Moving a Player unit into a space with Zeds immediately ends that Player unit's movement and begins a Hand-to-Hand combat.
As a general rule:
Heroes can move 4 spaces.
Unit Movement Value
Heroic Civilians can move 3 spaces.
Regular Civilians units can move 2 spaces.
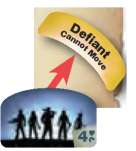
Defiant Civilians cannot move until released.
Movement Restrictions:
-
Start Spaces: Cannot be entered by Player units as part of a Move Action.
-
Player Unit Stacking Limit:
At the conclusion of each Move Action, up to 2 Player units can be in each space. The only exception is: Town Center can hold an unlimited number of Player units.
Your units can move through each other, but at the end of each Move Action, this stacking limit applies.
A Player unit entering a full space (at its stacking limit) as a result of a retreat or other effect (eg., Mr. Johnson's Traps ability) must continue to move back or retreat until it reaches a space with room for it.
-
Stacked Player Units:
Player units that are in the same space are stacked with each other. Stacked Player units move and take Actions independently. They cannot combine attacks, defenses, or any movement or Action.
When defending a space with 2 Player units, you must select the defending unit before making any combat die roll. Apply only the selected unit's combat bonuses and / or Terrain shifts for that combat. The selected unit must receive all Hits applied to its side. If the selected defending unit loses and must retreat, both Player units stacked there must retreat.
Forage
Player units can perform Forage Actions to try to increase your reserves of Ammo and  Supplies.
Any Hero or Civilians unit located in a named space can perform a Forage Action. This includes immobile Civilians units with a Defiant marker. Named spaces include all spaces on tracks that have names (such as Village spaces, Town and Town Center spaces, Farmingdale University, etc)..
They do not include the Start spaces or any space identified only by number, nor do they include the Cemetery, Laboratory, Hospital spaces, or Refugee Camp.
Procedure:
- Pick which unit is Foraging and spend 1 Action.
- Roll a
 and consult the Forage table on the Player Aid for the result.
 - Adjust the Ammo marker accordingly if you are successful.
- Ignore Supplies (
 ) results.
Scavengers: These are Hero units that can really forage, scavenge, and scrounge; for them a Forage Action is a two-dice ability.
Tracking Supplies and Ammo:
Move the Supplies and Ammo markers along their respective tracks to keep track of these resources.
Each of these markers has a +10 side; when you acquire more than 10 of either of these resources (lucky you!), flip its marker over to the +10 side, place it on the 1 space, and keep counting upward. When it drops below 11, flip it to its other side, place it on the 10 space, and count downward from there.
You cannot have more than 20 of either of these resources (any excess is lost).
Two-dice Abilities
All two-dice abilities (indicated by ) on a Hero card allow you to roll two dice when performing that Action.
You can choose the result of either die, but if you roll a natural double (before any die roll modifiers), you receive that outcome twice!
Conduct a Gunfire Attack
Player units (including immobile Civilians units with a Defiant marker) can make a Gunfire attack against a Zeds unit in any adjacent space on their track. Gunfire attacks require Ammo.
Requirements: Pick the Player unit that will make the Gunfire attack and then spend 1 Action and 1 Ammo. Follow the Combat procedure.
When you have no Ammo, you cannot initiate a Gunfire attack. Time to Forage for more ammunition!
Restriction: You cannot make Gunfire attacks into or out of Start spaces.
Long-Range Gunfire Attacks: A few units can make Long-Range Gunfire attacks from two (or more) spaces away, as indicated on their cards.
Long-Range Restrictions: You cannot conduct Long-Range Gunfire attacks through the Town Center space (eg., you cannot shoot from Downtown to Suburbia); however, you can shoot over any other space (even over the heads of other units).
6. Fighting
Start spaces: Hand-to-Hand combat never takes place on Start spaces nor can Gunfire attacks be made into or from Start spaces.
Who wins a combat is extremely important for Brains! events, where the Zeds units, if they win, continue to move towards Town Center.
Hand-to-Hand combat immediately occurs when your Player units are in the same space as Zeds units for any reason.
Gunfire attacks take place at range between spaces during your Action Phase as an Action
Winning and Losing in Hand-to-Hand Combat: The simple rule is, Retreat = Defeat.
There is Always a Winning Side and a Losing Side: The winning side stays in the space where the fight took place; the losing side always retreats.
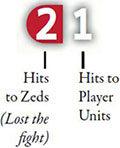
How to Tell Who Won or Lost: The Combat Table highlights the side that loses and that, therefore, must retreat. The other side wins and stays in the space where it fought.
Dying and Winning: The losing side has to retreat, even if the winner died.
The Combat Procedure
Both types of combat, Hand-to-Hand and Gunfire, follow the same basic procedure, using the tables on the Player Aid to determine the result:
-
Pay Any Costs: Gunfire attack: Spend 1 Action and consume 1 Ammo (see Rule 5.4).
-
Find the Correct Combat Table and Determine the Initial Column:
-
Find the correct Combat Table for either a Hand-to-Hand combat or Gunfire attack on your Player Aid.
-

Determine the correct Initial Column for conducting that attack.
-
Determine Strengths of Attacking and Defending Units:
- A unit's Strength is the large number in the lower right corner of the unit.
- A unit's Strength is unaffected by Hit markers. &
- A Zeds Mob's Strength is the sum of the Strengths of all Zeds units in that space.
- Player units never combine their Strengths. If there is more than one Civilians and / or Hero unit on a space, determine which unit is fighting. Only that unit's Strength is used.
-
For Gunfire Attacks: The Initial Column = the firing unit's Strength. Find this column on the Gunfire Attack Table on your Player Aid and proceed to step 3. (Continued on page 14)
-
For Hand-to-Hand Combat:
Compare the Zeds units' Strength to the fighting Player unit's Strength.
Use how strong the Zeds are compared to the Player unit to determine the appropriate Initial Column on the Hand-to -Hand Combat Table on your Player Aid.
-
-
-
Apply Column Shifts and Determine the Final Column:
Certain abilities and / or conditions shift the Initial Column (from the above step) a number of columns to the left (
 #), which is bad for you, or right (#
 ), which is good for you. After applying the net shift, use that Final Column to determine the Combat Result. For example, a combat with these shifts: 1, 1, and 1 , would have a net shift of 1 applied; the Final Column would be the one to the left of the Initial Column.
Many of these shifts (
, ) are indicated on Hero, Event, and Fate cards, while others are shown on various markers. 'Hie effects of combat shifts are cumulative.Terrain shifts (
 ) are a special kind of shift that apply only when your unit is defending in Hand-to-Hand combat, and you receive only the single best Terrain shift. Zeds never get Terrain shifts.
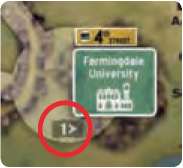
Named spaces automatically give defending Player units a Terrain shift:
 a Player unit is defending in a named space (e.g, a Village space, the Campground, etc). outside of Town.
 if a Player unit is defending in a Town space (e.g., the #0 spaces such as Downtown or Suburbia). As a rule, you do not defend at Town Center; if the Zeds enter that space, you instantly lose.
Be sure to apply the net shift of all the markers and abilities plus the single best Terrain shift (when defending) to each combat.
Player units are only considered to be defending when Zeds enter their space, regardless of how.
-
Determine the Combat Result: Roll two dice (
):How Things Roll in Dawn of the Zeds: Higher die rolls are always better for the Hero's side than low rolls. High is good! Low is bad...
-
Find the sum on the left side of the Combat Table.
-
Cross-index this sum with the Final Column to determine the Combat Result.
- Gunfire Attacks: 'Hie numbers indicate how many Hits are applied to the target unit.
- For Hand-to-Hand Combat: The number to the Zeds units and the number to the right is the Hits ap highlighted side indicates who lost.
-
-
Apply the Hits: First to the Zeds, and then to your unit.
-
Apply Retreats
Initial Column
Zeds x3: When the Zeds units' Strength is at least three times greater than the Player unit's Strength.
Zeds x2: When the Zeds units' Strength is at least two times greater, but less than three times greater, than the Player unit's Strength.
Zeds Advantage: When the Zeds units' Strength is greater than, but less than two times greater than, the Player unit's Strength.
Equal To: The Zeds units' Strength and the Player unit's Strength are the same.
Human Advantage: When the Player unit's Strength is greater than, but less than two times greater than, the Zeds units' Strength.
Human x2: When the Player unit's Strength is at least two times, but less than three times, greater than the Zeds units' Strength.
Human x3: When the Player unit's Strength is at least three times greater than the Zeds units' Strength.
Applying Hits
Hits represent the amount of damage a unit can sustain. After obtaining the Combat Result, apply the indicated number of Hits (sustained damage) to the affected Zeds first. 'Then apply any Hits to the Player unit.
How to Apply Hits:
-
Determine who is taking damage:
If only one unit is involved for the Zeds or the Hero side, the unit fighting is the unit that takes the damage.
You may apply Hits to Zeds Mobs in any way you desire, placing all the Hits on one unit or splitting them between all the units.
When more than one Player unit is on the space, apply Hits only to the unit involved in the fight.
-
Apply Hits: Regardless of how damage occurs, it is applied in the same way.
Each unit has icons on each side that indicate how damage is shown on that unit; apply the indicated markers or actions to apply Hits to a unit:
Each
 represents 1 Hit; place 1-Hit markers
  or 2-Hit markers
  on the unit when they are damaged.
A
 represents the last Hit on the full-strength side, which is enough to flip the unit over to its reduced- strength side.
An
 represents the last Hit on the unit's reduced-strength side, which is enough to eliminate the unit.
The number of symbols on each side of the unit indicates how many Hits of damage it can take before it is either reduced in Strength or eliminated.
When units take their last Hit:
- Hero and Civilians units get a Saving Roll (see Rule 6.3).
- Zeds units are returned to the Zeds Cup.
Saving Rolls
Procedure for The Basic Game Only: When a Player unit suffers its last Hit, roll one die ():
- If the result is 1, 2, or 3, immediately place it in the Cemetery.
- If the result is a 4, 5, or 6, immediately place it in Town Center: on its reduced-strength side if it is any Civilians unit; on its full-strength side if it is a Hero unit.
The Cemetery: Player units in the Cemetery are considered eliminated and removed from play.
Death does not release you
If your personal Hero unit is in the Cemetery, take control of an unassigned Hero or Heroic Civilians unit if (or as soon as) one is available; simply move its card in front of you to symbolize that.
Applying Retreats
When units retreat, they never remain in their current space, no matter what obstacles are in their way:
-
In Hand-to-Hand combat: the side whose Combat Result is highlighted lost that battle and any of its remaining units must retreat one space. Even if the winning unit or units were eliminated, the losing units must retreat.
If there is more than one Player unit on the space and either Player unit lost, both units must retreat even though only one of them actually fought the Zeds.
-
Retreat from Gunfire Attacks: Units do not retreat from Gunfire attacks.
-
Retreat and More Fighting: Depending on what is causing a retreat, it is possible that a unit will be forced to retreat into a space with an enemy unit, beginning a new Hand-to-Hand combat. The retreating unit is the attacker in this case.
-
Retreat Direction:
- Zeds units always retreat towards the Start space of their track.
- Hero and Civilians units retreat toward Town Center when defending.
- Hero and Civilians units retreat back to the space they attacked from when attacking.
-
Retreat when There is no Space:
- Zeds units fill in available spaces as they retreat, leaving the strongest units closer to Town Center (see Rule 4.6).
- Player units fill in available spaces as well, but it is the Hero players' choice which units fill these spaces (see Rule 5.2).
-
Withdrawing and Backing Up:
Occasionally Player units will withdraw or back up (move back 1 space) because of an ability (such as Mr. Johnson's Traps) or other circumstance. Withdrawing from a space and backing up work the same as a retreat but are not considered losing (this is important for Brains! events).
7. Housekeeping Phase Part 1
Th e Housekeeping Phase is when you tidy up things at the end of one turn to prepare for the next. First, discard the current Event card. Then, reset the Actions.
At the end of the Housekeeping Phase, that turn is over and you begin a new turn by revealing the next Event card.
Actions Reset
Place the Event Actions marker on the 0 space of its track (if it is not already there) and flip any spent Action markers to their Ability side.
Continue play until you win (on the last card) or you lose (when the Zeds enter Town Center).
If you win, consult the Scoring and Epilogues sections of Th e Setup and Epilogue Book to see how you did.
End of the Game
Continue playing until:
You win the game when the last Event card says you have won.
Or you lose immediately when any Zeds unit enters Town Center.
How Will the World Remember You? To determine how well you did, check the Scoring and Epilogues sections at the back of The Setup and Epilogue Book.
Continue Reading


