Ranged Combat (fire)
Only units armed with missile weapons may engage in this type of combat. Heavy war machine units are missile capable. Most green circle symbol units (whether or not they have a white border) have missile weapons. Only Light barbarian Chariots do not. Other types of units may be designated as capable of ranged fire in Scenario Special Rules.
A unit with missile weapons battling an enemy unit more than 1 hex away is said to conduct Ranged Combat (fire) at that enemy unit (the "target unit"). In Ranged Combat, the target unit must be within both range and line of sight of the firing unit.
- Ranged Combat may not be used against an adjacent enemy unit.
- A unit adjacent to an enemy unit may not fire on another, more distant, enemy unit. If it chooses to battle in this case, the unit must Close Combat an adjacent enemy unit.
- A target unit may not Battle Back after a Ranged Combat attack (see Battle Back).
- A target unit may not Evade a Ranged Combat attack.
Ranged Combat (fire) Procedure
- Announce firing unit
- Check Range
- Check Line of Sight
- Determine terrain battle dice reduction
- Resolve Battle
- Score Hits
- Apply Retreats
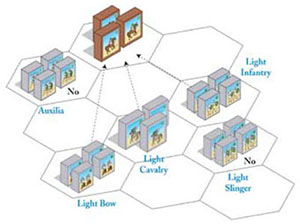
Example Of Ranged Combat:
All Roman units are ordered. The light bow unit fires at a range of three hexes, while the light cavalry and light infantry units have a range of two.
The light slinger unit may not fire because its LOS is blocked by friendly units.
Assuming none of the units have moved, they would each get two dice to use in Ranged Combat. If any of these units had moved they would roll one die in Ranged Combat.
The auxilia unit may not fire, because it is adjacent to an enemy unit. It could close combat the enemy cavalry unit before or after any of the other unit's ranged fire. Or, if the enemy cavalry unit is destroyed or retreated by the other units' ranged fire, and the auxilia unit has not attacked in close combat, it could then possibly use ranged fire.
1. Announce Firing Unit
Announce the ordered unit you want to fire with and its target unit.
Note: Each Ranged Combat attack is declared and resolved one ordered unit at a time, in the sequence of your choice. You must announce and resolve one unit's Ranged Combat entirely before beginning the next unit's battle.
Regardless of the number enemy units in range, each Ranged Combat is conducted by one eligible, ordered unit against one enemy unit in line of sight and in range. Multiple Ranged Combats against one enemy unit must be made and resolved one at a time.
2. Check Range
Verify that your target is within range. The range is the distance between the firing unit and the target unit, measured in hexes. When counting the range in hexes, include the target unit's hex but not the firing unit's hex.
| Ranged weapon unit | Range |
|---|---|
| Light infantry, light cavalry, auxilia | 2 hexes |
| Light bow infantry and light slinger infantry | 3 hexes |
| Light bow cavalry | 3 hexes |
| Heavy war machine | 6 hexes |
3. Check Line Of Sight
Verify that your target is within line of sight. A unit must be able to "see" the enemy unit it wants to fire at. This is known as having "line of sight".
Imagine a line drawn from the center of the hex containing the firing unit to the center of the hex containing the target unit. This line of sight is blocked only if a hex (or part of a hex) between the battling unit and the target hex contains an obstruction.
Obstructions include a unit or leader (regardless if friend or foe), some terrain features and the edge of the battlefield. The terrain in the target unit's hex does not block line of sight.
If the imaginary line runs along the edge of one or more hexes that contain obstructions, line of sight is not blocked unless the obstructions are on both sides of the line.
4. Determine Terrain Battle Dice Reduction (if Any):
Reduce the number of battle dice rolled accordingly. Terrain battle dice reductions are described in the section on Terrain.
5. Resolve Battle
Roll battle dice and resolve resulting dice rolls. The number of dice rolled depends upon whether or not the unit held its position (did not move) before firing. If the unit did not move prior to firing, it may use 2 dice in Ranged Combat; if it moved, it may only use 1 die.
Exceptions:
- An auxilia unit that moves two hexes cannot use Ranged Combat.
- A Heavy war machine unit that moves cannot use Ranged Combat.
- A light barbarian chariot unit cannot use Ranged Combat at any time.
6. Score Hits On Units
The unit firing scores 1 hit for each dice symbol rolled that matches the unit type targeted.
- A green circle will score one hit on units with a green circle symbol (with or without a white border).
- A blue triangle will score one hit on units with a blue triangle symbol (with or without a white border).
- A red square will score one hit on units with a red square symbol (with or without white border).
A flag does not score a hit but may cause the unit to retreat (see Retreat).
If the attacking unit rolls a leader symbol (leaders affect Close Combat but not Ranged Combat), sword symbol, or a unit sym- bol that does not match the target unit, the Ranged Combat has missed its target and has no effect.
Effect of Ranged Combat hits on Units: For each hit scored, 1 block is removed from the target unit. When the last block in the opponent's unit is removed, you collect a Victory Banner block. If a player rolls more hits than the number of pieces in the enemy unit, these additional hits have no effect.
Hits on Leaders: See Leader Casualty Checks.
7. Apply Retreat
See Retreat Section
Close Combat
A unit battling against an adjacent enemy unit is said to be in Close Combat with the enemy unit. A unit adjacent to an enemy unit must Close Combat the adjacent enemy unit if it chooses to battle. It cannot use Ranged Combat (fire) against the adjacent enemy unit or any other enemy unit within range.
Close Combat Procedure
-
Announce Close Combat
Announce to your opponent which ordered unit is going to attack in Close Combat and the enemy unit it is attacking. A unit must be adjacent to an enemy unit to engage in Close Combat.
Note: Each Close Combat attack is declared and resolved one ordered unit at a time, in the sequence of your choice. You must announce and resolve one unit's Close Combat entirely (including any Momentum Advance, Bonus Close Combat, and opponent's Battle Back) before beginning the next one.
Regardless of the number of friendly and enemy units adjacent to each other, each Close Combat is conducted by one eligible, ordered unit against one adjacent defending enemy unit. If more than one ordered unit is adjacent to the defending enemy unit, each ordered Close Combat attack is resolved separately.
-
Evade (possible, Defender Choice)
Some defending units are eligible to Evade. This allows them to move away from the attacking unit, modifying the Close Combat resolution (see Special Actions-Evade).
-
Determine Terrain Battle Dice Reduction (if Any)
Reduce the number of battle dice rolled accordingly. Terrain battle dice reductions are described in the section on Terrain.
-
Attacker Rolls Battle Dice
Roll battle dice and resolve resulting dice rolls. The number of battle dice a unit rolls in Close Combat is determined by its unit type.
-
Attacker Applies Hits
-
Apply Retreats
See Retreat Section below.
-
Possible Momentum Advance And Bonus Close Combat
See Momentum Advance
-
Battle Back.
The defender in some situations may Battle Back. If Battle Back occurs, the defender applies any hits and resolves retreats on the original attacking unit.
In Close Combat, the defending enemy unit may Battle Back against the attacking unit if one or more of the defending unit's blocks survived the Close Combat attack and the defending unit did not retreat from its hex.
If the defending unit is forced to retreat out of its original hex, it may not Battle Back, even if the retreat move leaves the unit in a hex that is still adjacent to the attacking unit.
If the defending unit was unable to fulfill a required retreat, it may Battle Back as long as it still has one or more blocks remaining on the battlefield after taking losses (see Retreat).
During a Battle Back, the unit determines any terrain battle dice reduction, and resolves Battle Back (roll battle dice and apply hits and retreats) in the same manner as the attacker.
Special Situations:
- Elephant Battle Back against elephant-roll 3 dice.
- Elephant Battle Back against a warrior unit-roll 3 dice.
- Elephant Battle Back against a heavy chariot unit-roll 3 dice.
- Heavy Chariots roll 3 dice in Battle Back.
- Camels and cataphracted camels roll 2 dice in Battle Back.
Foot Unit Combat
Light infantry, light sling infantry, and light bow infantry units may either stay in position or move one or two hexes and Close Combat an adjacent enemy unit with 2 battle dice. These units do not score a hit if they roll a sword symbol in Close Combat.
An auxilia infantry unit may either stay in position or move one hex and Close Combat an adjacent enemy unit with 3 battle dice. If the unit moves two hexes, it may not Close Combat. Although an auxilia is classed as a light unit, it does score a hit if it rolls a sword symbol in Close Combat.
A medium infantry unit may either stay in position or move one hex and Close Combat an adjacent enemy unit with 4 battle dice.
A warrior infantry unit may either stay in position or move one or two hexes and Close Combat an adjacent enemy unit with 3 battle dice. Note that a warrior unit's normal movement is only one hex, but it may move two hexes when "charging" into a Close Combat attack against an enemy unit. A warrior unit that moves two hexes must then battle in Close Combat (if any possible targets remain).
A warrior unit at full strength Close Combats with 1 additional battle die and may ignore one flag rolled against it. A warrior unit loses these bonuses after its first block is lost, but this only takes effect when the unit is either attacked again by another enemy unit or is ordered to battle during its own side's turn.
Note, the key point here is that a full strength warrior who loses blocks in a close combat but is entitled to Battle Back may roll 4 dice against the attacker who inflicted the first casualties. In subsequent attacks, either in this turn or any that follow, the warrior unit will only close combat with 3 dice.A heavy infantry unit may either stay in position or move one hex and Close Combat an adjacent enemy unit with 5 battle dice.
A heavy war machine unit may stay in position and Close Combat an adjacent enemy unit with 2 battle dice. A heavy war machine unit does not score a hit on a sword symbol in Close Combat. A heavy war machine unit may not move and Close Combat.
Mounted Unit Combat
-
Light cavalry and light bow cavalry units may either stay in position or move one, two, three, or four hexes and Close Combat an adjacent enemy unit with 2 battle dice. These units do not score a hit on a sword symbol in Close Combat.
-
Light barbarian chariot units may either stay in position or move one, two or three hexes and Close Combat an adjacent enemy unit with 2 battle dice. A barbarian chariot unit at full strength Close Combats with 1 additional battle die and may ignore one flag rolled against it.
A barbarian chariot unit loses these bonuses after its first block is lost, but this only takes effect when the unit is either attacked again by another enemy unit or is ordered to battle during its own side's turn.
As with warriors, the key point here is that a full strength barbarian chariot that loses blocks in a close combat, but is entitled to Battle Back, may roll 3 dice against the attacker who inflicted the first casualties.
In subsequent attacks, either in this turn or any that follow, the barbarian chariot unit will only close combat with 2 dice.
Warrior Example:
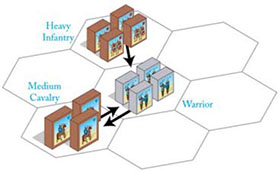
A player orders two unsupported units (a medium cavalry unit, and a heavy infantry unit).
They are adjacent to an unsupported full-strength enemy warrior unit.
The player chooses to conduct Close Combat against the warrior unit, using the medium cavalry first. The cavalry unit rolls three dice and scores one blue triangle hit and one flag.
The warrior unit loses one block, but chooses to ignore the flag so that it can Battle Back. The warrior unit still rolls four dice (even though a block was lost in this combat) because it started this combat at full strength. The warriors roll one sword and one flag, scoring a block loss on the medium cavalry, and forcing it to retreat 3 hexes. The first Close Combat is finished.
Because the Warrior unit is no longer at full strength, the warriors will not be able to ignore the first flag and must battle with only three dice in all subsequent combats. The heavy infantry unit now engages in Close Combat against the warrior unit, rolling five dice and scoring one sword hit, one blue triangle hit, and one flag.
The warrior unit loses two more blocks and must retreat 2 hexes because the flag cannot be ignored. The victorious heavy infantry unit may choose to Momentum Advance onto the vacant hex after the successful Close Combat.
-
A medium cavalry unit may either stay in position or move one, two, or three hexes and Close Combat an adjacent enemy unit with 3 battle dice.
-
A heavy cavalry unit (regular or cataphracted) may either stay in position or move one or two hexes and Close Combat an adjacent enemy unit with 4 battle dice. A heavy cataphracted cavalry unit may ignore one sword hit rolled against it in Close Combat.
Camel Unit Combat
A camel unit (regular or cataphracted) may either stay in position or move one, two, or three hexes and Close Combat an adjacent enemy unit with 3 battle dice.
When Battling Back in Close Combat (or from play of the First Strike card), a camel unit will only roll 2 battle dice. A cataphracted camel unit may ignore one sword hit rolled against it in Close Combat.
Camels vs. Cavalry and Chariots: Horses do not like the scent of camels, hence the following rules. When a cavalry or chariot unit is in Close Combat with a camel unit, the camel unit may ignore one blue triangle hit.
If a cavalry or chariot unit is forced to retreat when in battle with a camel unit, it must retreat one additional hex for each flag rolled by the camel unit.
Heavy Chariot Combat
A heavy chariot unit may either stay in position or move one or two hexes and then Close Combat an adjacent enemy unit with 4 battle dice.
When Battling Back in Close Combat (or from play of the First Strike card), a heavy chariot unit will only roll 3 battle dice. A heavy chariot unit may ignore one sword hit rolled against it in Close Combat.
Elephant Combat
-
An elephant unit may either stay in position or move one or two hexes and then Close Combat an adjacent enemy unit. In Close Combat, an elephant unit will roll the same number of battle dice as the unit it is attacking would normally roll against the elephant.
-
When an elephant unit Battles Back after being attacked in Close Combat it will roll the same number of dice as the unit which made the attack on the elephant unit normally rolls. (The elephant does not use any "bonus" die that the attacking unit receives).
Special Situations:
- Elephant against elephant-roll 3 dice.
- Elephant against a leader-roll 1 die.
- Elephant against a warrior unit-roll 3 dice.
- Elephant against a heavy chariot unit-roll 3 dice.
- Elephant against a camel unit-roll 3 dice.
-
A leader does not modify an elephant unit's Close Combat dice (helmets do not score hits).
-
Each sword symbol an elephant unit rolls in Close Combat scores 1 hit. Furthermore, each battle die producing a sword hit is rolled again for possible additional symbol hits, sword hits, or flag results.
Play Note: In other words, keep rolling that die until a sword hit is no longer obtained! Take care to track the total number of flags and hits scored as you make additional rolls. All hits and retreats scored are applied only after the extra rolls have been completed.
However, if the elephant is attacking a unit that, due to terrain or its own ability, can ignore sword hits, you do not re-roll them.
Thus, if an elephant is attacking a Foot unit in a fortified camp (which can ignore one flag and one sword), the "first" sword the elephant rolls is not a hit and is not re-rolled. If the elephant rolls 2 or more sword hits, those beyond the first do count as hits and are re-rolled. Since Elephants ignore all sword hits, if an Elephant was attacking another Elephant, any sword hits rolled would be ignored. (No re-roll).
Example:
An elephant unit attacks an unsupported full-strength light infantry unit that chooses not to Evade. The elephants roll two dice because they are in Close Combat with a light infantry unit. The elephant unit scores one green circle hit and one sword hit.
The die producing the sword hit is re-rolled and produces another sword hit. This die is rolled for a third time, producing a flag result. The die may no longer be re-rolled, and the damage to the light infantry unit is tallied: one green circle hit, two sword hits, and one retreat flag.
The thoroughly beaten light infantry unit loses three of its four blocks and must retreat its maximum movement allowance of two hexes. The elephant unit may now Momentum Advance onto the vacated hex.
An Elephant unit ignores all sword hits rolled against it in Close Combat.
An Elephant unit will not receive close combat or morale benefits from an attached leader or close combat benefit from a leader in an adjacent hex.
Elephants vs. Cavalry and Chariots: Horses were easily frightened by elephants in battle, hence the following rules: When a cavalry or chariot unit is in Close Combat with an elephant unit, the elephant unit may ignore one red square hit and one flag.
If a cavalry or chariot unit is forced to retreat when in battle with an elephant unit, it must retreat one additional hex for each flag rolled by the elephant unit.
Elephants In Close Combat Example
A: In battle A the elephants have attacked the heavy cavalry and inflicted one flag result. Heavy cavalry units normally retreat 2 hexes but if attacked by elephants they retreat 3 hexes. The image above shows some of the retreat path options. Because it cannot retreat one of its hexes it will lose one block. The Roman elephant unit chooses to Momentum Advance onto the vacated hex, and chooses not to take a bonus Close Combat.
B: In battle B the Roman warrior unit inflicted two flag results on the Carthaginian elephant and so it must Rampage and then retreat two hexes. Note that the two friendly units behind the el-phant do not provide support (bolster morale) because elephant units cannot receive support-only provide it. First it Rampages against all adjacent hexes-five units in this case.
The Roman player rolls two dice each for possible loss of the units in hexes X and Y, while his opponent rolls for the three Roman units still adjacent the rampaging elephant. (Note that the Roman elephant shown in the example has already Momentum Advanced into the hex it attacked, and thus avoids the elephant rampage).
If the Roman warrior unit is hit the leader attached must make a leader loss check. After rolling for all five hexes the elephant unit is retreated. Since its retreat path is blocked, it remains in place and the two friendly blocking units will suffer two hits each (one for each hex the elephant could not retreat). The Carthaginian elephant may now battle back against the warrior unit.

Leaders in Close Combat
Leaders engage in combat somewhat differently from units. A leader may not battle if he is alone in a hex. However, a leader will inspire attached or adjacent friendly units which are attacking or Battling Back in Close Combat.
If a friendly leader is attached to or adjacent to the battling unit, the unit scores a hit for each leader helmet symbol rolled on its battle dice, regardless of the type of unit being attacked.
Exception: A leader does not modify an elephant unit's Close Combat dice.
Score Hits
In Close Combat, the unit attacking scores 1 hit for each die symbol rolled that matches the target unit. It does not matter whether or not the symbol has a white border.
- A green circle will score one hit on units with any kind of green circle symbol.
- A blue triangle will score one hit on units with any kind of blue triangle symbol.
- A red square will score one hit on units with any kind of red square symbol.
- One hit is scored in Close Combat for each sword symbol rolled (with some exceptions).
- One hit is scored in Close Combat for each leader helmet symbol rolled, if a friendly leader is attached to or adjacent to the unit that is battling, regardless of the type of unit being attacked. Exception: elephant units do not receive this leader benefit in Close Combat.
- A flag does not score a hit, but may cause the enemy unit to retreat (see Retreat).
Exceptions:
- War machine units and green circled units without a white border (light infantry, light sling infantry, light bow infantry, light cavalry, and light bow cavalry units), do not score a hit on a sword symbol in Close Combat.
- Chariot units ignore one sword hit in Close Combat.
- Elephant units ignore all sword hits in Close Combat and ignore one red square hit from cavalry or chariot units in Close Combat.
- A leader does not modify an elephant unit's Close Combat dice.
- Camel units ignore one blue triangle hit from cavalry or chariot units in Close Combat.
- Cataphracted camel units ignore one sword hit and one blue triangle hit from cavalry or chariot units in Close Combat.
- Cataphracted heavy cavalry units ignore one sword hit in Close Combat.
Effect Of Close Combat Hits On Units
For each hit scored, 1 block is removed from the target unit. When the last block in the opponent's unit is removed, the unit has been eliminated and you collect a Victory Banner block. If a player rolls more hits than the number of blocks remaining in the enemy unit, the additional hits have no effect.
Retreat
Retreats are resolved only after any hits have been resolved by re- moving blocks from the affected unit. For each flag rolled against the target unit, the unit must move one movement back toward its own side of the battlefield. A movement is the maximum number of hexes a unit may move when given an order.
Exceptions: Warriors retreat 2 hexes. Elephants and auxilia retreat 1 hex.
Example:
A light horse unit incurring one flag against it would retreat its maximum move of 4 hexes. If two flags were rolled against it, the light horse unit would have to retreat 8 hexes! A light infantry unit would retreat 2 hexes for each flag rolled against it.
If three flags were rolled against the light infantry unit, it would have to retreat six hexes.
The player controlling the unit decides which hex the unit retreats onto, using the following rules:
- A unit must always retreat toward its controlling player's side of the board, regardless of what direction the attack came from. Units may never retreat sideways.
- Terrain that is not impassable has no effect on retreat moves, therefore a retreating unit may move onto and through a forest or a fordable river, etc., without stopping. However, impassable terrain blocks retreat.
- A unit may not retreat onto or through a hex already containing another unit (regardless if friend or foe).
- An attached leader must retreat with its unit if the unit is forced to retreat.
- A unit without an attached leader may retreat onto a hex that contains an unattached friendly leader (i.e. a leader alone in a hex).
The leader is immediately attached to that unit and the unit's retreat stops in the leader's hex. The unit ignores any additional retreat movement. - If a unit cannot retreat because its retreat path is occupied by units (regardless if friend or foe), an enemy leader that is alone in a hex, or it is forced to retreat off the battlefield or onto a hex that has impassable terrain, one block must be removed from the unit for each hex of the mandated retreat movement that the unit cannot fulfill.
If a unit can retreat legally (first bullet) without taking block losses, it must take this retreat path Instead of one where block losses occur.
Example Of Retreats:
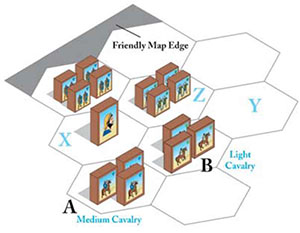
The medium cavalry unit in hex A has been attacked and has two flags rolled against it. The medium cavalry unit may ignore one flag because it is supported, but must still retreat 3 hexes.
Fortunately, the first hex (X) contains a leader by himself, which attaches to the retreating unit and stops its retreat. The light cavalry in hex B is attacked and has two flags rolled against it.
The light cavalry unit may ignore one flag because it is supported, but must still retreat 4 hexes. Because its retreat path is occupied by friendly units, it must lose all three blocks-one for each hex it could not retreat, since hexes X and Z are occupied by friendly units.
The three-block loss eliminates the unit. Note that it could not retreat to hex Y because a retreat must always proceed in the direction of the unit's battlefield edge.
Bolster Morale
Some situations allow a unit to disregard one or more flags rolled against it. If more than one of the following situations applies, the effects are cumulative. A unit in such a situation may choose to disregard flags each time it is attacked.
- A unit may disregard one flag when a leader is attached to the unit (leader is in the hex with the unit). If the unit loses one or more blocks, the leader must survive the leader casualty check for the unit to ignore one flag.
- A unit may disregard one flag when supported by two friendly units. Support units may be in any two hexes that are adjacent to the unit.
- A leader, when alone in a hex, may act as an adjacent support unit and can provide support just as a unit does.
- Some terrain allows a defending unit on the terrain to disregard one flag (see Terrain).
- Full-strength warrior units may disregard one flag result.
- Elephants may act as a support unit, but may not receive support from units or leaders.
Note: Disregarding a flag result is purely a matter of choice. The owning player may decide he wishes to accept a flag result (which could take his unit out of danger).
If more than one flag result can be ignored, the owning player can choose to ignore one (or more) and accept one (or more), but, if he accepts a flag result, he must retreat the full amount that each flag would normally cause.
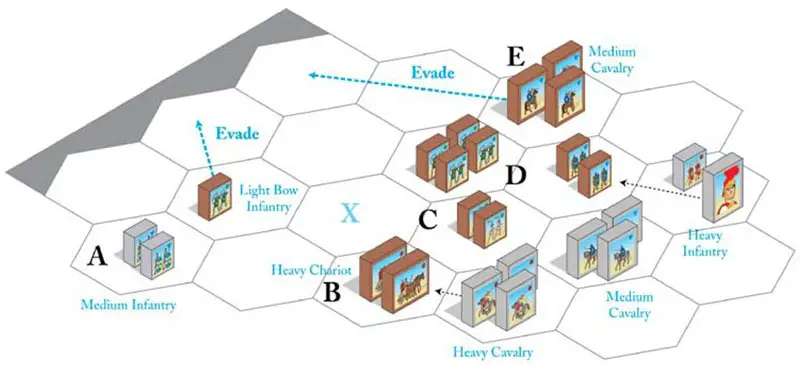
Evade And Battle Example
A: The medium infantry unit attempts to battle the light bow infantry unit (both units are reduced), but the defending unit Evades instead. The Roman player rolls 4 dice but only green circle symbols will hit.
If the evading unit survives, it must be moved 2 hexes towards its battlefield edge. In this case it can only Evade one hex (which is allowed if there is no alternative).
D&E: The heavy infantry unit with an attached leader conducts Close Combat against hex D. Even though the heavy infantry unit has only one block left it still battles with 5 dice. The result is 1 hit and 1 helmet-enough to eliminate the unit.
The heavy infantry unit and leader advance, and then make a bonus Close Combat against hex E. The cavalry unit evades. Before the Evade movement is carried out, the Roman player gets to roll 5 dice, but will only hit on blue triangle symbols.
B&C: The heavy cavalry unit (4 battle dice) Close Combats the chariot unit and forces it to retreat (chariots may not Evade against cavalry). The heavy cavalry unit can now make a Momentum Advance through the vacated hex and onto hex X. From there it conducts a bonus Close Combat against the slingers in hex C who have no chance to Evade.
The result of 4 dice is 1 hit and 1 flag, and since the slingers' retreat path is blocked, this is enough to eliminate the unit. The heavy cavalry unit could make another Momentum Advance onto the hex, but would not get the one additional hex or another bonus Close Combat this turn.
Elephant Retreat (rampage)
An elephant, when it retreats, goes on a Rampage before it is moved back. All units and any leaders who are alone in adjacent hexes (friend and foe) must check to see if they are trampled. (This can include the attacker who prompted the Rampage!)
Roll two dice for each adjacent hex with a unit or a lone leader. During a rampage, your opponent rolls for hits on your units, and you roll for hits on his units. A hit is scored when the symbol rolled matches the unit type. A leader helmet will eliminate a lone leader. If the leader is not hit on the rampage roll he must evade. All other symbols are ignored.
After the Rampage, the elephant completes its retreat movement. If the retreat path of an elephant unit towards its side of the battlefield is occupied by friendly units, enemy units, or a lone enemy leader, the elephant is not moved back and does not lose any blocks; rather, the units or enemy leader that occupy the hexes of the retreat path must each lose one block for each hex of its retreat that the elephant was unable to fulfill.
A lone enemy leader is removed without a leader casualty check and counts as a Victory Banner. (A lone friendly leader does not block the elephant's retreat. The elephant unit would move onto the hex with the lone friendly leader and cease further retreat. This is the only case where a leader can influence an elephant).
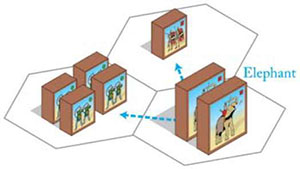
Elephant Retreat Example:
An elephant unit is attacked and two flags are rolled against it. After the Rampage roll, the elephant unit must retreat 2 hexes, but two units occupy the elephant's retreat path, a unit with one block and a full-strength unit.
The elephant therefore will not retreat from its hex. Instead each unit in its retreat path must lose two blocks-one for each retreat hex the elephant cannot complete. The unit with one block is eliminated and the other unit must lose two blocks, gaining a victory banner for the opponent.
Momentum Advance
When an ordered unit attacks in Close Combat and eliminates or forces the defending enemy unit to retreat from the hex it occupies, it has conducted a successful Close Combat. The victorious attacking unit may advance (move) onto that vacated hex.
This is referred to as a Momentum Advance, where the unit's momentum after the successful Close Combat carries it onto the vacated hex.
A Momentum Advance after a successful Close Combat is not mandatory. However, if the Momentum Advance is not taken, the victorious attacking unit forfeits the possible opportunity to make a bonus Close Combat, even if adjacent to other enemy units.
Cavalry Special Momentum Advance: A cavalry unit (light, light bow, medium, heavy or heavy cataphracted cavalry), after its initial successful Close Combat, may Momentum Advance into the vacated hex and then move one additional hex.
All camels, chariots and elephants, while considered mounted units, are not cavalry and are not eligible for the additional one hex movement. This one hex additional move is optional and is not required to conduct a bonus Close Combat. After a successful bonus Close Combat a cavalry unit may only momentum advance onto the vacated hex.
The following situations do not allow Momentum Advance:
- If a defending unit Evades a Close Combat attack, the attacking unit may not claim a Momentum Advance onto the vacated hex.
- When a leader is alone in a hex and is attacked in a Close Combat, the leader must Evade. The attacking unit may not claim a Momentum Advance onto the vacated hex.
- A unit Battling Back is not eligible to take a Momentum Advance.
- A unit ordered by a 'First Strike' card is not eligible to Momentum Advance, but the unit targeted by the First Strike remains eligible for Momentum Advance and possible bonus Close Combat.
- Some terrain restrictions will prevent a Momentum Advance.
- A War Machine unit may never make a Momentum Advance.
Bonus Close Combat
After a successful Close Combat, some units that make a Momentum Advance are eligible to battle in Close Combat a second time. This bonus Close Combat is optional and making the Momentum Advance does not require an eligible unit to attack in Close Combat again.
The following units may choose to conduct a bonus Close Combat after a successful Close Combat and Momentum Advance:
- A warrior unit may make a bonus Close Combat after a Momentum Advance.
- A non-warrior foot unit with an attached leader (except for War Machines) may make a bonus Close Combat after a Momentum Advance.
- A camel, cataphracted camel, cavalry, cataphracted cavalry, chariot, barbarian chariot or elephant unit may make a bonus Close Combat after a Momentum Advance.
Note, a cavalry unit on its initial successful Close Combat may Momentum Advance into the vacated hex and then move one additional hex-in any direction (including back to their original hex). - Some terrain restrictions prevent a bonus Close Combat.
A unit that qualifies for a bonus Close Combat attack after a Momentum Advance may choose to battle any enemy unit in any adjacent hex. It does not have to battle the enemy unit that just retreated from the hex.
When a unit's bonus Close Combat is successful it may Momentum Advance into the vacated hex but may not battle again this turn. A cavalry unit on a successful bonus Close Combat may only move onto the vacated hex, it may not move the one additional hex.
Some terrain restrictions prevent movement into the vacated hex.
Continue Reading