Monster Activation
Monsters are only ever activated as a reaction to a Hero's actions. Their activation is always controlled by the player to the right of the active player.
Guard Reaction
Every Monster in the game guards all Spaces Close to itself, and will attack any Close Hero that lowers his guard by trying to move past it or by attacking somebody else.
A Hero standing Close to a Monster is considered to be actively fending it off, until he decides to move or attack.
Triggered by a Move
Whenever a Hero that occupies a Space Close to a Monster moves to another Space, he triggers that Monster's Guard Reaction. That causes the Monster to immediately attack the active Hero with its listed attack attributes and abilities.
The Monster does not move, it only attacks. Entering a Space Close to a Monster does not trigger its Guard Reaction, it is only triggered by moving from a Close Space, no matter if the movement is towards the Monster or away from it.
Whenever a Hero's move would trigger the Guard Reaction in one or more Monsters, the player to the right of the active player must perform the attacks of all activated Monsters before the Hero executes his move.
After all attacks are resolved (including the Hero's Defense rolls), then the Hero can perform the intended move. Always resolve all Guard Reaction attacks triggered by a move before executing the following move.
It is possible to trigger several consecutive Guard Reaction attacks from the same Monster or different ones in the same turn, if each move the Hero executes leaves a different Space guarded by the Monster. Keep in mind that using a portal or manipulating a door does not trigger Guard Reaction.
Triggered by an Attack
When a Hero performs an attack that doesn't target any of the Monsters Close to him, he triggers the Guard Reaction of all Close Monsters. Whether he attacks an enemy Hero anywhere, or a Monster at a distance, if there are any Monsters Close to him they will seize the opportunity and attack him.
In this case, after the Hero's attack has been completely executed, any Monsters Close to the active Hero will perform an attack against him (they do not move).
Note that if the Hero's attack targets any Monster Close to him - whether directly or as a special effect - he effectively fends off all Close Monsters and no Guard Reaction will be triggered by this attack.
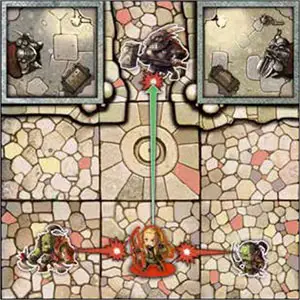
Example 1: Greensleeves makes a Ranged Attack against the Hammer Beastman. Since it's not a Close Monster, this triggers the Guard Reaction of the Orc and the Goblin, who attack Greensleeves once his attack has been resolved.
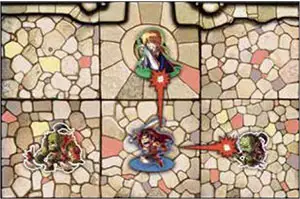
Example 2: Grom attacks bothJ0han and the Goblin using the Cleave ability. Because his attack also targeted a Close Monster, no Guard Reaction is triggered.
Payback Reaction
Attacking a Monsters is always a risk, for they will not suffer it quietly. Attacking a Monster triggers its Payback Reaction. Whenever a Hero attacks a Monster (even if his attack roll completely fails), the Monster is activated and may immediately attempt to strike back at his attacker.
The difference with Payback Reaction is that the activated Monster may perform its Movement before attacking. The player to the right of the active player controls the activated Monster and may choose how best to employ it.
After fully resolving the Hero's attack, the Monster may move up to its full Movement rating (as listed on its card) and then attempt an attack against the Hero who attacked him (it cannot move after attacking).
A moving Monster may choose to open doors and use portals or move in any direction he wishes, following the same Movement rules and restrictions as Heroes. The player controlling the Monster doesn't have to move it or even perform its attack, if he so desires, but any attack made by the Monster must necessarily have the active Hero as the primary target.
If a Hero's attack targets more than one Monster at once, only one of the targeted Monsters is activated; the player to the right chooses which one.
Monster Attack
A Monster's attack follows most of the same rules as a Hero's attack. Since all of a Monster's attack information is contained in its own card, they don't exhaust cards to perform an attack and thus are always ready to attack when activated.
Some monsters perform Melee attacks and other perform Ranged attacks. These are subjected to same parameters of proximity and Line of Sight in order to be executed as a Hero's attack, as well as any Ability the Monster may have. A Monster's attack is always executed by the player to the right of the active player.
Anatomy of a Monster
A. Name - The Monster's name.
B. Monster Tier - This indicates what type of Monster this is.
C. Life - The number of Wounds the Monster has to sustain in order to be killed.
D. Overkill - The number of Wounds a single attack must inflict in order to eliminate the Monster instantly.
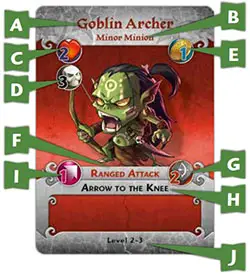
E. Reward - How many coins are immediately awarded to the Guild that kills the Monster.
F. Attack Type - Whether the Monster executes Melee or Ranged attacks.
G. Attack Dice - The number of dice rolled by the Monster's attack.
H. Attack Name - The name of the attack the Monster performs.
I. Movement - The number of Movement points available to the Monster when it executes a Payback Reaction.
J. Level - This should be the same as the number of the scenario being played in the campaign (1st scenario - Level 1, 3rd scenario - Level 2-3, etc).
K. Defense - How many Defense dice the Monster can roll to try to prevent an attack from inflicting Wounds. Most Monsters have no Defense.
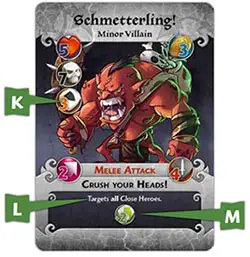
L. Ability - Some Monsters have a special Ability that is always in effect. They work very much like a Hero's Natural Ability or that of an Upgrade card.
M. Reroll - Some Monsters have a Reroll Pool available to them. The controlling player can always choose to reroll this number of dice both when attacking and defending with that Monster.
Overkill
Even if the Hero's attack deals enough Wounds to kill a Monster, the Monster still gets to perform its full activation against its attacker before dying being removed from the board.
If, however, the Hero's attack is so powerful that it deals a number of Wounds equal to or higher than the Monster's Overkill rating, the Monster is immediately killed and removed from the board, without getting the chance to trigger its Payback Reaction.
Note that it doesn't matter how many Wounds the Monster already has. In order to Overkill it, a single attack must beat its Overkill rating.
Monster Tiers
The Monsters are classified into four tiers: Minor Minion, Major Minion, Minor Villain and Major Villain. Minion-type Monsters have no special rules to them, they're the rank and file of the monster horde.
Villains are the hardest Monsters to kill (whether Minor or Major), and so anybody who contributes to their demise is deserving of some reward. Any Hero who manages to inflict a Wound on a Villain places one of his Guild tokens on that Villain's card.
If that Villain is eventually killed, all Guilds that have a token on its card win the full Coin reward listed on the Monster card. The credit for killing the Villain still goes only to the Hero that inflicts the last Wound, so only his Guild would win any associated Quest.
Villain-type Monsters also don't go to the Spawn tile when killed, they're returned straight to the game box.
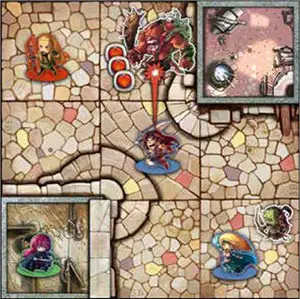
Example: Grom, a Blue Guild Hero, attacks Schmetterling, the troll (see its card on the previous page). It already has 3 Wounds previously inflicted by the Green Guild.
Grom's attack scores 4 hits! The player to the right of the Blue Guild player is responsible for controlling the troll, (in this case he's the Red Guild player) so he rolls its 3 Defense dice, scoring a single save. Because Schmetterling has 2 Rerolls, he rerolls the two failed dice and scores another save, for a total of 2 saves. Schmetterling suffers 2 Wounds! While this, added to the 3 previous Wounds, is enough to kill the troll, it is far from its Overkill rating of 7, so the troll will be able to perform its full activation before succumbing to its injuries and leaving the board.
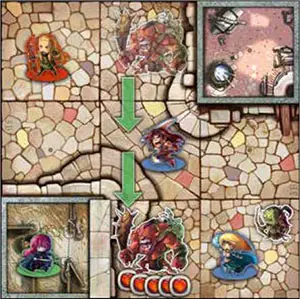
Schmetterling could strike back at Grom without needing to move, however the controlling Red Guild player notices that Schmetterling's ability says "Targets all Close Heroes", which means his own Hero, Greensleeves, would be targeted as well.
The Red Guild player decides to put the troll to better use. He uses its 2 Movement Points to move straight through the Space occupied by Grom.
Now he unleashes Schmetterling's powerful "Crush Your Heads!" attack, which targets not only Grom, but also Scarlet and Maya! (the Goblin is not a Hero, so it is not targeted)
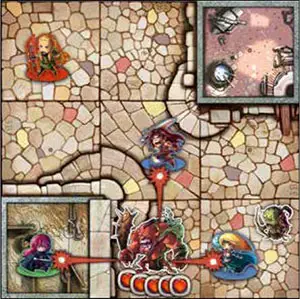
The Red Guild player rolls 4 Attack dice, scoring 2 hits. He then uses Schmetterling's 2 Rerolls to obtain another 2 hits. Each of the targeted Heroes will have to roll Defense against the troll's 4 hits!
After that its figure is finally removed from the board and the Blue and Green Guilds get the reward of 3 coins because they both helped kill this Villain. If there's a Quest related to killing Schmetterling, however, only the Blue Guild accomplishes it.
Spawning Monsters
Unless otherwise stated in the scenario, when a Minion-type Monster is killed, it is removed from the board and placed in the first available slot of the Spawn Tile.
When the Spawn Tile becomes full, with five figures on it, or when there are no more Monsters left on the board, the active player must perform a Monster Spawn as soon as he finishes his turn. Starting with the figure in the first slot, he rolls two attack dice to determine where it will spawn.
Compare the dice result to the symbols in the Spawn Tokens on the board and find the matching token with the same pair of symbols. The Spawn roll is not subjected to normal dice rolling mechanics, such as Rerolls and extra dice.
If there is no matching Spawn Token on the board, the figure is returned to the game box.
If the Space with the matching Spawn Token is full, the figure is returned to the game box.
If the Space with the matching Spawn Token is free, the figure is placed in that Space.
This procedure is repeated, following the slot order, for all of the figures in the Spawn Tile, with each one being either placed back on the board or completely removed from the game. Once the Spawn Tile is empty, the next player begins his turn.
Note: If more than one Monster is killed in the same turn, and there are no more available slots in the Spawn Tile, any exceeding Monsters are immediately returned to the box.
Continue Reading


