
Darjeeling is a town and a municipality in the Indian state of West Bengal. It is located in the Lesser Himalayas and is noted for its tea industry, the spectacular views of Kangchenjunga, the world's third-highest mountain, and the Darjeeling Himalayan Railway.
Tea planting in Darjeeling began in 1841 using seeds of the Chinese tea plant (Camellia sinensis); the Brit- ish government also established tea nurseries during the period, and the Alubari Tea Estate was opened by the Kurseong and Darjeeling Tea company in 1856 to be quickly followed by more than 80 Tea Estates.
Components
- 1 gameboard
- 8 Tea Estate cards
- 1 cloth bag
- 55 cards
- 131 cubes
- 1 Score pad
- 48 Tea leaves
- 19 "5 Tea leaves"
- 2 Fog tiles
- 1 Darjeeling blockage tile
- 3 Blockage tiles
- 48 Rubble cubes
- 18 discs
- 16 Steel bars
- 3 Workers
- Starting Player marker
- 10 Game Ownership markers
- 20 Ownership markers
Object of the Game
In Alubari, players compete to cultivate and harvest their own Tea Estates and assist in the building of the Darjeeling and Himalayan Railway, from Siliguri Town to 'the summit' at Darjeeling.
Guided by the placement actions of their workers, players can also use their harvested tea leaves to make Chai for their thirsty workforce to boost their actions even more!
When the railway is completed, the player who has contributed the most to the railway, the building of the towns along the way, and the most auspicious Tea Estates will be declared the winner.
Setup
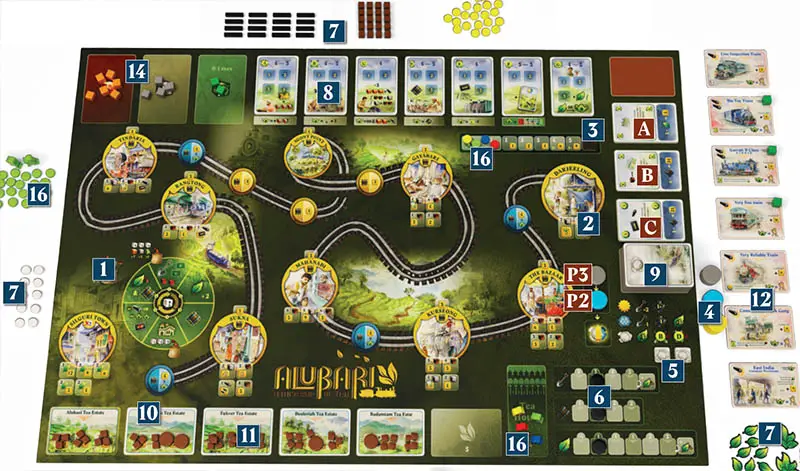
1 Place the board in the center of the table within easy reach of all players.
2 If playing with fewer than 3 players, also place the Darjeeling blockage tile on the second Darjeeling Station space (top right of the board, see marking on the board).
3 According to the number of players, place a blockage tile on one or more spaces at the end of the Chai track. For example, in a 3-player game, block off the last two spaces.
4 Take the weather markers (3 yellow for Sun, 3 blue for Rain, and 3 grey for Fog) and place them near the weather track.
5 Place the 2 Fog tiles on the spaces below the fog effect line.
6 Take the 3 black discs and place one on each of the starting spaces of the Excavation Work rate, Lay Track Work rate, and Crop Harvest Work rate tracks (indicated by a darker green).
7 Place all of the Tea Leaves, Rubble cubes, Steel bars, and Game Ownerships markers in a general supply near the board.
8 Take the overlay cards appropriate to the number of players and place them on top of the corresponding Action areas printed on the board.
9 Shuffle the Contract cards and place them face down in a deck on the darker card space. Reveal the 2 top cards and place them, face up, in spaces A and B.
Then, look at the back of the card on the top of the deck and place a Weather marker of the appropriate color in position P2 of the Weather track. Reveal that card and place it, face up, in space C.
Look at the back of the next card on top of the deck, place the corresponding Weather marker in position P3 of the Weather track.
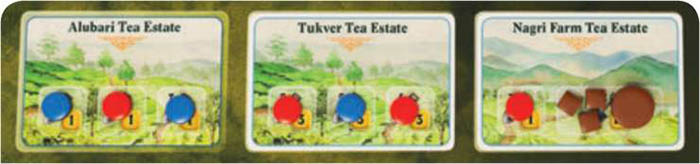
10 Shuffle the Tea Estate cards and flip them at random during shuffling as they are double-sided. Then, place one on each of the Tea Estate spaces printed on the board, filling spaces according to the number of players in the game.
For your first game, the Alubari Tea Estate, which is already printed on the board, is used and is a helpful start so should be left uncovered.
In future games, you can choose to leave it uncovered or place another Tea Estate card over it. Return unused Tea Estate cards to the game box, they will not be used in this game.
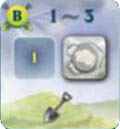
11 For each space on the Tea Estate cards, take a number of Rubble cubes from the supply as indicated by the number next to the shovel and place them on the space. For spaces requiring five or more Rubble, make use of the "5 Rubble" disks for convenience.
12 Shuffle the Equipment cards and choose 7 of them at random, placing them face up near the board to form the Engine shed. Return the remaining Equipment cards to the game box, they will not be used in this game. If any of the selected Equipment 'comes with' Chai, place a Chai cube on the Equipment.
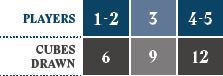
13 Fill the supply bag with the resources (Iron ore, Stone, and Chai) according to the Supply table (see below). Return any unused resource cubes to the game box, they will not be used in this game.

14 Mix up the contents of the bag and draw an appropriate number of cubes from the bag depending on the number of players (6 for the solo game, 12 for 2-5 players). Place them on the appropriate spaces of the game board.
15 Add the Event cubes into the bag. Use 4 in a solo game, and 5 for all other player counts.

16 Give each player a set of player pieces: 3 Workers and 20 Ownership markers. One of the Workers is placed on the Tea House, one of the Ownership markers goes on space 0 of the Chai track, and all other pieces go into the player's personal supply/playing area. Return unused player pieces to the game box.
17The player to last drink a cup of tea is the Starting Player, give them the Starting Player marker.
Game Play
The game is played over a series of Rounds with each Round divided into five Phases, carried out in the following order:
- Restock Contract cards (skip in Round 1)
- Adjust the Weather (skip in Round 1)
- Restock the Stockyard & process any Events (skip in Round 1)
- Assign Workers to Actions
- Resolve Actions then check for End of Game
At the end of the game, Final Scoring is performed, and the player with the most points wins the game.
Phase 1- Restock Contract Cards
Skip this Phase in Round 1 of the game.
If a Contract card is in position A of the Post Office (the highest at the right side of the game board), put it face down onto the discard pile. Then, move all other Contract cards in the Post Office to the top (towards position A), closing up any gaps.
Then, from the top of the Contract card deck, add cards face up to refill any empty positions until all three Post Office positions are filled.
If the Contract card deck is ever empty, shuffle the discard pile to make a new Contract card deck and if necessary, continue filling any spaces.
Phase 2- Adjust the Weather
Skip this Phase in Round 1 of the game.
Follow these steps:
Remove the Weather disc from the bottom space.
Remove any fog markers from actions
BandD.Move each Weather disc one space to the bottom along the Weather track. The disc now in the bottom space shows the weather for the current Round.
Adjust the Work rate markers on the Excavation, Lay Track, and Crop Harvest tracks according to the current weather, referring to the Weather Key next to the Weather track.
Look at the top (unrevealed) card of the Contract card deck, take a Weather disc in a color matching the weather icon on the back of that card and place it in the top position on the Weather track.
Sun: +2 to Excavation, +1 to Lay Track.
Rain: -1 to Excavation, -1 to Lay Track, +1 to Crop Harvest.
Fog: -1 to Crop Harvest and block the last Worker space on the B Excavate and D Lay Track actions with a Fog marker; these spaces will not be available for placement of Workers in the current Round.

Excavation Work Rate
This represents how much Rubble can be excavated per action. If the marker is on the leftmost space, ignore any effect that decreases the Work rate further. If the Excavation Work rate ever increases above 5, set it back on 5 and immediately process a Tea Harvest.

Lay Track Work Rate
This represents how much track can be laid per action. If the marker is on the leftmost space , ignore any effect that would decrease the Work rate and if the marker is on the rightmost space, ignore any effect that would increase the Work rate.
Crop Harvest Work Rate
This represents how much tea can be harvested from the estates. If the marker is on the leftmost space, ignore any effect that decreases the Work rate further.
If the Crop Harvest Work rate reaches the end of the track, set it back on the rightmost '2' space and immediately proceed to a Tea Harvest.
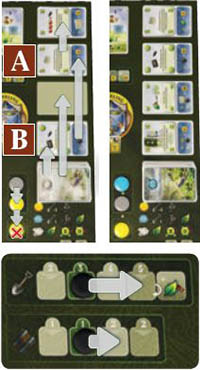
Example: Card A discarded. Card B is moved to the top space of the line and two cards are drawn to fill the two empty spaces below.
The Sun token is removed from the board and the next two tokens (sun and fog) are moved one space down.
The day's weather is now Sun. Move the Excavation Work rate marker 2 spaces right, and the Lay Track Work rate marker 1 space right.
The weather shown on the top card of the draw pile is Rain. Add a Rain token on the top space of the weather track.
Tea Harvests
Tea Harvests happen when any of these things is true:
- the Excavation Work rate gets to more than five.
- the Crop Harvest Work rate reaches the end of the track.
- the Harvest event happens on the Event track (this could happen multiple times in a single game).
- as the result of a Contract card effect.
All players who have their markers in excavated Tea Estate spaces now harvest Tea.
Each player gains Tea Leaves equal to the number of Tea Estate spaces they own (have their markers on) multiplied by the current Crop Harvest Work rate, rounded down.
After a Tea Harvest, reset the Crop Harvest marker back to its starting space (with darkest green).

Example: The current Crop Harvest Work rate is Blue has 3 Tea Estates and gains 1 Tea Leaf.
Red has 4 Tea Estates and gains 2 Tea Leaves. Then move the marker to the starting space.
Phase 3 - Restock the Stockyard and Process any Events
Skip this Phase in Round 1 of the game.
In this Phase, the Stockyard is re-filled with cubes drawn from the bag. The number of cubes needed to restock the Stockyard varies according to the number of players and is shown on the board to the top-left of the Event rondel.
Take the appropriate number of cubes at random from the Supply bag and place them in the Stockyard spaces according to their type: Iron ore (orange), Stone (grey), and Chai (green).
Then, if any Event (white) cubes are drawn, put them on the Events rondel, one cube per space, starting with the first Event space (as shown by the (1)) and then each subsequent cube being placed on the next empty space in a clockwise direction.
As you place each Event cube, immediately resolve the Event in that space before placing any further Event cubes.
Phase 4 - Assign Workers to Actions
At the start of this Phase, each player with at least one Equipment may pay one Chai from their supply (recorded on the Chai track) to take their temporary Worker from the Tea House space and put it in their personal supply; this gives the player one additional Worker to place this Round.
Then, in clockwise order beginning with the Starting Player, each player places one of their Workers from their personal supply onto any empty numbered action space in any of the Action areas on the game board A through C.
Action spaces do not need to have Workers placed on them in numeric order (you can place a Worker on the "3" space of Action area A for example, even if spaces "1" and "2" are empty. It is allowed for a player to have multiple Workers in the same Action area.
Continue to place Workers, one per player at a time, until all players have placed all of the Workers from their personal supply onto Action areas.
Phase 5 - Resolve Actions then check for End of Game
In this Phase, the Action areas are resolved in order from A Stockyard through to G Chaiwala. When resolving an Area, the following two steps are performed in order:
- All players may use any unused Contract cards (see below)
- Resolve the action spaces in numeric order.
1. Using Contract Cards

Before any actions are resolved for an Action area, each player, beginning with the Starting Player and going clockwise round the table, may use one or more unused Contract cards (not turned sideways) that have the current Action area shown in the corners of the upper section.
A player may use a Contract card for an Action area even if they do not have any Workers in that area, and even there are no Workers in the area at all.
To indicate a Contract card has been used, turn it sideways but leave it in front of you.
When a Contract card is used in this way, the effect of it (printed in the upper section of the card) lasts until the end of the current Round. This could be to modify the Action you are about to take, provide extra actions for free, and/or change the rules in your favor.
Each Contract card can only be used once during the game. However, the scoring bonus printed on the top part of the Contract card still applies at the end of the game whether the card has been used or not.
2. Resolve Action Spaces
For each Action area, resolve the Action space resolved one by one in numeric order starting with space  . If you have a Worker on an Action space, you must carry out the action if possible. If you have multiple Workers in the same Action area, the action must be carried out for each Worker if possible.
Before resolving your Action, you may pay one Chai from your supply (recorded on the Chai track) to take the more powerful version of that Action; the effect of paying Chai is detailed in the descriptions of the actions below. A maximum of one Chai can be spent on each Worker during a Round.
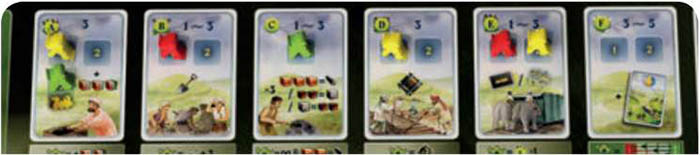
Description of the Action Spaces:
A. The Stockyard
Take up to 3 cubes from the Stockyard and place them in your personal supply. You may take any combination of cubes but not more than one Chai (green) cube for a given Worker.
If your Worker was on the last space of the Stockyard, you additionally take the Starting Player marker and immediately becomes the new Starting Player from this point on. If no Worker is in the last space, the current Starting Player retains the Starting Player marker.

Chai bonus: Your Worker may take an additional two cubes from the Stockyard; one of them could be a Chai cube.
Taking Chai Cubes
Whenever you take a Chai cube (from either the Stockyard or from an Equipment card), advance your marker on the Chai track by one space and remove the Chai cube from the game.

B. Excavation
Take a number of Rubble cubes equal to the current Excavation Work rate from the leftmost Excavation space(s), continuing along the line of Tea Estate cards from left to right.
The current Excavation Work rate is shown by the Excavation Work rate marker but this can be modified by bonuses from an owned Equipment, Contract cards, and/or spending Chai.
If you remove the last Rubble cube from a space on a Tea Estate card, place one of your Ownership markers on the space. This will be worth Victory points for you at the end of the game and you will also gain Tea from that site whenever there is a Tea Harvest.
It is possible to excavate and clear multiple spaces with this Action.
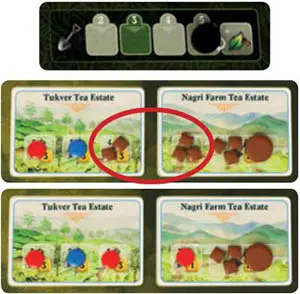
Example: The current Excavation Work rate is 5. Patrick (Red) is resolving his Excavation action.
This clears 5 Rubble cubes in total, taken from left to right as shown here.
Patrick places Ownership markers in the two spaces cleared from Rubble with his action.
If able to, you must take the full number of Rubble cubes up to the current Excavation Work rate plus any permanent modifiers (e.g. from an Equipment that permanently increases your Work rate of excavation), but you are not required to trigger Chai or Contract card effects if you do not wish to.
Chai bonus: The Excavation Work rate for this Worker's Action is considered to be 3 higher than the current Excavation Work rate. E.g. If the Excavation track shows a Work rate of 4, the Worker's actual Excavation Work rate is 7 for this Action.
At the end of a Round when the last Rubble cube is removed from the line of Tea Estate cards, place the additional Action card over the B Action area on the board.
This is now a new Action area with a single space for a Building (Equipment or Station space) on it.
C. The Foundry
You may perform up to three of the following mini-actions, in any combination (you may perform the same mini-action more than once):
Make Steel: Pay 3 Iron ore cubes into the Supply bag and take 1 Steel bar into your personal supply.
Make Stone: Pay 2 Rubble cubes to the general supply and take 1 Stone cube from either the Stockyard OR the Supply bag (your choice).
Smash Stone: Pay 1 Stone cube into the Supply bag and take 2 Rubble cubes from the general supply into your personal supply.
Chai bonus: Your Worker may perform any number of mini-actions they are allowed to perform. Also, 'Make Steel' costs 2 Iron ore cubes, instead of 3.
D. Lay Track
Return a number of Steel bars to the general supply up to the current Lay Track Work rate plus any other permanent effects (e.g. from an Equipment that permanently increases your Work rate) and/or temporary effects (eg. paying Chai or a Contract card).

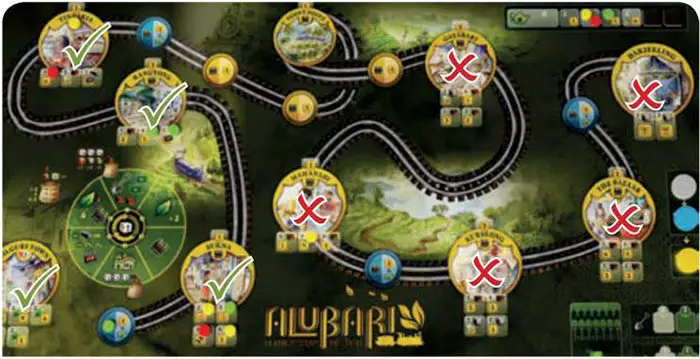
For each Steel bar returned, place one of your Ownership markers on the next available Track space on the railway, starting from the space between Siliguri Town and Sukna (crossing the river) and moving 'up' the mountain towards Darjeeling.
An available Track space is one that does not have an Ownership marker on it. It could be:

Markers on Track spaces will bring you Victory points at the end of the game.
If you build on a River space (blue circle), gain 1 Chai as a bonus (record this on the Chai track). Now players can build Station spaces in any towns before the next available River space (see Build a Station Space).
If you have the Steel bars available, you cannot choose to lay fewer tracks than the current Lay Track Work rate (modified by permanent effects). However, you are not obliged to use Chai or Contract card effects if you do not wish to.
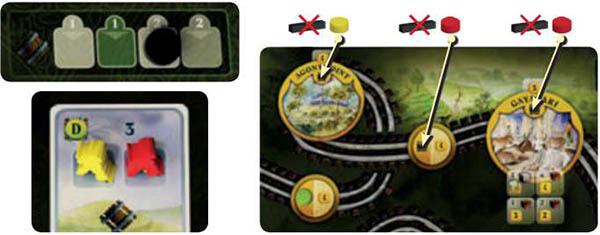
For example: The current Lay Track Work rate is 2. Yellow and Red players choose the Lay Track action. They must lay track twice, but Yellow only has 1 Steel bar, so they can perform this action and lay only one track.
If there are not enough Track spaces remaining to be completed by an action, you must complete as many as there are available. If the last Track space has now been filled, the game will end at the end of the current Round.
Chai bonus: 'The Lay Track Work rate for this Worker's Action is considered to be 2 higher that the current Lay Track Work rate. E.g. If the current Lay Track Work rate is 2, the Worker's actual Work rate is 4 for this Action.
E. Building
With this action, you have two choices: Build a Station or Buy an Equipment.
Build a Station Space
At the start of the game, the only Station spaces that can be built are the five in the town of Siliguri at the bottom of the mountain.
When a marker is placed on a River space (see Lay Track), players can build Station spaces in any towns before the next available River space (with no marker on it).
Track does not need to have been laid right up to the town for a Station to be built there.
For example: Once a marker has been placed on the first River space, the towns of Sukna, Rangtong, and Tindharia can have Stations built in them, even if no other track has been laid.
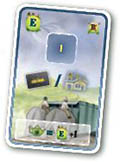
To build a Station, pay the resources specified on the space itself and place one of your markers on it. Iron ore and Stone cubes are returned to the Supply bag, Rubble and Steel bars are returned to general supply. Some spaces provide Victory points at the end of the game, others provide an immediate bonus:

For example: To build a Station on this town space in Sukna costs 8 Rubble. This space is worth 5 points at the end of the game.

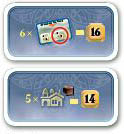
Cost: 2 Stone. Bonus: 4 points at the end of the game plus get your third worker, for free, for the next round only.

Cost: 1 Steel bar. Bonus: Take 2 Steel bars from the general supply.

Cost: 8 Rubble. Bonus: Immediately take a Contract Card from the display; do not replace it.

Cost: 1 Steel bar. Bonus: Immediately take any available Equipment card for free (it will have cost you 1 Steel, in effect).
Buy an Equipment
To buy an Equipment, choose one of the available Equipment by the board and pay the cost as indicated in the top left corner of the Equipment card to the general supply/from the Chai track. Then, take the Equipment card and place it in front of you.
If there were any Chai cubes on the card, return those cubes to the game box and move your marker along the Chai track one space for each Chai cube.
Any bonus or effect of the Equipment applies immediately after you have built it. You may own more than one Equipment, but each is subject to maintenance (see Events). Each Equipment is worth 9 points at the end of the game (16 for the Very fine train).
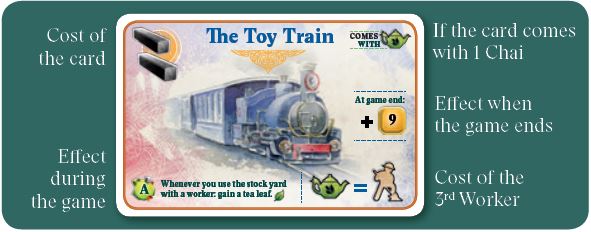
At the beginning of each Phase 4 - Assign Workers to Actions (see page 5), if you have at least one Equipment card, and if you pay the cost, you could take your third Worker for the Round.
Chai bonus: Your Worker may perform an additional building action (build in a Station space / buy an Equipment).
F. The Post Office
The Post Office is where you gain contracts for powerful in-game bonuses and/or game end scoring. Take one of the available face-up Contract cards at the side of the game board, and place it face up in a portrait orientation in your personal area.
Do NOT replace the taken card; other players using the Post Office action during this Round must choose from those cards remaining. If there are no cards available when an action space resolves, the action is wasted.
There is no limit to the number of Contract cards you can have. Each Contract card is worth points at the end of the game, if you manage to complete the requirements depicted on the card. Also, as mentioned earlier, each Contract card can be rotated to use the effect of them once per game.
Chai bonus: You may discard all of Contract cards in the current line and refill with three new cards from the top of the deck. Then, take one of the available Contract cards. If there are not enough cards in the deck, shuffle the discard pile to make a new draw deck.
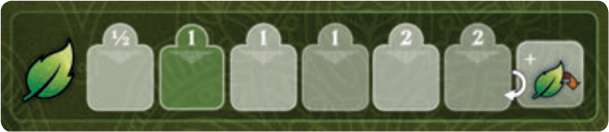
G. The Chaiwala
With this action, you have a choice: Take Tea Leaves, or Convert Tea Leaves into Chai.
If you choose to take Tea Leaves, you receive a number of them from the general supply equal to the position of the marker on the Crop Harvest track (1 or 2). If the Crop Harvest track is on the leftmost space (1/2), you cannot take Tea Leaves.
If you choose to convert Tea Leaves, they are converted into Chai on a one for one basis. Return the Tea Leaves you are converting to the general supply and record your Chai on the Chai track.
Note: You cannot move your Chai marker higher than the point indicated on the Chai track; the maximum varies according to the number of players in the game (and is printed on the game board).
Chai bonus: There is no Chai bonus for this area.
End of the Round
When all worker actions have been resolved, it is the end of the round. Players should make sure that they retrieve all of their workers (if not already done) and (if necessary) return their third worker to the Tea House for a well-earned cup of tea.
If it is not yet the end of the game, begin the next round with Phase 1: Restock Contract cards (see page 4) otherwise proceed to final scoring.
End of the Game
The game ends at the end of the Round in which the last Track space on the railway - the one adjacent to Darjeeling - has been completed (either by a player or a game Event).
In the solo or 2-player game, the game may end before the last Track space has been laid with track:
Solo game: as soon as you place your last scoring marker
Two players: as soon as one player has placed their last scoring marker, their opponent plays one additional Round by themself before the game ends.
Scoring
Victory points are depicted by this symbol  : Using the score pad provided, each player records their victory points as follows:
-
Tea Estates
Score Victory points for each Tea Estate space you own. Do not remove your markers yet as these may be used for scoring Contract card bonuses.
Note: if you have made use of Contract cards 28 and/or 29 to 'borrow' one or more game-owned Tea Estate spaces during the game, remove your markers from those spaces before scoring.
-
Stations
Score Victory points for each of your markers on Station spaces in towns which are worth points. Do not remove your markers yet.
-
Completed Track Spaces

Score Victory points for each of your markers on Track spaces. Do not remove your markers yet.
-
Completed Contract Cards
Score Victory points for each Contract card you have if you meet the requirements as shown on the bottom section of the Contract card. "These points are scored regardless of whether or not the card's effect has been used. There is no penalty if you fail to complete a Contract card.
Note: Each cube and marker can only be used for one Contract card.
Contract cards score in a variety of ways across various categories. If a Contract card has a mix of criteria, you must satisfy ALL of the criteria to score the points.
-

Track bonuses: Move the indicated number of Ownership markers from Track spaces you have completed on to the Contract card and gain the indicated number of points. If you cannot move enough markers onto the card, leave them where they are and score nothing for the Contract card.
-
Building/Tea Estate space bonuses: move the indicated number of Ownership markers from Station or Tea Estate spaces you have completed on to the Contract card and gain the indicated number of points.
If you cannot move enough markers on to the card, leave them where they are and score nothing for the Contract card.
Note: Some building bonus Contract cards explicitly refer to Station spaces with RUBBLE requirements; you can only use Ownership markers in that type of space to score these contracts eg. 3 of the 4 spaces in Gayabari are built using Rubble cubes.
-

Tea bonuses: Move the indicated number of Tea Leaves from your personal supply onto the Contract card and gain the indicated number of points. If you cannot move enough Tea Leaves, leave them in your personal supply and score nothing for the Contract card.
-

Chai bonus card (No. 27): Score an additional 2 points for each Chai recorded on the Chai track; this is in addition to the points you will get from the Chai track.
-
-
Chai & Tea Leaves
Score the points according to the position of your marker on the Chai track. Then add % point for each tea leaf in your personal supply (not already assigned to a Contract card) - do not round down.
-
Equipment
Each Equipment you own is worth 9 points (not in the solo game); in addition, the Very Fine Train is worth an additional 7 points.
The player with the most points is the winner; if there is a tie, then all players share in the victory.
Equipment
There are a number of ways in the game that you can buy an Equipment. Equipment provide a number of benefits:
If you have at least one Equipment, you can spend 1 Chai to use your temporary Worker for that Round.
Each Equipment is worth 9 points at the end of the game (16 for the Very Fine Train).
Each Equipment provides an additional ability, as described below. You may own more than one Equipment, but must pay maintenance for each one during the Equipment maintenance event.
-
-
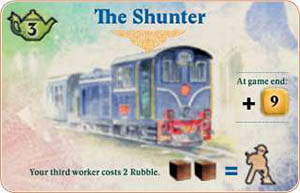
The Shunter
You may use your extra Worker for the Round using 2 x Rubble rather than 1 Chai.
-
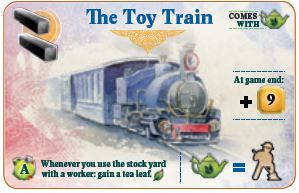
The Toy Train
Whenever a Worker of yours takes action A, take 1 Tea Leaf.
-
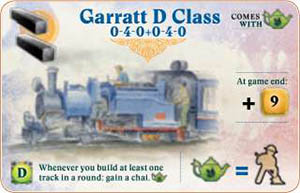
Garratt D Class 0-4-0+0-4-0
The first time you lay one or more tracks in a Round, gain 1 Chai; you may use it with any other Workers you have yet to resolve in action spaces, including space D.
-
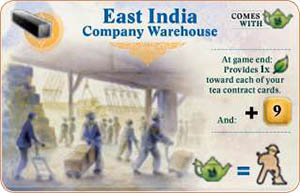
East India Company Warehouse
At the end of the game, each Contract card you have that requires Tea Leaves requires 1 fewer Tea Leaf to be completed.
-
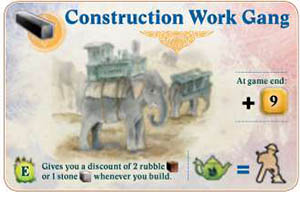
Construction Work Gang
Provides a discount of 2 x Rubble or 1 x Stone when building in Rubble or Stone Station spaces respectively.
-
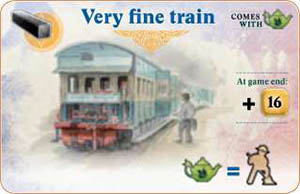
Very Fine Train
Score an extra 7 points at the end of the game.
-
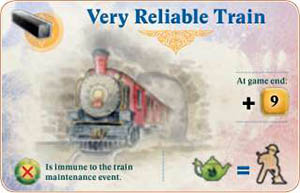
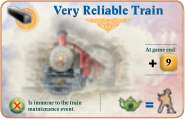
Very Reliable Train
Not affected by the Equipment Maintenance Event.
-
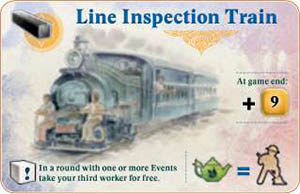
Line Inspection Train
In a Round with at least one Event, you get your third Worker to use for free for that Round
Continue Reading

