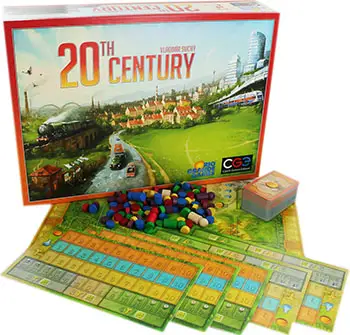
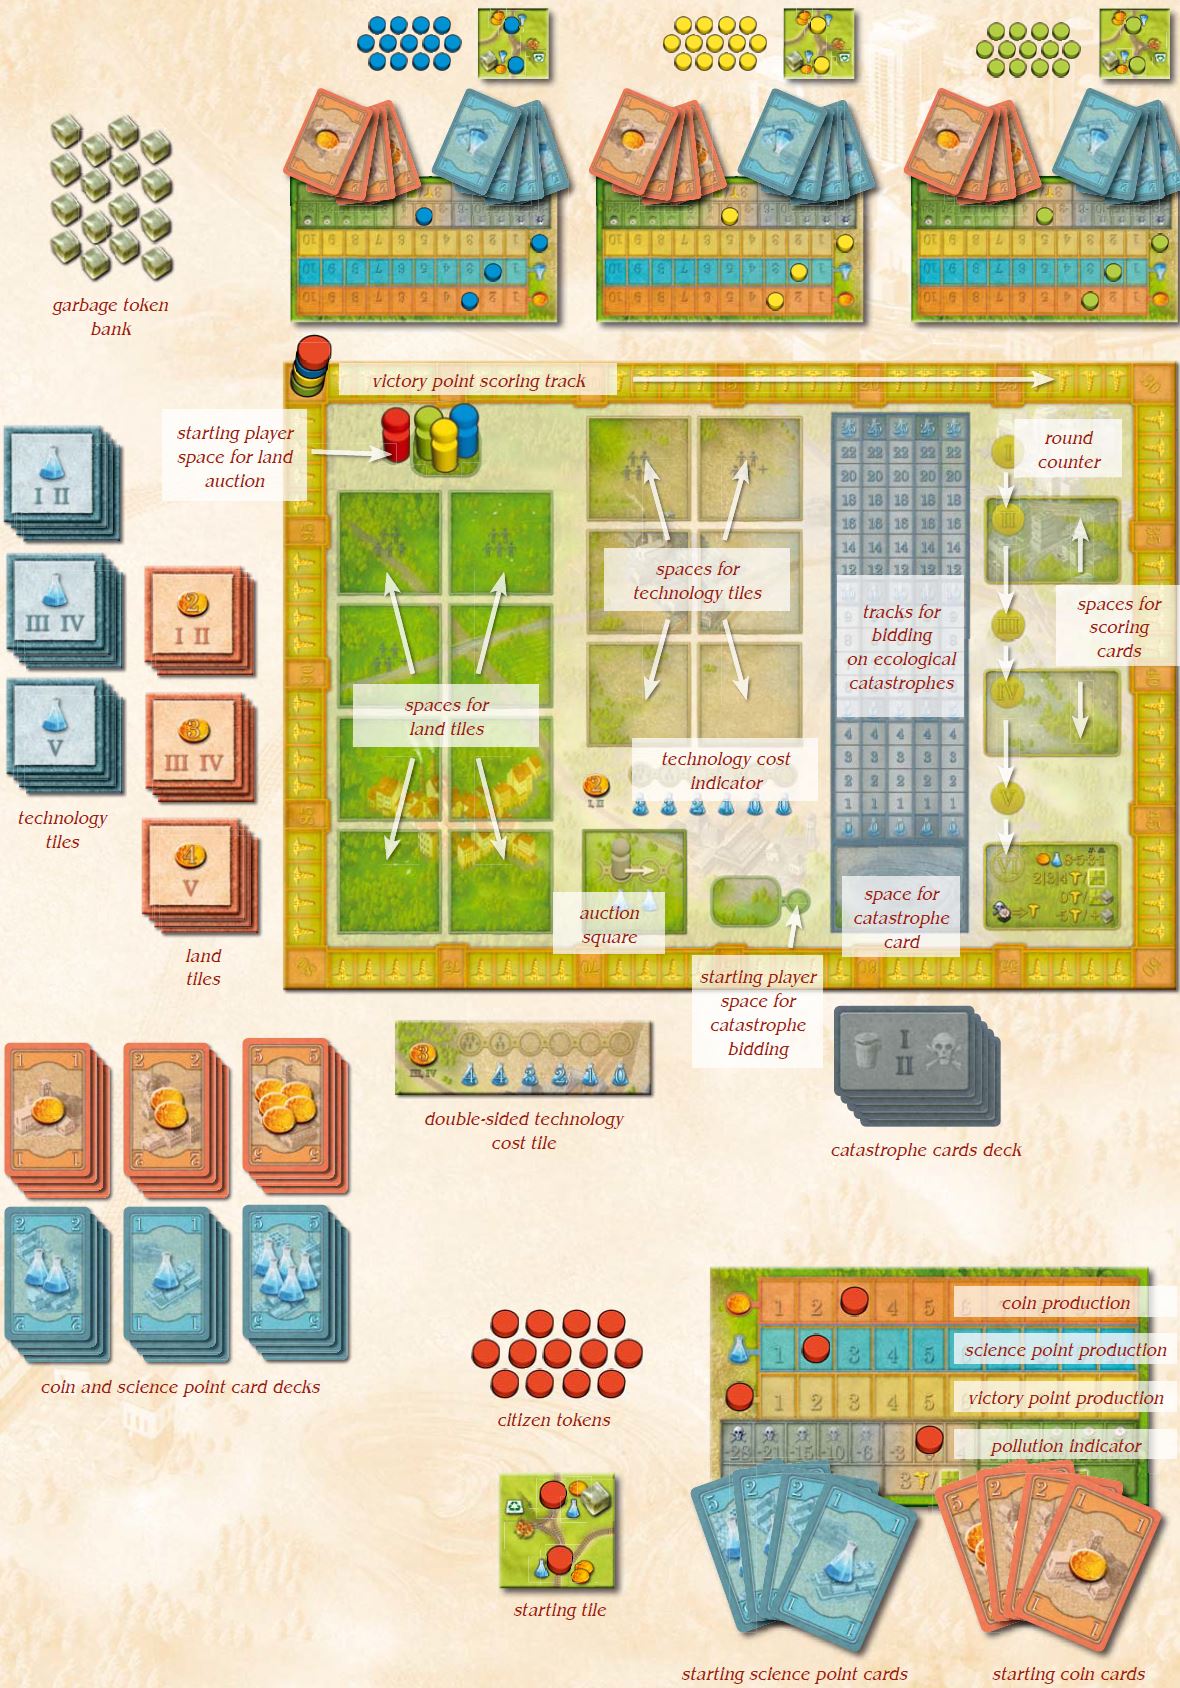
Components
- 45 land tiles
- 30 technology tiles
- 1 game board
- 5 player boards
- 1 double-sided technology cost tile
- 1 player figure
- 20 citizen tokens
- 1 scoring counter
- 95 garbage tokens
- 4 bridges
- 1 technology cost marker
- 1 round counter
- 6 scoring cards
- 9 catastrophe cards
- 94 coin and science point cards
- Rulebook
Setup
Table Setup
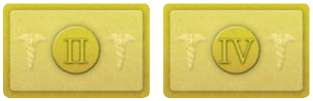
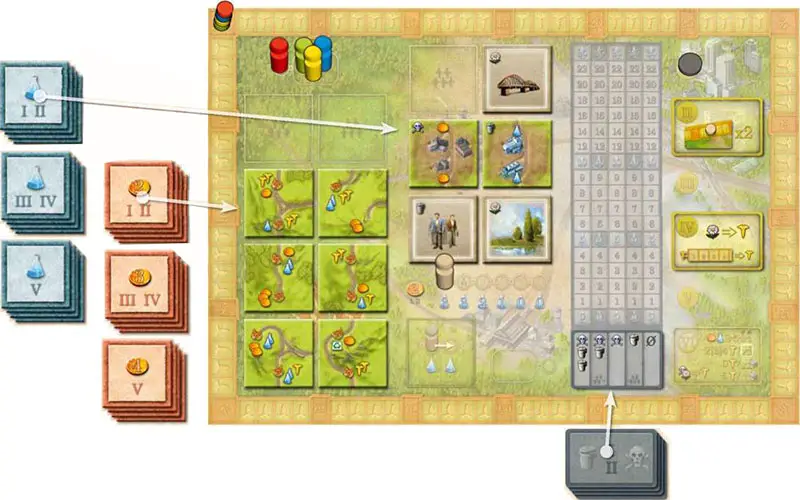
Place the game board in the center of the table and put the double- sided technology cost tile next to it. It will be needed later in game. Randomly select one of the round II scoring cards and one of the round IV scoring cards.
Place these on the corresponding spaces of the game board, face up, so that everyone can see which cards have been chosen. Put the remaining scoring cards in the box. They will not be needed in this game.
Note: If this is your first game, or if you are teaching the game to new players, we recommend playing without these scoring cards.
Land and Technology Tiles
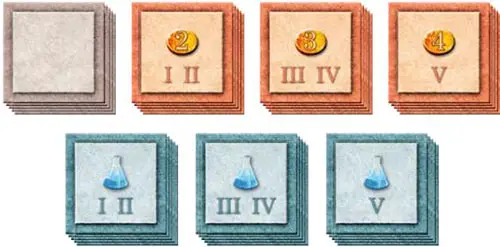
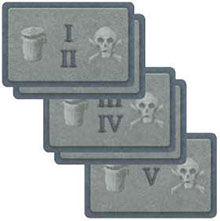
Separate the land tiles into four face down stacks, according to their backs. There should be one stack of starting tiles, one stack for rounds I and II, one stack for rounds III and IV, and one stack for round V. Shuffle each stack separately. Place these stacks near the game board.
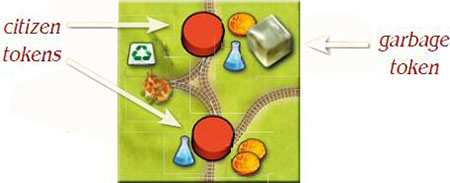
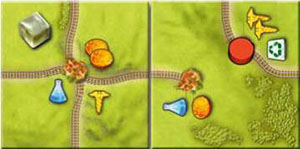
One city produces 1 coin and 1 science point. The other produces 2 coins and 1 science point. So the total is 3 coins and 2 science points.
Do the same with the technology tiles.
Catastrophe Cards
Randomly select five catastrophe cards: two labeled 1-II, two labeled III-IV, and one labeled V. Stack them with 1-11 on top, III-IV in the middle, and V on the bottom. Put the remaining catastrophe cards in the box. They will not be used in this game.
Note: No one should know which catastrophe cards are in the stack. Do not look at the cards that are returned to the box.
Player Setup
Each player chooses a color and takes the citizen tokens, figure, and scoring counter in that color. The player who is most fastidious about sorting garbage places his or her figure on the starting player space above the land tiles (the small space, on the left).
The other players place their figures on the larger space. Each player's scoring token begins the game on the 0 space of the victory point scoring track.
Starting Land

Each player takes a starting land tile and puts one garbage token and two citizen tokens on it. The garbage token can go anywhere.
The player places his citizen tokens in the two cities that produce coins and science points.
Player Board
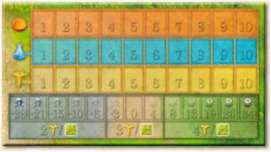
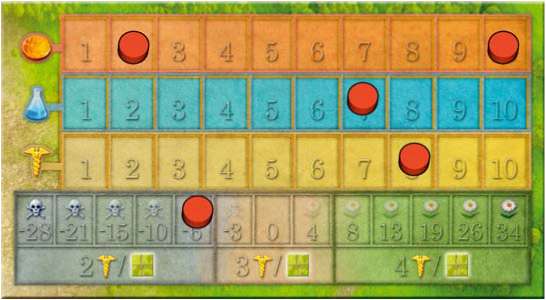
Each player takes a player board. The player board has tracks for indicating production and pollution. Players use some of their citizen tokens as markers of these values.
Each player places a token on the 3 coins space to show that his country produces 3 coins each turn. Each player places a token on the 2 science points space to show how much science his country produces.
Each country produces no victory points (yet) so each player places a third token on the victory points symbol to indicate no point production. Finally, each player places a token on the 0 space of his pollution indicator.
Coin and Science Point Cards
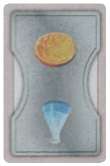
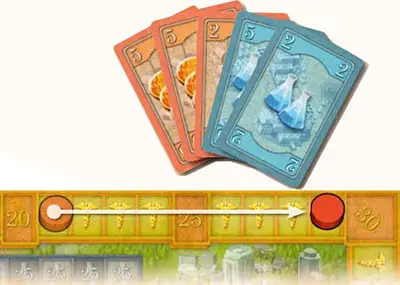
Each player begins the game with 10 coins and 10 science points, represented by coin cards and science point cards.
These cards are kept secret from the other players. The remaining cards form the bank. Players can make change at any time.
Game Play
The game consists of five full rounds and an abbreviated sixth round. Each full round has five phases:
- Setup
- Land Auction (and Technology Purchase)
- Preventing Catastrophes
- Upkeep (and Technology Use)
- Production (and Recycling)
Each even-numbered round has a sixth phase:
Bonus Scoring
Round VI is abbreviated, consisting only of Upkeep, Production, and the final Bonus Scoring.
Phase 1: Setup
Move the round counter to the space corresponding to the new round. Players' figures should already be on the spaces above the land auction section of the game board.
For later rounds, the starting player is the one who got the worst catastrophe in the previous round.

If any land tiles, technology tiles, or catastrophe cards are left on the board from the previous round, remove them. They will not be needed again in this game: can return them to the box.
Deal out new land tiles, face up, from the appropriate stack. (The tiles come in three stacks: one for rounds I and II, one for rounds III and IV, and one for round V). Do the same with the technology tiles
Symbols on the board indicate that certain spaces are to be used only when you have that many players. So in a five-player game, players deal 8 lands and 6 technologies. In a four-player game, players deal 6 lands and 5 technologies. In a three-player game, players deal 5 lands and 4 technologies.
No new land or technology tiles will be dealt later in the round. These will be the only tiles available this round, and any that are not purchased will be removed at the beginning of the next round. Reveal the top card from the catastrophe deck and place it face up on the appropriate space of the game board.
Prices go up twice during the game. At the beginning of round III, cover up the technology cost space with the double- sided technology cost tile, so that the 3 coin side is up. At the beginning of round V, flip the card over so that the 4 coin side is up. The coin symbol indicates the minimum cost of a land tile.
The cost of technology is indicated by the position of the technology cost marker. Place it on the appropriate space of the technology cost indicator. (In rounds I and II, the technology cost indicator is the one printed on the game board. The indicator for later rounds is printed on the double-sided technology cost tile). For a four- or five-player game, the marker is placed all the way to the left. For a three-player game, the marker begins the round on the second space from the left. Technologies will get cheaper during the land auction, as explained below.
Phase 2: Land Auction (and Technology Purchase)
Land is auctioned off to the highest bidder. Players may acquire one or more land tiles during this phase. Each player also gets one chance to purchase one technology after dropping out of the land auction.
Bidding on Land Tiles
The starting player (the on the left space) chooses the first land up for auction and moves it to the auction square (underneath the technology cost indicator).
The starting player must also make the opening bid. The minimum opening bid is depicted beside the technology cost indicator (2 coins in rounds one and two, 3 coins in rounds three and four, and 4 coins in round five) but the starting player may open higher if he or she wishes.
All players in the auction then take turns bidding, beginning with the player on the starting player's left and proceeding clockwise.
On a player's turn to bid, he has three options:
- Bid a higher number of coins;
- Pass on the current land tile; or
- Drop out of the land auction (and possibly purchase a technology).
Bidding continues around the table, so that each player (including the starting player) may raise the bid multiple times.
If a player passes, he cannot bid on that land tile later, but he does get a chance to bid on the next tile. If he drops out, he cannot bid on any more land tiles this round. If he does not have enough coins to beat the previous bid, he must either pass or drop out; he cannot bid more coins than he actually has.
Once all other players have passed or dropped out, the player who bid the highest does the following:
- pays the stated number of coins to the bank,
- places the auctioned land near his or her other land tiles,
- moves the technology cost marker one space to the right (unless it is already on the rightmost space)
- places one of his or her citizen tokens on the newly acquired land tile
- places one or more garbage tokens on the land tile,
- becomes the new starting player for the next auction this round.
A player gets one garbage token on the first land he acquires this round, two on the second, three on the third, etc. The amount depends only on the number of land tiles you have bought this round, not on your total number of land tiles.
Note that decisions about where to attach the land and where to place the citizen token are not made until later in the round, during the Upkeep phase.
The new starting player chooses the next land to put up for auction and makes an opening bid. Players who dropped out of the land auction cannot participate, but those who passed on the previous land will have a chance to bid on the new land, pass on it, or drop out. The winner of each auction becomes the starting player for the next, and the auctions continue until all players have dropped out.
The starting player can choose to drop out instead of picking the next land to auction. If the starting player does not have enough coins to make the minimum bid, he or she must drop out instead of picking a land.
When the starting player drops out instead of picking a land, the new starting player will be the next player in clockwise order who has not dropped out. The new starting player then has the option of picking a land (and making an opening bid) or dropping out.
If a player is the only player who has not dropped out, he may acquire as many of the remaining land tiles as he wants, for the minimum price. Do not forget, however, that additional lands come with additional garbage.
Dropping out and Purchasing a Technology Tile
When a player drops out of the land auction, he gets a chance to purchase a technology tile. There are two time when he can drop out:
- when it is his turn to bid on the current land tile
- when he is the starting player and it is time for him to pick the next land tile to be auctioned.
If a player passes on a land tile, he does not get a chance to drop out until it is his turn to make a bid on the next land tile or choose new land tile for auction.
When a player drops out, he moves his figure to one of the spaces below the technology cost indicator. (The last player to drop out gets the starting player space. All other players' figures go on the larger space).
A player can buy any one of the available technologies by paying the number of science points indicated by the technology cost marker. This is a player's only chance to buy a technology this round.
Order is important. The first player to drop out gets first choice of the technologies. Note that the technology cost marker moves to the right only after a land is won in auction, so everyone who drops out during the same land's auction will pay the same price for a new technology.
People who drop out after a few lands have been auctioned will have a cheaper price for technologies. In the end, every player will drop out of the land auction (either because of lack of funds, lack of lands, or lack of interest) so each player will get one chance to buy a technology every round.
When a player buys a new technology tile, he pays the required number of science points to the bank and takes the tile. Most technologies have an immediate ecological impact, indicated by one or more symbols in the upper left corner:

Take the indicated number of garbage tokens and place them next to your land tiles. (The player will place this garbage on his land during Upkeep).

Moves his pollution marker (on his player board) one space to the left.

Moves his pollution marker one space to the right.
A technology's immediate ecological impact happens only once during the game: immediately after you acquire the technology tile.
There is a limit to how good or bad a player's environmental quality can be. If a  or
or  would move his marker off the end of the pollution indicator, just leave the marker where it is.
Some technologies (the ones with buildings and railroad tracks) are institutions that are attached to a player's country during Upkeep. Some give a player an ability that only he can use once. Some give a player an ability he can use every turn. Complete information on technologies is included in the Technologies chapter.
Consolation
In certain cases, it can happen that a player wins none of the round's auctions and gets no new lands. To compensate for this misfortune, the player receives money from the bank: 4, 5, or 6 coins, depending on the round. (Take the minimum land tile price and add 2).
Note that even a player with no coins will have a chance to purchase a technology tile when he or she drops out of the auction.
Phase 3: Preventing Catastrophes
At the end of the Land Auction phase, all players' figures are below the technology cost indicator and beside the catastrophe card. Now it is time to start dealing with these catastrophes.
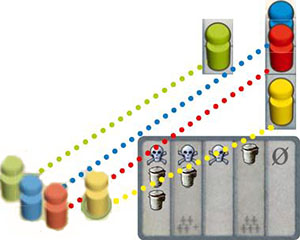
In a five-player game, all five columns of the catastrophe card apply. In a four-player game, ignore the column labeled for five players In a three-player game, ignore that column and the column labeled for four players . To make this more clear, use tokens from the leftover colors to cover up these columns on the card.
Most columns have garbage  or pollution icons - or both! Each icon represents one garbage token that is acquired by the "winner" of the catastrophe. Each icon requires the "winner" to move his or her pollution marker one space to the left. This means that the first column of the catastrophe card is the full force of the catastrophe, while the last column (the empty one) represents efforts that completely avert the catastrophe.
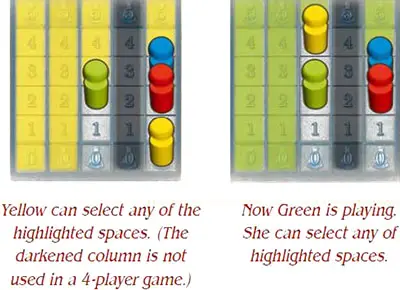
The player who dropped out of the land auction last should have placed his or her figure on the starting player space. This player opens the bidding on catastrophes by choosing a column and bidding a certain number of science points for it.
Bidding continues around the table, clockwise. To indicate a bid, a player places his figure on the corresponding number in that column. The minimum bid is 0 and the maximum is 25. A player cannot bid more science points than he can pay. When a player bids on a column that already has a figure in it, he must make a higher bid.
Yellow is the starting player. He chooses the rightmost column. Green chooses the middle column. Red wants the same column as Yellow, so she overbids him. Blue also wants that column, so he overbids both of them.
After each player has placed his or her figure on the bidding tracks, bidding continues, in clockwise order, until there is only one figure in each available column. On a player's turn, there are two possibilities:
-
His figure marks the highest bid for that column. In this case, play passes to the left. He cannot change columns unless someone overbids him.
-
His figure is below one or more other figures in that column. In this case, he must make a new bid. He may choose any column (including his current column) as long as he makes the highest bid on that column.
When there is exactly one figure in each available column, bidding ends. Pay the promised science points to the bank, and collect the results of your chosen catastrophe.
For each icon, the player takes one garbage token and place it in front of him.
For each icon, the player moves his your pollution marker one space to the left (unless the marker is already as far left as it can go).
The leftmost column is the worst catastrophe. The player who "wins" this mess will open the land auction next round.
Phase 4: Upkeep (and Technology Use)
To speed play, all players can deal with upkeep simultaneously. However, if one player wants to base his or her decisions on the actions of the others, players should handle upkeep sequentially, beginning with the player in the leftmost column, and continuing clockwise.
Placing New Garbage
First, a player needs to place any garbage tokens that he got this round (from his new technology and his ecological catastrophe). Garbage tokens are always placed on land tiles, not on institution tiles.
The garbage he accumulated this round should be placed on land tiles that he acquired this round, but he may choose how much goes on each tile. If he acquired no new land tiles this round, he places his new garbage tokens on the lands that are already a part of his region.
A garbage token's exact location on its tile doesn't matter (but try not to cover up cities, railroads, or production icons). Unlike a citizen token, the garbage token belongs to the entire land tile, not to any particular city.
Note that it is only garbage from technologies and catastrophes that is distributed at this time. The garbage that came with land tiles a player purchased must remain on those tiles (for now).
Attaching New Lands and Institutions
Next players add their your newly acquired lands (and institutions) to their region. Tiles are placed in a grid. Each tile has four possible orientations, and they may use any one of them.
Each new tile should connect to a tile already in place, either edge-to-edge or corner-to-corner. They may attach new tiles in any order. Railroad tracks leaving the edge of one tile are not required to match up with tracks on another tile.
If a player acquired a new institution (a technology tile with buildings and railroad tracks) he adds it to his region as though it were another land tile.
Placing New Citizens
While attaching new land tiles, a player needs to decide where his new citizens will work. Each land comes with one citizen token, but many lands have two cities. His new citizen can only work in one of them. Choose the city wisely because it is difficult to move the citizen token later.
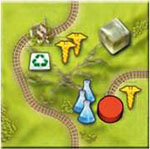
The icons indicate what the city produces when it is occupied by a citizen token. No city may have more than one token, but some cities will have no token. Cities can produce coins, science points, and victory points.
Some cities have recycling centers, which can be used during the Production phase. Unoccupied cities produce nothing, and their recycling centers do not work. Note that newly acquired citizens are not free to work in any city in the region. They have to work in a city on the tile that they came with (at least for now).
Using Technologies
Once you have all your new garbage assigned to land tiles, all your new citizens assigned to cities, and all you new land (and institution) tiles added to your region, you can use any special abilities that your technologies give you.
For example, if you have a locomotive, you may transport a citizen token at this time. See the Technology chapter for details.
Read here all detailed information about Technologies.
Updating Production Indicators
Finally, a player needs to update his production indicators to reflect his current production of coins, science points, and victory points. There is no upper limit to production. If he produces more than 10 of something, he denotes this with multiple tokens:
Example: To indicate an income of 23 coins, put 2 tokens on the 10 space and one token on the 3 space.

At any point during the game, it is possible to verify the values shown on the production indicators by counting the icons produced by each occupied city in the country. However, the indicators should be kept up-to-date so that you do not waste time re-counting.
Phase 5: Production (and Recycling)
In this phase, the players' occupied cities produce the indicated number of coins, science points, and victory points.
Since players just counted these values at the end of the Upkeep phase, the indicators on the players boards should tell them how much they get of each. They also get a chance to use functional recycling centers at this time.
Getting Cards and Scoring Points
From the bank, take coin cards to represent the number of coins produced. Do the same with science point cards. (Reminder: players can make change at any time). Next, players move their score counters ahead one space for each victory point produced.
Example: After Upkeep, Red's production indicators look like this:
Red gets cards equal to 12 coins and 7 science points from the bank. Red moves her scoring counter ahead 8 spaces on the scoring track.
Recycling
The Production phase is also the players' chance to use their functional recycling centers. Only recycling centers in occupied cities are functional. Each functional recycling center can remove 1 garbage token. The garbage token must meet one of the following criteria:
Either the token must be on the same land tile as the recycling center;
Or the token must be on a land tile adjacent to the recycling center and there must be direct rail link to the recycling center between the two tiles.

The recycling center can remove this garbage.
This recycling center has no citizens to make it work.
It cannot remove any garbage.
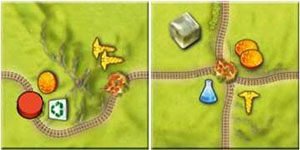
The recycling center can remove this garbage.
The rail link connects the garbage to the other tile, but not to the tile's recycling center.
This garbage cannot be removed.
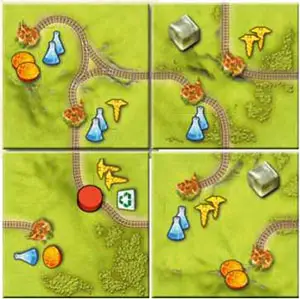
The lower two tiles are adjacent, but the rail link between the two tiles doesn't go far enough.
The garbage cannot be removed.
The upper right tile shares a corner with recycling center tile. That is not good enough. The garbage cannot be removed.
Once a player has taken care of his production and recycling, move his figure back to the game board's land auction section to show that he is ready for the next round. The player who got the worst (leftmost) catastrophe moves to the starting player space. All other players move to the larger space.
Phase 6: Bonus Scoring
Victory points produced by players' cities are scored every round during Production. However, at the end of rounds II, IV, and VI, players also score bonus points.
The scoring cards were selected at random at the beginning of the game. They should be kept on the game board face up, so that players know the bonus criteria from the very beginning.
Note: We recommend playing your first game without the scoring cards for rounds two and four. In this simplified game, you will still produce victory points during Production, but you will not have any bonus scoring until the end of the game.
Round Two Scoring Cards
-
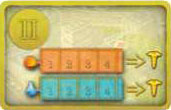
You score one victory point for each coin and each science point that your cities produced this round (as shown on your indicators).
-
You score one victory point for each victory point you have gained in the first two rounds (so you double the number of victory points you currently have)
-
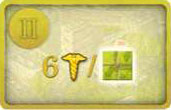
You score 6 victory points for each land tile that has no garbage tokens. (Technology tiles do not count as land tiles).
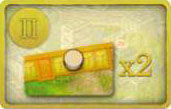
Round Four Scoring Cards
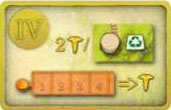
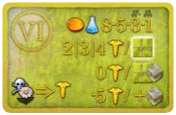
You score 2 victory points for each functional recycling center. You also score one victory point for each coin that your cities produced this round.
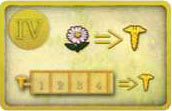
With a symbol, you score the indicated number of points. If not, you score no points (but you get no penalties at this time). Either way, you also score one victory point for each victory point your cities produced this round.
So the amount shown on your victory points indicator gets scored twice in round four: once during Production and once during this Bonus Scoring.
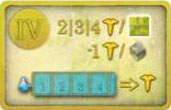
Each land tile (not technology tile) with no garbage gives you 2, 3, or 4 victory points, depending on the location of your pollution marker. (The pollution indicator is divided into three sections).
For each garbage token in your country, move your scoring counter back one point. You score one victory point for each science point that your cities produced this round.
Round Six Bonus Scoring
The bonus scoring at the end of round six is always the same, even for your first game.
-
Each land tile with no garbage scores a player 2, 3, or 4 victory points, as determined by his pollution marker. (Technology tiles do not count as land tiles).
-
Each land tile with 1 garbage token is neutral and gives a player no bonus or penalty.
-
Each land tile with more than 1 garbage token gives a player a steep penalty:
- 2 garbage tokens is -5;
- 3 garbage tokens is -10;
- 4 garbage tokens is -15;
- etc.
-
A player scores victory points for environmental quality
or takes penalties for pollution as shown by the number under his pollution marker.
Players also score points for being better than their opponents at commerce and science. All players reveal their coin cards. The player with the most coins gets 8 points. The player with the second most gets 5 points. The third player gets 3 points. The fourth player gets 1 point. To score any points, players have to have at least 1 coin.
The player with the fewest coins always scores 0 points for commerce. So in a four-player game, you only award the bonuses 8, 5, and 3. In a three-player game, you award the bonuses 8 and 5.
After scoring points for coins, reveal science point cards and score them in the same way.
In case of ties, add up the points in question and divide them by the number of tied players, rounding down, as shown in this example:
Note that these bonus points are scored by comparing the cards remaining in players' hands, not by comparing production indicators.
Round Six
Round six is shorter. Skip the land and catastrophe bidding and go straight to Upkeep. So round six has three phases:
- Upkeep (Technology Use)
- Partial Production (and Recycling)
- Bonus Scoring
Since players get no new tiles, the only thing players do during Upkeep is use their technologies.
In round six, players get no new coins or science points during Production. However, they do produce victory points, as normal, and they have one last chance to use their recycling centers.
The Bonus Scoring at the end of round six is according to the scoring card printed on the game board. This is explained in detail in the previous section.
End of the Game
After the round six bonus points are scored, the game ends.
The winner is the player with the most victory points. Break ties in favor of the player with the fewest garbage tokens. (If players are still tied, there are multiple winners).
Continue Reading
