While the Fellowship covertly seeks to reach Mount Doom, Sauron is searching tirelessly for the Ring-bearers and their Companions. The Dark Lord gathers rumors and sends out spies, hoping to finally reclaim his long-lost treasure. These efforts are represented in War of the Ring by the Hunt for the Ring.
The Hunt Pool
The Hunt Pool is a set of cardboard tiles representing the effects of a successful Hunt. These tiles should be placed in an opaque container at the beginning of the game (such as a cup or similar container), as one tile must be drawn randomly each time the Hunt is successful.
If, at any time, all the tiles in the Hunt Pool have been used, return all Standard tiles (beige) to the pool, but do not return to the pool any special tiles (blue/red), or any tile who has been "permanently removed" from the game due to an Event card effect.
Standard Hunt Tiles
Most of the standard Hunt tiles (which have a beige background) show a numerical value, ranging from 0 to 3. This value represents the effectiveness of the successful Hunt and is called Hunt damage.
Hunt Tiles
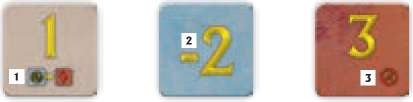
The background color indicates the type of tile: beige=standard, blue=Fellowship, red=Shadow
- Reveal Icon (if present)
- Hunt Damage
- Stop Icon (if present)
Some Hunt tiles have the special icons described below:
The Eye icon
 , which represents a variable numerical value.
The Reveal icon
 , which represents the Fellowship being revealed to Sauron.
Special Hunt Tiles
The special Hunt tiles (which have either a blue background, for the Fellowship special Hunt tiles, or a red background, for the Shadow special Hunt tiles) are set aside at the beginning of the game and enter play only by the use of Event cards.
When these Event cards are played, the special Hunt tile in question is set aside until the Fellowship enters Mordor. When the Fellowship enters Mordor, any such special Hunt tiles are added to the Hunt Pool.
If the Fellowship is already on the Mordor Track when a special tile enters play, simply add the tile immediately to the Hunt Pool.
Some of the special Hunt tiles show a negative value or a random value, described as follows:
A negative value (-2 or -1) means that there is no Hunt damage and instead the indicated number is actually subtracted from the current Corruption of the Ring-bearers on the Fellowship Track (to a minimum of zero).
A Die icon
 means that the Hunt damage is equal to the subsequent roll of a die (roll after the tile has been revealed). Such a Hunt tile is considered to be a numbered tile for all Event card effects.
All Shadow special tiles show a small Stop icon
 in the lower right corner.
Hunting The Fellowship

The Hunt Roll
Every time the Free Peoples player moves the Fellowship, the Shadow player rolls dice to determine the effect of the Hunt. The effect of the Hunt is determined as follows.
First, the Shadow player determines the Hunt Level. The Hunt Level is equal to the total number of Shadow Action dice in the Hunt Box.
Note: These dice were placed in the Hunt Box by the Shadow player during the Hunt Allocation phase, plus any Eye dice that he rolled during the Action roll phase.
Then, the Shadow player makes a Hunt roll by rolling a number of Combat dice equal to the Hunt Level. Each result of '6' is a success.
The maximum number of dice that can be rolled for a Hunt roll is five. A Hunt Level in excess of five does not add further dice to the roll.
Modifiers to the Hunt Roll
If the Fellowship has moved more than once per turn, the Hunt becomes easier.
For every Action die that the Free Peoples player has placed in the Hunt Box (a Free Peoples Action die is placed here after every movement of the Fellowship), the Shadow player adds +1 to each Hunt roll die result.
If a die result is '6' or higher after this addition, it is a success.
Example: When the Fellowship moves for the first time during a turn, the Shadow player needs to roll '6' results on his Hunt dice to achieve a successful Hunt.
If the Fellowship, however, is moving for the second time (after the Free Peoples player has used an Action die for the first movement and placed it in the Hunt Box), the Shadow player needs only to roll a '5' or '6' for a successful Hunt.
Note: A roll of '1' is always a failure, regardless of any modifier.
Hunt Re-rolls
The presence of Sauron's servants or Strongholds makes movement of the Fellowship more dangerous.
If, during the Hunt, the Ring-bearers are in a region that contains one or more of the following:
- A Stronghold controlled by the Shadow player
- One or more Shadow Army units
- One or more Nazgul
then, the Shadow player can, after the Hunt roll, re-roll one failed Hunt roll die for each of these conditions that apply.
Example 1: Three Army units and two Nazgul are in the region that contains the Fellowship figure, so the Shadow player may re-roll two dice (one for the presence of Army units, and another for the presence of the Nazgul).
Example 2: One Nazgul, four Army units, and a Shadow Stronghold are in the region containing the Fellowship figure, so the Shadow player may re-roll three dice (because all the listed conditions apply).
Re-rolls also receive the +1 bonus for each Free Peoples die in the Hunt Box.
Hunt effects when declaring or revealing the fellowship
When the Free Peoples player declares the Fellowship, certain abilities and events may force him to draw a Hunt tile. When this happens, ignore any Reveal icon on the drawn tile if the Fellowship has been declared in a Free Peoples Stronghold or City controlled by the Free Peoples.
When the Fellowship is revealed, if the Free Peoples player is forced to draw multiple Hunt tiles because of a Shadow Stronghold presence, events, and abilities, each tile effect is resolved completely before applying the following tile effect.
First the player resolves the effect of the tile that caused the Fellowship to be revealed. Then he resolves all tiles related to events and abilities. Lastly, he resolves the tile drawn due to the Shadow Stronghold.
Example: A Hunt tile reveals the Fellowship in Moria, and the "Balrog of Moria" card is in play. Three Hunt tiles are drawn (one for the Hunt, one for the Balrog, and one for the Shadow Stronghold).
First the player applies all effects due to the first Hunt tile (the one which caused the Fellowship to be revealed), then the effect of the tile drawn for the Balrog card is resolved, and finally the effect of the tile drawn for the Stronghold is resolved.
Determining Hunt Damage
If the Shadow player rolls at least one success on his Hunt roll (including re-rolls), the Hunt is successful and the Shadow player draws one tile from the Hunt Pool.
If the tile is numbered, its value represents the Hunt damage inflicted to the Fellowship.
If the tile shows an Eye, the Hunt damage is equal to the number of successes rolled in the Hunt roll (if such a tile was drawn because of the Fellowship's leaving or entering a Shadow Stronghold, or due to an Event card, the Eye is considered to have a value of 0).
If the tile has a Reveal icon on it, the Fellowship is revealed after resolving any other effect.
Effects of the Hunt
To deal with the effects of a successful Hunt, follow these steps in order:
-
The Free Peoples player may use one relevant "Play on the Table" Event card to cancel or reduce the damage of the Hunt.
-
Then, the Free Peoples player may use the Guide's special ability. If, after these steps, the Hunt damage is one or more, the Free Peoples player may decide to reduce the Hunt damage by taking a casualty - losing one Companion due to the hazards encountered by the Fellowship, or a fight between the Fellowship and servants of the Shadow.
-
Any remaining Hunt damage must be dealt with by using the Ring (see below), increasing the Corruption of the Ring-bearers.
-
If the Hunt reveals the Fellowship, the Fellowship is now revealed (sometimes, revealing the Fellowship may cause the draw of a new tile, see Hunt Effects When Declaring or Revealing the Fellowship).
Note: If, at any time during the Hunt resolution, a new Guide is appointed (this happens, for example, when you use Meriadoc's and Peregrin's Guide ability, or because the Guide has been eliminated), the ability of the new Guide may be used immediately, if applicable.
Taking a Casualty
If the Free Peoples player takes a casualty, he must eliminate one Companion.
The Free Peoples player can decide between either taking the Guide as a casualty or randomly picking one Companion (excluding the Ring-bearers, but including the Guide) from the Fellowship.
If the Free Peoples player decides to suffer a random casualty, the Shadow player randomly selects a face-down Companion counter from the Fellowship Box. The drawn Companion is eliminated from the game.
If the Hunt damage is higher than the Level of the eliminated Companion (including an eliminated Guide), any excess damage must still be taken as Corruption by the Ring-bearers.
If the Hunt damage is lower than the Level of the Companion, he is eliminated nonetheless (i.e., it is not possible to "wound" Companions).
Using the Ring
When the Free Peoples player uses the Ring, he advances the Corruption counter on the Fellowship Track by a number of steps equal to the Hunt damage.
Example: During the fourth game turn, the Ring- bearers are in the Goblin's Gate region and the Free Peoples player is moving the Fellowship Progress counter from step '1' to step '2' of the Fellowship Track.
There are three Shadow dice in the Hunt Box and one Free Peoples die, as this is the second time the Fellowship has moved this turn.
The Shadow player rolls three Combat dice: he must roll at least one '5' or '6' for the Hunt to be successful. He rolls '2,' '5,' and '6': a total of two successes (the Shadow player needed only one success for the Hunt to succeed). He then draws a random tile from the Hunt Pool: a tile with a '3' and no Reveal icon. The Hunt damage must be resolved.
There are no cards or Character's abilities to be used, and the Free Peoples player decides to take a casualty. Strider is guiding the Fellowship, and the player does not want him to die, so he decides to draw a random Character instead
All the Companion counters are shuffled and one is chosen randomly: Gimli is drawn. The valiant dwarf dies confronting the servants of the Shadow. As Gimli's Level is 2, and the Hunt damage is 3, 1 point of Hunt damage remains to be taken as Corruption, and the Corruption of the Ring-bearers increases.
Because the tile does not have a Reveal icon, the Fellowship Progress counter's Hidden side remains face up.
The one Ring and the Quest For Mount Doom
Even as the Dark Lord desperately searches for the One Ring, he cannot imagine that someone would bring it to Mordor.
Consequently, he does not look for the Ring within the borders of his own land.
In War of the Ring, from the moment the One Ring reaches the borders of Mordor, events are set in motion that are mostly beyond the control of the players themselves.
The real struggle now lies between the will of the Ring to return to its Master and the determination of the Ring-bearers to pursue their mission to its bitter end.
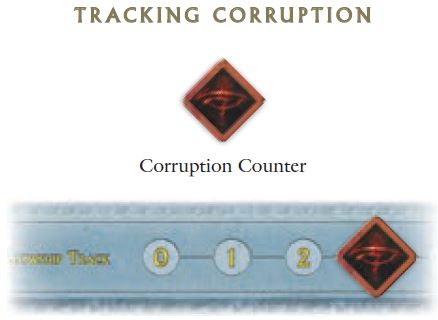
The Position of the Corruption counter on the Fellowship Track is used to record the Corruption of the Ring-bearers.
The Burden of the Ring
The physical, mental, and moral struggle of the Ring- bearers is represented by Corruption. Corruption is added to the Ring-bearers each time that the Ring is used to counter the effects of a successful Hunt, or as a result of various Event cards.
Corruption is removed from the Ring-bearers by resting in a friendly City or Stronghold or by the use of certain special abilities and Event cards.
Each time Corruption is added or removed, the Free Peoples player adjusts the Corruption counter on the Fellowship Track accordingly.
As soon as the Corruption counter reaches 12 Corruption points on the Fellowship Track, the Free Peoples player immediately loses the game.
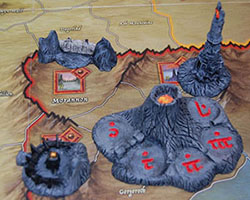
The Fellowship in Mordor
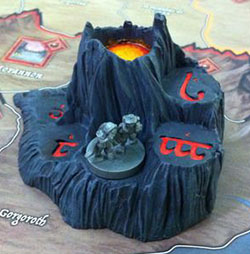
In Mordor, the power of the Dark Lord is everywhere, and the burden of the Ring becomes heavier with every step. The Mordor Track is the final part of the quest to destroy the One Ring.
The track is represented by the circles superimposed on the Gorgoroth region on the map. Note that the circles are not actually considered to be part of that region, and the Fellowship is not considered to be in the Gorgoroth region, or any other region, when on the Mordor Track.
If the Fellowship is in Minas Morgul or Morannon during a Fellowship phase, the Free Peoples player may decide to enter Mordor. In this case, immediately proceed to the following steps (after fully resolving the declaration of the Fellowship's position, if necessary):
-
Place the Ring-bearers figure on the first step of the Mordor Track (labeled with the Elven numeral '0'). From this moment on, the Fellowship is considered to be "On the Mordor Track".
The Fellowship Progress counter is no longer advanced on the Fellowship Track, but it is still used to show whether the Fellowship is Hidden or Revealed.
-
Create a new Hunt Pool by placing all Eye tiles previously drawn back with the remaining tiles of the Hunt Pool, and also add any special tiles put in play by Event cards. Do not place back in the pool any Eye tile which was permanently removed from the game.
Special Rules
The following special rules apply when the Fellowship is on the Mordor Track:
Companions in the Fellowship can never be separated, either as a result of using Action dice or as the effect of special abilities or Event cards. Anything that would normally separate a Companion removes him from the game instead.
When the Free Peoples player tries to move the Fellowship during the Action Resolution phase, do not roll the Hunt dice. Instead, automatically draw one tile from the Hunt Pool. The effects of this tile are applied normally as for a successful Hunt, except for the following:
-
If the tile drawn shows an Eye, the Hunt damage is equal to the number of dice in the Hunt Box (including Free Peoples dice previously used for moving the Fellowship during the same turn).
-
Normally the Fellowship advances one step on the Mordor Track when moving. However, if the tile shows a Stop icon, the Fellowship remains on the same step and does not move forward.
The Fellowship is still required to be Hidden in order to advance on the Mordor Track. If the Fellowship is Revealed, the Free Peoples player must, as normal, use a Character Action die result to hide the Fellowship once again.
If, at the end of the Action Resolution phase, the Free Peoples player has not attempted to move or hide the Fellowship on the Mordor Track during that turn, one Corruption is automatically added to the Ring-bearers.
When the Fellowship has completed all five steps on the Mordor Track, the Crack of Doom has been reached and the Free Peoples player wins the game (unless the Ring-bearers have reached 12 Corruption points).
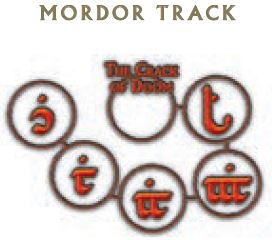
The Mordor Track is not considered a part of the Gorgoroth region.
When the Fellowship enters Mordor, the Ring-bearers figure is put on the first circle of the track.
If the Fellowship enters the Crack of Doom and the Ring-bearers are not at 12 Corruption, the Free Peoples player wins the game.
Continue Reading


