
Components
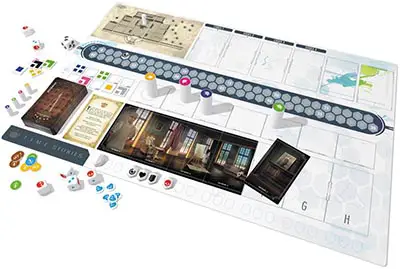
- Game Board
- 8 Agent Pawns
- 1 Time Token
- 1 Group Token
- 1 Time Captain Die
- 6 Action Dice
- 40 Normal Shields / Skull Shields
- 7 Time Shields
- 7 Heart Shields
- 7 Special Shields
- 140 Resource Tokens
- 30 Life Points (LP)
- 24 State Tokens
Object of the Game
At the beginning of the scenario, you are at the T.I.M.E Agency base and you receive your mission briefing. It's then a question of you successfully completing that mission, ideally in a minimum number of attempts.
An attempt is commonly called a "run". A run equals a complete game, meaning the use of all of the Temporal Units (TU) at your disposal.
Sending you into your receptacles, wherever they might be at the four corners of time and space, has an enormous energy cost, and because of that you have only a limited time in the field to successfully complete your mission, after which you'll be recalled to base.
Setup
The set-up of all scenarios remains the same. Simply follow the numbers below step-by-step.
The set-up of all scenarios remains the same. Simply follow the numbers below step-by-step.
As much as possible, sit on the same side of the game board so that everyone can clearly see the card panoramas during the game.
This aids immersion and also helps in your missions as some details from the artwork can turn out to be vital...
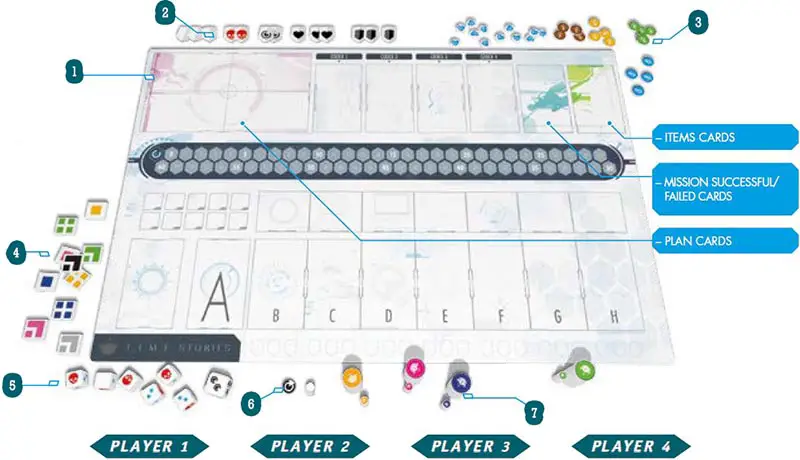
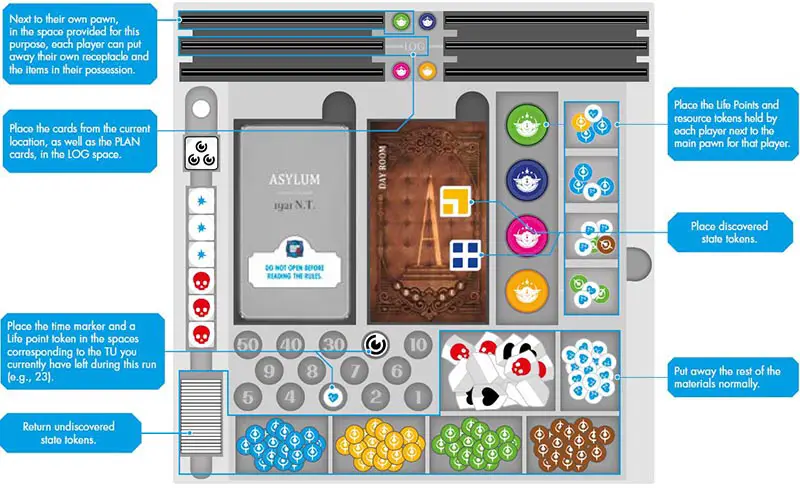
1 Set up the game board facing the players.
2 Place half of the normal shields with the skull side showing and other half with the white shield showing. Sort the other three kinds of shields by type.
3 Place the Life points as well as the resource tokens above the board.
4 Sort the 24 state tokens and place them to the left of the board.
5 Place the 6 action dice and the Time Captain die near the players.
6 Place the time token and the group pawn near the players. Their starting position is given to you at the beginning of the scenario, during the lecture at the base.
7 Each player takes one of the main pawns of the color of their choice, as well as the small one of the matching color.
Anatomy of a Deck
As you now know, a scenario is comprised only of the cards that make the deck. There are many types of cards, of which these are the which will be found in all decks.
The "flash Cards"
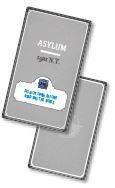
This term is taken from poker, where it's important to not reveal the card at the bottom of the deck.
The upper flash card gives the name of the scenario, while the lower flash card keeps you from seeing the last card of the deck by accident.
These cards are not used in the game and can be set aside. Some scenarios do not contain flash cards.
Set-up of a Deck
Starting from the top, the cards of a scenario are sorted by set-up order and adventure start-up. The base is therefore always found at the top of the deck. Bob, Laura, and Sam will let you know where and when to place which cards.
When you open a deck, place it on the space for it on the board, open the base (see further), and let yourself be guided. During the mission, it's up to you to discover the locations that most interest you.
Resetting the Deck
If you must reset your deck (to put it away, to play it with friends, or after failing a mission), the little numbers on the back of the cards allow you to sort them in their original order. Card #1 must be on the top, followed by card #2, etc.
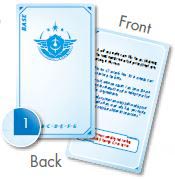
Front/Back
The back of a card is always the side that shows the numbering discussed above. The front is the other side, of course.
The Base Cards
All missions start at the base. This is where the players learn the nature of the mission, as well as any rules specific to the scenario.
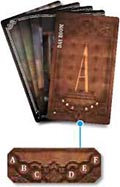
The base is constructed like a location, that is, a set of cards whose backs form a panorama that illustrates the scene which opens before you.
Opening the base means placing all of its cards on the board in the alphabetical order of the letters shown on the back of the cards (from A to - at most - H).
Be careful: This area works differently from the others. There are no TU to spend, no tokens to place. Simply read the cards in order, one after another.
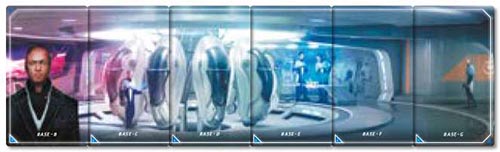
Once read, the Base cards are always kept next to the board. This way, they are available throughout the game to allow confirmation of rule points, to check the mission goal, etc.
The Successful/failed Mission Cards
If you successfully complete your mission, the game sends you to the Mission Successful card.
If you end up using all of your TU before completing the mission, you must read the Mission Failed TU card.
There are sometimes other ways of failing your mission. If this happens, the scenario will then direct you to the Mission Failed card matching your failure.

The 4 Plan Cards
The 4 PLAN cards are placed on the board on their reserved space to form a map of the area. On this map, you will place the group token in order to locate your team in the world being visited.

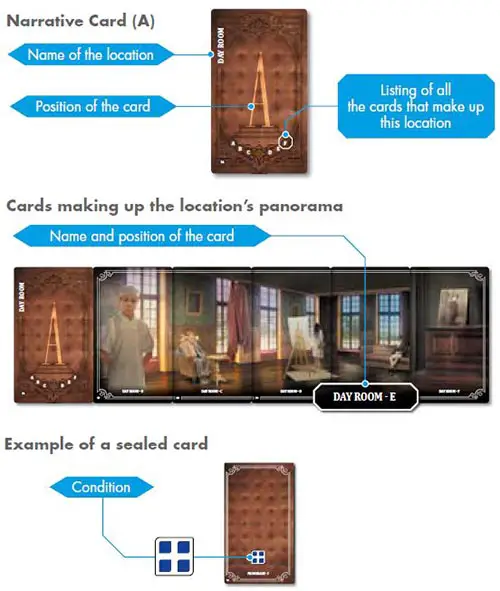
The Location Cards
A scenario is made up of locations, each of which is made up of two or three types of cards:
Card A is a narration card, which details the location you are looking at and which is read out loud by the current Time Captain.
The other location cards form a panorama that illustrates what you're seeing through the eyes of your receptacles.
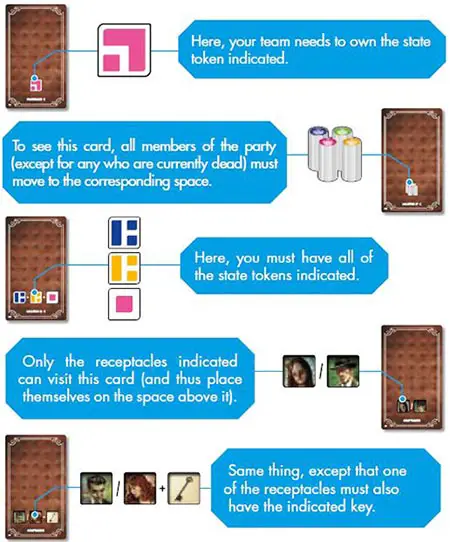
Some cards can be sealed: To gain access to such a card, you must fulfill a condition shown on its back.
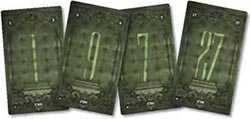
Item Cards
Item is a generic term that represents all sorts of things you'll discover, encounter, or receive during your mission: objects, information, people, etc. Each item is designated by a number in order to keep its nature secret and so that you can easily find it in the dedicated pack of cards.
Receptacle Cards
A receptacle is a character you possess in the world in which your team is being sent on a mission. You take possession of its body and are thus in charge of its abilities (and sometimes of its flaws..)..
From among the offered receptacles, you can choose whichever one inspires you, or the one that seems ideal for the current mission, knowing that for any new run, you can choose a different receptacle from among those available.
On the back, an illustration reveals its physical appearance as well as its name. On the front are found the number of action dice you can roll depending on the nature of the tests encountered, its resistance, and its Life Points (LP), as well as any possible "powers" that the receptacle has, which might also alter the game's rules slightly.
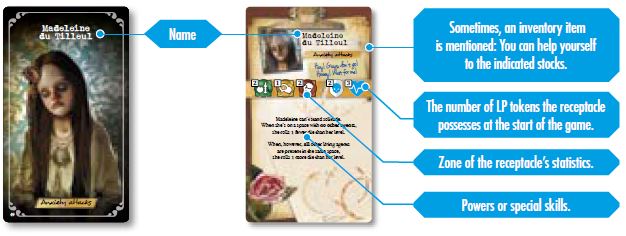
The zone of the receptacle's statistics is divided into two parts.
On the left is the number of dice that can be rolled depending on the nature of the tests; on the right, its resistance and the LP that it has at the start of the game.
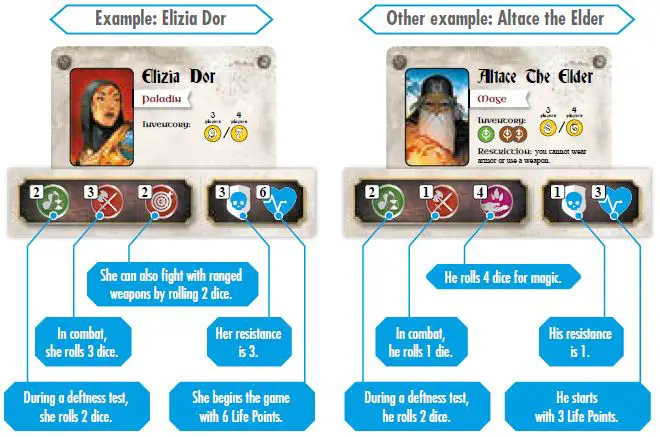
The receptacles thus have varying levels of abilities and not necessarily the same statistics. Above, we can see that Eliza knows how to use a ranged weapon, but does not use magic, while in Altace's case, the opposite is true.

The Life Points (LP) of a character may not exceed the written value on the receptacle card.
Time Captain
In order to prevent anyone from staying in the background during the game, the players each take on, in turn, the role of the Time Captain, the "chief" of the current location. Various tasks are given to that player:
- They read card A of that location out loud.
- That player is responsible for TU expenditure (as detailed later).
- That player breaks ties if the team can't reach a clear majority regarding an action or a location change.
Overview of a Run
A run lasts for a certain number of TU, which will be allocated in the base. The team is then transferred to a first location. Two phases then succeed one another until the allocated time runs out:
- 1 - Opening and Exploration of a Location;
- 2 - Location Change.
1. Opening and Exploration of a Location
You must follow these guidelines:
Opening of the Location
The Time Captain searches through the deck for the location the party has decided to explore. The player must never flip over the cards in the deck and should look at the card backs as little as possible.
To aid your searches, card A is on top of the others from that location, and the name of the location is indicated on the left side.
To ensure that you don't miss or forget the cards that make up a location, they are all listed on the back of card A.
The Time Captain then places the cards on the board in alphabetical order to create the scene's panorama (from B to - potentially - H, without revealing them).

Reading of Card A
The Time Captain reads card A out loud. The words in bold refer to some of what is found on the cards that comprise the scene spread out before you.
Exploration of a Location
Once the location has been presented by the Time Captain, it is time to enter it in order to discover what it holds. "Entering" a location does not cost TU.
To enter a location, all that's required is that each player place their pawn on a space above the card that interests them.
As with any other decision of the party, you can debate and argue as much as you want, but in the end each player does as they wish. However, if at least one agent decides to enter a location, all of them must do so as well. (Theoretically, after reading card A, the group might decide to change locations). There are no restrictions on the number of agents allowed on a single card.
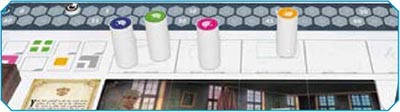
Blue and Green have decided to go to the same space to explore the corresponding card, while Pink and Yellow have decided to go on their own.
Sealed Cards
The marks found on the back of a card indicate the conditions needed to be able to see the card (and/or place yourself above the corresponding card). If you do not fulfill these conditions, you cannot place or move your pawn above this card, and therefore check it (as detailed later).
Consult a Card and Exchange Information
Only an agent present on a space can consult the corresponding card by taking it and reading its front side.
If multiple agents are on the same space, they can read the card together, or one after another, at their convenience.
The agents have a telepathic power that allows them to explain to the others what's happening, to communicate any information gathered, and to expose the choices that are offered to them - but to encourage discussion and favor a narrative ambiance, there are two important rules to follow:
- Don't show a card to a player who isn't on the same space as you.
- Don't read all of a card out loud. Paraphrase, cite, and evoke; in short, tell what you're going through.
Exception: When a card contains a game rule or technical explanations (a text box), carefully read how to proceed, possibly even out loud, in order to ensure that the entire team has a good understanding of the situation.
Spend Temporal Units (TU) and Act
You're now at the heart of the action and it is possible that you need to spend time to act. After discussing things as a group, the Time Captain spends 1 TU (moving the time token one space closer to 0) and each player performs one action. The sequence is therefore:
- Discussion and debate;
- Expenditure of 1 TU;
- Actions.
For 1 TU, all of the players can each perform one of the following 3 actions:
-
Make A Characteristic Roll.
This is a die roll for which you refer to your receptacle's characteristics.
-
Move Your Pawn.
Move your pawn from one space to another, provided that you're allowed to access it (see sealed cards).
-
Don't Do Anything.
This action is rather specific! Note that in combat, not doing anything is often a very bad idea.
All for 1 TU!
Note that there are no game turns, properly speaking, and all of these actions take place during a single TU. However, each player executes and resolves their action in an order chosen by the players.
For 1 TU
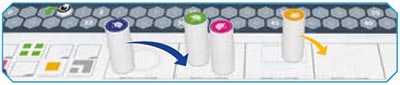
Green and Pink are in the middle of combat. They separately roll the number of dice appropriate for their receptacles but fail to defeat their opponents.
The group decides that Green and Pink need more help, so Blue joins them by moving to their space. He'll be able to help them fight during the next TU. Yellow uses this TU to go discover another space, as the group feels Yellow's receptacle isn't much of a fighter.
For 1 TU
Yellow is stuck in combat and rolls, but does not defeat his opponent. Pink and Blue are also working at completing a test. Blue rolls first and successfully finishes the test, so Pink moves now, ready to help Yellow on the next TU. Green decides to not do anything.

Important: You can immediately look at the card corresponding to the space on which you have just arrived. This does not cost any extra TU.
Special Rolls (no TU)
Some die rolls result from rules specific to a location and cost no TU as they do not refer to a receptacle's characteristics.
Location Change
If you feel that you've explored everything or if you simply want a change of scenery, you can leave one location for another. This happens in five easy steps.
-
Leave The Current Location
Each player takes their main pawn and places it in front of themselves.
-
Choose A New Location
Your destination can be any location written on the general PLAN.
Clarifications:
The group token represents all players; therefore, you cannot split up to visit multiple locations simultaneously.
You are allowed to return to a location you've already visited.
The choice of the new location is a decision made by the entire group. If you cannot reach a consensus, a vote takes place. In case of a tie, the Time Captain splits the tie.
Players are not allowed to leave a location only to return to it immediately. They must always go to a different location when they leave a location.

You feel like you're done with the Day Room. You can change locations by choosing any location available, meaning any location that is visible on the PLAN.
-
Putting away the current Location
Before you can open a new location, the current one must first be put away. The Time Captain places all of the location's cards face down in order, with card A on top.
They then place all of these cards on the bottom of the deck without looking at it.
Be careful that you sort the cards properly and never mix cards from different locations.
-
Roll the Time Captain Die
The Time Captain rolls their die and gets a result that ranges from 1 to 3 TU. These TU are immediately spent on the Time Line. They represent the time that was needed for the group to change location. When a card or in-game effect orders a group movement to another location, the Time Captain die is rolled normally.
Special situation: Depending on the scenario, it's possible that the names of some locations are written in red. To go from a location with a red name to another location (no matter what its color) costs 2 extra TU. Note that leaving a red location, and not entering it, is what costs 2 extra TU.

The Time Captain die indicates 2 TU, so going from the basement to the roof costs 2 extra TU (for a total of-4 TU).

-
Change the Time Captain
The Time Captain die goes to the player sitting to the left of the current Time Captain. The new Time Captain is now responsible for setting up and putting away the new location, the reading of card A, the TU expenditure, etc. Open the new location and continue the adventure.
Tests and Dice Rolls
During a mission, you may find yourself facing various situations, such as a creature to fight, a person to convince, a door to lockpick, a chasm to cross, etc. All of these tests are resolved using the action dice.
Tests
Iconography
The difficulty level of each test is expressed in the form of shields linked to a characteristic. There can be up to three types of shields linked.

To face a test, place on the board below the card as many shields as indicated (there are three spaces for this), following the left-to-right order!
You're now ready to start the test - but before you do, return your card to the board face down. (The agents who aren't with you don't get to see it).
Succeeding at a Test
To succeed at a test, you must eliminate all of its shields. The reward (if any) depends on the situation: sometimes you simply defeat your opponent, sometimes you win an item, sometimes a state token, etc.
Overview of aTest
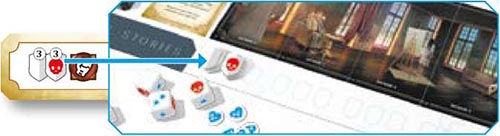
For each TU spent by the Time Captain, all agents present on the space corresponding to the test can roll their quota of dice to take part in the effort.
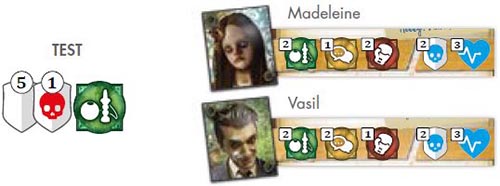
Madeleine and Vasil are together on a card and are facing a deftness test. On the same TU, they will each roll 2 dice, which represents their quota for this characteristic.
You can leave the card, ignoring the test, or you can start the test, then drop it to go do something else.
Note: If you quit a test and change location or space, that test is automatically reset.
Die Roll
No matter what the nature of a test, each die roll is always divided into four identical steps.

-
Roll
The agent rolls a number of dice corresponding to their receptacle's characteristic related to the test.
-
Hits
Each hit (
 ) obtained on the dice eliminates 1 shield from the test. When there are many types of shields, they are always removed from left to right.
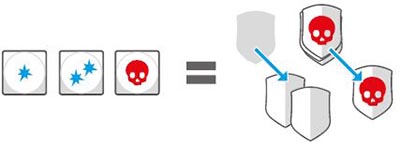
In this example, the 3 hits obtained first remove 2 shields from the left stack. Then, since that stack is empty, 1 shield from the right stack is removed.
Riposte (skull shield)
After having applied the hits, the question of the riposte needs to be considered. If you rolled at least 1 skull on the dice and the test still contains at least 1 skull shield, this causes a riposte.
Add the skulls showing on your dice to those present on the shields to determine the strength of the riposte. Compare this result to your resistance and resolve the consequences:
If your resistance is equal to or greater than the number of skulls, nothing happens; you brushed it off.
If your resistance is lower than the number of skulls, you lose 1 Life Point (LP).
-
Automatic Penalty
Once you have resolved the previous steps, it is possible that 1 or more specific shields remain on the test. In that case, resolve the following steps:
For each remaining shield of this type, you lose 1 Life Point.

For each remaining shield of this type, the party loses 1 TU.

The effect of the special shield depends on the scenario you're playing. These effects will be described in the scenario at the appropriate moment.


Lock
When a lock is present on a card, you must pass this test (trap, combat, etc).. You cannot leave the card before you've successfully defeated it.
End of a Test
The passage of a test takes place TU by TU until:
- You complete it (by eliminating its last shield); or,
- You decide to leave the space (ifyou're allowed); or,
- You die (by losing your last Life Point).
Defeating An Opponent
When you eliminate an opponent's last shield, it is defeated and its card is removed from the game until a possible next run. (Place its card next to the board so that you can easily find it for the next run).
If you later come back to this same location on the current run, the enemy will no longer be there. Note that from this point on, the panorama will be visually incomplete.
Last Clarifications
If multiple agents take part in the combat or the test, each of them rolls their dice separately and applies the effect of their roll.
For all rolls, the blank faces on the dice are ignored.
Don't forget that the play order is not fixed. You can therefore choose in which order the agents roll their dice or move during a given TU, which could be critical.
When you eliminate a test's last shield, it is immediately successfully completed.
Important: If you decide to do nothing during a test (because, for example, you do not have the required characteristic) and that test has at least one skull shield, your receptacle automatically loses 1 Life Point.
The heart, time, and special shields always take effect, even when no skull shields are present.
Death of a receptacle
If a receptacle loses their last Life Point, they die and the agent possessing them is expelled into the inter-temporal vortex. The Agency requires time to recover them and reinsert them back into their receptacle. From that point on, play proceeds as follows:
The agent's main pawn is removed from the board and their small pawn is placed 7 TU away from the time marker's current position. The agent can take part during discussion, but is no longer part of the action.
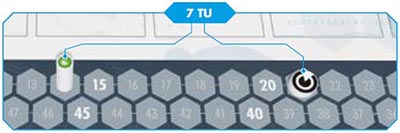
They are removed from the game and must place their pawn 7 TU from the time marker.
While an agent is wandering in the inter-temporal vortex, their possessions (items, tokens, etc). can be used by the other agents until they return to their receptacle.
As soon as the time marker reaches the agent's small pawn, that agent can reintegrate their receptacle. To do this, they enter (for free) a space of the location currently being visited that contains at least one agent, and their receptacle is once again operational. It comes back with all of its Life Points.
If 7 TU or fewer are left when the receptacle dies, the agent will not be able to be reintegrated during this run.
If all receptacles are dead at the same time, the run immediately ends, even if TU remains (in which case, read the Failed Mission (TU) card).
Items
Some of the items you will find are objects. Below are listed a few general clarifications about them. If their use differs from normal, everything will be explained on the card.
There are no limits to the number of items a receptacle can carry. However, don't forget that T.I.M.E Stories is a cooperative game, and it's often smarter (not to mention friendly) to divide items between all receptacles.
You can hand an item to another agent, but your pawns must be on the same space or off the board completely (while the group moves from one location to another).
An item cannot be used by two different receptacles during the same TU.
Some elements bear the Agency's logo. They remain in the possession of the receptacles from one run to the next. You will therefore be able to start the mission again with a few advantages.

In the game, we often refer to the items using only their number, as written in green. The font type changes depending on the scenario.

State Tokens
Your actions, your path, the items you accumulate, and the information you gather will sometimes earn you a state token, which you will then have to place on the board on the space designated for this.
Unlike with items, which are personal and held by only one receptacle, all of the members of your team will gain an advantage from a state token, unless otherwise noted. A state token is kept, even after use.
Moving an agent pawn on a sealed card
If you possess the state token corresponding to the symbol on a sealed card, one or more agents can now move to that space and access that card.
Revealing a sealed card
When a reference is made to a sealed card that you can or must reveal immediately at the same location, do not take the corresponding state token; instead, the card in question simply replaces the one where you are and you can read it immediately. In practice, it overwrites the previous card. This doesn't cost any TU.

Here, the card on the space with Pink and Blue has instructed them to reveal the  card. The corresponding state token is not taken, instead card D is placed on the space with the Pink and Blue agents, and they can read it immediately.
End of the Game
Mission Success
You 'll have succeeded in your mission once the game clearly indicates that you should read the Mission Successful card - and never before!
Mission Failure
There are three ways of failing the mission:
The time marker reaches the 0 space. You are immediately transferred and must read the Mission Failed (TU) card.
All agents are dead, in which case you must immediately read the Mission Failed (TU) card.
A specific situation causes your failure. In that case, the scenario will indicate which Mission Failed card you must read.
When the mission fails, leave the ITEMs stamped  in place, but reset the other game elements (discarded cards, acquired ITEMs, tokens, life points, etc). to their starting places and initial values.
And you're ready to start:
You've now reached the end of the rules and can start your first mission. When all players are ready, pull out the N.T. 1921: Asylum deck and perform the following set-up:
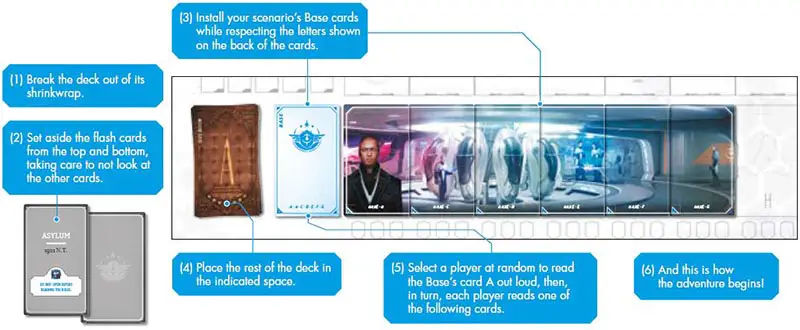
Advice for how to explain the rules: If you are the only one who knows the rules and you want to explain them to other players, instead of waiting for a scenario's first location, you should explain the game's main mechanisms (spending TU, entering a location, moving, ..). by way of the Base cards once they are installed on the board.
For special rules (die rolls, LP loss, etc)., use the images from these rules for support. In this way, you will be, just like your fellow players, totally immersed in the adventure as soon as the scenario opens, without being interrupted by questions or explanations.
Saving
A T.I.M.E Stories scenario can last for quite some time. Considering that, we can imagine that you will need to stop in the middle of a run for various reasons.
Everything has been planned so that you can put it away, then bring the game back out without losing anything. Proceed thusly:
If you reach the end of your TU before completing the mission, you must read the Mission Failed (TU) card.
Storage
While everything has been thought through as best we could, in the case of an interrupted game, take care to store your game box flat in order to preserve your saved game.
Continue Reading