
Components

- Gameboard
- 4 Player Boards
- 56 Master Cards
- 54 Posteer Cards
- 16 Circus Tents
- 40 Coins
- 19 Dice
- 48 Special Effects Gems
- 3 Wagons
- 32 Trainer Markers
- 4 Scoring Markers
- 8 Hat Figures
- 72 Camp tiles
- 12 Trainer Tiles
- Portable Plastic Box
Setup
-
Place the game board in the middle of the table.
-
Make supplies of the following:
- Coins - sort them by value
- Gems - sort them by color
- Camp tiles - sort them by type Put the pieces in separate compartments of the portable plastic box. The plastic box is the general supply and must be placed within every player's reach.
-
Determine a random starting player by rolling dice. Depending on the number of players, use the number of dice shown below. Leftover dice are returned to the box. The starting player rolls all dice and places them on the MAIN TENT.
- 2-player game: 3 orange, 3 green, 3 purple, 2 clear
- 3-player game: 4 orange, 4 green, 4 purple, 3 clear
- 4-player game: All dice
-
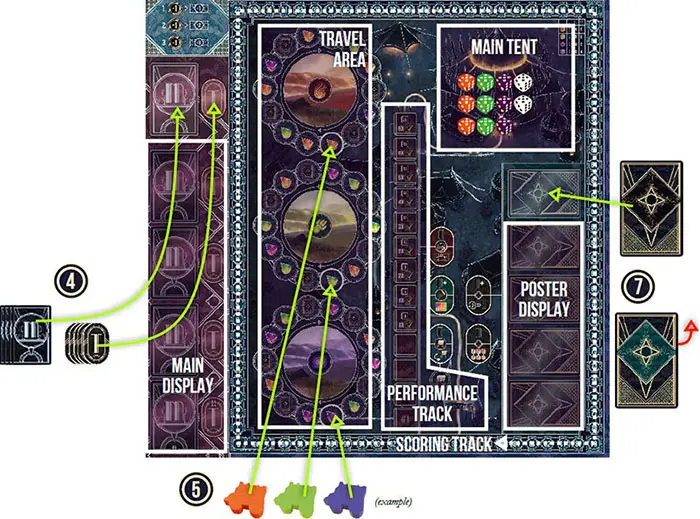
Set aside the 16 master cards marked with Roman numbers, I- IV (at the bottom-left side of the cards), for now.
Shuffle all remaining master cards and all trainer tiles and make two facedown decks on the designated spaces.
Draw master cards and trainer tiles from the decks and fill up the card spaces and tile spaces of the MAIN DISPLAY. Place all these cards and tiles face up.
- 2 or 3-player game: Fill up the top three spaces (3 cards and 3 tiles).
- 4-player game: Fill up all spaces (4 cards and 4 tiles).
-
Place the three wagons on their designated starting spaces (the highlighted space) in the TRAVEL AREA - one on each of the three tracks. The front of the wagons should be pointed towards the left (in clockwise direction).
-
Randomly place one tent face up on each of the 15 spaces with a poster symbol (5 on each track) in the TRAVEL AREA.
The leftover tent is returned to the box.
-
Set aside the starting posters (green backside) for now. Shuffle the remaining posters and make a facedown deck. Place the deck on the designated space on the game board.
Draw 4 posters from the deck and distribute one to each space in the POSTER DISPLAY - face up.
Player Setup
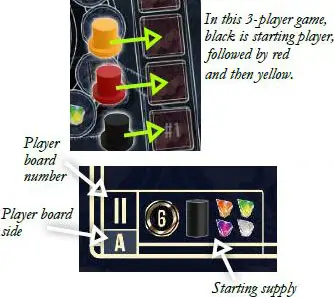 This player receives Player Board "II" and makes sure she has the A-side facing up. She also takes all Master Cards marked II |
-
Each player chooses a player color and takes the following in this color:
1 scoring marker, which is placed on space "0/100" of the SCORING TRACK. You move your scoring marker every time you earn ticket points (from now on called points).
2 hat figures. The starting player places one of their hat figures on the "#1" space of the performance track.
The player sitting to the left of the starting player places his/her hat figure on the space above it, and so on. Each player places the other hat figure in front of them.
-
Deal one random player board to each player.
Important: The players must make sure they have the A-side facing up!
Each player board has a Roman number as a reference. For your first game, each player takes the four master cards with the corresponding number (from the cards that were set aside during General Setup).
In a game with less than 4 players, all remaining "starting mastercards" are shuffled into the deck.
-
Shuffle the starting posters (green backside) face down and deal a random poster to each player - face up. Leftover starting posters are returned to the box.
-
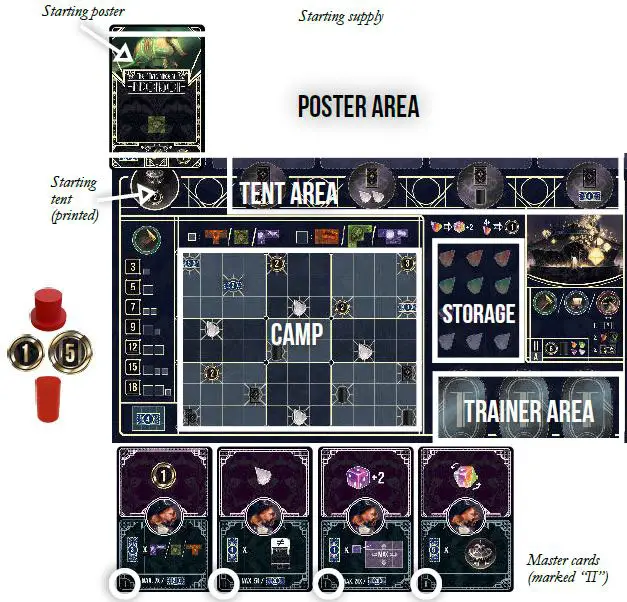
Each player organizes their PLAY AREA as follows:
-
Your starting poster is placed face up just above your starting tent at the top-left corner of your player board.
-
Your master cards are placed face up somewhere besides your player board.
-
Take your starting supply:
- Gems: 1 of each orange, green, purple and clear, which are placed on matching spaces in your storage.
- 6 coins and 1 trainer marker, which are placed beside your player board (together with your hat figure).
- Important: The starting player must give 1 coin to the last player in turn order.
-
-
Choose a trainer tile: Depending on the number of players, draw a number of trainer tiles from the deck (in addition to those already drawn during General Setup) and place them face-up on the table:
- 2 or 3-player game: 3 tiles
- 4-player game: 4 tiles
Starting with the player to the right of the starting player and going counterclockwise, choose one of these tiles and place it faceup on the left most space in your trainer area.
In a 2-player game, the tile that was not chosen is shuffled back into the deck.
Game Play
The game is played over 3 rounds. In each round, the players take 4 turns each. The players try to gain the most tickets (points) for their shows, which are mainly gained by setting up shows and by scoring their master cards.
The players must expand their CAMPS (to recruit performers), travel (gaining special effects, raising tents and marketing their shows with posters) and set up shows (gaining points and coins).
At the end of each round, all players gain a new master card and then choose one of their cards to be scored. The master cards represent the decisions the Ringmaster (the player) makes, which consequently will earn points.
In the game, players draft dice in order to get enough power to execute the actions they want.
But beware: The higher the total dice value of the same color you take, the stronger actions you get, but the more coins you must pay at round end!
The starting player takes the first turn, followed by the other players in clockwise order. On your turn, you execute the following 3 steps:
1. Take One Die
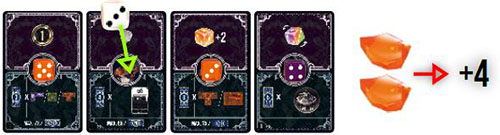
Choose one die from the main tent and place it on any vacant master card in your PLAY AREA. In each round, you will eventually have 1 die on each of your 4 cards.
On top of the card you chose, there is a bonus that may be used once and any time during your turn (with some exceptions).
Anna takes an orange die with value 3. She adds the value of her other orange die for a total of 8 in power. The bonus on the chosen card lets her increase her power by 2 if used with an orange die. Her power is therefore increased to 10.

2. Determine Your Power
Determine your current power, which is the value of the die you took this turn + all dice of the same color that you have taken previously this round (those already lying on your master cards). You use your power when executing actions (see below).
Now, you may discard gems of the same color as the die in order to boost your power. For each gem you discard, you increase your power by 2. Clear gems are "wild" (may be used as any color).
Clear dice: If you took a clear die, you treat it as if it was of any color (orange, green or purple). To determine your power, add the value of all dice of one chosen color. Important: A clear die only adds to your power on the turn it is taken. Clear dice lying on your master cards from previous turns are never added to your power.
On her next turn, Anna chooses a clear die, and she decides to use it as if it was orange. She adds the values of her two orange dice, making her total power 11. She then discards 2 orange gems to increase her power by another 4, making her final power 15.
3. Choose one of the following 3 actions

Trainers are very important in this game . During your turn, you may use trainer spaces (trainer tiles or common trainer spaces on the gameboard) for special abilities.
A. Build
If you execute a "Build" action, you expand your CAMP with camp tiles. The following rules apply:
Choose one of the alternative "Build levels" shown at the left side of your player board - with a printed power requirement that is equal to or less than your current power (you don't have to use your full power). Small box = small camp tile (covering 4 spaces in your CAMP); Large box = large camp tile (covering 6 spaces).
Take the corresponding camp tiles from the General Supply. You can only build camp tiles of the same color as the die you took this turn.
The first camp tile you build may be placed anywhere in your CAMP. All subsequent tiles must be placed so that they share at least one border (one space) with another camp tile.
Camp tiles may be rotated and/or flipped to the opposite side before they are placed in your CAMP. Once placed, you cannot move, flip or rotate the tile.
If you cover bonus spaces, immediately gain the shown bonuses.
If you build more than one camp tile on the same turn, you may build them in the order of your choice. You take the bonuses from the first tile before you build the next tile(s).
On Carla's very first turn in the game, she chooses a "Build" action. With the green die and the discarded gems, she has a power of 10 (6+4).
She may, therefore, take green camp tiles with a total value of no more than 10. She decides to build one large and one small camp tile (requiring 9 power).
She also gets a trainer marker and 2 coins as bonuses.
Note: If the general supply of any camp tile Bonus spaces is exhausted, you cannot acquire this camp tile anymore.

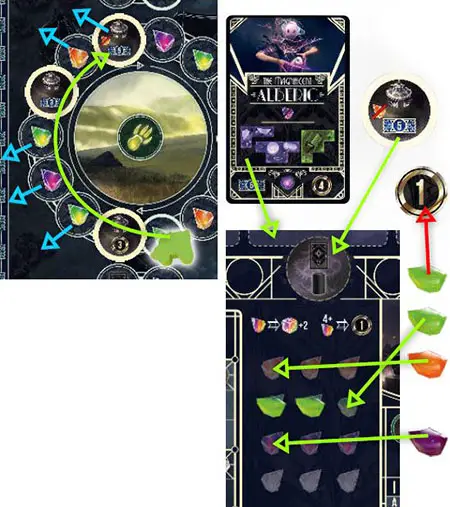
B. Travel
If you execute the "Travel" action, advance the wagon that matches the color of the die along its track in a clockwise direction. Move the wagon a number of steps up to the value of your power (you don't have to use your full power).
Gems and posters: You gain a gem or a poster for every such symbol you pass through or land on (poster symbols will only become available after tents have been picked up).
Tent: To pick up a tent, you must end your movement on a tent (and you cannot move any further this turn).
Bernd takes a "Travel" action with a green die and a power of 8. He may move the green wagon up to 8 spaces. He decides to stop on the tent (after 7 spaces) to pick it up. He also gains 4 gems: two green, one purple, and one orange.
He places the tent on a space in his TENT AREA and takes the bonuses (one poster and one trainer marker). The gems are placed in the STORAGE. Since he already has 2 green gems, he must discard one green gem for one coin.
Gaining Gems
When you gain a gem, place it on an empty matching space in your STORAGE.
The maximum storage capacity is 3 of each type of gem. If you gain a gem that you cannot store, you gain 1 coin instead. Note that you cannot voluntarily discard gems to gain coins.
Gaining Tents
When you gain a tent, place it on any vacant space in your TENT AREA (you cannot cover the preprinted tent to the left). Immediately gain the shown bonuses on the space (see page 8).
Note: After you have gained your 4th tent, you cannot take any more tents. You may still end your movement on a tent without taking it.
Gaining Posters
Each time you gain a poster, draw the top poster from the deck or take any face-up poster from the POSTER DISPLAY. In the latter case, immediately replenish the POSTER DISPLAY with a new poster from the deck. The poster you took must be placed on an empty space in your POSTER AREA (not necessarily attached to a tent below it).
Note: If all five spaces in your POSTER AREA are occupied (and only then), you have three options: A) replace a poster and discard the replaced poster, B) discard the poster you take or C) choose not to take a poster at all.
C. Perform
With the "Perform" action, you stage shows that match the requirements on your posters and tents to earn points and coins.
Important: The color of the die used for this action is not relevant - only the power matters. Execute the following steps:
-
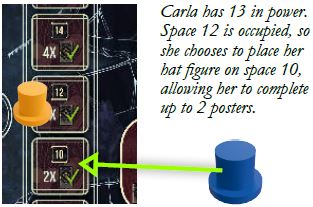
The first time you choose this action in a given round, take your hat figure on the game board and place it on a vacant space on the PERFORMANCE TRACK matching your power - or on any vacant space below.
If you choose this action a second time in the same round, take the hat figure from your PLAY AREA instead. In case you choose "Perform" more than twice in a round, move one of your hat figures to the new space (even if the new space is further down than its current space).
-
Complete up to as many posters as shown on the space where you just placed your hat figure. You may even choose not to complete any posters at all. In order to complete one poster, the following requirements must be met:
The poster must have a tent directly below it. Note that the left space in the TENT AREA already has a preprinted tent that you may always use with a poster above.
Each poster shows one or more camp tiles. You need to have all these camp tiles built in your CAMP. If you complete multiple posters, the camp tile requirements are added together. In order to complete several posters with the same camp tile, you need several copies of that camp tile in your CAMP.
Discard the gems shown on the poster (about half of the posters in the deck have gem requirements). Remember that clear gems are "wild".
Some tents also have a gem requirement. To complete a poster above such a tent, you also need to discard the gem shown on the tent (or a clear gem).
Receive the points and coins shown on all completed posters and on the tents below completed posters. Flip completed posters over and put them in a facedown pile next to your player board. Tents are not removed - they may be used again.
-
After completing posters, you may freely reorganize any number of your remaining posters in your POSTER AREA.
Carla may only complete her leftmost and rightmost poster (as there is no tent below her middle poster).
She checks if she fulfills all camp tile requirements: In her CAMP, she has the two orange camp tiles, two purple camp tiles and the two large green camp tiles shown on these cards.
She pays the required gems for the posters (orange, green, purple), plus the extra orange gem for the rightmost tent.
She earns a total of 27 points and 6 coins (including 2 coins for the preprinted tent). The two completed posters are put face down in a stack in her PLAY AREA.
Finally, she reorganizes her remaining poster, moving it to a position with a tent.
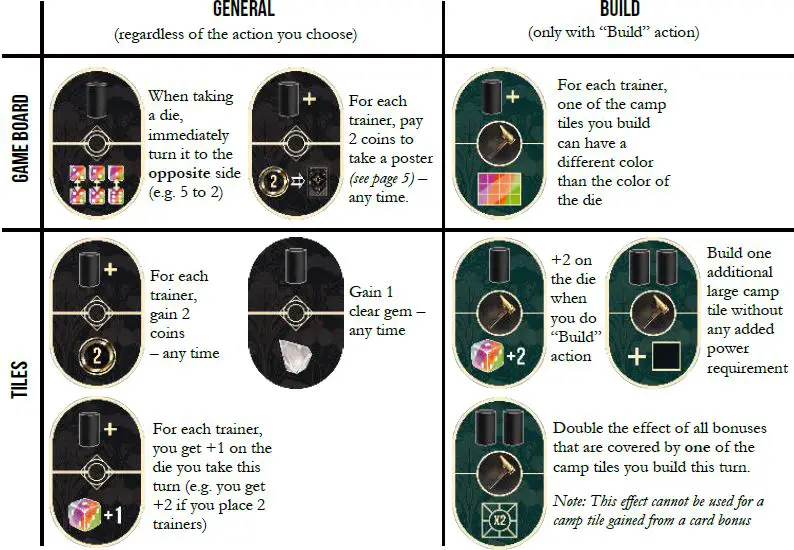
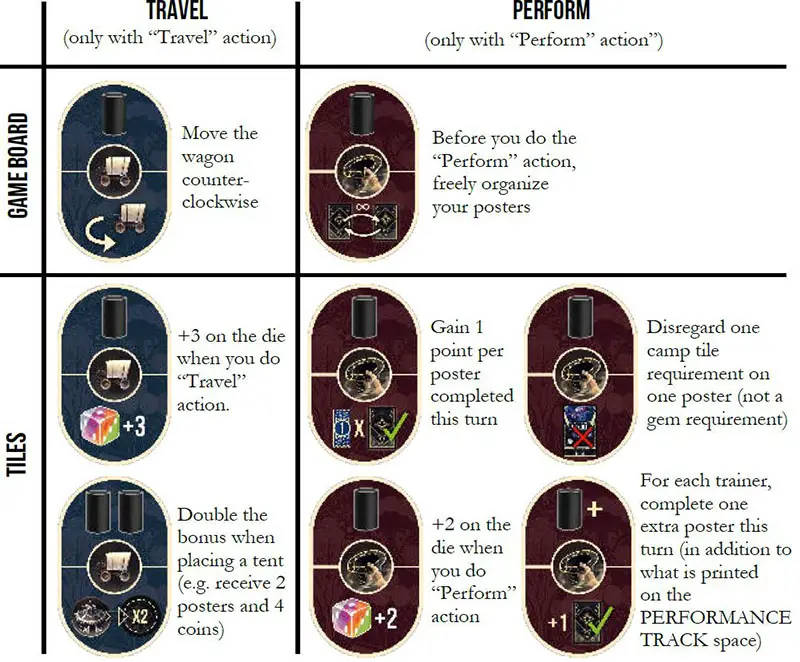
Trainer Abilities
On your turn, you may use any number of trainer markers (trainers) on trainer spaces (either on the common spaces on the game board or on your trainer tiles on your player board).
At the end of your turn, move all trainers used this turn to the area by the MAIN TENT. In the table below, you'll find an overview of all trainer spaces.
Most of them require that you execute a specific action in order to take effect. Note: Some trainer spaces are more powerful than others - on purpose.
The symbol on top of each space tells you how many trainers that are required to trigger the effect:
 Place one trainer to trigger the effect once.
 Place one or more trainers to trigger the effect one or more times (once per trainer).
 Place two trainers to trigger the effect once.
Note: When you gain a trainer, this may be used in the same turn. But this trainer cannot be used to improve or change the specific step that gave you the trainer.
E.g. you cannot use a trainer just gained from placing a camp tile to double the bonus of the same tile (but you may use the trainer to double the bonus of the next tile).
Round End
When all players have taken 4 turns, the round ends. Now, go through the following steps:
-
Payment: For each color (orange, green, purple), calculate the total value of the dice lying on your master cards. You must pay coins equal to the highest of these values. In addition, you must pay the total value of all clear dice. Note: You don't pay for any die symbols printed on cards.
If you cannot pay the required number of coins, you must pay whatever you have. Then, for each missing coin, you lose points: -1 point in round 1, -2 points in round 2, -3 points in round 3 (move below "0" points on the scoring track if necessary).
-
New master card & trainer tile: First, each player that has 2 hat figures on the performance track, returns the lowest one to their play area.
Then, following the order of the remaining hat figures, starting with the player on top, each player, in turn, chooses one set - one master card and the adjacent trainer tile - from the main display (there are no trainer tiles in the last round).
Place the card next to your four other master cards. The trainer tile is placed on a vacant space in your trainer area.
In a 2-player game only: If there is at least one vacant space between the two players' hat figures, the player whose hat figure is on top discards one set (master card + trainer tile) before the other player takes the last set. If not, the other player may choose between the two remaining sets and discards the last set.
-
Score and discard a master card: Each player must now choose one of their five master cards to score (the master card they just acquired may be the one they choose to score). Gain points by moving your scoring marker. After scoring, this card is put in a discard pile.
-
Prepare For The Next Round (only After Round 1 And 2):
All trainer markers by the main tent are returned to the respective owners.
Replenish the main display with new master cards and trainer tiles from the decks (in the same way as in General Setup). Before the last round, you don't draw trainer tiles.
Hat figures on the performance track are moved to the bottom of the track, keeping their relative order. The starting player in the next round is the player whose hat figure is moved to space "#1" (the one at the very bottom).
In the next round, players still take turns in clockwise order, regardless of the positions of the other players' hat figuresThe new starting player collects all dice, rerolls them and places them on the main tent.
End of the Game
After the end of the third round, the game ends. Do the following in the order shown:
-
Score master cards (half the value): Score half the value of each of your four remaining master cards (each card rounded down).
-
Score Coins: Gain 1 point for each remaining 5 coins.
-
Score Areas: Gain 4 points for each of the 9 rectangular areas in your CAMP that are fully covered. Players may use their remaining gems to fill any empty spaces in areas with one gem per space.
Placing gems only helps for completing areas; bonus spaces are not rewarded when placing gems, and the gems don't help you to score completed rows or columns (scoring criteria on some of the master cards).
Carla uses one purple and one orange gem to fill in the two empty spaces in the rectangular area. Then, she scores 4 points for this area.

Card Scoring
At the bottom of each master card, there is a scoring criterion. At the end of each round, you score one of your five master cards. At the end of the game, your four remaining master cards are scored at halfvalue.
Many cards have a maximum number ofpoints you can score (printed at the bottom of the card). When you score half the points at game end, the maximum score is also halved (rounded down).
Bonuses
Bonuses are gained when activating a master card, covering up a bonus symbol with a camp tile and when placing a tent in the TENT AREA. You can never use a bonus twice (for instance discard 2 trainer markers to build two small green camp tiles).
Continue Reading
