
You have entered the Sonoran Desert. A place of vast beauty: technicolor sunsets pop-out over vistas revealing deep canyons, trickling tributaries, and ancient pueblo cliff-dwellings. Immerse yourself in the secrets of the desert in this delectably fun "flick and write" where cunning and dexterity meet.
In Sonora, players flick wooden disks onto a game board representative of the different vibrant landscapes across the Sonoran sands.
Each area encompasses a different unique game, so skillful aim is required to play in the region of a player's choosing! But watch out for other players eager to bump discs to score points for themselves!

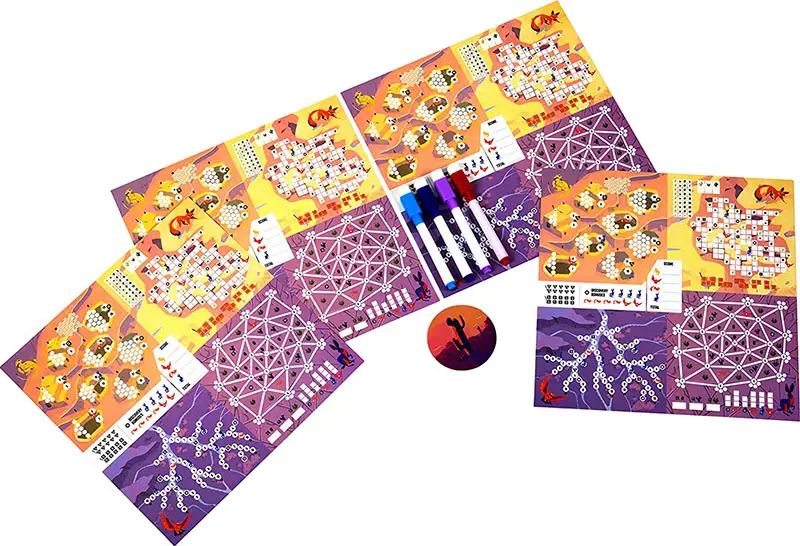
Components
- Game board
- 20 colored disc
- Scoresheets and pens
- Starting player token
- Instructions
Setup
-
Place the game board such that it can be easily rotated and in reach of all players.
-
Each player selects a color, taking all the discs in that color. They also take a scoresheet+ pen.
-
The first player will be the player who most recently helped a wild animal. Otherwise, select a first player in any way players decide and give them the first player marker.
-
The gameboard should be rotated so that the Cliff Dweller Ruins are in front of the first player.
Game Play
Sonora is played over several rounds, with each round broken up into two phases, flick and write.
Players will take turns flicking discs into the different scoring zones on the gameboard and securing resources to use on their scoresheets. The game ends after a certain number of rounds depending on the length of game agreed upon by players.
- Short Game: 5 rounds
- Standard: 6 rounds
- Long Game: 7 Rounds
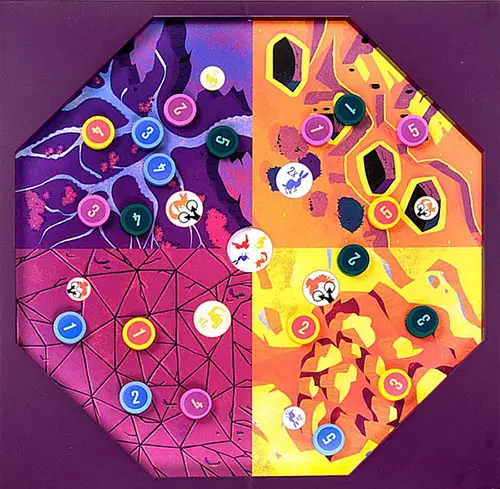
Scoring Zones
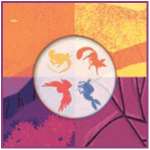
Each quadrant on the board is a scoring zone with a corresponding spot on the scoresheet and is represented by a desert animal.
More detail about how each scoring zone works can be found in the Write section below
The top-left zone on the scoresheet is the cliff dweller ruins and is represented by the lizard. This zone scores with all players competing to be the first to complete each of the different ruins.
The top-right zone is the canyon and is represented by the fox. This zone scores by drawing shapes matching the value of the discs.
The bottom-left zone is the creek bed and is represented by the owl. This zone scores by moving through a number of spaces matching the value of the discs.
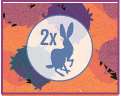
The bottom-right zone is the desert mud cracks and is represented by the rabbit. This zone scores by filling in nodes in the cracks using the total value from the discs.
Flick
In turn, order starting with the start-player and going clockwise, each player will take turns flicking discs onto the four scoring zones of the gameboard from the launch zone in front of them.
Players' goals are to get their disc into one of the scoring four zones on the board to use during the write phase. The scoring zone that discs are in will dictate the zone of the scoresheet that disc will be used in.
Flicking has only a few rules:
-
Each player has 5 discs. In every Flick phase, players will be flicking 2 discs. Players choose the order they will flick their discs. For the final (3rd) flicking phase players will flick a single disc. Flicked discs will remain on the flicking board until the end of the round.
-
Players may flick from anywhere within the launch zone corner closest to them. The disc must be entirely behind the edge of the launch zone.
-
At the end of the flicking phase, any disc that is in two (or more) zones will count as being in the zone that the majority of the disc is in.
If the disc is exactly evenly in two (or more) zones the player who the disc belongs to must choose between which of the tied zones the disc will count towards.
-
The center of the board features a recessed hole. Any disc that falls into the hole is immediately removed and assigned to any section of the owner's scoresheet to be scored during the Write Phase.
The best way to do this is to move the disc onto the scoresheet where it will be assigned.
-
There are several bonus zones on the gameboard that are represented by a small circular-cutout with the representative animal.
-
A disc is considered within a bonus zone if it is touching it- including the border! If more than one disc is touching a bonus zone, all discs in that zone will count towards being in the bonus zone.
-
If a disc is within a bonus zone, the disc only counts towards the bonus zone, not the scoring zone that the bonus zone is within.
-
Any flick that results in a disc not landing on the board will be disqualified and cannot be used in the write phase! Any discs owned by other players that get knocked off the board will be re-flicked by their owner. If a player fails to flick a disc hard enough to leave the launch zone (i.e. it never enters the scoring zones) may flick again for free.
-
Players may choose to spend reflick bonuses to reflick a disc for any reason. You may only use a reflick bonus on the disc that was just flicked. You may use multiple reflick bonuses in a row on the same disc.
-
Discs that end standing on their side or on top of other discs will still count as if they were flat on the board.
Write
In the write phase, players will be filling in their scoresheets according to the results of the flick phase.
First, check if any players want to use a swap bonus. This allows players to swap the positions of any two of their own discs.
The first zone to score is the Cliff-dweller ruins; it is the only directly competitive zone so all players must complete this zone in order. The player with the highest total value on their discs in the Cliff-Dweller Ruins Scoring zone (and within matching bonus zones) will go first.
Ties are broken by turn order with the player earlier in turn order winning the tie. After all players have scored the cliff-dweller ruins, each player may score the rest of their scoresheet individually in any order they choose.
Cliff-dweller Ruins
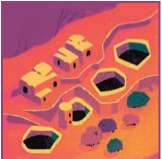
Players start by totaling the sum of all their discs in the Cliff-Dweller scoring zone on the gameboard. Any discs on a Cliff-Dweller bonus zones (represented by the lizard) will be doubled in value.
On their scoresheet, players will be filling in the small hexagonal spaces equal to the total value of their discs in that zone on the scoresheet. Players may fill hexes in any order they choose and may fill in hexes across any of the groupings.
There are a total of 8 groupings in the cave-dweller zone labeled A-H. Filling in all the hexes in a grouping will result in the player scoring for that grouping.
The first player to finish a grouping will receive the top award for that grouping by circling the reward. Only one player is eligible to earn the top award for any spot.
Once a player has completed a grouping, they should announce this to other who should mark an X over the top reward to that it is no longer available to them. All other players to complete this grouping will gain the bottom reward and will circle the bottom reward when they complete a grouping.
Canyon
Each disc in the Canyon scoring zone on the gameboard will be scored individually. Any discs on a Canyon bonus zone (represented by the Fox) will count as two discs of that value, each one scored individually.
Players will be outlining shapes matching the value of their discs in the canyon scoring zone on the gameboard. The corresponding shapes for each number are shown on the bottom of the Canyon zone on the scoresheet.
If players have multiple discs within the Canyon scoring zone they will draw a shape for each disc in the zone. Players may choose to draw shapes in any order so long as they follow the placement rules for the shapes.
Important: Do NOT sum the discs in this zone. They will each be counted individually.
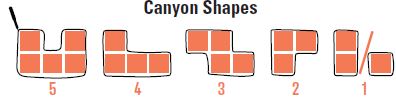

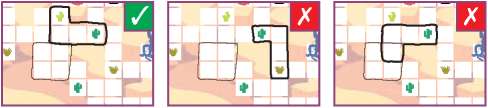
All outlined shapes added by the player must touch on at least one side of a previously drawn shape. Diagonals do not count! To begin with, there is a single pre-drawn square (4x4 grid) in the lower-left corner of the canyon
Shapes drawn must fit completely on the board and may not overlap any previously outlined shapes. The shapes can be rotated or flipped to any orientation, but they cannot overlap any empty space or any previously entered shape.
Players may at any time "downgrade" to any single shape of a lower value shape, i.e. the 4 disc can be turned into the shape for a 3,2 or 1.
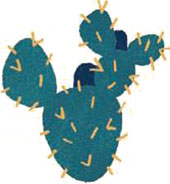
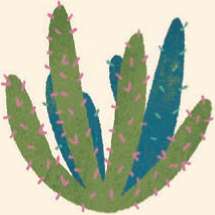
Player's goal in the Canyon game is to enclose sets of unique cacti in order to score points. The more of a particular cactus that is enclosed, the more points they are worth at the end of the game.
Creek Bed

Each disc in the Creek Bed scoring zone on the gameboard will be scored individually.
Any discs on a Creek Bed bonus zone (represented by the Owl) will count as two discs of that value, each one scored individually.
Important: Do NOT sum the discs in this zone. They will each be counted individually.
Players will be building paths down the creek bed using the values on each of their discs. Each space on the creekbed counts as a single space. You will move spaces equal to the value on each of your discs, marking an X on any space you move through and circling the final space you move into.
Players must begin movement from any previously visited space (circled or crossed out) but may not move through any previously visited spaces during their movement.
Each disc is scored individually, and the full value of a disc must be spent on a single movement. Unlike the Canyon zone, you may not "downgrade" the value of a disc in the Creed Bed.
Note: In the unlikely event that movement is impossible with a given disc that discs movement is forfeited and not used.
Mudcracks
Players start by totaling the sum of all their discs in the Mudcracks scoring zone on the gameboard. Any discs on a Mudcracks bonus zones (represented by the rabbit) will be doubled in value.
Players will be using the total value of all their discs to cross off nodes in the desert floor. Any nodes that are crossed off must be adjacent to a previously crossed off node.
This means the nodes must be connected by a pre-printed line without skipping over any nodes that are not crossed off. Once two adjacent nodes are crossed off the line between them should be filled in.
Note: At the start of the game a single crossed off node is in the center of the play-area.
The goal of the Mudcracks game is to fully complete all three sides of the various small triangles created by the lines connecting the nodes. The various cacti within these triangles are worth varying points at the end of the game for each enclosed triangle.

In addition to using the value of their discs to cross of nodes, players may fill in boxes for the bonus section in the lower right-hand corner of the Mudcracks zone on their scoresheet.

End of the Round
At the end of the round, players retrieve all discs in their player color, pass the first-player marker clockwise and rotate the gameboard 90 degrees clockwise and begin a new round as described above!
Each box has a cost of 1 point. Once all of the boxes are completed in a column the bonus is immediately gained.
This is a good use of any points that remain after crossing off nodes.
Note: This means the first-player should always have the Cliff-Dweller game Zone directly in front of them on the gameboard.
End of the Game
The game ends once the final round of the game has been completed. This will vary depending on the game-length players agreed upon at the outset of the game.
Players should now tally their final score.
-
Cliff-Dweller Zone
Players should sum the total of all circled rewards for completed groupings on hexes and write it in the score matching the zone (represented by the lizard).
-
Creek Bed Zone
Players should sum all of the circled spaces in the creek bed and write the total in the Score section of their scoresheet (represented by the Owl).
-
Canyon Zone
Players should count the total number of cacti of each type that they have enclosed in shapes. You can do this by marking Xs over the cacti in the top left corner starting from the top.
Each of the three cacti types will score individually and will earn points equal to the number of enclosed cacti per the chart on the top-left of the Canyon Zone. Players should write the total points for each cacti type in the appropriate boxes at the top of the Canyon Zone.
Players should write the total in the score section of their scoresheet (represented by the fox)
-
Mudcracks Zone
Players should count the total number of each cacti type that they have enclosed with completed triangles. Each cacti type is worth a different number of points each.
The first type is worth 2 points each, the second type 4 points each and the last type 12 points each. Players should write the total points earned for each type of cacti in the boxes in the lower left corner.
The sum of these 3 boxes should be written in the Score section of their scoresheet ( represented by the rabbit).
Final Score
Players should sum the scores from all 4 of their zones to reach their final score. The highest total score wins.
In the event of a tie, the tied player who unlocked the most discovery bonuses wins. If there is still a tie then the victory is shared.
Scoresheet Bonuses
Each scoresheet zone has bonuses that can be claimed and used during the game. This can be utilized to build a chain of actions and score huge amounts of points in a single round! Bonuses are gained during the write phase in 4 ways.
At the start of the game, all players will start with one reflick and one swap which are already circled on your scoresheet.
Earning Bonuses
Cliff-Dweller Ruins - Bonuses are gained whenever a grouping is completed that shows a bonus symbol in the reward earned.
Canyon - Bonuses are gained immediately when they are enclosed in a shape drawn by a player.
Mudcracks - Bonuses are gained immediately when the triangle containing them is enclosed by a player.
Creek bed - Bonuses are gained immediately when they are circled by a player.
Bonus Types
-
 Discovens
Usable during the Write phase. This bonus allows the player to Circle a Discover Bonus (6 rabbit, 4 fox or # Owl). Players may use this circle bonus at any time of the players choosing now or in future rounds. Players should cross off the bonus once used.
-
 Reflick
Usable during the Flick phase, players should circle an earned Reflick bonus to show it is available during future Flick phases. Your most recently flicked disc can be picked up and flicked again if this bonus is used. Players should cross off the bonus once used.
-
 Swap
SwapUsable at the beginning of the Write phase players should circle an earned Reflick bonus to show it is available during future Flick phases.
Any two of your discs on the board can be swapped in position. Use this to put higher scoring discs into better zones or bonuses! Swaps are done in turn order starting with the first player.
Players should cross off the bonus once used.
-
Animals
Used immediately during the Write phase. These act as additional values to use in the section corresponding to that animal.
-
 Rabbit Bonus (5 Points)
These count as additional points in the mud crack zone following all rules of that zone.
-
 Fox Bonus (4 Points)
This allows you to immediately draw the shape corresponding to the 4 shape in the Canyon Zone, following all rules of that zone.
-
 Owl Bonus (# Points)
Owl bonuses allow players to move from 1-5 spaces in the creekbed Zone following all rules of that zone.
Continue Reading