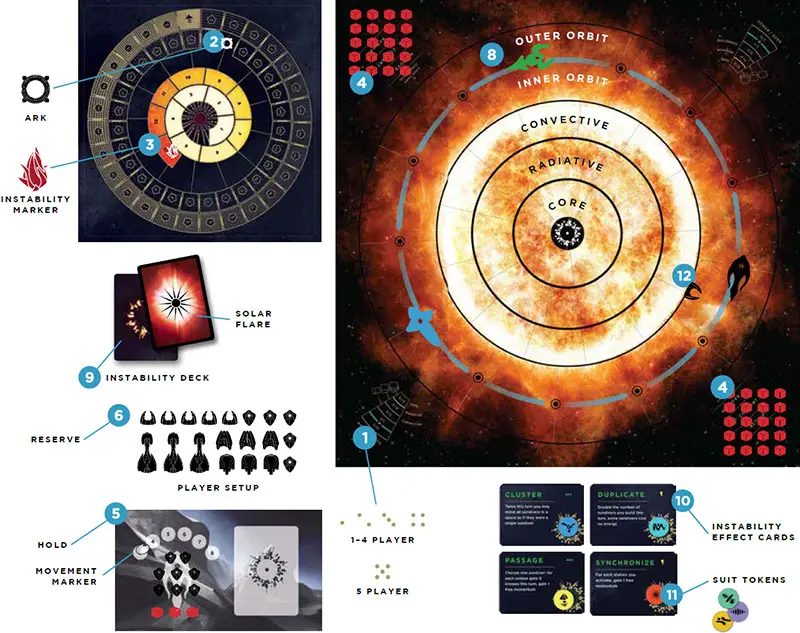
Components
- 1 Game Board
- 30 Effect Cards
- 96 Instability Cards
- 5 Player Holds
- 1 Momentum Track + Instability Spiral
- 5 Player Aids
- 8 Trigger Events
- 1 Instability Marker
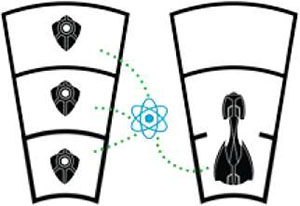
- 7 Suit Tokens
- 89 Energy Cubes
- Rulebook
Setup
1 Lay out the game board (either 1-4 player or 5 player side).
2 Stack players' arks on space 0 of the momentum track (order does not matter).
3 Place the instability marker on space 13 of the instability spiral.
4 Divide the red energy cubes and place 2 piles in opposite corners of the game board.
5 Players select a homeworld and take that world's player aid and player hold. Place the following into your hold:
- 8 sundivers
- 3 energy cubes
- Movement marker on space 3 of the movement track
6 Place the rest of the pieces of your color in your reserve:
- 5 sundivers
- 5 solar gates
- 3 energy nodes
- 3 sundiver foundries
- 3 transmit towers
Hold Vs. Reserve: You have both a hold and a reserve.
The reserve is where your unbuilt structures live when they are out of play. This includes sundivers but also nodes, foundries, towers and gates that have not yet been converted on the board.
Your hold is where you keep your sundivers that are in play, but not yet launched onto the board, as well as any energy you may possess. After converting, sundivers are sacrificed to the reserve; after activating, sundivers are recalled to your hold.
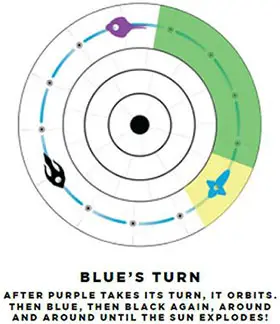
7 Whoever has been closest to the Sun most recently is the first player!
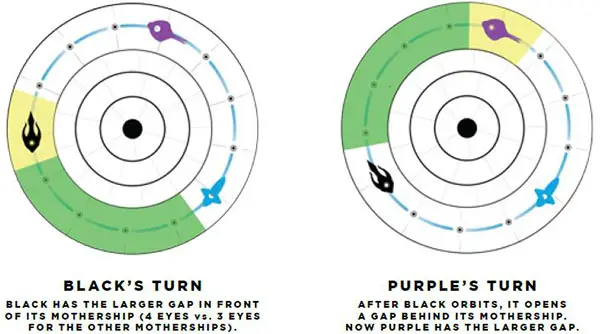
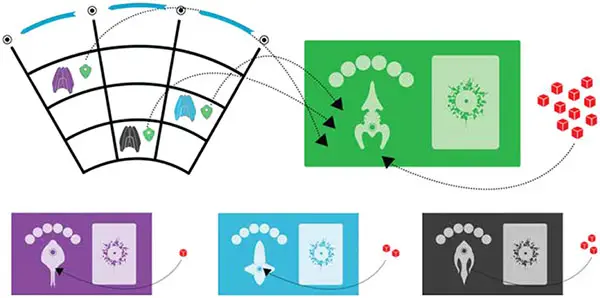
8 Place each player's mothership on the board, on one of the eyes between outer and inner orbit. Space them equidistantly, but leave a larger gap between the first and last player. The number of spaces between motherships will vary based on the number of players.
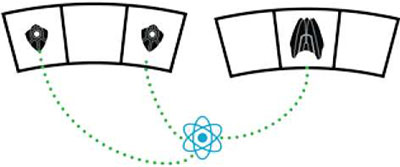
9 Construct the instability deck by combining the solar flares with one other suit per player and shuffle the deck. Place the instability deck near the momentum track.
10 Select instability effect cards (same number as suits above). Instability effect titles are color coded:
- Blue and green cards have simple effects
- Yellow cards have more complex effects
- Red cards have attack/negative effects
11 Assign each instability effect a suit token to correspond to one of the instability suits (solar flares also get an associated instability effect).
Note: For your first game, we suggest using the blue cards. Once you know how to play, feel free to mix in other instability effect colors to create a custom mix for each game.
WARNING: Only use red cards if everyone agrees they are okay with being targeted and attacked!
12 VESTIGIAL STRUCTURES - Some vestiges of the ravaged solar harvesting infrastructure remain. If it is anyone's first game, or you just want to play a quicker game, do the following: Each player in turn order places either a single gate or a single station (node, foundry or tower) on the board.
Vestigial gates can be placed anywhere on the barrier between inner orbit and the convective layer. Vestigial stations can be placed in outer orbit, inner orbit or the convective layer. There can be only one station per space and only one gate connecting any two spaces.
Each player then places a station (if you previously placed a gate), or a gate (if you previously placed a station), following the same rules. After you have placed your station, advance your movement track to 4.
If not using vestigial structures, add another instability suit to the deck, along with a corresponding instability effect.
13 You Are Now Ready To Play!
Object of the Game
Gain momentum by transmitting energy to your ark and/ or hurling sundivers into the heart of the Sun. It is a race against time-and other worlds-as your actions accelerate the oncoming supernova. The ark with the most momentum at the end survives! The others perish in a fiery demise.
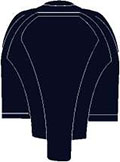
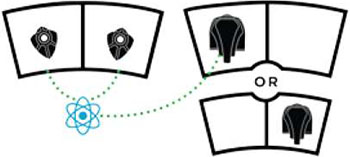
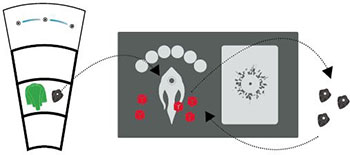
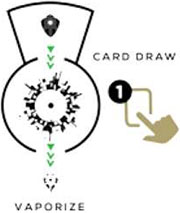
The image to the right is your hold (if you are the purple player). It represents the inside of your mothership and houses your available sundivers, energy, movement marker and space for one instability card.
Every turn you perform one action, then advance your mothership one space forward along the orbital track.
 Purple Player Hold |
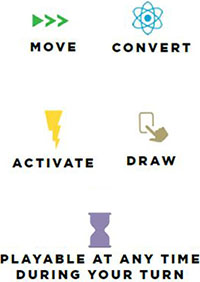
You have 3 actions to choose from:
-
 Move
MoveLaunch sundivers from your mothership onto the game board, fly them around the board and hurl them into the heart of the Sun.
-
 Convert
Once your sundivers are in certain patterns, you can convert them into gates or stations (nodes, foundries or towers).
-
 Activate
Sundivers on stations can activate those stations to harvest energy, spend energy to build new sundivers or transmit energy back to your ark.

Note: You can use anyone's gates and stations, not just your own. If you use someone else's, they get a small bonus.
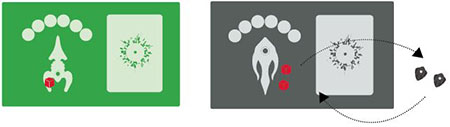
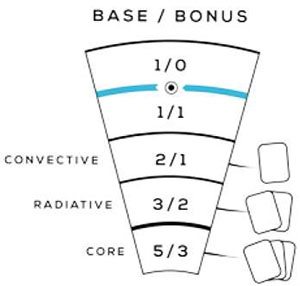
Stations built on deeper layers of the Sun yield greater rewards, but also trigger greater instability (represented by drawing cards from the instability deck) when you convert or activate on those layers.
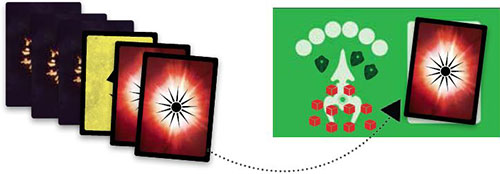
You draw instability cards every time you hurl sundivers, and every time you convert or activate within the 3 layers of the Sun. You can keep one of these cards to play on a future turn-its effect is determined by which instability effect card contains its suit token.
Every time you draw a red solar flare, you advance the instability marker down the instability spiral. When you draw the 13th solar flare the Sun goes supernova and the game is over!
Whoever moved their ark farthest along the momentum track escapes just in time (winning the game), and the rest...do not.
Game Play
Orbit
The motherships are placed equidistantly on the eyes between outer and inner orbit, with one exception: the current player has a larger gap in front of their mothership. The number of spaces between motherships will vary based on the number of players.
Orbiting signals the end of a player's turn. Once you've completed your action, advance your mothership one space along the arrows (counterclockwise) on the orbital track, closing the gap in front of you and creating a larger gap behind you.
This indicates it is the next player's turn.
On your turn:
On your turn, you must pick one of 3 actions: move, convert, or activate. In addition to one of these actions, you may choose to use an instability card you earned on a prior turn.
After your action is complete, orbit your mothership; the next player can take their turn.
Actions
1. Move
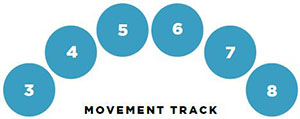
You start with 3 movement points (tracked by the movement marker on the movement track in your hold), and gain one for each of the five layers in which you own a station.
If you set up with vestigial structures, your movement points are immediately raised to 4 by placing your first station. You can spend your available movement points to do any combination of launching, flying or hurling.
-
Launch
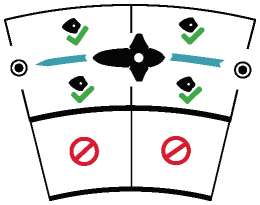
For one movement point you may launch a sundiver from your hold onto the game board into any of the 4 orbital spaces adjacent to your mothership. You cannot exceed a maximum of 5 of your own sundivers in any single space on the game board at any time during play.
Launch Sundivers
-
Fly
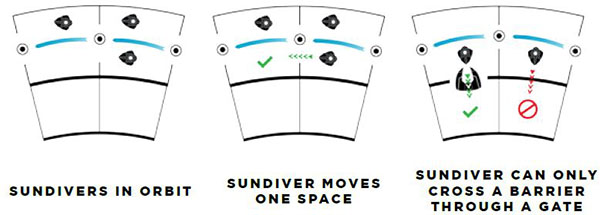
Once sundivers are on the board, you can fly them individually from space to space for one movement point per space.
You cannot fly through the thick black lines (barriers) between the 3 layers of the Sun without using a solar gate. Sundivers can fly forward and backward, up and down, provided solar gates are present where necessary.
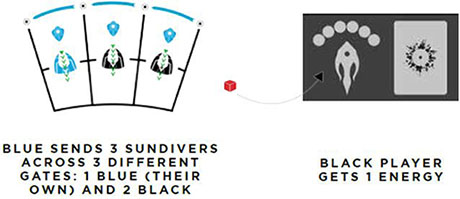
Movement And Gates: If you move across someone else's gate, they gain one energy cube from the general supply. If you use multiple players' gates in one turn, they each get one energy.
The maximum reward per player per turn is one energy total, regardless of how many of their gates you use. Consider it a day pass.
The owner of the gate cannot turn down this energy. You do not get the energy bonus for using your own gates.
-
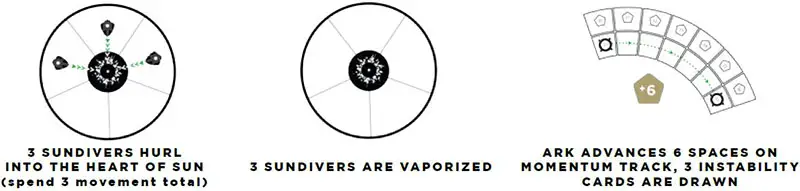
Hurl
Sundivers in the core can hurl themselves into the heart of the Sun for one movement point each.
They are vaporized (removed from the game permanently), but you are able to capture the shockwave as momentum, advancing your ark 2 spaces on the momentum track for each sundiver hurled.
You also draw one instability card per sundiver hurled; if that card happens to be a solar flare, you gain 1 more momentum! All other instability card rules still apply.
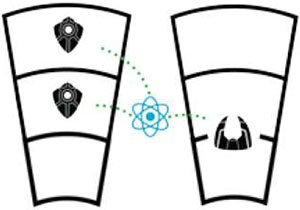
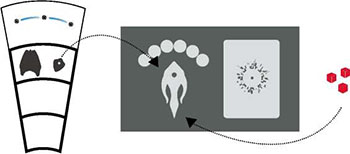
2. Convert
Sundivers in various patterns can be converted into stations or gates. When you convert, place the station or gate on the game board and sacrifice the sundivers (put them back in your reserve, NOT your hold).
You will have to rebuild them if you want to fly around with them again. Then, if you converted a station in a layer that did not previously contain one of your stations, advance the movement marker on your movement track one space.
You are allowed a total of only one conversion per turn. Draw instability cards based on the layer you convert into.

Note: If you ever start your turn and discover that you have no sundivers in your hold or on the board, deconstruct one of your stations or gates and return it to your reserve, then add 2 sundivers from your reserve to your hold.
If you remove a station from a layer of the board where you have no other stations, move your movement marker down one space on the movement track in your hold. You may then proceed with your turn.
-
Solar Gate

Gates are used to connect the layers of the Sun. The pattern is 2 sundivers, one above the other-the gate connects the space of the deeper sundiver to an adjacent space in the layer below.
Cards are drawn based on the deepest layer the gate touches.
-
Energy Node
Nodes are used to harvest energy from the Sun.
The pattern is 2 sundivers in the same layer with a gap between them-the node is placed in the gap between where the two sacrificed sundivers used to be.
-
Sundiver Foundry
Foundries are used to rebuild sundivers from energy. The pattern is 2 sundivers in the same layer in adjacent spaces.
You can place the new foundry in either of the spaces where the sacrificed sundivers used to be.
-
Transmit Tower
Towers are used to transmit energy to your ark on the momentum track.
The pattern is 3 sundivers on 3 different layers (adjacent spaces). The tower is placed in the space where the deepest sundiver was sacrificed.
Important: There can only be one station in total per space and only one gate connecting any 2 spaces.
Always remember to draw instability cards after converting and activating!
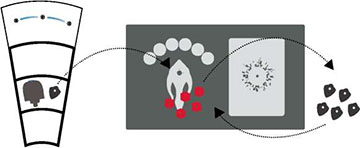
3. Activate
To activate stations (nodes, foundries or towers), you must have sundivers of your color in the spaces containing those stations at the start of your turn.
When you choose the activate action, you recall each activating sundiver back to your hold (not the reserve!) and reap the reward of the station.
- Energy nodes yield new energy cubes (see values below)
- Sundiver foundries spend energy to rebuild sundivers (one sundiver per energy)
- Transmit towers spend energy to boost your momentum (one momentum point per energy)
How much do i get for activating a station?
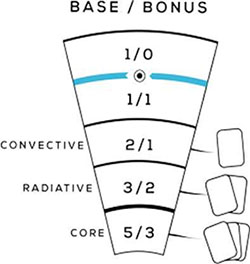
The amount you get for each station you activate depends on who owns it:
Anyone who activates a station gets the base amount
The owner then has the option to take the bonus amount
If the owner declines the bonus, then the activator has the option to take the bonus If you are the activator and the owner, then you get the base amount and the option to take the bonus as well.
The base and bonus for each station are determined by how deep the station is (as shown in the diagram on the left). In general, the deeper the station is, the higher both the base and bonus.
Important: Station rewards are ALL OR NOTHING-you can never do less than the full amount of either the base or bonus. For foundries and towers, if you do not have the full amount of energy required you cannot do the action or gain the reward.
Again: one energy is required per sundiver built at a foundry, and one energy is required for each point of momentum transmitted from a tower to your ark.
Similarly, if you do not have enough sundivers in your reserve to complete the full foundry activation reward you cannot take that action/bonus.
Examples:
Black player activates an energy node in the convective layer. The sundiver is recalled to her hold and she adds 3 energy to her hold as well (base of 2 + bonus of 1).
Black player activates her sundiver foundry in the radiative layer. The sundiver is recalled to her hold and she pays 5 energy, adding 5 new sundivers from her reserve to her hold (base of 3 + bonus of 2).
A black sundiver on a green foundry in the radiative layer. Black activates the foundry, recalls her sundiver and pays 3 energy to build 3 new sundivers (base of 3 in the radiative).
Green has only 1 energy, but the bonus requires 2-green must decline the bonus. Black then claims the bonus, paying 2 more energy and building 2 more sundivers.
Multiple Activations in a Single Turn
If you have sundivers on multiple stations of the same type, you can activate as many of these stations as you wish, no matter who owns the stations.
However, each individual station can only be activated once per turn; even if you have 5 sundivers on one station, you can only activate it once.
You cannot activate different types of stations (an energy node and a sundiver foundry, for example) on the same turn, unless something like the FESTIVAL effect is in play.
Important: Once the energy has been paid (if any) and the activation reward received, recall the activating sundiver back to your hold.
This is an important difference between converting and activating: when converting, the sundivers are sacrificed and placed in your reserve-they need to be rebuilt in order to use them again.
When activating stations, however, the sundivers are recalled to your hold where they can be launched again on a subsequent turn. Don't thoughtlessly cast away your loyal sundivers!
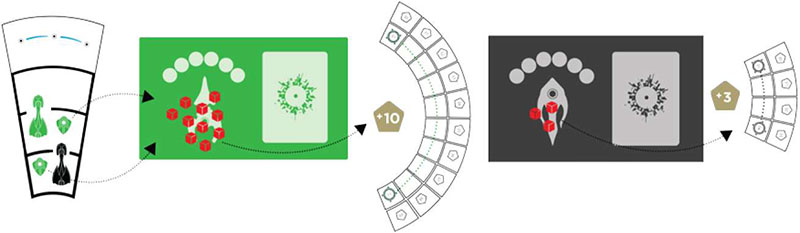
Green player activates his own transmit tower in the radiative layer and also black's tower in the core - on the same turn! both green sundivers are recalled back to green's hold.
Green transmits 10 (5 for the base + bonus of his own tower + 5 for the base of black's tower), paying 10 energy and moving his ark forward 10 spaces on the momentum track.
Black has the option to take the bonus of 3 transmit for green activating her tower. Black has enough energy, so she pays the 3 energy and moves her ark forward 3 spaces on the momentum track.
Green sundivers are on 3 other player's energy nodes, one each in convective, radiative and core. All 3 are activated; green player gets 10 energy and each other player gets 1, 2 and 3 energy respectively.
Then, 6 cards are drawn by green. 2 are solar flares, whose immediate impact is resolved first. Green chooses one card to keep (a solar flare in this case) and places it into his hold. He can play it on a subsequent turn to perform whichever instability effect the solar flare's suit token is on.
Instability Cards & Effects
Instability cards serve two functions in the game: they are the means for tracking time, and they provide opportunities to use the instability effects selected at the beginning of the game.
Drawing Instability Cards
Our actions in the Sun have an impact on solar integrity.
When you convert or activate in any of the 3 layers of the Sun, you must draw instability cards. For multiple activations, cards are drawn for each station activated in that turn.
Number of cards per layer:
- Convective: Draw 1 card
- Radiative: Draw 2 cards
- Core: Draw 3 cards
- Hurling into the heart of the Sun: Draw 1 card per sundiver hurled. If that card is a solar flare, gain 1 additional momentum!
Solar Flares
For each solar flare drawn, immediately resolve its impact in this order:
-
Down Spiral
The instability marker descends on the instability spiral, counting down to solar finality.
-
Unstable Energy
Energy is stored in a volatile plasma form: all players with 13 or more energy cubes in their hold lose half! (Round loss down).
-
Orbital Activation
All stations in outer orbit (not inner!) of any and all types may be activated by their owners. The owner does not need to have a sundiver present at the station. Foundries and towers still require one energy to activate, which could come from an energy node in outer orbit if you have one.
Choosing a card to keep
You can only keep ONE card in your hold for use on a future turn. If you have a card in your hold and draw more, you may choose to keep the old card or one of the new cards.
Place the chosen card face up in your hold. Discard the others. Once the impact of the solar flare is resolved, a player may choose to keep it just like any other instability card.
Using your Instability Card
(based On Instability Effects)
On your turn, you may elect to use an instability card earned on a previous turn. This is in addition to your regular action.
The ability associated with each instability suit is determined by the suit tokens assigned to each instability effect selected at the beginning of the game.
Each instability effect has a symbol indicating when it can be played: move, convert, activate, draw or any time.
Discard the instability card immediately after use and before drawing any new cards as a result of your action. You cannot play a card the same turn you receive it.
For the full list of possible effects, see INSTABILITY EFFECTS, back cover.
Ending Your Turn
Once you have completed your action, drawn any instability cards and resolved the impact of any solar flares, your turn is complete.
Orbit your mothership! Then the next player can take their turn while you decide what card to keep. If someone really cares what card you keep, they can wait for you to pick, but in general play can continue.
If it gets around to your turn again and you still haven't decided which card to keep, the player on your right selects one at random from your choices.
End of the Game
When the 13th solar flare is drawn, the instability marker reaches the supernova on space 0 of the instability spiral.
Any towers in outer orbit activate and then the game is immediately over!
The ark that is farthest along the momentum track escapes just ahead of the wave of the impending solar cataclysm, saving their people, while the rest are engulfed in a fiery demise.
Continue Reading
