Setup
The setup for you remains the same. To set up the AI player, follow these steps:
-
Choose 1 of the Player Boards and flip it over to the AI Player Board side.
-
As with the regular Player Board, place the 7 Monks, Outposts and Absolves onto the AI Player Board.
-
Stack the AI's Attribute Markers on the zero space, with Influence on the Bottom, Faith in the middle and Strength on top.
-
Place the Resource Marker on the left-most space of the Resource Track, on the left side of the AI Player Board.
-
First set aside the 5 "King's Favour" Scheme Cards, then shuffle the remaining Scheme Cards and place them facedown on the right card space of the AI Player Board.
-
Decide on what difficulty you wish to play. Based on the table below, shuffle all 6 King's Order Cards and reveal the indicated number. For each card revealed, place 1 of the AI's Workshops onto the specified action space of the AI Player Board.
- +Easy = 1 King's Order Card
- +Standard = 3 King's Order Cards
- +Hard = 5 King's Order Cards.
After doing this, reshuffle the King's Order Cards and place 3 facedown on the Main Board as per the normal setup rules.
-
After placing both the King's Order and King's Favour Cards onto the Main Board, place 1 AI Workshop on top of each King's Order Cards and 1 "King's Favour" Scheme Card faceup on top of each of the King's Favour Cards on the Main Board.

-
The Start Player Marker is not required as you will always act first.
Round Setup And Tavern Cards
On Rounds 1-3, add the AI Player's Workshop from on top of the King's Order Card onto the action space matching the revealed King's Order. This will help the AI Player focus on completing the King's Orders. On Rounds 3-7, simply add 1 "King's Favour" Scheme Card to the Scheme Discard Pile.
When revealing Tavern Cards, only reveal 2. You choose 1 as normal. The AI Player does not gain Workers from Tavern Cards, but immediately gains 1 Suspicion per Criminal on the unchosen Tavern Card.
Game Play
Resource Track
The AI does not collect Provisions, Silver or Tax. Instead, any time they would gain resources, move the Resource Marker on the AI Player Board 1 space to the right along the Resource Track.
If they were gaining Silver from the Tax supply, return the required number of Silver to the main supply (as well as moving the Resource Marker.
When moving the Resource Marker from the right-most space, return it to the left-most space and continue counting from there. Each time this happens, increase the AI's lowest Attribute Marker by 1.
If tied, move the top-most Attribute Marker from that space (for this reason, it is important to keep Attribute Markers stacked as they move up the Attribute Track, rather than placing them side-by-side).
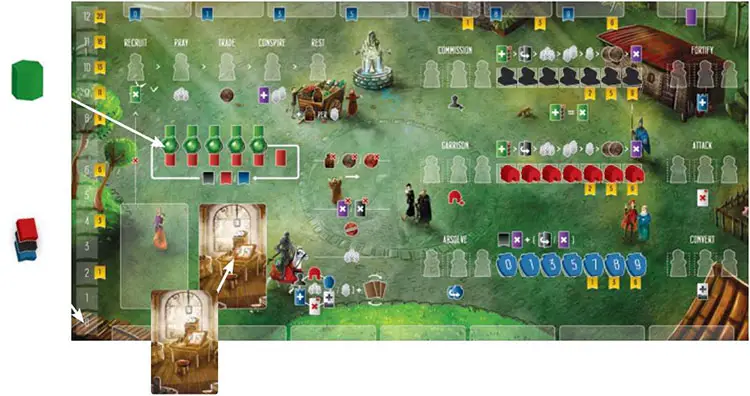
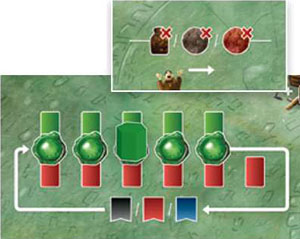
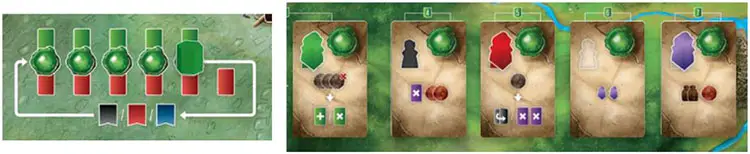
Not only does the Resource Track slowly boost Attributes from gathering resources, but it also acts as a deciding factor when interacting with certain card types. The layout of the Resource Track reflects the physical layout of Townsfolk Cards (5 green cards), King's Favour Cards (5 green seals) and Outsider Cards (6 red cards).
When required to interact with 1 of these cards, the AI will always attempt to first interact with the card where the Resource Marker sits. If the targeted card is not available, the AI will attempt to target the next card to the right (following Resource Track.
If they are trying to target the right-most card, they will move back to the left-most card. Note that with Outsiders, if failing to target the fifth card from the left, they will first try to target the sixth card from the left before moving on to the left-most card.
Any time the AI Player is required to remove a Suspicion or Debt Card and does not have 1 to remove, it will instead return 1 Tax from the Tax supply to the Main supply. However, this does not move the Resource Marker along the Resource Track.
Important rule: The AI Player ignores all Provisions and Silver costs.
Workers
The AI Player treats all Worker types (colors) as the same. However, any time they gain a Criminal (purple), they still gain suspicion. Also, they do not gain Workers from Paladin Cards or Tavern Cards.
Instead, they always start each Round with a specific number of Workers (Workers = Current Round, plus 3).
Scheme Cards
These are how the AI Player takes action. You will always take the first action each Round. Once you have taken your action, turn over the top card from the Scheme Card Draw Pile and place it face up in the space to the left.
This will indicate which action the AI Player will attempt to make. If the AI Player does not have enough workers available to take the action, or if that action is already blocked from a previous turn, it will instead attempt to take the left-most available action, from those available across the top left of the AI Player Board (Recruit, Pray, Trade, Conspire, Rest. Once the AI Player has completed an action, you will take your next action, followed by the AI player, then back to you, and so on.
As in the regular game, you will continue taking actions until you decide to pass. The AI will continue taking actions until they have no Workers left in their supply, or until they take the Rest action on their AI Player Board.
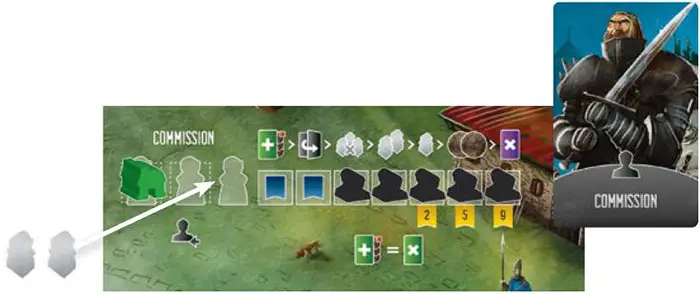
For example, the next AI Scheme Card revealed was "Commission". As the AI already has 1 Workshop on their Commission action space, this only requires 2 Workers.
The AI places 2 Workers and completes the Commission action. However, if they only had 1 Worker available in their supply, they would have instead attempted to take the left-most action across the top left of their AI Player Board.
AI Actions
Recruit
When taking this action, the AI Player will always attempt to discard the specified Townsfolk Card, based on the position of the Resource Marker on the Resource Track.
If that card is no longer available, it will move on to the next card as described on Page 28. Just like when human players discard Townsfolk Cards, the AI Player will gain 1 or more immediate rewards.
Pray
When taking this action, clear all Workers off the right side of the AI Player Board (note that this does not include any Workers placed on the left side.
If there are no Workers on the right side of the AI Player Board, they instead gain 1 Worker from the supply.
In either case, all Scheme Cards (Draw Pile and Discards) must be shuffled together to form a new Scheme Card Draw Pile.
Trade
When taking this action, the AI Player simply moves the Resource Marker 1 space along the Resource Track.
Conspire
When taking this action, the AI Player gains 1 Suspicion Card and 2 new Workers from the supply. For each Tax icon on the revealed Suspicion Card, return that much Silver from the Tax supply to the main supply and advance the Resource Marker 1 space along the Resource Track.
Rest
When taking this action, advance the Resource Marker 1 space along the Resource Track, plus 1 additional space for each Worker still in their supply. This also causes the AI Player to pass for the remainder of the Round.
Commission and Garrison
When taking either of these actions, the AI Player will always attempt to place their left-most token (Monk for Commission, Outpost for Garrison) onto the Main Board. They also immediately gain the indicated Attribute increase when revealing it from under the Monk or Outpost.
Just like human players, the AI Player must have the required Attribute to take the action. When placing Monks and Outposts, they will always target available spaces on the Main Board in a particular order.
If there are multiple spaces available of the same reward type, they will always target the left-most space on the Main Board.
The AI will first target "Free Recruit" spaces, then "Pay a Debt" (only if they have an unpaid Debt, followed by "Pray", "Gain 2 Workers", "Gain 1 Worker", "Gain 2 Silver" and finally, "Remove 1 Suspicion". Keep in mind that Recruit will always attempt to discard a Townsfolk Card for an immediate reward. Also, the Pray action will cause them to clear the right side of the AI Player Board (or gain 1 Worker) and shuffle all Scheme Cards.

Absolve
When taking this action, the AI Player must have enough Influence to target their left-most Jar. If they do, simply flip over the targeted Jar. The AI Player immediately increases their Faith by 1 on their Attribute Track and removes 1 Suspicion. They also either flip an unpaid Debt, or remove 1 additional Suspicion (in that order).
Fortify
When taking this action, the AI Player must have enough Influence to build their next Wall. Just like when human players Fortify, the AI Player will place the Wall into the left-most space above their Player Board and gain all printed rewards.
Note that if the Wall card offers a choice of rewards, it will always favour the left option first.
Attack
When taking this action, the AI Player will always attempt to target the specified Outsider Card, based on the position of the Resource Marker on the Resource Track.
If that card is no longer available, it will move on to the next card as described on Page 28. However, the AI Player must also have enough Strength to make the Attack.
Therefore, they will only be able to target Outsider Cards within the limits of their Strength Attribute. Just like when human players Attack Outsiders, the AI Player will gain 1 or more immediate rewards and keep the Outsider Card facedown alongside their Player Board.
Convert
When taking this action, the AI Player will always attempt to target the specified Outsider Card, based on the position of the Resource Marker on the Resource Track.
If that card is no longer available, it will move on to the next card as described on Page 28. However, the AI Player must also have enough Faith to successfully Convert the Outsider.
Therefore, they will only be able to target Outsider Cards within the limits of their Faith Attribute. Just like when human players Convert Outsiders, the AI Player adds them to the left-most available space below their Player Board. Important Rule: The AI always scores a minimum of 1 VP for each Converted Outsider.
King's Order
When taking this action, the AI Player will always attempt to take the right-most revealed King's Order, of which they have not already completed.
However, if they have completed all the revealed King's Orders, they will still try to attempt the right-most 1. As with other actions, if they cannot take actions pertaining to any of the revealed King's Orders, they will then move on to the top row actions of the AI Player Board.
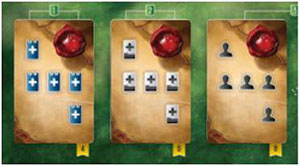
For example, based on these 3 King's Orders, the AI would first attempt to Commission, then Convert, then Fortify.
If they had already done 5 Commissions, they would try to Convert instead. Likewise, if their Commission action space was already filled, they would try to Convert instead.
King's Favour
When taking this action, the AI Player will always attempt to target the specified King's Favour Card, based on the position of the Resource Marker on the Resource Track.
If that card is no longer available, it will move on to the next card as described on Page 28. As with other actions, if they cannot action any of the revealed King's Favour Cards, they will instead move on to the top row actions of the AI Player Board.
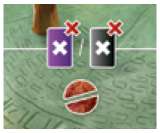
For example, the AI Player has revealed a "King's Favour" Scheme Card. Based on the position of the Resource Marker, they will attempt to place a Worker on the fifth (right-most) King's Favour Card.
However, this has already been blocked by another Worker. Following the flow of the Resource Track, they would then attempt the first (left-most) King's Favour Card.
As this is also blocked, they will instead place a Worker onto the second King's Favor Card, removing 1 Suspicion and gaining 2 Tax. As they don't collect resources, they would instead return 2 Silver from the Tax supply to the main supply and move the Resource Marker 2 spaces along the Resource Track.
This would cause the Resource Marker to wrap around, landing back on the second space and increasing the AI Player's lowest Attribute by 1.
End of the Round
Note that the AI Player does not carry Workers over between Rounds. They always start each Round with the specified number of Workers. Also, it is important to remember not to shuffle Scheme Cards between Rounds. This only happens when the AI Player takes the Pray action.
In the regular game, if the right-most Townsfolk Card or left-most Outsider Card is still in play, they are discarded. However, in the Solo Game, also discard the second-right-most Townsfolk Card and second-left-most Outsider Card.
Continue Reading
