Components
- 2 game boards, only one of which is used each game
- 2 identical production wheels to indicate production amounts
- 4 heartland landscapes (one for each player)
- 9 district landscapes
- 9 plot landscapes
- 450 goods tiles
- 41 double-sided building cards
- 32 settlement cards
- 37 forest cards with moor on their reverse sides
- 3 clergymen in each of four colors
- 9 goods indicators in different shapes and colors
- 1 house-shaped, turquoise building marker
- 2 pins to attach the production wheels to the game boards
- 1 game setup sheet
- 1 scoring pad
- 15 plastic bags
Overview
Ora et Labora is a game about monastic economy during the Middle Ages. There is prayer. But mostly, there is hard work - both within the cloister walls as well as outside them.The players are cloister heads and send their clergymen (the prior along with two lay brothers) to buildings in which they produce goods.
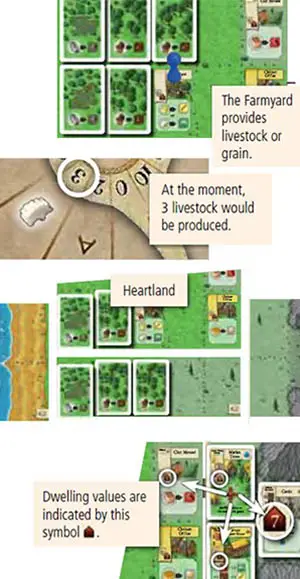
How many goods are produced is indicated by the production wheel. The players also send their clergymen to buildings that upgrade their goods. To start, players have only their heartland, a small 2x5 space landscape with moors and forests that can be expanded with later purchases.
In total, the game is interrupted five times for a settlement phase. Players use them to add settlements to their landscape such that they gain as many points as possible for them by being next to buildings with high dwelling values.
Buildings and settlements can, for the most part, be built on any empty landscape spaces. The most important exception are the cloister buildings (distinguishable by their yellow colored title and symbol boxes).
Cloister buildings must be adjacent to other cloister buildings, such that a cloister of ever-increasing size is created. (In the example to our right, the Cloister Chapter House is adjacent to the Cloister Office).
Ora et Labora can be played in either a France or an Ireland variant. Depending on which variant the players choose, turn all building cards in the game to their appropriate sides.
Game Play
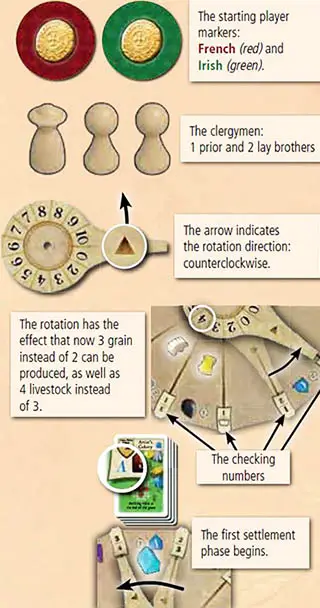
Determine who will receive the starting player marker in the first round. Give that player either the French or Irish starting player marker (the starting player marker for the other variant is not used). Turn the starting player marker over so that the side with 1 coin is showing. The starting player marker rotates clockwise each round.
In a three or four player game, the game is played in rounds with changing starting players. A round consists of five phases, each of which is played through in order.
-
At the start of each round, all players check to see if they have all three of their clergymen on buildings. Those that do get them back.
- If you have only used 1 or 2 clergymen then you do not get them back.
- You must take your clergymen back.
-
Thereafter, rotate the production wheel one position in the direction of the arrow illustrated on it (i.e. counterclockwise).
The goods indicators indicate production levels. Production levels increase through the rotation of the production wheel.
Before rotating the production wheel, use the checking number to ensure that the correct player is the starting player. How this is done is explained in more detail on page 6.
Should a goods indicator be located on the last space (space 10) before the wheel is rotated, then it is pushed forward by the wheel beam. (In other words, the goods indicator stays on space 10).
In round 8, the grapes goods indicator enters the game (only in the France variant) and in round 13 the stone goods indicator enters the game. The new goods indicators get pushed onto space 0 of the production wheel.
-
Should the beam push the building marker forward and hence past the next pile of buildings and settlements (the A cards come into the game first, followed by the B, C and D cards), then the game is temporarily interrupted by a settlement phase.
-
Each player, in clockwise order, then gets to carry out one action. At the end of the round, the starting player gets to carry out a second action. So a round in the three player game consists of 4 actions while a four player game round consists of 5 actions.
-
At the end of the round, pass the starting player marker to the next player in clockwise direction.
The Action Options
Phase 4 of a round is the action phase. You have three options for this action.
- You can place one of your own clergymen (prior or lay brother) or issue a work contract to another player: In that case, the other player must place one of his own clergymen.
- You can fell trees or cut peat and take the corresponding production amount.
- You can build a building.
Action: Place a clergyman in order to use a building
You can either place one of your own clergymen (a lay brother or the prior) or request that one of your opponents place one of their clergymen.
If you place one of your own clergymen, then you place it into one of your own, unoccupied buildings and use the building's function.
Placing A Clergyman
- Should a player have placed all three of his clergymen over the course of a round, then his buildings cannot be used again until the end of the round. (Clergymen are only removed at the start of a round. See phase 1 of a round).
Exception: The Priory and Palace/Grand Manor provide alternative ways of using buildings.- Building functions are only triggered by placement, not by just being in a building.
- You can place a clergyman on a building without using its function.
- You can only use buildings that have been placed onto landscape spaces. Buildings next to the game board may not be directly used.
Work Contracts
If you want to use one of an opponent's buildings, then you must pay him 1 coin and, by doing so, issue a work contract: The other player must choose one of his own available clergymen and place it on the chosen building.
Important! Doing this means that one of your opponent's clergymen and not one of your own will be placed.
Work Contracts
- When you want to use one of an opponent's buildings, then your opponent gets to choose if he wants to use his prior or one of his lay brothers for the action.
- You cannot issue a work contract to a player who has already placed all of his clergymen.
- A work contract cannot be refused.
- You must pay the price for the work contract immediately. (You cannot wait to receive the building's benefit first).
- You are allowed to issue a work contract without actually using the building's function.
As soon as one player builds the Winery (in the France variant) or the Whiskey Distillery (in the Ireland variant), then the price for work contracts increases from 1 coin to 2 coins for all players. (This price increase is in effect until the end of the game and is indicated by flipping the starting player marker over to its reverse side).
Presents For The Host
From the start of the game on, you may choose not to pay coins to use another player's buildings. Instead, you can return 1 wine (in the France variant) or 1 whiskey (in the Ireland variant) back to the general supply; the owner of the building being used gets nothing (as the present is opened and drunk).
Wine is produced in the Winery and Whiskey is produced in the Whiskey Distillery.
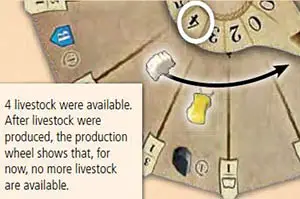
The Production Wheel
The production wheel is the central game element in Ora et Labora.
The players produce goods. How many goods of a particular type they produce is indicated by the production wheel. At the start of each round, rotate it one space counterclockwise (Phase 2 of a round). In this manner, nearly all goods production is increased at once.
Each time a goods is produced, move its corresponding goods indicator back to the 0 space. (Because of the relatively slow rotation of the production wheel, it will take a few rounds before this good will be interesting again).
Goods tiles have a total of four types of icons on them:
is for food,
is the symbol for energy,
is for money and
is for points. Every goods and their symbols can be found on the summary.
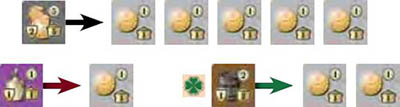
Using The Joker 
Whenever you carry out an action that uses the production wheel, you can choose to use the joker instead of the regular goods indicator. (Buildings that use the production wheel all have a game board outline in their function boxes). You are allowed to use the joker indicator for a goods type whose normal goods indicator is not in the game yet (see Example 2). This rule affects stone as well as grapes in the France variant.
Action: Fell Trees
Remove (maximum) 1 forest card from your landscapes. The production wheel indicates how many wood goods tiles you take from the general supply. Move the wood goods indicator to the 0 space of the production wheel.
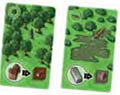
The forest and moor cards don't have function boxes since they are not occupied by clergymen. The game board outline indicates that you can use them to obtain wood or peat.
Action: Cut Peat
Remove (maximum) 1 moor card from your landscapes. The production wheel indicates how many peat goods tiles you take from the general supply. Move the peat goods indicator to the 0 space of the production wheel.
Using Forest And Moor Cards
- Important! Felling trees or cutting peat does not use a clergyman.
- You cannot use other players' forest or moor cards.
- You are allowed to remove a forest or moor card even when the wood or peat goods indicator is at 0, although you will not receive any goods. (This still costs an action).
- Once you run out of forest or moor cards, you can still carry out the "Felling trees" or "Cutting peat" actions, although you won't receive any goods. You also do not adjust the goods indicators.
- You can use the joker indicator to get wood or peat.
- Removing forest or moor cards results in empty landscape spaces that can be built on later (see next section, "Build a building").
Action: Build A Building
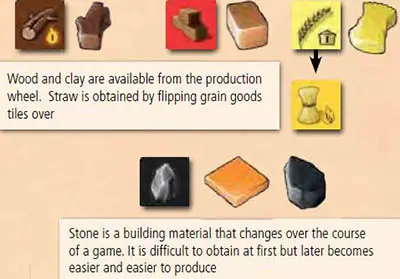
You may build an available building from the open display by paying the building costs, located in the upper left hand corner of the building card. (There are four different building materials: wood, clay, straw and stone. Place the building card onto an empty landscape space.
The Building Rules
Important: Cloister buildings, recognizable by their yellow colored title and symbol boxes, must always be adjacent (horizontally or vertically) to other cloister buildings.
The landscape type a building card can be built on is indicated in the upper left hand corner of the card as well as in the illustration's background color. There are five landscape types (see the overview): Water, Coast, Plains (which include spaces from which peat or wood has been removed), Hillside and Mountain.
All landscape types are recognizable by their icons. (Coast spaces are also recognizable by their sandy beaches and proximity to water. Hillside spaces are recognizable by their pine trees and grey-green background. Mountain spaces are recognizable by their rock cliffs).
Only the Quarries or the Castle may be built on mountain spaces. Only the Houseboat may be built on water spaces. (The Houseboat only appears in the Ireland variant).
The effect of the prior when building
After having built a building, you can use your prior to immediately use the function of the building. Place your prior onto the newly-built building. (You can only do this with your prior, and only if your prior is available).
The Building Action
- You may only build a single building with the "Build a building" action.
- The function of a building is indicated in its function box.
- Cards such as the Cloister Courtyard also count as "buildings".
- You cannot build any buildings if you do not have any empty landscape spaces.
- You cannot buy a building card and set it aside until you can free up a landscape space.
- Buildings, once placed, may not be moved until the end of the game.
Financing Instead Of Building
Some buildings do not require building materials to build; instead, you need to finance them with money. Building these buildings also counts as a building action (not as an additional action).
Additional Actions
In addition to carrying out one of the actions outlined above, you may carry out as many additional actions on your turn as you wish (before or after your main action).
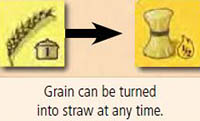
Extra Action: Turn Grain Into Straw
You may flip grain goods tiles over to become straw at any time in the game. Straw is used when building or as a source of energy. (Grain is the only goods tile that may be flipped at any time).
Straw cannot be turned back into grain.
Some buildings require different types of goods tiles for their functions. Since both sides of a goods tile count as different types of goods, you will sometimes want to flip grain over to become straw as part of a building function; this lets you pay both 1 grain and 1 straw (provided that you have two tiles).
Extra Action: Trade Coins
You may trade coins at any time: You may trade a 5 coin tile in for five 1 coin tiles or vice versa. Additionally, you can trade in at any time wine for 1 coin or whiskey for 2 coins (see illustration to your right).
Extra Action: Buy a landscape
You may buy a landscape once per turn and once per settlement phase (see below). There are rectangular districts as well as square plots. The topmost tile on both piles is available for purchase. Their prices are shown at bottom right. (You must place the landscape as soon as you buy it; you may not set it aside temporarily).
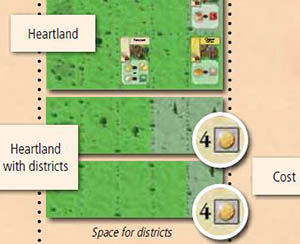
Districts
The heartland that each player receives at the start of the game defines the orientation that the districts must follow. The five district spaces must all be placed above or below the heartland; they may not be offset to the right or to the left.
You can place districts above or below other districts; in this case they must also not be offset. When placing a district, you can choose if you want to use the "Moor/Forest/ Forest/Hillside/Hillside" side or the "Forest/Plains/Plains/Plains/Hillside" side.
When you place the tile, it must be oriented such that the price remains at bottom right. Place forest cards onto the forest spaces and moor cards onto the moor spaces. (The remaining spaces remain empty).
Plots
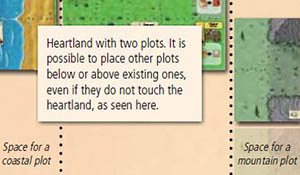
The plots have a coastal and a mountain side. You must decide, after buying the plot, which side to use when placing the tile. Coastal plots are added to the left of your land while mountain plots are added to the right.
When placing plots:
- At least one Coast space of the new coastal plot must be placed adjacent to an existing heartland space, district space or other Coast space.
- At least one Hillside space of the new mountain plot must be placed adjacent to an existing heartland space, district space or other Hillside space.
- When you place the tile, it must be oriented such that the price remains at bottom right.
Fundamental rule: Each player should always be able to see how many tiles the other players have in their supplies (without having to ask).
Starting Player Change
Each round ends by passing the starting player marker to the next player on the left.
Next Round
The next round begins with all players who have used all three of their clergymen getting them back. (Players who have used only 1 or 2 of their clergymen do not get them back). Rotate the production wheel tile one space (see "Course of a Round", page 2).
The Settlement Phase
A settlement phase occurs whenever the production wheel beam moves past the next pile of building and settlement cards (first the A cards, then the B, C and finally the D cards).
The turquoise building marker indicates when this will happen next. A fifth and final settlement phase takes place at the end of the game. The settlement phase consists of three parts.
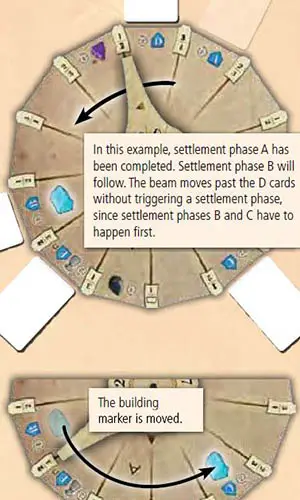
-
Move the turquoise building marker. Until the first settlement phase, the building marker is located in front of the A cards. At the start of the first settlement phase, move it onto the production wheel space in front of the B cards.
In the third settlement phase, move the building marker from the C cards to the D cards. After the fourth settlement phase, move the building marker onto the E space (see next section, page 6), where it indicates how many rounds are left before the bonus round is played (indicated by the
 symbol on the game board).
 -
Each player may build a maximum of 1 settlement from their supply.
To build a settlement, pay the required energy and food costs (located in the top left corner of the card) and place it (following any restrictions) onto an empty landscape space on your heartland or other landscape tile. You are allowed to buy a maximum of 1 landscape before building your settlement. (Should multiple players wish to buy a landscape, then they do so in player order, starting with the starting player).
-
Distribute the current letter's pile of settlement and building cards. Each player receives a new settlement card that may be built in later settlement phases or via the Castle's function.
Building settlements
- Settlement costs are paid for with goods tiles that have energy and food symbols on them. No change is given for excess food or energy, so any excess is lost.
- You cannot build a settlement if you have no empty landscape spaces. You cannot build a settlement "for later" and set it aside temporarily until you can free up a (possibly better) landscape space.
- The "Build a building" action may not be used to build a settlement.
- You cannot build your opponents' settlements.
- A summary of the 8 settlements is provided on page 8 of the glossary.
- The Fishing Village may only be built on a Coast space, while the Hillside Village may only be built on a Hillside space. (This is easily missed).
- You cannot build settlements on mountain or water spaces.
- You may choose not to build a settlement.
- A settlement, once placed, cannot be moved until the end of the game.
- Your supply of settlement cards is not limited to 4: If you choose not to build a settlement, then you may have more than 4 settlement cards in your supply.
- Each player receives the same type of settlement card.
- Add the new building cards to the "old" ones in the display. The "old" buildings are not removed from the game. Review the functions of the new buildings.
You can prepare for building a settlement during the next settlement phase by placing the settlement you intend to build onto a landscape space and then taking its food and energy costs from your supply and placing them on top of it. Remember that if you need to use these goods for something else first you must of course remove the card.
Bonus Round In Three And Four Player Games
As soon as the production wheel beam moves past the E space (indicated by the corresponding building symbol and ) for the second time, the 25th and final round of the game begins.
Before the bonus round, each player takes his prior back. Each player, in player order, then gets exactly one more action (including the starting player) to either build a building or place his prior onto any built building of his choice.
It does not matter if the building is occupied or not. You do not have to pay for a work contract if you place your prior on another player's building. Placing your prior on another player's building is only possible in the bonus round. You may also build a building and then immediately place your prior onto it.
A fifth and final settlement phase follows the bonus round. The game is then over ( ).
).
The Stone Good
At first, stone is only available from the Stone Merchant, then via the joker goods indicator once the Quarry enters the game. Stone only gets its own goods indicator in round 13.
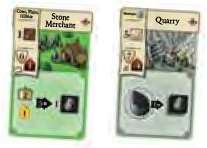
The Stone Merchant is a start building, the Quarry is a B building. (There is a second Quarry included with the C buildings in the France variant).
Checking Numbers
When rotating the production wheel, use the checking numbers to verify that the right player is the starting player. The production wheel beam points (after rotation) at a pair of numbers. The pair of numbers refer to the first and second full rotation that the production wheel undergoes.
- A number 1 means that the player who was starting player in round 1 is the current round's starting player.
- A number 2 means that the player who was second in round 1 is the current round's starting player.
- Etc.
(Should the checking number show that a mistake has been made, then you can try and correct it).
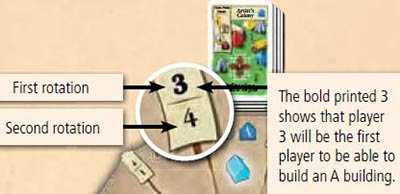
Bold print checking numbers indicate which player will be the first to choose from new buildings.
Goods Tile 5x
All tiles apart from the Wonders are in unlimited supply. Should the supply run out for some reason, then you can take a Wonder tile from the general supply, flip it upside down and place one other goods tile onto it.
This counts as 5 goods of that type. Should you run out of 5 goods tiles or should the tiles be needed as Wonders, then you will need to improvise.
Scoring
Scoring consists of three parts.
-
Add up the points on the goods tiles: 5 coins
 , book , ceramic
  , ornament
  , reliquary
  , Wonder
  and either wine
  or whiskey ().
Remember that wine/whiskey is not only worth
, but also 1 coin, which means that 1 wine/whiskey plus 4 coins are worth a total of . -
Then, score the economic value of all buildings and settlements. (Their dwelling values are irrelevant here).
-
Finally, score the settlements. Each settlement is worth points depending on the cards directly adjacent to it: Settlement points are calculated by adding the dwelling values of the settlement (recognizable by the house symbol
 ) and all adjacent buildings together.
Details Regarding Settlement Scoring
- Only horizontally and vertically adjacent buildings are counted. (Diagonal does not count as adjacent).
- Should a building be adjacent to more than one settlement, then its dwelling value is counted for each of these settlements.
- Settlements also have a dwelling value. Settlements are therefore counted as well when calculating the value of their neighboring settlements.
- Water spaces have a dwelling value
.
- Some buildings have negative dwelling values.
Important! These negative values only matter when the buildings are adjacent to settlements. (When they are far away from settlements, you can completely ignore negative dwelling values).- Each mountain space borders two hillside spaces. (And the hillside spaces on the mountain plots each border one mountain space).
The winner is the player with the highest total points. In the case of a tie there are multiple winners.
Continue Reading

