
Cloister School

Players executing this action place one influence marker from their personal supply onto the cloister school sector of their borough.
Players then take from the general supply the number of their influence markers equal to the number of markers currently in their cloister school sector, adding the influence markers to their individual supply. Influence markers must be visible to all players.
If there are not enough of a player's influence markers in the general supply, the player takes only what is there, and thus does not get the full advantage of the action.
Example: Peggy plays the cloister school action card. She takes one influence marker from her play area, and places it in the cloister school sector of her borough (where she already had 2 influence markers), giving her 3 influence markers there. Peggy takes three of her influence markers from the general supply, placing them in her play area.
If she later places another influence marker in the cloister school, she would be able to take 4 influence markers from the general supply, placing them in her play area.
Bank

Players executing this action place one influence marker from their personal supply onto the bank sector of their borough.
Players then take from the general supply the number of gold coins equal to the number of influence markers currently in their bank sector.
The gold must be visible to all players. If there is an insufficient number of gold coins in the supply, take the missing coin(s) from the player with the most money.
Residence

Players executing this action place one influence marker from their personal supply onto the residence sector of their borough.
Players then take from the general supply the number of prestige tokens equal to the number of influence markers currently in their residence sector.
Unlike with influence markers and gold coins, players do not need to keep their prestige tokens (or their values) visible to other players.
They should instead stack them in their play areas so their total remains hidden. Players should exchange small valued markers for larger ones from time to time.
Carriage House
Players executing this action place one influence marker from their personal supply onto the carriage house sector of their borough.
Players then move their carriage from marketplace to marketplace (of theirs or that of any player) any number of times up to the number of influence markers currently in their carriage house sector.
The carriage always moves along the streets from one marketplace to the next (i.e. a carriage cannot stop on a street or in any sector in a borough; it may stop only at a marketplace).
Several carriages may stop at the same marketplace, however. Also, players may choose to stop earlier, i.e. they need not move their carriage the full movement allowed. If the marketplace where the carriage stops has a message (octagonal token), the player may take the token and immediately use its power: either
- take 1 prestige point and 1 coin or
- take 2 prestige points and 1 influence marker or
- take 3 prestige points and the option to move their rat marker 1 space back on the rat track or
- take 4 prestige points.
Players place collected message tokens face down in their play area. Players may not collect a second message of any color until they have collected a full set (i.e. one of every color in the game). In the same way, players may not collect a third message of one color until they have 2 full sets, etc.
The only exception to this rule occurs when there are no messages left on the board of the color needed to complete a set. In this case, the player need not collect the missing color.
Example: Red, violet, yellow and green messages are being played. Leo has already collected a violet, green and red message. The next message Leo must collect is yellow.
Hotel

Players executing this action place one influence marker from their personal supply onto the hotel sector of their borough.
If a player now has 1 or 2 influence markers in the hotel, the player may either take 1 gold coin from the general supply, or take 1 influence marker from the general supply, or move their rat marker back 1 space on the rat track (e.g. from space 4 to 3).
A player with a rat marker on space 0 may not take this option.
If the player has 3 or more influence markers in their hotel, the player gets two bonuses (either taking two different bonuses, or the same one twice).
Example: Mike executes the hotel action card and adds his influence marker to the one influence marker already on his hotel space, giving him two. Then, he takes one gold coin from the supply.
Of course, he could have taken one of his influence markers from the general supply or moved his rat marker back on his rat track instead. If Mike adds yet another influence marker to the hotel, making the total there three, he can then take, for example, 2 influence markers or two gold coins, or one influence marker and one gold coin, or one gold coin and move his rat marker back one space on the rat track, or ...
Trusted Friend

Players executing this action place no influence markers. Instead, players place their trusted friend in any of the seven sectors in their borough (not the harbor; this is never a "sector"!).
The first time taking this action, players place the friend onto the borough (in any of the seven sectors); on subsequent turns, players move their trusted friend to a different sector.
Next, players execute the action associated with the sector on which the trusted friend sits, just as though the player had placed an influence marker there.
Example: Bill plays the trusted friend card and places his trusted friend on his bank sector; as the sector already had two influence markers, Bill takes three gold coins from the supply.
Note: The trusted friend counts as an influence marker in the sector. Thus, when a player executes an action whose effect is based on the number of influence markers in a sector, the player counts the trusted friend, if it is there, as an influence marker.
Park

Players executing this action place one influence marker from their personal supply onto the park sector of their borough.
Players then move their rat marker one space back on the plague track (regardless of the number of influence markers in the park). If the player's rat marker is already on 0, the player does not move the marker.
Having influence markers in the park will add bonus points to the number of prestige points a player gets during the game. For each 2 (rounded down) influence markers in the park, a player earns 1 additional prestige point every time the player does something in the game to earn prestige points.
A player with one influence marker in the park earns no bonus points; for 2 or 3 markers in the park, earn one bonus point; for 4 or 5, earn 2 points, etc.
Example:
Scott places a second influence marker in his park. He moves his rat marker back one space on his plague track, and that is all. He earns no bonus prestige points as he earned no prestige points for this action.
A bit later, Scott places a third influence marker in his residence, earning 3 prestige points for the 3 influence markers there + 1 bonus point for the park (2 influence markers there) = 4 prestige points.
Scott hires the advocate (see page 10). Since he has collected 5 messages, he earns 6 prestige points (for the advocate) + 1 bonus point (for the park) = 7 prestige points.
A few rounds later, Scott now has 5 influence markers in the park. He executes a Notre Dame card (see below) and donates two gold coins. He earns 3 prestige points (for the donation) + 2 bonus points (for the park) = 5 prestige points.
At the end of the ninth round, Scott has 6 influence markers in the park. For his 2 influence markers in Notre Dame (see below), he earns 6 prestige points + 3 bonus points (for the park) = 9 prestige points.
Hospital

Players executing this action place one influence marker from their personal supply onto the hospital sector of their borough.
Players then move their rat marker one space back on the plague track (regardless of the number of influence markers in the hospital). If the player's rat marker is already on 0, the player does not move the marker.
With influence markers in the hospital, players can reduce the effect of plague in phase 5.
Notre Dame

Players executing this action place one influence marker from their personal supply onto the Notre Dame sector in the middle.
Players then must donate at least one and at most three gold coins to the church, taking them from their play area and placing them into the supply.
Players earn prestige points as follows: 1 coin = 1 prestige point; 2 coins = 3 prestige points, and 3 coins = 6 prestige points.
Players who cannot or choose not to donate gold may still play the card, but may not place an influence marker on Notre Dame. Players may not donate more than 3 coins, nor may they place more than 1 influence marker, when executing this action.
Players may execute the action as often as they can during a round or a period, and donate and place influence markers per the above limits each time.
Important note: At the end of each period (after every 3 rounds), players with influence markers on Notre Dame earn prestige points for the markers they have there. The players distribute the number of prestige points shown on Notre Dame (6, 8, 10 or 12) equally among the influence markers there.
The players simply divide the number of prestige points to be distributed by the number of influence markers on Notre Dame and round the result down. Each player with influence markers on Notre Dame now takes this number of prestige points from the supply for each influence marker that the player has on Notre Dame.
After all these players have received their share of the prestige points, all influence markers on Notre Dame are returned to the general supply.
Example: In a game with 4 players, there are 10 prestige points to distribute from Notre Dame. At the end of a period, there are 1 blue and 2 green influence markers in Notre Dame. The players divide 10 by 3 and thus allocate 3 prestige points to each influence marker in Notre Dame. Green earns 6 points and blue earns 3. Then all three markers are returned to the general supply.
No Influence Markers In A Player's Supply
If players execute an action but have no influence markers in their supply, they may choose to move an influence marker (not their trusted friend) from any other sector (or from Notre Dame) to the sector corresponding to the executed action.
In other words, in order to execute an action, players must place one influence marker in the corresponding sector (either from their personal supply or, if that is empty, from some other place on the board, but never from the general supply).
Example: Peggy wants to execute the Notre Dame card, but has no influence markers in her supply. She chooses to move an influence marker from her hospital to Notre Dame so she can execute the action. She chooses an amount to donate and takes the prestige points.
The Plague
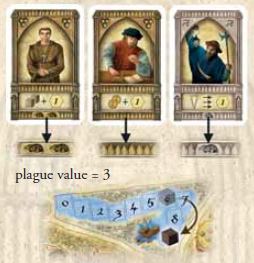
As the fifth and last phase in each round, players determine the plague value, and move the plague marker along their plague tracks accordingly. The plague value equals the sum of the rats pictured on the 3 person cards for this round.
Thus, players know at the beginning of the round what effect the plague will have and can take actions to reduce the effect if they so choose.
Each player moves their rat marker forward on their plague track in their harbor sector the number of spaces equal to the sum of the rats pictured on the cards. Every player is subject to the same plague effect, whether or not they hired a person, but each player may reduce that effect if they have taken actions to do so.
If players have their trusted friend or influence marker(s) in the hospital, they reduce the amount of the plague effect (for themselves only) by the number of influence markers plus the trusted friend, if it is there.
The player actually subtracts the amount of the reduction from the plague amount before moving the rat marker. By doing so, it is possible for the player to reach a negative number and, therefore, move their rat marker backwards (but never below 0) on the rat track, instead of forward.
Example: In a game with 3 players, the plague value for a round is 2 + 0 + 1 = 3.
Anna Has 2 Influence Markers In Her Hospital. Her Rat Marker Is On Space 4. Anna Moves Her Rat Marker One Space Forward (3 - 2) To Space 5.
Scott Has No Influence Markers In His Hospital. His Rat Marker Is On Space 6. Scott Moves His Rat Marker 3 Spaces Forward (3 - 0) To Space 9.
Mike Has 3 Influence Markers And His Trustedfriend In His Hospital. His Rat Marker Is On Space 5. Mike Moves His Rat Marker Back One Space (3 - 4) To Space 4.
Gradually, the players' rat markers move forward, some more quickly than others. Whenever a player would have to move their rat marker beyond space 9 (the number of spaces beyond doesn't matter!), the following occurs:
- The player places their rat marker on space 9 of their rat track (never further).
- The player returns 2 prestige points from their play area to the supply.
- The player removes 1 influence marker from the sector with the most influence markers and returns it to the general supply.
The trusted friend is counted when determining the sector with the most influence markers, but may not be removed. If sectors tie for the most, the player chooses one.
Continue Reading
