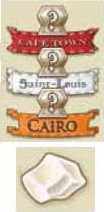
In Mombasa, players acquire shares of chartered companies based in Mombasa, Cape Town, Saint-Louis and Cairo and spread their trading posts throughout the African continent in order to earn the most money.
Chartered companies were associations formed for the purpose of exploration, trade and colonization, which links them inextricably to a very dark chapter in human history: global colonialism. This period lasted roughly from the 15th century to the middle of the 20th century and is associated with exploitation and slavery.
Although Mombasa is loosely set within this time frame, it is not a historical simulation. It is a strategy game with an economic focus that roughly refers to historical categories and places them in a fictional setting . The exploitation of the African continent: and its people is not explicitly depicted within the game play.
Components
- 1 game board
- 4 double-sided company tracks (each consisting of 2 jigsaw pieces)
- 4 player boards
- 44 action cards
- 36 starting action cards
- 4 "1"-expansion cards
- 4 track cards
- 72 book tiles
- 10 starting tiles
- 4 bonus tiles
- 60 coins (40 x 1 pound 20 x 5 pounds)
- 60 trading posts
- 16 track markers
- 20 bonus markers
- 4 ink jar markers
- 4 diamond markers
- 1 first player marker
- 1 scoring note pad
- 4 overview sheets
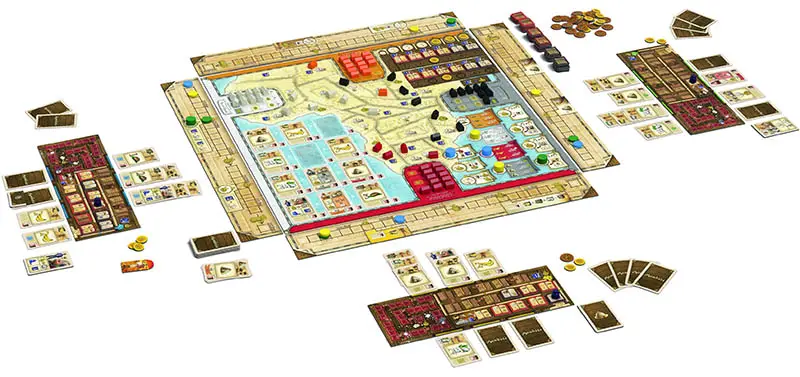
Setup
1) Place the game board in the middle of the table.
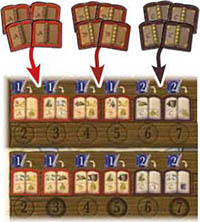
2) Return the 4 track cards to the box. They are not needed for the first game. Then take the company tracks A1, B1, C1, D1 and place them at the edges of the game board as follows:
- A1 at the black Mombasa edge
- B1 at the red Cape Town edge
- C1 at the white Saint-Louis edge
- D1 at the orange Cairo edge.
For the remainder of the game, each of these company tracks is now linked with its company: A1 is called the Mombasa track, C1 is called the Saint-Louis track, etc.
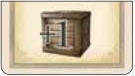
3) Place the 15 trading posts of each color onto the spaces of their matching company bases: the 15 black trading posts in Mombasa, the red ones in Cape Town, the white ones in Saint-Louis and the orange ones in Cairo. Make sure that each space of a company (and any coin icon on it) is covered with a trading post.
4) Sort the 44 action cards by the letter Book display in the upper right corner of each card (A,B,C,D,E). Shuffle the 4 cards of letter E and place them as a face-down stack next to the lower left corner of the game board. Then shuffle the 4 cards of letter D and place them face down on top of this stack.
Continue in this manner with the 11 cards of letter C and the 16 cards of letter B. Finally place the 9 shuffled cards of letter A face down on top of this stack. This stack is called the "action card stack". Next to it, leave room for the action card discard pile.
5) Now fill the 12 spaces of the card display with cards drawn from the top of the action card stack. First fill the 4 spaces of the right column from top to bottom with one face-up card each, then do the same for the middle column and finally for the left column. If you did everything right, the card in the top space of the left column should be a card of letter A, while the 3 cards below it should show letter B.
6) Place the coins (of values 1 and 5 pounds) as a supply next to the game board. This supply is called "the bank".
7) Now fill spaces 2 to 7 of the round track with coins from the bank according to the number of players (space 1 is always left empty):
- 2 players: Take 6 coins of value 1. Place one of them onto each of the 6 spaces of the round track.
- 3 players: Take 9 coins of value 1. Place a stack of 2 coins each onto the spaces 2, 4 and 6 of the round track. Then place 1 coin each onto the spaces 3, 5 and 7.
- 4 players: Take 12 coins of value 1. Place a stack of 2 coins onto each of the 6 spaces of the round track.
8) Sort the 72 book tiles by the letter on their back (A,B,C) and place them face down next to the upper right side of the board as the book supply. Then fill the 12 spaces of the book display by revealing 4 tiles of each letter and placing each face up onto a book space of its letter in the book display.
9) Place the 4 bonus tiles face up next to the right side of the game board.
10) Each player chooses a color and receives:
-
The player board of that color, which he places in front of him (making sure that there is room below and above the player board).
-
The 4 track markers of that color, of which he places one onto each starting space of the 4 company tracks.
-
1 diamond marker, which he places onto the diamond space of the diamond track on his A player board.
-
1 ink jar marker (which he places below his player board for now).
-
1 pound from the bank (which he places next to his player board).
-
Each player also receives a number of bonus markers of his color (which he places next to his player board):
2 players: Each player receives 3 bonus markers.
3- or 4-players: Each player receives 2 bonus markers. Return the spare bonus markers to the box, they are only relevant in games that include the company track B2.
11) Determine a first player and give him the first player marker.

12) Give each player a specific "1"-expansion card.
- The first player receives the "1"-expansion card showing a in the upper right corner.
- The player to his left (the second player) receives the "1''-expansion card with the h.
- The third player (if any) receives the "1''-expansion card with the.
- The fourth player (if any) receives the "1''-expansion card with the.
Each player adds his "1''-expansion card to his hand, bringing it to a total of 10 starting action cards.
Return any spare "1''-expansion cards to the box.
13) Give each player in a clockwise order a specific starting tile:
- The first player receives this tile
- The player to his left (the second player) receives this tile
- The third player (if any) receives this tile..
- The fourth player (if any) receives this tile..
14) Now, each player carries out the following steps:
- He places his starting tile face up onto the space with the envelope on his player board.
- He places his ink jar marker onto the ink jar icon on this tile.
- From his starting hand, he finds the 3 cards indicated by the 3 icons in the left corner of his starting tile. He places these cards face up above his player board, each card in one of the 3 colored resting slots (in any order).
- He receives his starting bonus.
Setup of subsequent games
When you already know Mombasa, you can use a more variable setup in which steps 2 and 13 are carried out in a different way:
2) Take the 4 track cards and shuffle them face down. Place a random track card face down next to each edge of the board, making sure that 1 of the 2 arrows is clearly pointing towards that edge. Then flip the cards face up.
On each edge of the board place the company track indicated by the half of the card pointing towards that edge. Then return the track cards to the box.
13) Shuffle the 10 starting tiles and deal each player 2 face-down tiles. Return any spare starting tiles to the box. Each player looks at his 2 tiles, secretly chooses one of them and returns the other one to the box.
Then players reveal their chosen tiles simultaneously.
Object of the Game
As an investor, you try to earn the most money (pounds) by investing goods in chartered companies and spreading their trading posts from their company bases throughout the African continent. By investing goods you increase the number of shares you hold in those companies and by spreading their trading posts you increase the value of each share.
Also, you can improve your earnings and prospects by building up diamond stocks and by clever bookkeeping.
During the game, you earn money which you usually need to pay for certain actions. The main portion of pounds, however, you earn at the end of the game. Then your total is calculated by adding:
- the cash you have on hand.
- the value of the shares you hold of each of the 4 companies.
- the last value your diamond marker has passed on your diamond track.
- the last value your ink jar marker has passed on your bookkeeping track.
The player with highest total wins the game.
Company Shares And Their Value
During the game, you can advance your marker on each company track. Whenever you reach or pass a space with a share icon, you own as many shares of that company as the icon shows. Also, some cards (which you can acquire during the game) may show an additional share of that company.
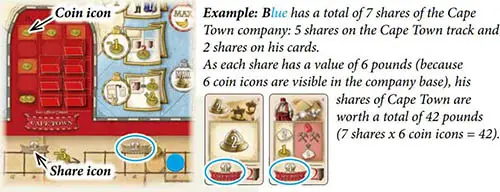
The value of each share of a company is determined by the number of trading posts that have left the company's base: The total number of coin icons revealed in its base equals the value of each share of that company.
Game Play
Mombasa is played over 7 rounds. Each round consists of 3 phases:
- Planning phase
- Phase 2: General action phase
- Phase 3: Preparation phase for the next round
Ater the General action phase of round 7, the game ends with a final scoring phase.
I. Planning Phase
The Planning phase is carried out by all players simultaneously and comprises 2 steps:
-
Place Cards Face Down In Your Action Area
Choose cards from your hand and place them face down in the available action slots of your action area (the area beneath your player board).
Note: You will use the cards in your action area during the General action phase. Thus, the cards you place will determine to a certain extent which actions you can perform (see pages 5 to 8 for details of the cards and their actions).
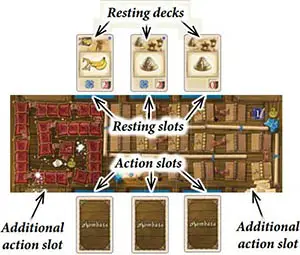
At the start of the game, you have 3 action slots available (the 3 colored slots at the bottom of your player board).
Each available action slot can hold 1 card. Therefore, you can place up to 3 cards.
Later in the game, you may unlock one or even two additional action slots by reaching or passing certain spaces on your diamond track and your bookkeeping track (see the top of page 12 for details). With each unlocked additional slot, you may place 1 additional card from your hand during the Planning phase (so you could place up to 5 cards if you had unlocked both additional action slots).
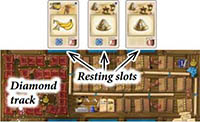
The card you place in each of your available action slots is up to you. However, there are certain things to consider:
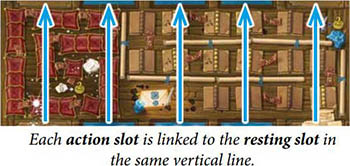
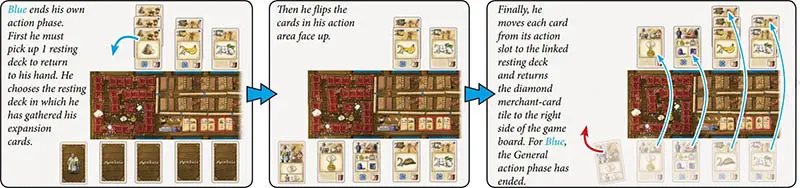
Each action slot is linked to the resting slot directly above it on top of your board. At the end of your action phase, you will move each card from its action slot up to the linked resting slot. Thus over the rounds, in each resting slot a resting deck builds up (that comprises all cards previously played into its linked action slot).
The cards of the resting decks are inactive and cannot be used until they are recovered. However, each round, you can only return the cards of one of these resting decks to your hand. Thus it can make quite a difference in which action slots you place certain cards, as you want each of them to go onto the resting deck best suited for your plans.
Note: In the Planning phases of round 6 and 7, however, it becomes irrelevant in which of your available action slots you place your chosen cards (because these cards cannot be returned to your hand before the end of the game).
You can always choose to place fewer cards than allowed.
-
Turn Cards Face Up
As soon as all players are finished placing their cards in their action area, turn all cards face up.
II. General Action Phase
The first player begins the General action phase by taking his turn. Then the player to his left takes his turn, then the next player and so on. In this manner, the General action phase proceeds turn by turn in a clockwise direction until all players have dropped out of the General action phase.
When it is your turn, you must perform exactly ONE of the following actions:
- Use 1 or more goods cards of one type in your action area.
- Use all expansion cards in your action area.
- Use 1 bookkeeper card in your action area.
- Use 1 diamond merchant card in your action area.
- Place 1 bonus marker.
- End your own action phase.
As soon as you perform the "End your own action phase" action, you drop out of the General action phase. Once all players have performed the "End your own action phase" action, the General action phase ends.
Note: Depending on which cards you placed in your action area during the Planning phase, some actions may not be possible (because you did not place the appropriate cards). If you do not have the appropriate card(s) to perform a certain action, you must choose a different action instead. (If you have nothing else to do, you must perform the "End your own action phase" action).
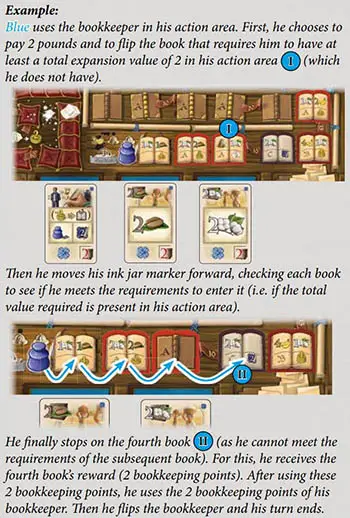
Example: On his turn, Blue may not perform the "Use 1 bookkeeper card" action as he has not placed a bookkeeper in his action area. (The bookkeeper of his middle resting deck does not count, of course, as it is inactive).
Important: After you have used a card for an action, you must flip it face down (to indicate that you have used it). Flipped cards cannot be used any more.
Example: After using his diamond merchant card, Blue flips it face down.
1. Use 1 or more goods cards of one type in your action area

With this action you can acquire new cards from the card display and advance your track markers on the company tracks.
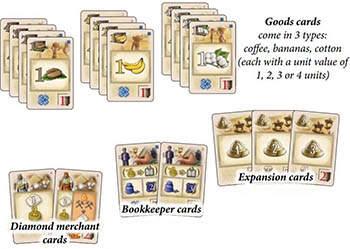
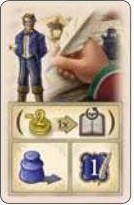
To perform this action, choose from the cards in your action area any number of face up goods cards which show the same type of good (coffee, bananas or cotton). You must choose at least one card, irrespective of how many goods cards of this type you have and which unit value each of them shows.
The unit values of your chosen cards add up to form your total unit value, which you must use to:
- Acquire a maximum of 1 card from the card display AND/OR
- Advance on 1 or more company tracks with your track marker(s).
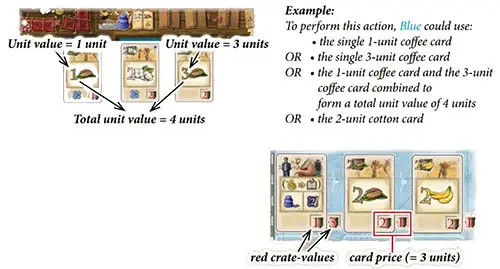
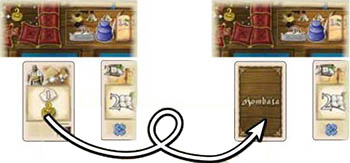
Acquire 1 card from the card display
Acquire 1 card of your choice from the card display on the game board. Each card in the display has a specific card price.
This price is composed of 2 values: the red crate-value of the card itself AND the red crate-value on the game board right next to it. The sum of these 2 values is the card price which you must at least match with your total unit value.
If your total unit value matches the card price, take the card from the display and place it in your hand.
If your total unit value exceeds the card price, take the card into your hand and use the remaining units to advance on 1 or more company tracks (see below).
Note: The card display is not filled up until the end of the round.
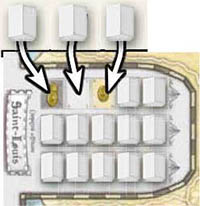
Advance on 1 or more company tracks
Use your total unit value (or the remaining units if you acquired a card) to advance on company tracks. For each goods unit, move one of your track markers 1 space forward. Do so until you have used up all units. You can split up your units in any way you want, using all of them on the same company track or dividing them among different tracks.
Once you used all units of your total unit value, flip each card that added to this total unit value face down. Then your turn ends.

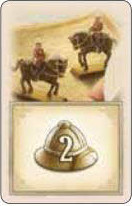
2. Use all expansion cards in your action area

With this action you can expand the companies by placing their trading posts in the regions of the map on the game board.
To perform this action, you must use all expansion cards in your action area at once. You may not keep any of them for a later turn.
Each expansion card shows in its helmet icon a number of expansion points (1, 2 or 3). Add up the expansion points of all expansion cards in your action area. The result is your total expansion value, which you must use to expand just 1 company. Which company you expand is up to you (but you may not divide your total expansion value among more than 1 company).
Note: It is irrelevant if any of the expansion cards you use show in their lower lef corner an additional company share of any company. These additional company shares only become relevant in the final scoring phase. You can ignore them while expanding a company.
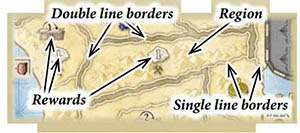
First, choose a company. Then spend your expansion points to enter new regions with trading posts taken from that company's base. The 24 regions of the map are separated from one another by single line borders or double line borders. Depending on which border you cross, entering a region consumes either 1, 2 or 3 expansion points. Once you have spent your total expansion value, your receive the rewards of the regions you have entered and your turn ends.
To Enter A Region, Carry Out The Following Steps:
-
Choose a region that is directly accessible to the expanding company. A region is directly accessible if it is adjacent to either the expanding company's base OR to any region that contains a trading post of the expanding company. (Important: You may choose to enter a region that contains a trading post of another company. It must, however, not contain a trading post of the expanding company itself).
-
Check how many expansion points it consumes to enter the region (going out from the adjacent base/region of the expanding company). If you only have to cross a single line border to enter it, it consumes 1 expansion point. If you have to cross a double line border, it consumes 2 expansion points. And if there is already a trading post of another company in the region, entering it consumes 1 additional expansion point.
-
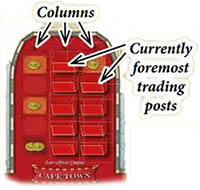
If you have enough expansion points to enter the region, take 1 trading post from a space of the expanding company's base to place in the region. Each company base comprises 3 columns with 5 spaces each. From which column you take the trading post is up to you. However, within its column, this trading post must be currently the foremost (the one closest to the center of the map).
-
Place the trading post in the region. However, place it on its slender side, so that it stands on edge. (This is to mark that you have entered the region but have not yet received its rewards).
Repeat the previous steps for entering a region until your total expansion value is used up. If you cannot or do not want to use up all expansion points, you must forfeit any excess.
Once you have used up your total expansion value, carry out the following steps:
-
Collect the rewards of each region you entered. Take the rewards in any order you like (irrespective of the order in which you actually entered the regions).
-
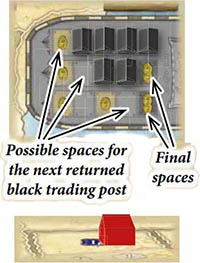
Oust all trading posts of other companies that are present in the regions you entered (if any). Return each of these trading posts to an empty space of its company base. If applicable, you may choose in which column to place a returned trading post. However, within this column, it must be placed onto the rearmost empty space. There is one exception: Once a column's final space (the 5th space on the rear end of a column) is empty, that space cannot be covered again. Thus, when you return a trading post to an entirely empty column, it must be placed onto the space in front of the final space.
-
Once any ousted trading posts have been returned to their company bases (there can be no more than one trading post in each region now), tip over the upended trading posts, so that they all stand up appropriately (with the rooftop up).
-
Finally, flip all expansion cards in your action area face down. Then your turn ends.
Further Notes and special cases:
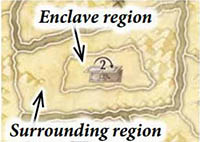
On the map, there are 2 enclave regions. Each of them is entirely surrounded by another region. Thus, before you can enter an enclave region, you must first have entered its surrounding region. (The 2 surrounding regions are the only ones on the map without any rewards).
If there are no trading posts left in a company base, this company cannot be expanded until trading posts are returned by ousting.
If a company base runs out of trading posts while you expand it, you must forfeit any remaining expansion points.
If you need to return an ousted trading post to its company base but there is no valid empty space left, remove the trading post from the game entirely.
If you only have one expansion card in your action area and its expansion points are not sufficient to enter any region you want, you must forfeit the action entirely and flip the card face down.
In each column of a company base, the final space is the most valuable as it shows 2 coin icons and cannot be covered again. Thus, when expanding a company, it is usually advisable to empty a column entirely before starting to empty the next column. However, if you have good reasons, emptying the columns evenly is also a viable option.
It does not matter if a trading post in a region has any connection to its company base whatsoever, you are still allowed to enter a region adjacent to this trading post's region.
Company bases are not regions and thus cannot be entered.
Before you learn about the "Use 1 bookkeeper card" action (which is used to advance your ink jar marker on your bookkeeping track), you first need to know about book tiles and bookkeeping points:
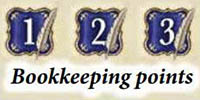
Your ink jar marker can only enter the spaces of your bookkeeping track if there are book tiles on them. This means that in order to move forward on your bookkeeping track at all, you must gradually fill its spaces with books from the book display. (Each player already starts with1 book on his starting tile).
To acquire books from the book display, you need bookkeeping points. You might get bookkeeping points when expanding a company (see the previous page), when using a bookkeeper or through certain bonuses. However, you must use any bookkeeping point rewards when you receive them. There is no way of saving bookkeeping points up for later!
Each bookkeeping point reward comprises a total number of bookkeeping points. You can split this total number of bookkeeping points between any of the following uses (each costing a specific number of bookkeeping points):


- Take 1 A-book from the book display (costs: 1 bookkeeping point)
- Take 1 B-book from the book display (costs: 1 bookkeeping point)
- Take 1 C-book from the book display (costs: 2 bookkeeping points)
- Take 1 pound from the bank (costs: 1 bookkeeping point)
At the end of you turn, after you have used up all the bookkeeping points of your reward(s), carry out the following two steps if you acquired at least 1 book:
-
Place the acquired books onto the spaces of your bookkeeping track.
Basically, you may place each book onto any space of the track. However, there are a few things to consider:
You are not allowed to place an A-book onto an empty space that shows a crossed out A. (Only B- and C-books may be placed onto these spaces).
Obviously, you need books if you want to advance on your bookkeeping track. How this is done in particular is described below. For now, you just need to know that in their upper part the books show requirements which you must meet with the cards in your action area. The better the requirements of the different books fit together, the easier it is for you to fulfill several of the books at once and advance quicker on the track. Since you cannot skip empty spaces, it usually is advisable to fill the spaces of the track from front to back. However, planning ahead and trying to place books with similar requirements next to each other can be a good reason to sometimes place books farther up the track.
Once you have placed a book onto a space, you have no way of removing it again (though you may be able to flip it - see below).
If necessary, you are allowed to place a newly acquired book on top of a book that is already on your track. However, you may never cover a B-book or C-book with an A-book.
-
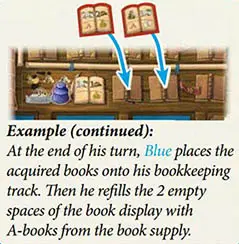
Fill each empty space of the book display with a face-up book tile that you draw from the book supply of the appropriate letter.
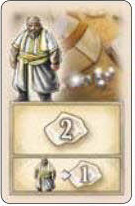
3. Use 1 bookkeeper card in your action area

With this action you may advance your ink jar marker on your bookkeeping track. This may give you various rewards. To perform this action, carry out the following steps:
-
Before moving your ink jar marker, you may flip 1 book on your track face down. For this you must pay 2 pounds to the bank. (However, this action is mostly meant as a last resort).
-
Move your ink jar marker forward on your bookkeeping track. You may move it as far as you can and want, but you have to consider the following things:
-
You must move the ink jar marker forward book by book. Before you can enter a book, however, you have to check whether you meet its requirements. Each book shows in its upper half 1 or 2 requirements. These requirements refer to the cards which you currently have face up in your action area. For each requirement, you must check whether the total value of the cards of this type in your action area matches or exceeds the total value required. (The order in which the requirements are depicted on the tile is irrelevant).
If you meet all requirements of a book, you may enter it. Then you must check whether you meet the next book's requirements. Again, if you do, you may move forward, and so on. This means each book is regarded separately. The requirements of the books are not cumulative. Also, the cards used to meet the requirements are not used up. So you do not flip them.
Flipped book tiles can simply be entered as they have no requirements. Empty spaces of the bookkeeping track can never be entered.
-
If you cannot or do not want to move any farther, leave your ink jar marker on the current book tile. Then you receive the reward of this (and only this) book tile on which you stopped. Flipped book tiles give no reward. If you did not move at all, you don't get any reward either.
-
-
After you have finished moving your ink jar marker forward (even if you did not move at all), use the total number of bookkeeping points depicted on the bookkeeper card as usual.
Afterwards, flip the used bookkeeper card face down. Then your turn ends.
Attention: If you are planning on using a bookkeeper in order to move forward on your bookkeeping track, make sure that you do that before using any required cards in your action area for other actions. Once flipped, they are not valid for the requirements any more.
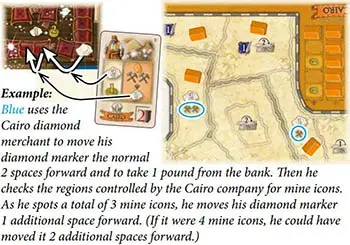
4. Use 1 diamond merchant card in your action area

With this action you advance your diamond marker on your diamond track and collect a few pounds.
Note: Diamond merchants are the only cards which you don't have in your starting hand. There are 5 diamond merchants in total which you can acquire from the card display during the game.
To perform this action, use 1 of the diamond merchant cards in your action area.
If you use this diamond merchant, move your diamond marker 1 space forward on your diamond track AND take 2 pounds from the bank.
If you use this Cairo diamond merchant, first move your diamond marker 2 spaces forward on your diamond track AND take 1 pound from the bank.
Then check whether you may move additional spaces forward on your diamond track. To do this, check how many mine icons are present in those regions that are controlled by the Cairo company (i.e. each region that contains an orange trading post). For every 2 mine icons that the Cairo company controls, move your diamond marker 1 additional space forward on your diamond track.
For each company, there is 1 diamond merchant that functions like the Cairo diamond merchant.
After you used your diamond merchant, flip it face down. Then your turn ends.
5. Place 1 bonus marker

With this action you can place 1 of your bonus markers onto an empty bonus space, which gives you certain privileges or rewards.
To perform this action, take 1 of the bonus markers in front of you and place it onto an empty bonus space.
Usually each bonus space states a requirement/cost which you have to meet/pay in order to place your marker onto it.
Depending on the space, you either receive its reward immediately or reserve for yourself a certain bonus tile for the next round. Once you have placed a bonus marker, it blocks that bonus space for the rest of the round.
On the game board, you can find the following bonus spaces:

Majority Bonus Spaces
Requirement: You are only allowed to place your bonus marker onto this bonus space if currently no other player has a higher total unit value of coffee face up in his action area than you (a tie is sufficient).
Reward: If you have a total unit value of 1 or 2 coffee, move your marker on the Cairo track 2 spaces forward. If you have a total unit value of 3 or 4 coffee, move your marker on the Cairo track 3 spaces forward. If you have a total unit value of 5 or more coffee, move your marker on the Cairo track 4 spaces forward AND remove a trading post from a company base of your choice.
Important: This does not use up the cards in your action area. (So do not flip them!)
Any of the 4 majority bonus spaces works like the coffee majority bonus space: You may only place your bonus marker onto a majority bonus space if you currently have the majority or at least the shared majority of the required type (goods units/expansion points) face up in your action area.
Depending on your total value of the respective type, you gain a certain reward which includes moving forward on a specific company track and may include an additional reward (like using 1 bookkeeping point, taking 1 pound, etc)..
If you want, you can always choose the reward of a lesser total value than you actually have (for example, even if you have 6 units of cotton in your action area, you still may take the "4+" cotton reward instead of the "6+" cotton reward).
Bonus Tile Spaces
Requirement: Pay to the bank the number of pounds shown on the space (1 or 2).
Reward: There is no immediate effect. You simply reserve the respective bonus tile for the next round. You are not allowed to take it right away! As this icon indicates, you get the bonus tile in the "Preparation phase for the next round".
The Bonus Tiles
If you reserved a bonus tile via its bonus tile space, you get this bonus tile during the "Preparation phase for the next round". (If you reserved more than 1 bonus tile, you get all bonus tiles you reserved, of course). There are 4 bonus tiles in total: one "+1"-goods tile and three action card tiles (1 bookkeeper-card tile, 1 diamond merchant-card tile, 1 expansion-card tile).
The big advantage of the action card bonus tiles is: They count as regular action cards but do not take up an action slot of your action area. They are additional to the cards of your available action slots and are placed in your action area a little set off.
Once again: They count for all intents and purposes as action cards of their respective type and are used like the regular cards of that type. After they are used, they are flipped face down as usual.
"+1"-goods tile.
When you receive the "+1"-goods tile, place it next to your player board and hold it there until the General action phase of the round. During any of your own turns of the General action phase, you may then take the "+1"-goods tile and place it onto the lower part of any face-up goods card in your action area.
From then on, the unit value of this goods card is increased by 1 unit (of that type) for all intents and purposes.
- Once placed, you are not allowed to move the "+1"-goods tile to another goods card.
- After you have used the goods card with the tile, flip both face down.
- You cannot use the tile independently from a goods card.
Bookkeeper-card tile.
This bookkeeper is used the same way as any other bookkeeper (but grants only 1 bookkeeping point).
Diamond merchant-card tile.
When you use this Diamond merchant, first move 2 spaces forward on your diamond track. Then move 1 additional space for each further diamond merchant card that is currently face up in your action area (excluded this diamond merchant-card tile).
Expansion-card tile.
The expansion-card tile is used like any other expansion card and has an expansion value of "2".
6. End your own action phase
Perform this action only if you cannot or do not want to perform any of the other actions. With this, you entirely drop out of the General action phase of this round.
Note: If you have any unused cards or bonus tiles in your action area, use those instead of performing this action. You cannot take any of them into the next round.
To perform this action, carry out the following 2 steps:
First, pick up exactly 1 of your resting decks. In the first round, each resting deck comprises only one card. Later, resting decks may comprise several cards. Take all cards of your chosen resting deck into your hand.
Then, clean up your action area. Do this by turning the cards of your action area face up again and then moving each card from its action slot up to its linked resting deck. If there are already cards in the respective resting deck, slide the new card in from behind, creating an overlapping column in which the top of each card is visible. If you have any bonus tiles, return them to the right side of the game board.
Note: Since you pick up 1 resting deck before each new Planning phase, having all potential cards visible is crucial for planning ahead effectively.
Players who have performed their "End your own action phase" action are skipped for the rest of the General action phase. Once the last remaining player has performed the "End your own action phase" action, continue with the "Preparation phase for the next round". After the General action phase of round 7, continue with the final scoring phase.
III. Preparation Phase For The Next Round
Carry out the following steps:
- Move coins from the round track to the book display
- Fill up the card display
- Return the bonus markers to the players (including possible bonus tiles)
A. Move coins from the round track to the book display
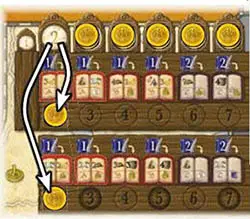
On each of spaces 2 to 7 of the round track there is a coin stack that comprises either 1 or 2 coins (depending on the number of players).
Now, move the coins of the leftmost coin stack down to the wooden spaces of the book display located vertically below it (these wooden spaces show the same digit as the space from which you took the coin stack). If it is only 1 coin, move it to the wooden space of the first row. If there are 2 coins, move one coin to the first and one coin to the second row.
Each coin moved to the book display is now linked to the book right above it. If a player acquires that book, he receives the coin in addition.
The revealed number on the round track indicates which round you are about to enter.
B. Fill up the card display
First, remove all remaining cards (if any) from spaces in the right column and place them onto the action card discard pile. After that, in each row of the display there should be either two, one or no cards left. In rows with two cards, move these cards together over to the right (filling the right and middle space of that row). If there is only one card left in a row, move it to the right space of that row.
Finally, fill each empty space of the card display with a face-up card from the action card stack: First fill the empty spaces of the right column from top to bottom (if any). 'I hen fill the empty spaces of the middle column from top to bottom (if any). Finally, fill the empty spaces of the left column from top to bottom.
If the action card stack is empty, the remaining empty spaces are not filled up any more.
C. Return the bonus markers to the players
Each player takes back his bonus markers from any bonus spaces and places them next to his player board. If he takes a marker back from a bonus tile space, he also takes the respective bonus tile and places it face up in his action area. ('I he "+1"-goods tile, however, is placed next to his player board).
Then the next round begins with the Planning phase.
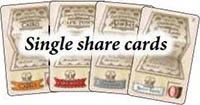
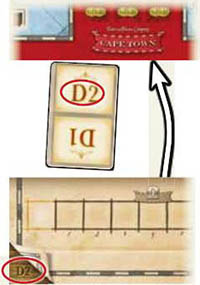
The last 8 cards of the action card stack are single share cards. Depending on how frequently the players have acquired cards from the display during the game, these single share cards enter the display sooner or later (or not at all).
Each of these cards only represents a single additional share of a specific company. Once acquired, a single share card remains in the hand of its player till the final scoring phase. It can never be placed in an action slot (as there is no action associated with it).
End of the Game
After the General action phase of round 7, the game ends. Now, the final scoring phase takes place as follows:
First, each player returns all his inactive cards to his hand by picking up all his resting decks. 'I hen he finds from his hand all cards that show an additional company share in their lower left corner. He sorts these cards by company and places them in front of him.
Now, take the included scoring note pad. Go step by step through the 7 scoring categories and write down how much each player scores in each category:

First, write down the cash (the number of pounds of actual coins) each player has in front of him.
'I hen turn to the Mombasa company and calculate for each player the number of pounds he scores for his shares of Mombasa.
To do this, count the number of uncovered coin icons in Mombasa's company base AND multiply this number by the total number of shares which the respective player owns of Mombasa. Write the individual result of each player down.
Reminder: A player's total number of shares of a company is equal to the last share icon that he has reached or passed with his marker on that company's track + each additional share of that company he has on his cards.
Once you have written down the result for each player regarding his Mombasa shares, repeat the whole procedure for the Cape Town company, then for the Saint-Louis company and finally for the Cairo company.
Check on the player board of each player how far he has advanced his diamond marker on his diamond track: Write down the last value which his diamond marker has passed.

Check on the player board of each player how far he has advanced his ink jar marker on his bookkeeping track: Write down the last value which his ink jar marker has passed.
Any marker that has not advanced far enough to score is ignored. Also book tiles (no matter if the ink jar marker has entered them or not) are not worth anything now.
After you have written down everything, add up the scores of the 7 categories for each player.
The player with highest score (who has earned the most money) wins the game. In the case of a tie, the victory is shared.
Continue Reading