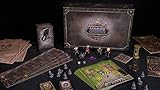
Components
- 5 Mechs
- 100 Minions
- 1 Bomb Piece
- 4 Crystal Shards
- 1 Gear Tracker
- 2 Gear Rings
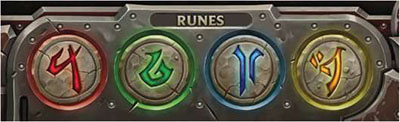
- 4 Rune Coins
- 95 Command Cards
- 55 Damage Cards
- 40 Schematic Cards
- 5 Map Tiles
- 1 Color Compass
- 5 Command Lines
- 2 Numbered Dice
- 2 Rune Dice
- 1 Minuteglass
- 10 Mission Envelopes
- 1 Final Reward Envelope
- 5 Game Trays
Adjacency
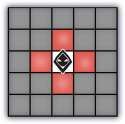
Spaces or figures are adjacent if they share an edge. For example, a Mech is adjacent to the four spaces surrounding it. Diagonal spaces are not adjacent.
The Bomb
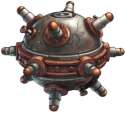
The Bomb is an objective in some missions. It acts sort of like a Mech.
It can be pushed and towed.
It stomps minions when pushed or towed onto them, but it takes 1 damage each time it stomps a minion in this manner!
It blocks Ripsaw commands, but it takes no Damage from them.
Use the Doom Tracker on the Gear Tracker to remember the health of the Bomb. In all Missions, if the Bomb explodes, the Mission fails and the players lose.
The Boss
Rumble's stolen Mech "Tristy" is an objective in several Missions.
The Boss does not act during Minion Phase like a Minion. instead it Moves and deals Damage through its own Boss
Command Line and Boss Command Cards during a special phase: "Danger Phase", which occurs after Minion Phase.
Further-the Boss is protected by Rune Shields that must be disabled before damage can be dealt to the Boss' health.
Boss Command Line
The Boss has a unique Command Line and special Boss Command Cards just like you! During Danger Phase, you'll execute its Command Line in order from 1 to 4, draft new Boss Command Cards and program one.
Default Danger
The Boss has default abilities in each slot that apply when there are no Boss Command Cards slotted. Be sure to execute these!

Game-ending Danger
If any slot reaches a 3-Power level, the Boss charges his GG-101 Doom Cannon. When a 3-Power slot is executed, it's Game Over! You lose!
Boss Command Cards
The Boss Deck includes the Boss's special Command Cards. After the Boss Command Line has been executed, the First Player draws two cards from the Boss Deck, plays one to the Boss Command Line and discards the other.
Rune Shields
The Boss is protected by four Rune Shields-one of each color/element, and starts with all of the shields fully operational.
Place Rune Coins on the Rune section of the Gear Tracker to keep track of which shields are up! (Remove and replace the coins as Rune Shields are disabled and reactivated).
While active, a Rune Shield prevents all damage from Command Cards of the same color/element (i.e. Red Rune Shield blocks Fire attacks). Turn his shields off by stepping on Rune spaces on the Game Board of the corresponding color.
Once he takes 1 Damage from an element of that color, turn the shield back on immediately.
Certain Schematic Cards can also deal damage to any of the Boss Mech's unshielded areas, but then turn the Rune Shield back on afterward, just like any other damage.
The Boss Mech is twice as large as the players' Mechs, taking up 2x2 spaces. This means that the boss has eight adjacent spaces.
The Boss blocks Ripsaw Command Cards and pushes Mechs just like player Mechs, but the player Mechs cannot push the Boss.
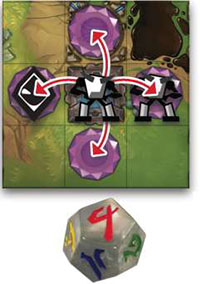
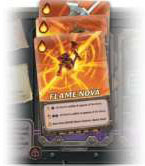
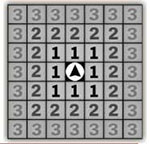
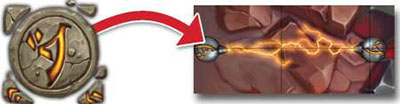
Chain Lightning (Command Card)
Chain Lightning is an electric Attack Command Card. It's a bit tricky and worth explaining!
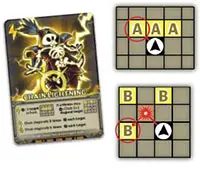
When executed at 1-Power, first pick an enemy target directly or diagonally in front of your Mech (A) and do 1 Damage to it.
Next, pick another enemy target (B) that is diagonally-adjacent to the initial target (A) and do 1 Damage to it as well!
This is called "chaining". With more power, you can chain to more targets and zap them all!
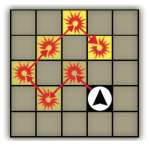
If executed at 2-Power, continue chaining two additional times, each time picking new targets that are diagonally-adjacent to the last target. This can result in a maximum of 4 total targets that you'll zap with lightning!
If executed at 3-Power, chain four additional times. This can result in a maximum of 6 total targets hit!
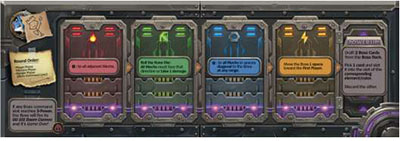
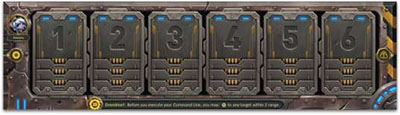
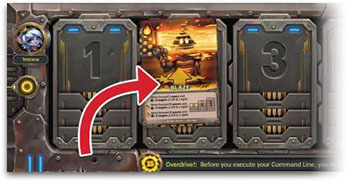
Command Line (Player)
A Command Line holds its pilot's instructions in the form of Command Cards.
Each turn you'll draw Command Cards, which are bits of programming that make your Mech Move, Turn and Attack.
Command Cards are programmed (slotted) into one of the six slots on a Command Line. On your turn you'll execute your Mech's program in order from slots 1 to 6.
Executing Command Lines
Starting with the First Player, execute your entire Command Line in order from slot 1 through slot 6, skipping empty slots. You must follow directions on every card.
Move and Turn your Mech figure on the Game Board (Turns can be in either direction).
 This symbol means Do Damage. After a Minion takes 1 Damage it should be removed from the board.
When the First Player is done, the next player clockwise executes their Command Line.
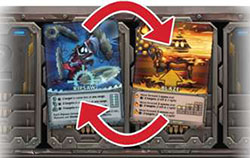
Command Cards
Command Cards are individual commands that allow Mechs to move, turn and attack.
Command Cards are drafted (drawn) at the start of the Player Phase, and either programmed (added to one of the Mech's undamaged Command Line slots) or scrapped (for an immediate effect and dis- carded).
There are three kinds of Mech Command Cards: Attack, Move, and Turn.
Attack Commands
Attack Commands will deal 1 Damage to one or more targets on the board. Attack Commands never move or turn the Mech. Attack Commands do not harm other Mechs or the Bomb, but they may destroy Crystal Shards in some Missions.
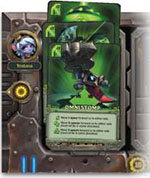
Move Commands
Move Commands move the Mech to another space, while facing the same direction it started. All Moves except for Omnistomp will only move the Mech forward. Omnistomp can move the Mech forward or to either side, but not backward.
If the Mech moves onto a Minion, the Minion is stomped and killed. If the Mech moves onto another Mech or the Bomb, the Mech or Bomb is pushed along in front of the moving Mech. You must move unless you are blocked by something impassable.
Turn Commands
Turn Commands turn the Mech without moving it. A 1-Power Turn (a single card) will turn the Mech to face either its right or left.
A 2-Power Turn will allow the mech to turn to either side or to turn around completely. A 3-Power Turn will allow the player to choose to turn a full 360 degrees and end up facing the way it started. Some turns will also deal Damage. You MUST execute a Turn Command, you may not forego them.
Element/color
There are 4 colors/elements of Command Cards: Fire (Red), Electric (Yellow), Metal (Blue) and Computery (Green).

Stacking Command Cards
Command Cards of the same element can be stacked on top of each other in the same slot.
The new card must be placed on top of existing slotted card(s), not beneath. Each slot can hold a maximum stack of three cards.
If you play a card on a max-size (3) stack, the bottom card must be discarded!
Active Card
The top card is the active Command Card (follow these directions when executing).
Card Power
The Power of this top card is the total number of cards in that stack. Each Command Card has instructions for each Power level.
Overriding A Command
You may place a card of a different element onto an already-programmed slot, but all previously-placed cards in that slot must be discarded.
Corki
Corki, the Daring Bombardier is an ace Yordle pilot and an aspiring Mech-anic.
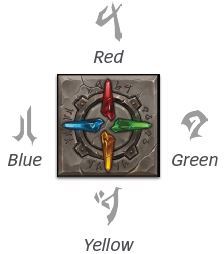
Crystal Compass
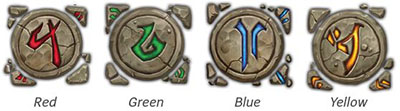
The Crystal Compass has four directions and four colors, match- ing the Runes throughout the game. Use it to determine random directions and movement on the Game Board, as well as random player events. Roll the Rune Die, also with matching Runes, and refer to the corresponding arrow on the Crystal Compass.
Exact directions aren't necessary when choosing a player this way - just pick the player closest. If there are fewer than four players, reroll if you get a result that doesn't have a player associated with it.
Crystal Shards

Crystal Shards are mysterious fragments of magical crystal that act as objectives in several Missions.
In some Missions, Crystal Shards are unaffected by Attack Commands. In others, they can be targeted and destroyed by Mech Attack Commands or by stomping on them (step- ping into the same space). Crystal Shards can never be damaged by Minions or the Boss.
Picking Up Crystal Shards
Simply step onto a space containing a Crystal Shard to pick it up. Each Mech can only carry one at a time. When you pick up a Crystal Shard, take it off the board and put it near your Command Line to show you are carrying it.
Dropping Crystal Shards
If you take damage while carrying a Crystal Shard, you drop it before resolving the Damage Card.
Roll the Rune Die and place the Crystal Shard in the adjacent space in the direction determined by the Crystal Compass.
If the Shard drops onto another Mech that isn't already carrying a Shard, the other Mech imme- diately picks up the Shard.
If the rolled space is off the board or there is no valid space in which to drop the Shard, it drops to the Mech's own feet and is instantly picked back up. (Nice catch!)
Dropping a Crystal Shard onto a space containing a Minion will result in the Shard being slid underneath.
Breakable Shards
In Missions where Crystal Shards are meant to be broken, they are very fragile, and will shatter upon taking 1 Damage from Mechs. Crystal Shards will also break if a Mech stomps on them (steps into the same space).
Damage
Damage taken is represented by Damage Cards drawn from the Damage Deck. Damage can make your Mech harder to control and achieving your objective more difficult! But-don't worry. You cannot die!

Glitch Damage
Glitch Damage Cards apply their effect immediately and are then discarded.

System Damage
System Damage Cards have ongoing effects. Place these near your Command Line to keep track of them!

Slot Damage
Slot Damage Cards disable a slot in your Command Line, and replace its normal contents with an uncontrollable action.
Executing Damage Cards
Always draw and fully process Damage Cards one at a time and in player order. It's possible for one player's damage to remove the source of damage that might affect the next player!
- For all damage types, first execute the instructions on the Damage Card.
- If it's a Glitch, discard it and move on to the next Damage Card.
- If it's a System Damage Card, place the card next to your Command Line to remember that damage is in effect.
- If it's Slot Damage, roll a Number Die. Place the Damage Card on top of any Command Cards in the slot that matches the Number Die. If the slot is already damaged, replace the old damage with the new damage. Whenever you next execute your Command Line, execute the Damage Card as if it was a Command Card.
Note: Slot damage to your Command Line prevents programming and reprogramming those slots.
(Command Cards cannot be placed on damaged slots!)
Repairing Damage
Damage can be removed from a Mech by way of scrapping (6 Fire or 9 Metal) Command Cards during a draft or by stepping on a Repair Pad on the Game Board.
Danger Phase
In some Missions, a Danger Phase takes place after the Minion Phase is complete. This is when the Lava Wall or Boss will act. The specific Mission Dossier will specify if there is a Danger Phase and what happens if there is. After the Danger Phase is complete, the First Player passes to the next player and a new round begins as usual.
Deal
When cards are dealt, be it Command Cards, Damage Cards or Boss Cards, draw them from the top of the appropriate deck and play them faceup where they can be seen by all players.
Doom Tracker
The Doom Tracker is a section of the Gear Tracker and is used in different ways each Mission. Sometimes you will want to track how close the Bomb is to exploding, or the health of the Boss, etc. Sometimes you want to keep the number above zero (Bomb countdown) and sometimes the way to win is to drain it zero (Boss Health), but regardless, monitor it closely to avoid certain doom!

Draft
Players and the Boss draft Command Cards for their respective Command Lines. To draft, deal a number of cards faceup, then choose a few to use, discarding the remainder.
Player Drafts
The First Player deals five Command Cards faceup on the table, flips Zhonya's Minuteglass, then picks one card. Continue clockwise with each player picking one card until four cards have been picked.
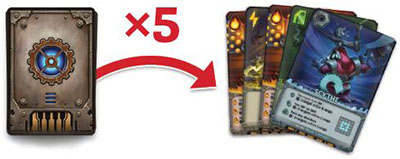
If Zhonya's Minuteglass runs out before four cards have been picked, shuffle the unpicked cards and deal out cards randomly.
Discard the remaining cards.
If your team has four players, this will result in each player having 1 Command Card. If your team has fewer players, players will end up with multiple Command Cards!
Double Draft
The first Player Draft of any Mission past the tutorial is a Double Draft. The First Player deals ten Command Cards, instead of five, faceup on the table. In order, players take turns picking one card until each player has two cards total. Discard the remainder.
Boss Draft
In certain Missions you'll face and manage a Boss Mech, which operates very similarly to a player Mech, including drafting two Boss Command Cards, selecting one to program into the Boss Command Line, then discarding the leftover card.
Escalation
At some point in most Missions, things get more dangerous for the players. Minions might start spawning or Lava Walls may begin flowing toward you, in response to player actions or a time limit. The Mission Dossier for the Mission you're on will tell you how and when the danger escalates.
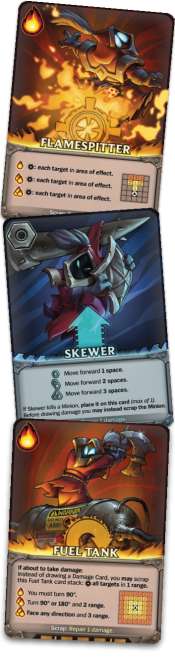
Fuel Tank (Command Card)
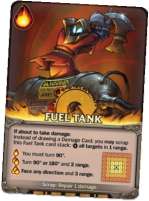
Fuel Tank is a Fire Move Command Card. It can only be used in certain conditions and is worth explaining!
Like any other Move Command, you must turn your Mech when it is executed, and according to the Power level of the Fuel Tank Command Card. However, it also has a special ability:
If-and only if-you are about to take damage (from a Minion during Minion Phase, or the Boss during Danger Phase, or even from hazards like Lava Pools or Spike Walls), you may choose to immediately detonate your Fuel Tank.
This detonation results in several things:
- The damage that would have been caused is ignored!
- The entire Fuel Tank stack is scrapped (removed from Command Line and discarded).
- Fuel Tank does 1 Damage to all targets within range. The range of effect increases for each Power level.
By killing nearby foes, Fuel Tank also eliminates those foes' ability to do damage, thereby preventing damage to other players.
First Player
The First Player leads the Player Phase, from drafting Command Cards to Command Line execution.
Once a full round is completed, the next player clockwise from starting positions becomes First Player, so everyone gets a turn!
Before the first turn of any Mission, Roll the Rune Die and use the corresponding direction on the Crystal Compass to determine who gets to be First Player first that Mission. Alternatively, pick the most experienced player to be the initial "First Player" to help everyone else get up to speed.

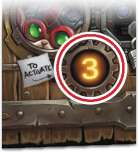
Tip: Use Zhonya's Minuteglass to keep track of who's First Player! (It even has a 1 engraved on top!)
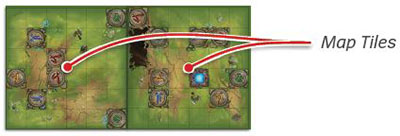
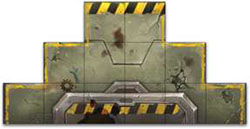
Game Board
The Game Board refers to all the Map Tiles that are in play during a Mission. All Missions after the tutorial utilize two or more Map Tiles. Take note of the exact Map Tiles and their orientation when setting up a Mission for the best experience.
The rules for each Mission (Escalation, Minion Phase rules, etc). are balanced with these Game Board setups in mind.
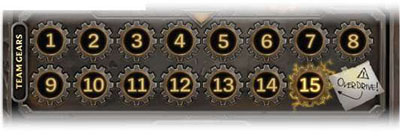
Gear Ring
Gear Rings are placed on numbered spots on the Team Gear and Doom Track sections of the Gear Tracker. You'll move these around every Mission as Team Gears are earned and Doom counts down in order to keep track of the exact values for each.
Gear Tracker
The Gear Tracker helps keep track of all the numbers in each Mission, such as Boss health, Team Gears you earn coop- eratively, Minions you've killed, etc. The Gear Tracker has four main tracks:
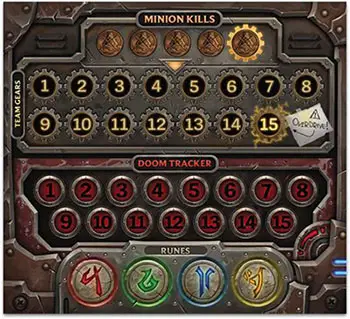
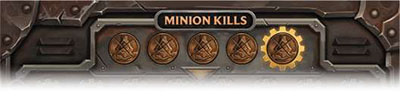
Minion Kills
Place Minion figures that Mechs kill on this track from left to right. When it reaches 5, your team earns a Team Gear. Clear the Minions off and increment the Team Gear track.
Team Gears
Team Gears start at zero every Mission. Team Gears directly relate to Schematic Cards and Overdrive special abilities. Kill Minions to earn Team Gears to unlock abilities!
When you've earned your first Team Gear, place a Gear Ring onto the first spot in the Team Gear track. When your team has earned the requisite number of Team Gears, each play- er's Schematic Cards become active (usable) and should be flipped faceup. The required Team Gear count is different per Schematic and that value is listed on the back of each Schematic.
If your team reaches 15 Team Gears, maximizing the track, each player gains a special Overdrive ability. Refer to the bottom of each player's Command Line for more information on Overdrive.
Doom Track
This is a multipurpose track that is used differently per Mission. It might track how close the Bomb is to exploding or the health of the Boss, but is always important to monitor lest your team meet its doom!
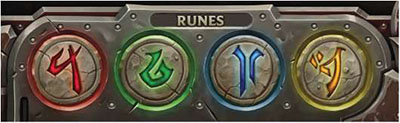
Runes
In later Missions, players will need to step on Rune Spaces on the Game Board to disable the Boss's Rune Shields and/ or open Rune Gates. Using Rune Coins on this track will help everyone remember whether a Rune is activated or not.
GG-101 DOOM Cannon
If any slot in the Boss Command Line reaches 3-Power and is executed during Danger Phase... well, GG! You lose! (Hey, it's in the name).
Heimerdinger

Heimerdinger, the Revered Inventor, is an awkward but brilliant scientific mind who is super handy with a Hextech wrench.
Lava Pool
When Magma Chamber Map Tiles are in play, many of the spaces become dangerous Lava Pools.
Whenever a Mech steps onto a Lava Pool space, it immediately stops moving, even if the Move Command could go farther (such as a Speed card or a Move Command of Power level 2 or greater).
A Mech instantly takes 1 Damage for stepping into a Lava Pool.
After executing the Damage Card you must continue to execute your Command Line as normal, but stepping onto another Lava Pool space will again cause you to immediately stop moving and take more damage.
Lava Wall

Some Missions involve a wall of molten lava that threatens the players. The Lava Wall will move during the Danger Phase.
The Lava Wall pushes all Mechs and the Bomb forward and does 1 Damage to them for each space they are pushed. This can result in tons of damage as the Lava Wall accelerates! When processing Lava Wall damage, first execute all player-drawn Damage Cards in player order and then move on to damaging other targets, such as the Bomb.
The Lava Wall instantly kills Minions if it passes over them. Count these on the Gear Tracker as Minion kills!
Magma Chamber
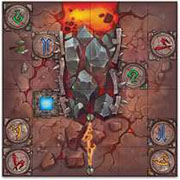
As the Missions get more complex and challenging, so does the Game Board.
On the backs of the grassy forest Map Tiles lie the Magma Chamber, introducing new obstacles such as Massive Boulders and Rune Gates, or new dangers like Lava Pools and Spike Walls.
Massive Boulders
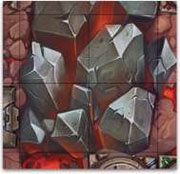
Massive Boulders are unpassable terrain found on Magma Chamber Map Tiles.
They block Mech, Minion, and Boss movement and block Ripsaw Attack Commands, just like the edges of the Game Board.
Map Tile
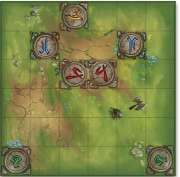
Map Tile refers to a single 6x6 tile that is used to make up the Game Board.
Each Mission Dossier will show how to lay out the Map Tiles to make the Game Board. Some Commands will affect all targets on a Map Tile or some scenarios may escalate when players enter or exit a specific Map Tile.
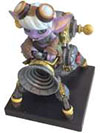
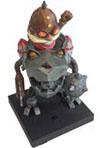
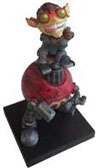
Mechs
Players take on the role of a Yordle mechanic that has built their own Mech (mechanical battle suit). You'll program your Mech with Command Cards on the Command Line and move your Mech figure on the Game Board. Later in the game you'll face a Boss Mech, piloted by a smarter-than-average Minion!

Minion Kill Tracker
The Minion Kill Tracker is part of the Gear Tracker. Whenever your team kills a Minion, count it on the Minion Kill Tracker by placing the Minions on each space from left to right. Five Minion kills earns your team a Team Gear, and the Minion Kill Tracker resets to zero.
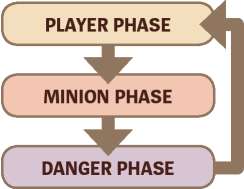
Minion Phase
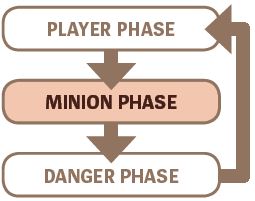
A Round is made up of two or three phases: Player Phase, Minion Phase, and-in some- Danger Phase.
The Minion Phase is broken into three main actions.
- Minion Movement - Minions move on the Game Board.
- Minions Spawn - more Minions are added to the Game Board.
- Minions Attack - Minions do damage to players.
Minions
Minions behave differently in each Mission. However, some things are standard:

- Minions can never move into an occupied space (except for those with Crystal Shards) or move off the board.
- Minions cannot push Mechs.
- Minions do damage by way of Damage Cards drawn from the Damage Deck.
- Minions always do 1 Damage when successfully attacking Mechs or the Bomb.
- Minions are considered adjacent if their space shares a side with the target space.
- Minions are not adjacent if they are in a space that is diagonal to the target space.
- Minions are very fragile, and will die upon taking 1 Damage.
- Look for the damage symbol on Command Cards.
Mission
These fearless Yordles will brave 10 Missions together, each featuring unique rules and challenges. As they venture forth, they'll learn the truth behind the Minion invasion, unlock new powerful abilities, and face increasingly complex dangers!
Each Mission has special setup instructions and often new game pieces that can be found in the corresponding Mission Dossier envelope.
Number Die

The Number Die is a standard six-sided die that is used to randomly select slots on the players' Command Lines, most commonly for placing Damage Cards.
Oil Slick
When a Mech, Minion, or Bomb moves onto an Oil Slick, it keeps moving in the same direction until it collides with a wall, obstacle (includ- ing other Mechs or Bombs), or the edge of the board. A Mech or Bomb will stomp Minions along the way, but Minions are blocked by other Minions.
Overdrive
When Team Gears reach maximum power at 15 Team Gears, your entire team unlocks their Overdrive abilities! Each Mech's Overdrive ability is described at the bottom of their Command Line.

Player Phase
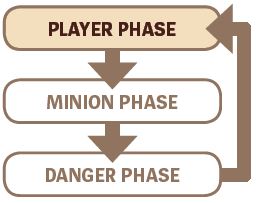
A Round is made up of two or three phases: Player Phase, Minion Phase, and-in some Missions-Danger Phase.
The Player Phase is broken into three main actions.
- Starting with the First Player, draft Command Cards.
- Program Command Cards into Command Line slots.
- Execute Command Lines, moving Mechs on the board.
Program
Once all players have drafted their Command Card(s), they may then choose to either program or scrap them. To program, place the Command Card onto any undamaged slot in the Command Line. To scrap, discard.
All players program at the same time and must slot or discard all Command Cards - they cannot be saved for later.
Once programmed into a Command Line, Command Cards are fixed in place and order. They can only be reprogrammed (reordered) by scrapping Electric or Computery cards during the draft phase.
Push
Player Mechs can Push and Tow other player Mechs and the Bomb. Player Mechs simply stomp Minions instead of pushing them, and cannot push the Boss Mech.
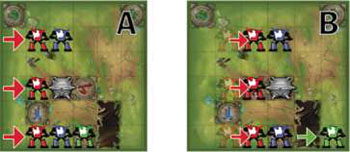
(In the above examples, the Red Mechs are facing and pushing rightward).
A Mech must be adjacent to another Mech or the Bomb to push it. Executing a Move Command that would put the Mech into a space containing another Mech or the Bomb pushes that object forward in the same direction, which could push another Mech or the Bomb.
If any piece cannot be moved forward, either due to impassable terrain or hitting the edge of the Game Board, then the movement doesn't happen.
An object pushed onto an Oil Slick slides as normal. The Mech cannot push an object into a Massive Boulder, through an active Rune Gate, or off the edge of the Game Board.
Mechs and the Bomb are not damaged if they are pushed, but if the Bomb is pushed onto a Minion, it takes 1 Damage. If a Mech or the Bomb is pushed into a Spike Wall or onto a Lava Pool, it will also take 1 Damage.
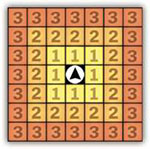
Range
When a numeric range is specified, count the number of spaces it would take to move to the target to determine the range between two game pieces, including diagonal spaces.
Repair Pad
When a Mech moves onto a Repair Pad, whether by choice or by being pushed, towed, etc., that player may immediately repair 1 Damage from their Mech. This can happen multiple times in a single turn, by stepping off and back onto the Repair Pad.
Round
A Round is comprised of two or three phases, depending on the Mission.
Player Phase
First Player hosts a draft, then players program and execute their Command Lines, moving their Mechs on the Game Board.
Minion Phase
Minions move, new Minions spawn, and Minions attack!
Danger Phase
When Mission-specific dangers such as the Boss or the Lava Wall take their actions.
Once all three phases are complete, the Round is over and a new Round begins with the First Player mantle being rotated to the next player.
Rumble
Rumble, the Mechanized Menace, is the undisputed king of weaponizing the trash he finds in his junkyard, and is both the headmaster of his own school and the leader of this ragtag outfit.
Rune Coins
The Rune Coins each have an Active and Inactive face. The Active face shows one of the four Runes that appear on the Rune Spaces. Flip the Rune Coins to keep track of the current state of each set of Rune Gates and Rune Shields.
Rune Die

The Rune Die has twelve faces with four different colors that correspond to the colors on the Rune Spaces and Crystal Compass. It is used to determine many of the random elements in the game, such as picking the initial First Player, choosing random Damage directions, Minion spawning, etc.
Rune Gates
In the Magma Chamber, many passages are blocked by magical Rune Gates.
Mechs can freely pass through these gates with like-colored Move Command Cards (Yellow = Speed, Green = Omnistomp, Red = Blaze and Blue = Skewer). However, if the Move Command Card does not match, the Mech cannot pass through until the Rune Gate is temporarily deactivated.
Rune Gates and the Boss Mech's Rune Shields are both deactivated by stepping on like-colored Rune Spaces, and can be simultaneously tracked with Rune Coins on the Runes portion of the Gear Tracker.
Rune Gates reactivate as soon as a Mech passes through one or the Boss takes damage from an attack of that color.
Minions and the Boss can ignore Rune Gates, whether they're active or not.
Rune Shields
The Boss is protected by four Rune Shields, one of each color/element, and starts with all shields fully operational.
Place Rune Coins on the Rune section of the Gear Tracker to keep track of which shields are up! Remove and replace the coins as Rune Shields are disabled and reactivated.
While active, a Rune Shield prevents all damage from Attack Commands of the same color/element (i.e.: Red Rune Shield blocks Fire attacks). Turn shields off by stepping on Rune spaces of the corresponding color.
Once the Boss takes 1 Damage from an element of that color, turn the shield back on immediately.
Certain Schematic Cards can also deal damage to any of the Boss Mech's unshielded areas, but the Rune Shield is turned back on afterward, just like any other damage.
Rune Spaces
There are four colors of Rune Spaces; Red, Green, Yellow and Blue. Each have a unique Rune shape. These spaces will typically be used for spawning Minions during the Minion Phase. Stepping on a Rune Space has no immedi- ate effect, but will block Minion spawning.
The School
The School itself is placed on the board in some Missions as a Mission objective. Spaces within the School are considered empty - Mechs, Minions, and the Bomb can move freely within.
Scrap
During Draft, Command Cards that you pick can be immediately scrapped (discarded) instead of being programmed into your Command Line. Depending on the color/element of the Command Card, scrapping the card allows you to either repair (6 Fire or Metal) or reprogram Electric or (Computery) your Command Line.
You may only scrap cards from a draft. Commands that are already slotted cannot be scrapped.
Scrap To Repair
During draft, you will pick one or more Command Cards. You have the option to slot these cards into your Command Line or scrap (discard) them for an immediate effect.
Scrapping Fire or Metal cards allows you to repair damage. Discard the scrapped card and remove any 1 Damage Card from your Mech. If it was slot damage, any revealed Command Card(s) below are re-enabled!
Scrap To Reprogram
During draft, you will select one or more Command Cards. You have the option to slot these cards into your Command Line, or scrap (discard) them for immediate effect.
Scrapping Electric or Computery cards allows you to reprogram your Command Line. Swap the contents of any two undamaged slots and discard the scrapped Command Card.
Schematic Cards
Schematic Cards are powerful Yordle-specific abilities that require Team Gears to activate.
At the start of each Mission, each player chooses up to two Schematics to bring to the Mission.
The player can choose any Schematic unlocked so far, but only Schematics associated with the Yordle they are playing as.
Activation
Once Team Gears reach the required number on the back of the Schematic Card it is activated. Flip the Schematic Card faceup to denote it is active. You may now execute your ability according to the instructions. Activating them and executing them does not reduce Team Gears. Level up for all!

Hack Schematics
Hacks are powerful but single-use only. Immediately discard them when used.

Boost Schematics
Boosts have ongoing effects that often help the other team. Keep these next to your Command Line and remember to utilize them!

Slot Schematics
Slot Schematics fit right into your Command Line and are executed every turn.
Skewer (command Card)
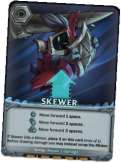
Skewer is a Metal Move Command Card.
When a Minion is killed using Skewer, it becomes a one-use shield to prevent damage.
Place the Minion on this card until you use it and don't forget to count this kill on the tracker as well!
Slot
Each player's Command Line has six slots where Command Cards-and sometimes Slot Damage Cards-are programmed (played).
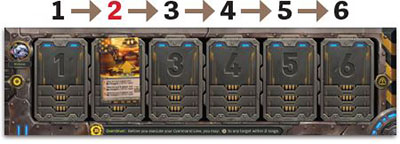
Slot-order is important because, during your turn, you'll follow the directions on each Command Card in order from slot 1 to 6. Similarly, the Boss Command Line has four slots and, during the Danger Phase (the Boss's turn), he'll execute each of the four slots in order as well.
Spawn
In each Mission during the Minion Phase, new Minions will spawn, i.e. you will add more Minion figures to the Game Board. Minions can only spawn in empty spaces. Quite often they will spawn on Rune Spaces, but it is different per Mission.
Spike Walls
Hopefully, by the time you've reached the Magma Chamber, you've learned how to avoid walking into walls - because now they can hurt!
Watch out for Spike Walls hastily attached to Massive Boulders.
Whenever a Mech moves into a Spike Wall as a result of any kind of movement (Command Cards, Damage Cards or being pushed), it is damaged (draw a Damage Card).
After executing the Damage Card, you must continue to go through your Command Line.
Stack

If there is more than one Command Card in a slot on a Command Line, it is a stack.
A stack may have up to 3 Command Cards in it, provided they are all the same color/element. Larger stacks amplify the effect of a Command Card. Every Command Card lists its effects at each Power level (1, 2-stack, 3-stack).
If a fourth Command Card of the same element is played on a stack, the bottom Command Card is discarded. The stack and Power are still 3, but the top card is the new active card.
A Command Card of a different element can be played on an existing stack, but the stack must be discarded so that only the new Command Card remains.
Stomp
When a Mech moves into a space containing a Minion, the Minion is stomped and removed from the board. Count this as a Minion kill on the Gear Tracker!
Team Gears
As Minions are slain, they add to the Minion Kill Tracker on the Gear Tracker. Every 5th Minion kill earns the entire team a Team Gear. Schematic Card abilities are inactive and kept facedown until the Team Gear total reaches the number on he back of the card.
Tow
Player Mechs can Tow and Push other player Mechs and the Bomb. Just like when a Mech pushes, it must be adjacent to the Mech or Bomb to tow it. However, it takes a Command
Card with 2 Moves to tow a Mech or Bomb 1 space. Two consecutive 1-Move Command Cards will not work! You need at least a Speed Command Card or a Move Command Card with a Power of 2 or greater.
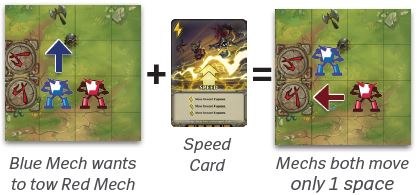
The towed object is towed into the space the towing Mech just left, and the towed object retains its original facing.
Tristana

Tristana, the Yordle Gunner, is a fear- less frontline fighter with a heart of gold.
Yordles
Yordles are a whimsical and passionate bunch. Some love inventing new contraptions, some love flying through the air, and some just love seeing things go boom.
Whether it's Rumble or any of the four playable Yordles (Corki, Heimerdinger, Tristana, and Ziggs), they'll all have to work together as a team, expertly piloting their custom Mechs to defeat the Minion hordes!
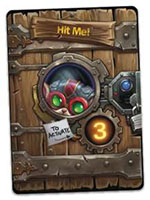
Zhonya's Minuteglass

Every new Round starts by drafting new Command Cards. Once the cards are dealt faceup on the table, the First Player will flip Zhonya's Minuteglass and select a Command Card.
All other players then take turns picking Command Cards until four total cards are picked or the sand runs out. If the sand runs out before four cards have been picked, the remaining picks must be chosen from the deck randomly.
Remember to rotate the First Player every round and pass Zhonya's Minuteglass as well! Curiously, Zhonya's Minute- glass only contains about 40 seconds of sand, but "Zhonya's 40 Second Glass" just didn't ave the same ring to it.
Ziggs
Ziggs, the Hexplosives Expert, loves bombs without subtlety, fear or sanity.
Continue Reading