You are a member of the Resistance, a small band of freedom fighters attempting to dismantle the German Occupation of France during World War II.
The Axis-controlled government has installed a paramilitary unit called Milice, tasked with policing the populace and fighting the Resistance. Should the Resistance prove to be formidable, the government will not hesitate to call in the German Military to stamp out dissent.
You have 15 Days to complete 2 Missions before the Occupation discovers you. If successful, the Resistance has won. However, if the town's Morale drops to zero, or all 15 Days run out, the Occupation succeeds in crushing the Resistance.
Engage the German Occupation of France in une petite guerre to throw off the yoke of oppression and free your homeland!
Components
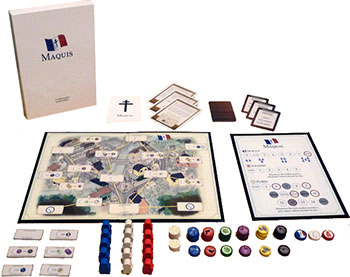
- 1 Game Board
- 5 White Resistance Worker pawns
- 5 Blue Milice Patrol pawns
- 5 Red Soldier Patrol pawns
- 24 Resource tokens
- 14 Mission cards
- 1 Morale/Soldier Tracking board
- 10 Patrol cards
- 1 Quick Reference card
- 6 Spare Room Action tiles
- 3 Tracking cubes
- 10 Yellow Action cubes
Setup
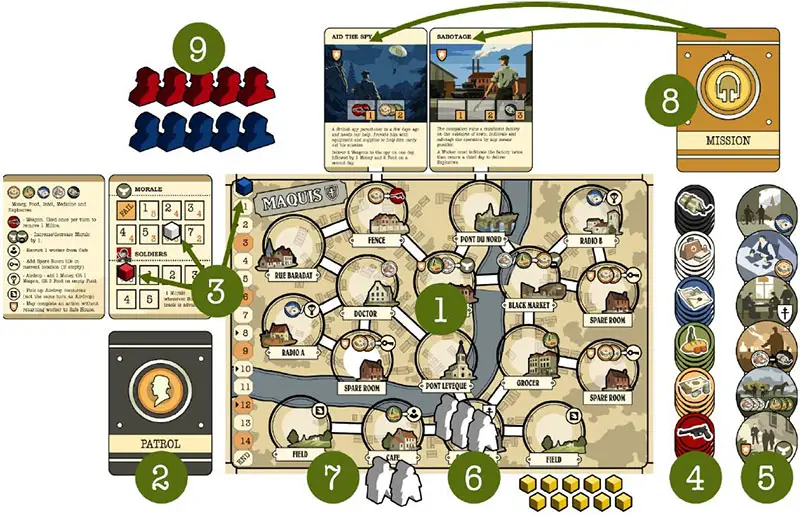
1 Place the boards in front of you.
2 Shuffle the ten Patrol cards and place them in a face-down stack. This forms the Patrol deck.
3 Place the three Tracking cubes on the Start spaces of the Main board and the Morale/Soldier board.
4 Place all Resource tokens to one side. These form the Supply.
5 Place the Spare Room Action tiles face up near the game board. These can be examined at any time.
6 Place three of the Resistance Worker pawns in the Safe House Location. These are your available pool of Workers.
7 Place the two remaining Resistance Worker pawns next to the Cafe Location. These are available to be recruited later.
8 Shuffle the Mission cards. Randomly select two and place them above the two exits at the top of the board. Return the extra Mission cards to the box.
9 Set all other pawns and tokens near the board for future use.
Game Play
A Day is comprised of the following phases, performed in this order:
- Placement phase
- Action phase
- Upkeep phase
1. Placement Phase
First, check the Morale track to determine how many Patrol pawns will be placed this Day. Then, beginning with the player, Resistance Workers and Patrols are placed back-and-forth, one pawn at a time.
The player will place all of their available Resistance Workers-those that are at the Safe House. Once all Resistance and Patrol pawns are placed, move on to the Action phase.
There may only be one pawn of any type per Location.
There may be points during gameplay where the number of available Resistance Workers will be less than the number of Patrols being placed.
When this occurs, place back-and-forth as usual, and then place all of the remaining Patrols one at a time, drawing a Patrol card before placing each.
Check Morale
Each space on the Morale track shows a black number-the Morale of the town-and a red number, which is the minimum number of Occupation Patrols that Day.
The number of Patrols placed this Day is equal to the number of recruited, available Resistance Workers or the red Patrol number in the currently-occupied Morale space, whichever number is higher.
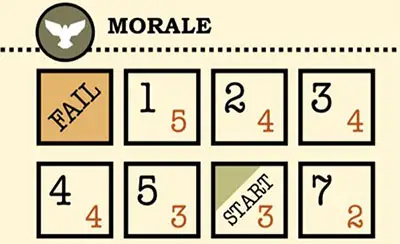
For example: If Morale is 3 and there are 3 available Resistance Workers, then the number of Patrols placed is 4 because the red 4 from the Morale track is higher than the number of Resistance Workers.
If Morale is 7 instead, there would be 3 Patrols, equal to the number of Resistance Workers.
Resistance Placement
To place your Resistance Workers, choose a Location on the board and place one of your available Resistance Workers from a Safe House. Workers left on Locations for multiple days count toward your total available Workers.
You may place your Worker on any available Location, regardless of whether you can trace a route there from a Safe House (see page 8, Check Escape Route).
Patrol Placement
Draw a card from the Patrol deck. The Patrol card lists three Locations on the board where a Patrol pawn can be placed. If the first Location on the card does not contain a Resistance Worker or any Patrol, place the Patrol in that Location for this Day.
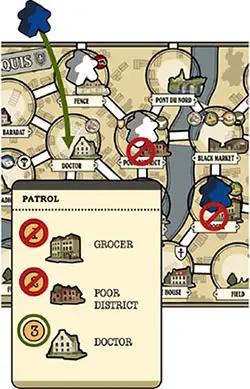
If the first Location is occupied, try the second Location, and, if still unsuccessful, try the third Location.
If all three Locations are occupied, the Patrol attempts an arrest instead of patrolling a Location. To attempt an arrest, check the Locations on the Patrol card from the top again.
However, this time the Patrol stops at the first Location occupied by a Resistance Worker. The arrested Resistance Worker is removed permanently from the game.
Place the Patrol in that Location. If all three Locations listed on the card are occupied by Patrol pawns, the Patrol pawn is not placed this Day.
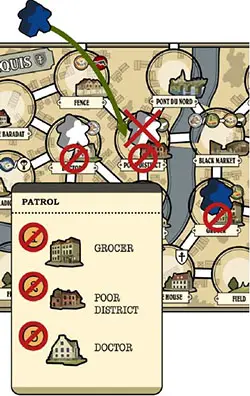
Discard the Patrol card face up. You may look through the discard pile at any time.
If the face-down Patrol deck is empty when you go to draw, shuffle the discard pile and place it face down to form a new deck.
Soldier Patrol Pawns
By default, all Patrols are Milice Patrols. If the Soldier track ever advances into and beyond the 1st space (see page 9: Shooting Milice), you must place Soldiers.
Soldiers replace Milice Patrols on a one-to-one basis. Soldiers are always the last Patrols placed.
For example: If 4 Patrols are being placed, and the Soldier track is at 1, place 3 Milice and then 1 Soldier.
2. Action Phase
Activate Workers
In any order you wish, activate each of your Resistance Workers one at a time. Workers may only be activated once per Day and for one action each.
Resources acquired during a Day may be used later in that Day to pay for another action. You are not obligated to perform an action just because you have a Worker in that Location.
Remember: All Resource tokens are limited.
Location Actions
If the Worker occupies a Location with an action, you may perform that action.
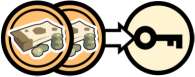
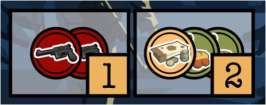
Resource Icon: In some Locations, you may spend an action to gather the Resource displayed in the top right of the Location.
Arrow: Some actions in Locations require trading in Resources from the left of the arrow to obtain rewards on the right.
All Resources are returned to and taken from the Supply.

Slash: This represents a choice to make. You may only perform one of the actions.

Airdrop: If you decide to Airdrop, you may choose either one Weapon, one Money, or three Food Resources to place on one of the Field Locations.
You may only place Resources in a Field that does not already have Resources in it.

Pickup Airdrop: A Resistance Worker may move to a Field Location containing airdropped Resources and retrieve these Resources as an action.
Airdrop Resources cannot be retrieved on the same turn as they were delivered. If there are no Resources in a Field Location at the start of the Day, you may not place a Worker there.
Add Spare Room: If you activate one of the three Spare Room Locations on the board-houses where the locals have a spare room they can provide to the Resistance-you may select any one of the Spare Room Action tiles to replace that Location.
Place the new Location action tile over the Spare Room Location. Building a new room is permanent.

The Safe House Spare Room acts as a second Safe House that Workers may return to at the end of the Day.
If a Resistance Worker cannot trace a route back to the Safe House at the bottom of the board, they may trace a route to the Safe House Spare Room Location instead.
Mission Actions
If the Mission card has an action rectangle on it, it is considered to be a Location connected to the town through the exit it is located above. A Worker must be placed here to take the Mission action just like any other Location.
Each time you score a success using the Mission action, place a marker on one of the success squares on the Mission card.
Numbered successes must be performed in order; all successes marked with a '1' must be completed before you may mark any successes marked with a '2'.
The Mission is only complete when all of the success squares have been marked.
For example: The Sabotage card has three success squares, two '1's and one '2'. You must perform the first action twice to fill both '1' success squares before you may perform the second action to fill the '2' success square.
Check Escape Route
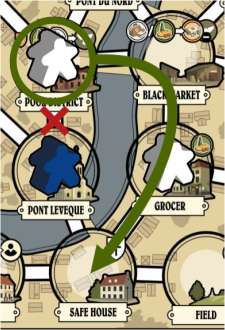
After each Worker has been activated, the Resistance Worker must be able to trace a clear route from their present Location-following the white road lines that connect Locations-back to a Safe House.
To draw this route, a Resistance Worker may only pass through empty Locations and Locations occupied by other Resistance Workers. The route may not pass through Locations occupied by Soldiers or Milice.
If there is a clear route, return the Worker to a Safe House Location the route connects to.
Getting Arrested

If you cannot draw a clear route from the Worker to a Safe House, then the Worker is arrested. Remove it from the game permanently. This worker may not be re-recruited!
If the Worker is arrested, you may only receive the rewards from that action if the Location has an orange shield with a star symbol. Otherwise, the Worker never makes it home and cannot bring the reward back.
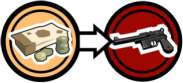
Shooting Milice
If you discard a Weapon Resource, you may remove one Milice
Patrol pawn from the board. You may only perform this action once per Day. Soldiers cannot be removed this way-they are too good at shooting back!
Each time you remove Milice in this manner, increase the Soldier track by one-removed Milice are replaced by Soldiers on future Days. Then, decrease the Morale track by one.
You may only shoot Milice that are already on the board. Milice being placed during Patrol Placement may not be shot. Shooting Milice may be-but does not have to be-used to free up a route, and may be used in between performing an action and tracing the route home.
A Worker collecting a Weapon Resource may use that same Weapon to shoot Milice if a shooting has not occurred yet that Day.
3. Upkeep Phase
- Remove all Patrols from the board.
- Increase the Day track by one. If the Day marker moves onto an orange space, decrease the Morale track by one.
End of the Game
You win the game immediately if you complete your second Mission.
You lose the game immediately if one or more of the following occur:
- Your last Worker is arrested.
- The town's Morale reaches the Fail space.
- You have not won at the end of the 15th Day.
Difficulty Modes
All of the rules presented here are additions or overrides to the main rules of the game, and if they contradict the main rules, the difficulty setting takes precedence.
-
Very Easy
When the turn track marker reaches the 'End' space, do not end the game; instead, move the turn track marker immediately next to the Day 1 space and continue as normal.
(Any objective that has specific day requirements may be completed on those days on either pass through the time track).
When you Airdrop in Resources, you may choose from 2 Money, 2 Weapons, or 4 Food.
-
Easy
When you Airdrop in Resources, you may choose from 2 Money, 1 Weapon or, 4 Food.
-
Tricky
Start the game with only two Workers, with two recruitable Workers by the Cafe; the fifth Resistance Worker does not exist. The game ends when the turn track marker lands on Day 12.
-
Hard
Utilize the same rules as Tricky mode. Additionally, instead of decreasing Morale when the turn track marker lands on an orange space, decrease Morale when the turn track marker lands on a space with a triangle.
-
Very Hard
Utilize the same rules as Tricky and Hard mode. Additionally, when a Resistance Worker is arrested (either by being cut off from a Safe House or by a Patrol landing on it because all available Patrol Locations were taken), reduce Morale by one.
-
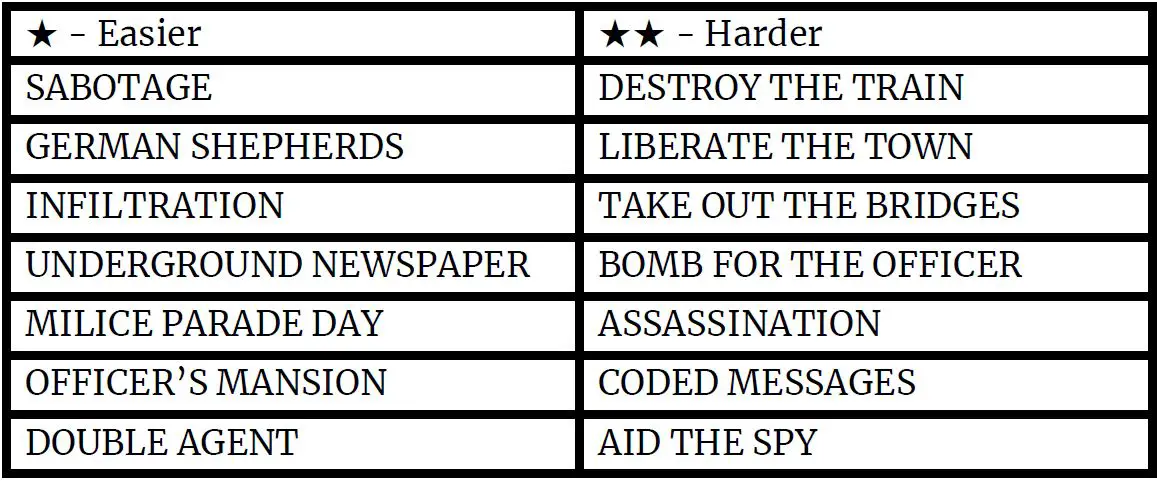
Mission Cards Difficulty
The Mission cards have two levels of difficulty. Mix and match difficulty instead of randomly drawing mission cards if you wish to have control over the difficulty level of the Missions.
Continue Reading
