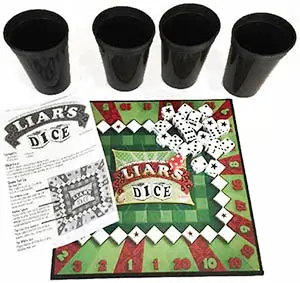
Components
- gameboard
- 4 dice cups
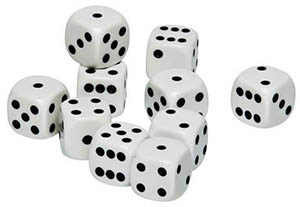
- 20 white dice
- 1 red die
Object of the Game
Be the last player to have at least one die in play.
A game is played in rounds. Each round, players roll their dice, an opening bid is made, play continues as the bid is raised until it is challenged and the challenge is resolved.
Players lose dice for incorrect challenges. Once a player has lost all of their dice they are out of the game!
Setup
The Red Die
Players place this die on the bidding track to declare their bids.
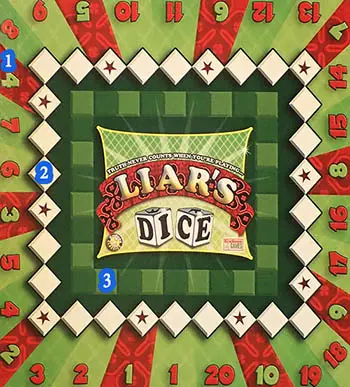
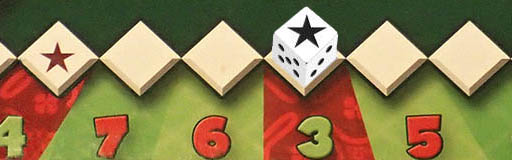
The Bidding Track 1
As bids are called and raised, the red die is moved clockwise on the bidding spaces around the track.
Bidding Spaces 2
Players declare their bids red die on either Number Bid Spaces or Wild Bid Spaces allowing all players to decide whether its time to bid or call.
The Lost Dice Squares 3
Players place dice they lose on these squares, where they remain out of play.
The White Dice
Players bid on a//white dice in play, including their own.
Game Play
1. Roll The Bones
Each player takes a dice cup and five white dice. Shake up your dice and give 'em a roll, but don't let your opponents see what you rolled. Keep them concealed under your cup.
You may peek in your cup as often as you like, but secrecy is a priority in Liar's Dice! Choose a player to begin the first round bidding. (The winner of the challenge in the previous round opens bidding in each additional round).
2. Open With a Bid
You may declare any amount of numbers (or wild stars) as your opening bid, even if you didn't roll them. There are two kinds of bids: Number Bids and Wild Star Bids.
Number Bids:
The unstarred spaces along the bidding track are for Number Bids. A Number Bid is a claim that revealing all of the dice in play (your dice as well as your opponents') will show a particular number or Wild Star.
All matching numbers and Wild Stars on the white dice count toward a number bid. For example, if you have two fives and your three opponents each have one Wild Star (but no 5's), there are five fives in play (5+5+H+H+H).
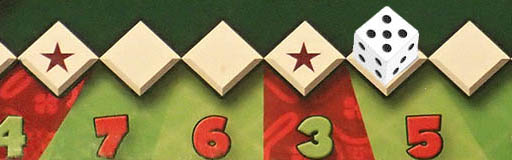
After reading your opponents eyes for weaknesses, declare your number bid by placing the red die on a number space as shown in the illustration below.
This bid states that there are at least five 5's in play.
Wild Star Bids:
A Wild Star Bid is a claim that revealing all of the dice in play (your dice as well as your opponents') will show a particular amount of Wild Stars. Only Wild Stars count toward a Wild Star Bid, but this gives you another option in bidding and bluffing your opponents dice out of play.
After checking for pattern developing twitches in your opponents, declare your Wild Star Bid by placing the red die on a starred space, as shown in the illustration below.
This bid states that there are at least three Wild Stars in play.
3. Bluff, Bluster and Raise
After the opening bid is made, play continues to the left. Each player has two options:
- Raise the current bid, or
- Challenge the current bid
Remember, all the white dice in play, yours and the dice held by the other players, even the dice you can't see, should be considered when you raise a bid.
This is a game of bluff and bluster, so setting up your opponents with a bid is not only allowed, it's recommended!
Don't let your opponents see the bead of sweat forming on your brow, because there is no passing in this game. You must either raise or challenge on your turn!
Raising the bid is where the strategy begins. Depending on your opponent's bid and the dice showing in your cup, you can raise the bid in a few different ways. (Keep in mind, honesty is not always the best policy when it comes to Liar's Dice. Bluffing your opponents is not only fun, its strategy!)
Either, keep the red die on the same bidding space, and show a higher number on the die. (For instance, if your opponent's measly bid was four 3's, then you can raise that with a bodacious bid of four 4's, four 5's, or four 6's).
Or, move the red die clockwise to any higher Number Bid space, and show any number on top. (For instance, if your opponent declares a bid of four 3's, then you can really give him a case of the shakes with a confident bid of five 2's, six 5's, seven 3's and so on).
Or, move the red die clockwise to any Wild Star Bid space and show the Wild Star on top. (For instance, if your opponent declares a bid of four 3's, counter his craziness with a bid of 3 Wild Stars, since it is in a position on the bidding track that is higher (clockwise) from the already declared bid).
Note: Immediately after opening or raising the bid, you may take advantage of the Show and Reroll Rule. This rule is explained later on.
Challenging the bid
If you don't think there are enough white dice in play to support the latest bid, then you can challenge the bid rather than raise it. You can only challenge a bid on your turn and must call, "Challenge" or "Call" for everyone to reveal their dice.
4. Resolving the Challenge and Ending the Round
Once a player has challenged a bid, all players lift their cups and reveal their dice. Count all the dice in play that match the bid: numbers and Wild Stars for Number Bids; Wild Stars only for Wild Star Bids.
After you count the total, it's time to determine whose dice bite the dust.
If the actual amount of dice is more than the bid amount, the challenger loses the challenge.
If the actual amount of dice is less than the bid amount, the bidder loses the challenge.
If the actual amount of dice is exactly the same as the bid amount, everyone except the bidder loses the challenge (A "Perfect Bid")
Losing Dice: When you lose a challenge, you lose the difference between the bid amount of dice and the actual amount of bid dice in play. If the bid amount was exactly the actual amount, every player except the bidder loses one die. See Challenge Examples below.
Mourn the loss of your dice as you place them in the Lost Dice Squares in the center of the gameboard. These dice are out of play for the remainder of the game. Once you're out of dice you're out of the game!
Challenge Examples
Example 1: You challenge a bid of nine 5's. When all white dice are revealed seven 5's and four Wild Stars are counted.
It's eleven 5's in all - two more than the bid amount.
The bidder was right: there were at least nine 5's in play. So you lose the challenge and two of your white dice (11 actual dice - 9 bid dice). Sulk as you surrender two of your white dice and place them in the Lost Dice Squares to rot forever in the dice dungeons, or until your next game.
Example 2: You challenge a bid of six Wild Stars. When the dice are revealed, five Wild Stars are counted. The bidder loses the challenge and surrenders one die (6 bid dice - 5 actual dice) to a Lost Dice Square. In this instance, gloating is encouraged!
Example 3: A Perfect Bid: You challenge a bid of fourteen 2's. The dice are revealed, and exactly fourteen two's and Wild Stars are counted. You and all the other players except the bidder surrender one die to a Lost Dice Square. A group hug is in order! (Please see The "Die Hard" rule to see how this applies when players are down to one remaining die).
Starting a New Round
After the challenge is resolved, load the dice you still have into your dice cup and roll again. The player who won the last challenge takes the red die and starts the bidding in the new round. Bidding can begin anywhere on the bidding track.
The Show and Reroll Rule
For those of you who like messing with your opponents' minds, we've added another rule to make the bluffing and bidding that much more fun!
Immediately after opening or raising a bid, you may place one or more of your dice outside of your dice cup for all players to see, then reroll and hide all of your remaining dice. Any rerolled dice that match your bid will count towards it. Showing and rerolling could improve your chances of winning a possible challenge.
You can show any amount of dice outside of your cup - as long as you have at least one die left to reroll. The dice shown don't have to match your bid. They stay in view, outside the cup, for the rest of the round and count toward the challenge bid if they match it. Showing and rerolling can save your bacon and your dice!
Show and Reroll Example: The bid is ten 6's. You have four dice left: one 6, one Wild Star and two 4's. You raise the bid to eleven 6's; then you show your 6 and your Wild Star, and reroll your two 4's.
If you're challenged, the 6 and Wild Star outside your cup will count toward your bid - as well as any 6's or Wild Stars you got by rerolling.
Final Die/"Die Hard" Rule
You cannot lose your last die when there is a perfect bid, unless you are the player challenging the bid. (For example, You have one die left. Shane has 4 dice, Mike and Mary both have 3. Shane challenges Mary's bid of eight 5's.
There are exactly eight 5's shown. Normally all players except Mary would have to surrender one die each, but because you didn't call the challenge, you are saved by the "Final Die/Die Hard" rule, and you can keep your final die).
End of the Game
Continue playing rounds until there is only one player with one or more dice in play. We recommend that the surviving player dance and celebrate because they are the winner!
Continue Reading